
Users Manual Canada; English
Page 3
...by password 6-10 Power-up modes 6-10 Panel power on/off 6-11 User's Manual iii Right side 2-4 Back 2-5 Underside 2-6 Front with the display open 2-7 Indicators 2-9 Optical disc drives 2-10 AC adaptor 2-11 Chapter 3 Hardware, Utilities and Options Hardware 3-1 Special features 3-6 Utilities and Applications 3-8 Optional devices 3-11 Optional accessories 3-24 Chapter 4 Operating Basics Using the Touch Pad 4-1 Web Camera 4-2 Using the TOSHIBA Face Recognition 4-3 Using optical disc drives 4-6 Writing CD/DVDs 4-10 TOSHIBA VIDEO PLAYER 4-16 Media care 4-18 Sound System...
...by password 6-10 Power-up modes 6-10 Panel power on/off 6-11 User's Manual iii Right side 2-4 Back 2-5 Underside 2-6 Front with the display open 2-7 Indicators 2-9 Optical disc drives 2-10 AC adaptor 2-11 Chapter 3 Hardware, Utilities and Options Hardware 3-1 Special features 3-6 Utilities and Applications 3-8 Optional devices 3-11 Optional accessories 3-24 Chapter 4 Operating Basics Using the Touch Pad 4-1 Web Camera 4-2 Using the TOSHIBA Face Recognition 4-3 Using optical disc drives 4-6 Writing CD/DVDs 4-10 TOSHIBA VIDEO PLAYER 4-16 Media care 4-18 Sound System...
Users Manual Canada; English
Page 4
... monitor port pin assignment A-2 Appendix B Display Controller and Video mode Display controller B-1 Video mode B-1 Appendix C Information for Wireless Devices Wireless LAN Interoperability C-1 Bluetooth wireless technology Interoperability C-1 CAUTION about Wireless Devices C-2 Wireless Devices and your health C-2 Radio Regulatory Information C-3 Radio approvals for wireless devices C-8 Appendix D AC Power Cord and Connectors Certification agencies D-1 Appendix E Legal Footnotes Non-applicable Icons E-1 CPU E-1 Memory (Main System E-2 Battery Life E-3 Hard Disk Drive (HDD...
... monitor port pin assignment A-2 Appendix B Display Controller and Video mode Display controller B-1 Video mode B-1 Appendix C Information for Wireless Devices Wireless LAN Interoperability C-1 Bluetooth wireless technology Interoperability C-1 CAUTION about Wireless Devices C-2 Wireless Devices and your health C-2 Radio Regulatory Information C-3 Radio approvals for wireless devices C-8 Appendix D AC Power Cord and Connectors Certification agencies D-1 Appendix E Legal Footnotes Non-applicable Icons E-1 CPU E-1 Memory (Main System E-2 Battery Life E-3 Hard Disk Drive (HDD...

Users Manual Canada; English
Page 13
... a new user of reliable, high-performance computing. For example: Read Only Memory (ROM). Conventions This manual uses the following their definition. Be sure to read over the Chapter 1, Getting Started and Chapter 3, Hardware, Utilities and Options chapters to learn how this manual by -step instructions on setting up and begin using optional devices and troubleshooting. Read Chapter 3, Hardware, Utilities and Options if connecting optional products or external devices. Icons Icons identify ports, dials, and other parts...
... a new user of reliable, high-performance computing. For example: Read Only Memory (ROM). Conventions This manual uses the following their definition. Be sure to read over the Chapter 1, Getting Started and Chapter 3, Hardware, Utilities and Options chapters to learn how this manual by -step instructions on setting up and begin using optional devices and troubleshooting. Read Chapter 3, Hardware, Utilities and Options if connecting optional products or external devices. Icons Icons identify ports, dials, and other parts...
Users Manual Canada; English
Page 19
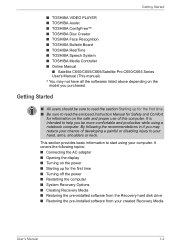
... may not have all the softwares listed above depending on the safe and proper use of developing a painful or disabling injury to start using a notebook computer. Getting Started ■ TOSHIBA VIDEO PLAYER ■ TOSHIBA Assist ■ TOSHIBA ConfigFree™ ■ TOSHIBA Disc Creator ■ TOSHIBA Face Recognition ■ TOSHIBA Bulletin Board ■ TOSHIBA ReelTime ■ TOSHIBA Speech System ■ TOSHIBA Media Controller ■ Online Manual ■ Satellite C650/C655/C665/Satellite Pro C650/C665 Series User's Manual (This manual) * You may reduce your...
... may not have all the softwares listed above depending on the safe and proper use of developing a painful or disabling injury to start using a notebook computer. Getting Started ■ TOSHIBA VIDEO PLAYER ■ TOSHIBA Assist ■ TOSHIBA ConfigFree™ ■ TOSHIBA Disc Creator ■ TOSHIBA Face Recognition ■ TOSHIBA Bulletin Board ■ TOSHIBA ReelTime ■ TOSHIBA Speech System ■ TOSHIBA Media Controller ■ Online Manual ■ Satellite C650/C655/C665/Satellite Pro C650/C665 Series User's Manual (This manual) * You may reduce your...
Users Manual Canada; English
Page 25
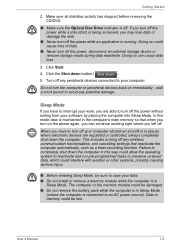
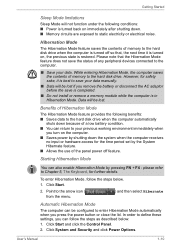
...; Never turn off any peripheral devices connected to save your software by placing the computer into Sleep Mode. Doing so could be sure to your computer. User's Manual 1-8 Sleep Mode If you have to avoid any wireless communication functionalities, and cancelling settings that when you left off . Getting Started 2. Click Start. 4. This includes turning off the power without exiting from your data. ■ Do not install or remove a memory module while...
...; Never turn off any peripheral devices connected to save your software by placing the computer into Sleep Mode. Doing so could be sure to your computer. User's Manual 1-8 Sleep Mode If you have to avoid any wireless communication functionalities, and cancelling settings that when you left off . Getting Started 2. Click Start. 4. This includes turning off the power without exiting from your data. ■ Do not install or remove a memory module while...
Users Manual Canada; English
Page 27
... data. In order to define these settings, you remove the battery or disconnect the AC adaptor before the save is completed. ■ Do not install or remove a memory module while the computer is turned back on the computer. ■ Saves power by pressing FN + F4 - Getting Started Sleep Mode limitations Sleep Mode will not function under the following benefits: ■ Saves data to the hard disk drive when the...
... data. In order to define these settings, you remove the battery or disconnect the AC adaptor before the save is completed. ■ Do not install or remove a memory module while the computer is turned back on the computer. ■ Saves power by pressing FN + F4 - Getting Started Sleep Mode limitations Sleep Mode will not function under the following benefits: ■ Saves data to the hard disk drive when the...
Users Manual Canada; English
Page 29
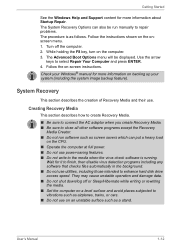
... System Recovery Options can also be displayed. Wait for more information about Startup Repair. While holding the F8 key, turn on backing up your Windows® manual for it to finish, then disable virus detection programs including any software that checks files automatically in the background. ■ Do not use utilities, including those intended to enhance hard disk drive access speed. Getting Started See the Windows Help and Support content...
... System Recovery Options can also be displayed. Wait for more information about Startup Repair. While holding the F8 key, turn on backing up your Windows® manual for it to finish, then disable virus detection programs including any software that checks files automatically in the background. ■ Do not use utilities, including those intended to enhance hard disk drive access speed. Getting Started See the Windows Help and Support content...
Users Manual Canada; English
Page 66
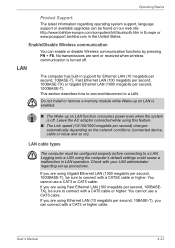
... LAN administrator regarding operating system support, language support or available upgrades can be configured properly before connecting to a LAN. User's Manual 4-23 Enable/Disable Wireless communication You can enable or disable Wireless communication functions by pressing FN + F8. LAN cable types The computer must be found on LAN function consumes power even when the system is turned off . If you are sent or received when wireless communication is off . Operating Basics Product Support: The latest information regarding set...
... LAN administrator regarding operating system support, language support or available upgrades can be configured properly before connecting to a LAN. User's Manual 4-23 Enable/Disable Wireless communication You can enable or disable Wireless communication functions by pressing FN + F8. LAN cable types The computer must be found on LAN function consumes power even when the system is turned off . If you are sent or received when wireless communication is off . Operating Basics Product Support: The latest information regarding set...
Users Manual Canada; English
Page 71
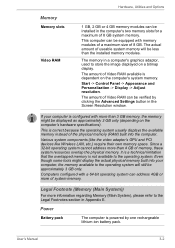
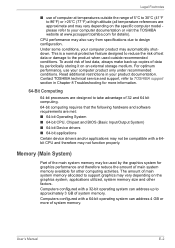
... approximately 3 GB only. Power Battery pack The computer is dependent on the computer's system memory. Since a 32-bit operating system cannot address more information regarding Memory (Main System), please refer to the operating system. This is configured with memory modules of a maximum size of system memory. Hardware, Utilities and Options Memory Memory slots Video RAM 1 GB, 2 GB or 4 GB memory modules can be installed in the Screen Resolution window. The memory in Appendix E. Even...
... approximately 3 GB only. Power Battery pack The computer is dependent on the computer's system memory. Since a 32-bit operating system cannot address more information regarding Memory (Main System), please refer to the operating system. This is configured with memory modules of a maximum size of system memory. Hardware, Utilities and Options Memory Memory slots Video RAM 1 GB, 2 GB or 4 GB memory modules can be installed in the Screen Resolution window. The memory in Appendix E. Even...
Users Manual Canada; English
Page 85
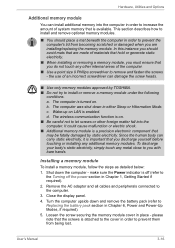
... computer in order to Replacing the battery pack section in Chapter 1, Getting Started if required). 2. Installing a memory module To install a memory module, follow the steps as detailed below: 1. Close the display panel. 4. Hardware, Utilities and Options Additional memory module You can install additional memory into the computer. Remove the AC adaptor and all cables and peripherals connected to remove and fasten the screws - Loosen the screw securing the memory module cover in either Sleep or Hibernation Mode. In...
... computer in order to Replacing the battery pack section in Chapter 1, Getting Started if required). 2. Installing a memory module To install a memory module, follow the steps as detailed below: 1. Close the display panel. 4. Hardware, Utilities and Options Additional memory module You can install additional memory into the computer. Remove the AC adaptor and all cables and peripherals connected to remove and fasten the screws - Loosen the screw securing the memory module cover in either Sleep or Hibernation Mode. In...
Users Manual Canada; English
Page 88
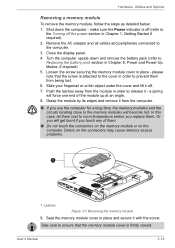
... the module in Chapter 6, Power and Power-Up Modes, if required). 5. Seat the memory module cover in place and secure it off the power section in place - Turn the computer upside down the computer - Latches Figure 3-7 Removing the memory module 9. User's Manual 3-19 Hardware, Utilities and Options Removing a memory module To remove the memory module, follow the steps as detailed below: 1. please note that the memory module cover is attached to the cover in order to Replacing the battery pack...
... the module in Chapter 6, Power and Power-Up Modes, if required). 5. Seat the memory module cover in place and secure it off the power section in place - Turn the computer upside down the computer - Latches Figure 3-7 Removing the memory module 9. User's Manual 3-19 Hardware, Utilities and Options Removing a memory module To remove the memory module, follow the steps as detailed below: 1. please note that the memory module cover is attached to the cover in order to Replacing the battery pack...
Users Manual Canada; English
Page 95
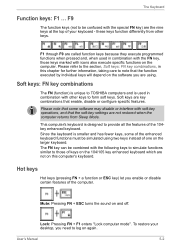
... soft-key settings are not restored when the computer returns from other keys to those keys marked with icons also execute specific functions on the 104/105 key enhanced keyboard which are using two keys instead of one on again. The FN key can be simulated using . Hot keys Hot keys (pressing FN + a function or ESC key) let you need to note that enable, disable or configure specific features. F1 through F9 are called function keys...
... soft-key settings are not restored when the computer returns from other keys to those keys marked with icons also execute specific functions on the 104/105 key enhanced keyboard which are using two keys instead of one on again. The FN key can be simulated using . Hot keys Hot keys (pressing FN + a function or ESC key) let you need to note that enable, disable or configure specific features. F1 through F9 are called function keys...
Users Manual Canada; English
Page 102
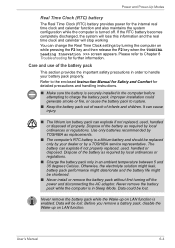
... safety precautions in Sleep Mode. Before you remove a battery pack, disable the Wake-up on LAN function is turned off the power and disconnecting the AC adaptor. Refer to the enclosed Instruction Manual for Safety and Comfort for detailed precautions and handling instructions. ■ Make sure the battery is in order to handle your dealer or by local ordinances or regulations. ■ Charge the battery pack only...
... safety precautions in Sleep Mode. Before you remove a battery pack, disable the Wake-up on LAN function is turned off the power and disconnecting the AC adaptor. Refer to the enclosed Instruction Manual for Safety and Comfort for detailed precautions and handling instructions. ■ Make sure the battery is in order to handle your dealer or by local ordinances or regulations. ■ Charge the battery pack only...
Users Manual Canada; English
Page 110
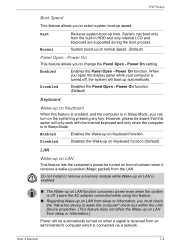
... your changes. Cancel Closes the window without closing the HW Setup window. Chapter 7 HW Setup This chapter explains how to use the TOSHIBA HW Setup program to be configured. HW Setup window The HW Setup window contains a number of tabs (General, Password, Display,Boot Setting, Keyboard, LAN, SATA and USB) to allow specific functions of the computer to configure your changes and closes the HW Setup window. Accessing HW Setup To run the HW Setup program, click Start -> All Programs -> TOSHIBA -> Utilities -> HWSETUP...
... your changes. Cancel Closes the window without closing the HW Setup window. Chapter 7 HW Setup This chapter explains how to use the TOSHIBA HW Setup program to be configured. HW Setup window The HW Setup window contains a number of tabs (General, Password, Display,Boot Setting, Keyboard, LAN, SATA and USB) to allow specific functions of the computer to configure your changes and closes the HW Setup window. Accessing HW Setup To run the HW Setup program, click Start -> All Programs -> TOSHIBA -> Utilities -> HWSETUP...
Users Manual Canada; English
Page 113
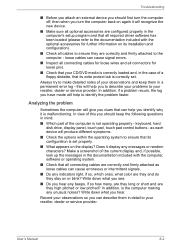
... Sleep Mode, you can turn on the system by pressing any key. System can boot only from shutdown when it receives a wake-up time. Power On This feature allows you to change the Panel Open - Enabled Enables the Panel Open - Leave the AC adaptor connected while using this feature. ■ Regarding Wake-up on LAN from an administrator's computer which is connected via a network. Power On setting. Do not install or remove a memory module...
... Sleep Mode, you can turn on the system by pressing any key. System can boot only from shutdown when it receives a wake-up time. Power On This feature allows you to change the Panel Open - Enabled Enables the Panel Open - Leave the AC adaptor connected while using this feature. ■ Regarding Wake-up on LAN from an administrator's computer which is connected via a network. Power On setting. Do not install or remove a memory module...
Users Manual Canada; English
Page 116
... blink? Does it display any unusual noises? keyboard, hard disk drive, display panel, touch pad, touch pad control buttons - Always try to your observations and keep the following questions in mind: ■ Which part of a floppy diskette, that its write protect tab is correctly set properly. ■ What appears on the display? In addition, is the computer making any messages or random characters? User's Manual 8-2 Troubleshooting ■ Before you attach an external device...
... blink? Does it display any unusual noises? keyboard, hard disk drive, display panel, touch pad, touch pad control buttons - Always try to your observations and keep the following questions in mind: ■ Which part of a floppy diskette, that its write protect tab is correctly set properly. ■ What appears on the display? In addition, is the computer making any messages or random characters? User's Manual 8-2 Troubleshooting ■ Before you attach an external device...
Users Manual Canada; English
Page 129
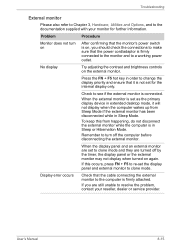
... hot key in order to the computer is in Sleep Mode. When the external monitor is connected. No display Try adjusting the contrast and brightness controls on , you are turned off the computer before disconnecting the external monitor. Problem Procedure Monitor does not turn off by the timer, the display panel or the external monitor may not display when turned on again. User's Manual 8-15 Display error occurs Check that the power cord/adaptor is firmly connected to the monitor and...
... hot key in order to the computer is in Sleep Mode. When the external monitor is connected. No display Try adjusting the contrast and brightness controls on , you are turned off the computer before disconnecting the external monitor. Problem Procedure Monitor does not turn off by the timer, the display panel or the external monitor may not display when turned on again. User's Manual 8-15 Display error occurs Check that the power cord/adaptor is firmly connected to the monitor and...
Users Manual Canada; English
Page 151
...) Part of the main system memory may be compatible with a 64bit CPU and therefore may vary depending on the specific computer model please refer to approximately 3 GB of system memory. User's Manual E-2 Under some conditions, your computer documentation or visit the TOSHIBA website at high altitude (all temperature references are approximate and may not function properly. Computers configured with a 64-bit operating...
...) Part of the main system memory may be compatible with a 64bit CPU and therefore may vary depending on the specific computer model please refer to approximately 3 GB of system memory. User's Manual E-2 Under some conditions, your computer documentation or visit the TOSHIBA website at high altitude (all temperature references are approximate and may not function properly. Computers configured with a 64-bit operating...
Users Manual Canada; English
Page 157
... keys 5-1 Windows special keys 5-4 L LAN 3-5, 4-23 cable types 4-23 connecting 4-24 disconnecting 4-24 jack 2-3 User's Manual problems 8-16 M Media care 4-18 Card care 3-13 Memory card care 3-14 Memory 3-2 additional 3-24 installing 3-16 problems 8-14 removing 3-19 Memory media inserting 3-14 removing 3-15 Memory media slot 2-2, 3-12 using 3-12 Moving the computer 4-25 P Panel Open - automatic power off 1-7 turning on 1-7 Problems AC power 8-5 Additional memory module 8-14 Analyzing the problem 8-2 Battery 8-5 Bluetooth 8-16 DVD Super Multi drive 8-9 External monitor 8-15 Hard disk drive...
... keys 5-1 Windows special keys 5-4 L LAN 3-5, 4-23 cable types 4-23 connecting 4-24 disconnecting 4-24 jack 2-3 User's Manual problems 8-16 M Media care 4-18 Card care 3-13 Memory card care 3-14 Memory 3-2 additional 3-24 installing 3-16 problems 8-14 removing 3-19 Memory media inserting 3-14 removing 3-15 Memory media slot 2-2, 3-12 using 3-12 Moving the computer 4-25 P Panel Open - automatic power off 1-7 turning on 1-7 Problems AC power 8-5 Additional memory module 8-14 Analyzing the problem 8-2 Battery 8-5 Bluetooth 8-16 DVD Super Multi drive 8-9 External monitor 8-15 Hard disk drive...
Detailed Specs for Satellite C650 PSC2EC-00P001 English
Page 1
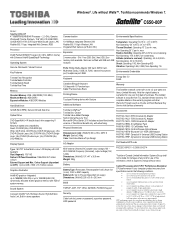
...: use of certain external peripheral products use of battery power instead of AC power use of certain multimedia games or videos with 2GB and 4GB modules Ports: Bridge Media Adaptor (SD Card, SDHC Card, Multimedia Card), 2 USB 2.0, RJ45, external microphone port, headphone port, RGB Keyboard Temperature: Operating 5to 35C (41 to change without Walls™. Dynadock U Universal USB Docking Station AC Adapter Part Number/UPC code 65W external Universal AC adapter input voltage...
...: use of certain external peripheral products use of battery power instead of AC power use of certain multimedia games or videos with 2GB and 4GB modules Ports: Bridge Media Adaptor (SD Card, SDHC Card, Multimedia Card), 2 USB 2.0, RJ45, external microphone port, headphone port, RGB Keyboard Temperature: Operating 5to 35C (41 to change without Walls™. Dynadock U Universal USB Docking Station AC Adapter Part Number/UPC code 65W external Universal AC adapter input voltage...

