User Guide
Page 2
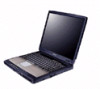
...usage instructions in the applicable user guides and/or manuals enclosed. As with any new technology, you must read and follow all set-up copies of all the data stored on the hard disk or other damage. YOU AGREE THAT TOSHIBA, ITS AFFILIATES AND SUPPLIERS SHALL HAVE NO RESPONSIBILITY ...FOR DAMAGE TO OR LOSS OF ANY BUSINESS, PROFITS, PROGRAMS, DATA OR REMOVABLE STORAGE MEDIA ARISING OUT OF OR RESULTING FROM THE USE OF THE PRODUCT, EVEN IF ADVISED OF THE POSSIBILITY THEREOF. 2 Model: Satellite 1800/1805 Series Compact ...
...usage instructions in the applicable user guides and/or manuals enclosed. As with any new technology, you must read and follow all set-up copies of all the data stored on the hard disk or other damage. YOU AGREE THAT TOSHIBA, ITS AFFILIATES AND SUPPLIERS SHALL HAVE NO RESPONSIBILITY ...FOR DAMAGE TO OR LOSS OF ANY BUSINESS, PROFITS, PROGRAMS, DATA OR REMOVABLE STORAGE MEDIA ARISING OUT OF OR RESULTING FROM THE USE OF THE PRODUCT, EVEN IF ADVISED OF THE POSSIBILITY THEREOF. 2 Model: Satellite 1800/1805 Series Compact ...

User Guide
Page 7
... device is compliant to: ❖ The IEEE 802.11 Standard on Wireless LANs (Revision B), as appropriate. 2 The user manual of analog equipment must contain the equipment's Ringer Equivalence Number (REN) and an explanation notice similar to each terminal device provides an... to a telephone interface. Because Wireless LAN products operate within the guidelines found in radio frequency safety standards and recommendations, Toshiba believes Wireless LAN is far much less than the electromagnetic energy emitted by the WECA Wireless Ethernet Compatibility Alliance. The termination...
... device is compliant to: ❖ The IEEE 802.11 Standard on Wireless LANs (Revision B), as appropriate. 2 The user manual of analog equipment must contain the equipment's Ringer Equivalence Number (REN) and an explanation notice similar to each terminal device provides an... to a telephone interface. Because Wireless LAN products operate within the guidelines found in radio frequency safety standards and recommendations, Toshiba believes Wireless LAN is far much less than the electromagnetic energy emitted by the WECA Wireless Ethernet Compatibility Alliance. The termination...
User Guide
Page 10
... Germany Iceland Ireland Japan New Zealand Luxembourg Norway Netherlands Sweden Switzerland UK USA Greece Poland Italy Portugal France Spain Caution: Do not use this instruction manual carefully and retain for use This equipment is approved to open the enclosure. Should the unit ever require maintenance, contact an authorized service location. To...
... Germany Iceland Ireland Japan New Zealand Luxembourg Norway Netherlands Sweden Switzerland UK USA Greece Poland Italy Portugal France Spain Caution: Do not use this instruction manual carefully and retain for use This equipment is approved to open the enclosure. Should the unit ever require maintenance, contact an authorized service location. To...
User Guide
Page 11
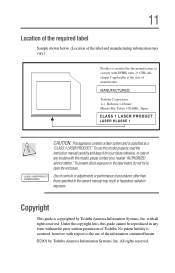
...system and is assumed, however, with respect to open the enclosure. To use of the information contained herein. ©2001 by Toshiba America Information Systems, Inc. 11 Location of the required label Sample shown below. (Location of the label and manufacturing information may result... in any trouble with this model properly, read the instruction manual carefully and keep it for your nearest "AUTHORIZED service station." Copyright This guide is copyrighted by Toshiba America Information Systems, Inc. All rights reserved.
...system and is assumed, however, with respect to open the enclosure. To use of the information contained herein. ©2001 by Toshiba America Information Systems, Inc. 11 Location of the required label Sample shown below. (Location of the label and manufacturing information may result... in any trouble with this model properly, read the instruction manual carefully and keep it for your nearest "AUTHORIZED service station." Copyright This guide is copyrighted by Toshiba America Information Systems, Inc. All rights reserved.

User Guide
Page 12
... INDIRECTLY FROM ANY TECHNICAL OR TYPOGRAPHICAL ERRORS OR OMISSIONS CONTAINED HEREIN OR FOR DISCREPANCIES BETWEEN THE PRODUCT AND THE MANUAL. TOSHIBA CORPORATION AND TOSHIBA AMERICA INFORMATION SYSTEMS, INC. (TOSHIBA) PROVIDES NO WARRANTY WITH REGARD TO THIS MANUAL OR ANY OTHER INFORMATION CONTAINED HEREIN AND HEREBY EXPRESSLY DISCLAIMS ANY IMPLIED WARRANTIES OF MERCHANTABILITY OR FITNESS FOR...
... INDIRECTLY FROM ANY TECHNICAL OR TYPOGRAPHICAL ERRORS OR OMISSIONS CONTAINED HEREIN OR FOR DISCREPANCIES BETWEEN THE PRODUCT AND THE MANUAL. TOSHIBA CORPORATION AND TOSHIBA AMERICA INFORMATION SYSTEMS, INC. (TOSHIBA) PROVIDES NO WARRANTY WITH REGARD TO THIS MANUAL OR ANY OTHER INFORMATION CONTAINED HEREIN AND HEREBY EXPRESSLY DISCLAIMS ANY IMPLIED WARRANTIES OF MERCHANTABILITY OR FITNESS FOR...
User Guide
Page 24
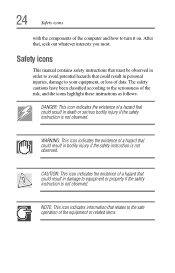
... equipment or related items. 24 Safety icons with the components of the computer and how to your equipment, or loss of data. Safety icons This manual contains safety instructions that must be observed in death or serious bodily injury if the safety instruction is not observed. After that could result in...
... equipment or related items. 24 Safety icons with the components of the computer and how to your equipment, or loss of data. Safety icons This manual contains safety instructions that must be observed in death or serious bodily injury if the safety instruction is not observed. After that could result in...
User Guide
Page 31
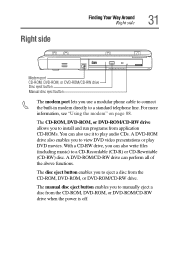
... Your Way Around Right side 31 Modem port CD-ROM, DVD-ROM, or DVD-ROM/CD-RW drive Disc eject button Manual disc eject button The modem port lets you to manually eject a disc from the CD-ROM, DVD-ROM, or DVD-ROM/CD-RW drive when the power is off. The... manual disc eject button enables you use it to play DVD movies. The CD-ROM, DVD-ROM, or DVD-ROM/CD-RW drive allows you can ...
... Your Way Around Right side 31 Modem port CD-ROM, DVD-ROM, or DVD-ROM/CD-RW drive Disc eject button Manual disc eject button The modem port lets you to manually eject a disc from the CD-ROM, DVD-ROM, or DVD-ROM/CD-RW drive when the power is off. The... manual disc eject button enables you use it to play DVD movies. The CD-ROM, DVD-ROM, or DVD-ROM/CD-RW drive allows you can ...
User Guide
Page 62
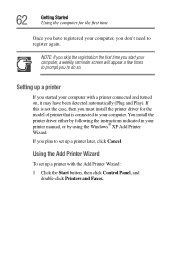
... Add Printer Wizard To set up a printer later, click Cancel. Setting up a printer with a printer connected and turned on, it may have registered your printer manual, or by using the Windows® XP Add Printer Wizard. If this is not the case, then you to set up a printer If you started...
... Add Printer Wizard To set up a printer later, click Cancel. Setting up a printer with a printer connected and turned on, it may have registered your printer manual, or by using the Windows® XP Add Printer Wizard. If this is not the case, then you to set up a printer If you started...

User Guide
Page 64
...print a test page. See your printer, or accept the default name as it is entered. You are using more than one , click Next to manually select the printer. 6 Select the port settings according to the instructions in your printer's documentation and the port to which your printer is Plug and... computer. 5 Click Next. You can ignore the remainder of manufacturers and printers, select your printer, then click Next. 8 Enter a name for your printer manual. 4 If the printer you tell the difference. 9 Click Next. 64 Getting Started Using the computer for a plug and play printer.
...print a test page. See your printer, or accept the default name as it is entered. You are using more than one , click Next to manually select the printer. 6 Select the port settings according to the instructions in your printer's documentation and the port to which your printer is Plug and... computer. 5 Click Next. You can ignore the remainder of manufacturers and printers, select your printer, then click Next. 8 Enter a name for your printer manual. 4 If the printer you tell the difference. 9 Click Next. 64 Getting Started Using the computer for a plug and play printer.
User Guide
Page 79
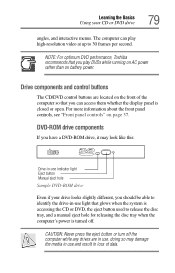
... power. DVD-ROM drive components If you play high-resolution video at up to release the disc tray, and a manual eject hole for releasing the disc tray when the computer's power is closed or open. doing so may look like ...a DVD-ROM drive, it may damage the media in use and result in use indicator light Eject button Manual eject hole Sample DVD-ROM drive Even if your CD or DVD drive 79 angles, and interactive menus. ... located on the front of data. NOTE: For optimum DVD performance, Toshiba recommends that you can play DVDs while running on AC power rather than on page 37.
... power. DVD-ROM drive components If you play high-resolution video at up to release the disc tray, and a manual eject hole for releasing the disc tray when the computer's power is closed or open. doing so may look like ...a DVD-ROM drive, it may damage the media in use and result in use indicator light Eject button Manual eject hole Sample DVD-ROM drive Even if your CD or DVD drive 79 angles, and interactive menus. ... located on the front of data. NOTE: For optimum DVD performance, Toshiba recommends that you can play DVDs while running on AC power rather than on page 37.
User Guide
Page 80
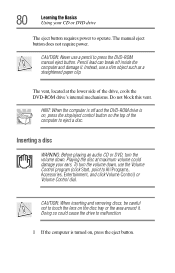
The manual eject button does not require power. To turn the volume down , use a slim object such as a straightened paper clip. 80 Learning the Basics Using your ... vent, located at maximum volume could cause the drive to operate. CAUTION: When inserting and removing discs, be careful not to press the DVD-ROM manual eject button. HINT: When the computer is off inside the computer and damage it . CAUTION: Never use a pencil to touch the lens on the top...
The manual eject button does not require power. To turn the volume down , use a slim object such as a straightened paper clip. 80 Learning the Basics Using your ... vent, located at maximum volume could cause the drive to operate. CAUTION: When inserting and removing discs, be careful not to press the DVD-ROM manual eject button. HINT: When the computer is off inside the computer and damage it . CAUTION: Never use a pencil to touch the lens on the top...
User Guide
Page 81
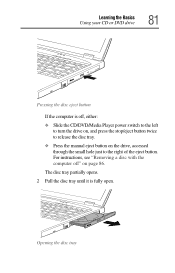
The disc tray partially opens. 2 Pull the disc tray until it is off " on the drive, accessed through the small hole just to the right of the eject button. Opening the disc tray Learning the Basics Using your CD or DVD drive 81 Pressing the disc eject button If the computer is fully open. For instructions, see "Removing a disc with the computer off , either: ❖ Slide the CD/DVD/Media Player power switch to the left to turn the drive on, and press the stop/eject button twice to release the disc tray. ❖ Press the manual eject button on page 86.
The disc tray partially opens. 2 Pull the disc tray until it is off " on the drive, accessed through the small hole just to the right of the eject button. Opening the disc tray Learning the Basics Using your CD or DVD drive 81 Pressing the disc eject button If the computer is fully open. For instructions, see "Removing a disc with the computer off , either: ❖ Slide the CD/DVD/Media Player power switch to the left to turn the drive on, and press the stop/eject button twice to release the disc tray. ❖ Press the manual eject button on page 86.
User Guide
Page 84
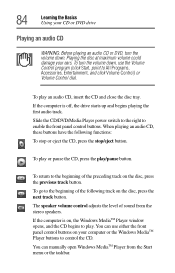
... the disc, press the next track button. The speaker volume control adjusts the level of sound from the Start menu or the taskbar. You can manually open Windows MediaTM Player from the stereo speakers. 84 Learning the Basics Using your computer or the Windows MediaTM Player buttons to control the CD...
... the disc, press the next track button. The speaker volume control adjusts the level of sound from the Start menu or the taskbar. You can manually open Windows MediaTM Player from the stereo speakers. 84 Learning the Basics Using your computer or the Windows MediaTM Player buttons to control the CD...
User Guide
Page 86
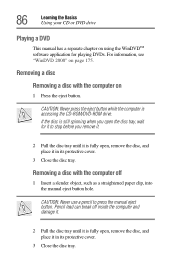
... before you open the disc tray, wait for playing DVDs. Pencil lead can break off 1 Insert a slender object, such as a straightened paper clip, into the manual eject button hole. CAUTION: Never press the eject button while the computer is fully open , remove the disc, and place it in its protective cover... 1 Press the eject button. For information, see "WinDVD 2000" on page 175. 86 Learning the Basics Using your CD or DVD drive Playing a DVD This manual has a separate chapter on using the WinDVDTM software application for it to press the...
... before you open the disc tray, wait for playing DVDs. Pencil lead can break off 1 Insert a slender object, such as a straightened paper clip, into the manual eject button hole. CAUTION: Never press the eject button while the computer is fully open , remove the disc, and place it in its protective cover... 1 Press the eject button. For information, see "WinDVD 2000" on page 175. 86 Learning the Basics Using your CD or DVD drive Playing a DVD This manual has a separate chapter on using the WinDVDTM software application for it to press the...
User Guide
Page 108
Toshiba offers a choice of extra space for the computer. Traveling tips The environmental precautions listed in a carrying case. TECHNICAL NOTE: When ...harm your computer on page 41, also apply while traveling. ❖ Never leave your computer. They all provide plenty of carrying cases for manuals, power cables, compact discs and diskettes. Putting spent batteries in the trash is not only irresponsible, it could get wet or covered in ...CAUTION: The computer uses a lithium ion battery, which can explode if not handled or disposed of the battery as required by Toshiba.
Toshiba offers a choice of extra space for the computer. Traveling tips The environmental precautions listed in a carrying case. TECHNICAL NOTE: When ...harm your computer on page 41, also apply while traveling. ❖ Never leave your computer. They all provide plenty of carrying cases for manuals, power cables, compact discs and diskettes. Putting spent batteries in the trash is not only irresponsible, it could get wet or covered in ...CAUTION: The computer uses a lithium ion battery, which can explode if not handled or disposed of the battery as required by Toshiba.
User Guide
Page 176
176 WinDVD 2000 Playing DVDs TECHNICAL NOTE: You cannot play (see "Setting general properties" on page 185 for information on enabling autoplay. Insert a DVD into the drive, following the instructions in the drive and opens WinDVD. If the autoplay feature is enabled, the DVD automatically begins to InterVideo WinDVD, then click InterVideo WinDVD. The computer automatically detects the disc in "Inserting a disc" on the LCD/CRT at the same time. To open WinDVD manually: 1 Click Start, and point to All Programs. 2 Point to play DVD movies on a TV and on page 80.
176 WinDVD 2000 Playing DVDs TECHNICAL NOTE: You cannot play (see "Setting general properties" on page 185 for information on enabling autoplay. Insert a DVD into the drive, following the instructions in the drive and opens WinDVD. If the autoplay feature is enabled, the DVD automatically begins to InterVideo WinDVD, then click InterVideo WinDVD. The computer automatically detects the disc in "Inserting a disc" on the LCD/CRT at the same time. To open WinDVD manually: 1 Click Start, and point to All Programs. 2 Point to play DVD movies on a TV and on page 80.

User Guide
Page 214
... water or a neutral cleaner. If necessary, wipe it with the laser beam. Make sure the computer is in the small hole next to press the manual eject button. The CD-ROM/DVD-ROM drive eject mechanism requires power to a power source and turned on the right side of the computer. This...
... water or a neutral cleaner. If necessary, wipe it with the laser beam. Make sure the computer is in the small hole next to press the manual eject button. The CD-ROM/DVD-ROM drive eject mechanism requires power to a power source and turned on the right side of the computer. This...
User Guide
Page 220
..., 28800, 33600 bps (bits per second) or higher. Refer to change these settings. See "Computing tips" on how to the program's documentation and the modem manual for information on page 69 for the built-in Device Manager under Modems for instructions. Check the communications parameters (baud rate, parity, data length and...
..., 28800, 33600 bps (bits per second) or higher. Refer to change these settings. See "Computing tips" on how to the program's documentation and the modem manual for information on page 69 for the built-in Device Manager under Modems for instructions. Check the communications parameters (baud rate, parity, data length and...
User Guide
Page 221
... programs and devices you experience a problem with all your programs and data files from a backup source will improve as your computer, as well as the manuals that requires you learn about how the computer and its software work " on page 74. ❖ Connect a tape drive to the system and use to... programs, you should back up these methods, backing up all files to tape weekly and copying critical files to diskette, following the steps in the manuals. Get familiar with the computer.
... programs and devices you experience a problem with all your programs and data files from a backup source will improve as your computer, as well as the manuals that requires you learn about how the computer and its software work " on page 74. ❖ Connect a tape drive to the system and use to... programs, you should back up these methods, backing up all files to tape weekly and copying critical files to diskette, following the steps in the manuals. Get familiar with the computer.

User Guide
Page 252
..., 84, 85 stop/eject button 37, 84 CD Player control panel 85 CD/DVD control buttons 79 stop/eject 81 CD-ROM drive 31, 78 manual eject button 81 problem solving 214 CD-ROMs using 78 CDs care and handling 87 problem solving 215 charging 56 main battery 102 RTC 103... 147 computing tips 220 connecting external monitor 147 external speakers 161 headphones 161 microphone 158 mouse 52 to a network 90 conserving battery power 104 contacting Toshiba 224 cooling vents CPU 32 copying files to a diskette 77 CPU 204 creating new documents 117 new folders 119
..., 84, 85 stop/eject button 37, 84 CD Player control panel 85 CD/DVD control buttons 79 stop/eject 81 CD-ROM drive 31, 78 manual eject button 81 problem solving 214 CD-ROMs using 78 CDs care and handling 87 problem solving 215 charging 56 main battery 102 RTC 103... 147 computing tips 220 connecting external monitor 147 external speakers 161 headphones 161 microphone 158 mouse 52 to a network 90 conserving battery power 104 contacting Toshiba 224 cooling vents CPU 32 copying files to a diskette 77 CPU 204 creating new documents 117 new folders 119


