
User Guide
Page 29
...50 Turning on the power 50 Adding memory (optional 51 Installing a memory module 52 Removing a memory module 57 Checking total memory 59 Hard Drive Recovery Utilities 60 Creating Recovery DVDs 60 Hard Disk Drive Recovery options 61 Hard Disk Drive Recovery using the Recovery media 67 Checking the HDD operating status 69 Installing drivers and applications 69 Using the TouchPad 70 Scrolling with the TouchPad 70 Control buttons 70 Disabling or enabling the TouchPad 71 Using external display devices 71 Connecting the display device 71 Directing the display output when you turn on...
...50 Turning on the power 50 Adding memory (optional 51 Installing a memory module 52 Removing a memory module 57 Checking total memory 59 Hard Drive Recovery Utilities 60 Creating Recovery DVDs 60 Hard Disk Drive Recovery options 61 Hard Disk Drive Recovery using the Recovery media 67 Checking the HDD operating status 69 Installing drivers and applications 69 Using the TouchPad 70 Scrolling with the TouchPad 70 Control buttons 70 Disabling or enabling the TouchPad 71 Using external display devices 71 Connecting the display device 71 Directing the display output when you turn on...
User Guide
Page 52
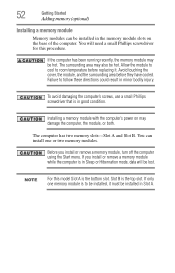
... to be installed, it . Installing a memory module with the computer's power on the base of the computer. Before you install or remove a memory module while the computer is in Sleep or Hibernation mode, data will need a small Phillips screwdriver for this model Slot A is to follow these directions could result in Slot A. If you install or remove a memory module, turn off the computer using the Start menu. Slot B is in the memory module slots on may damage...
... to be installed, it . Installing a memory module with the computer's power on the base of the computer. Before you install or remove a memory module while the computer is in Sleep or Hibernation mode, data will need a small Phillips screwdriver for this model Slot A is to follow these directions could result in Slot A. If you install or remove a memory module, turn off the computer using the Start menu. Slot B is in the memory module slots on may damage...
User Guide
Page 57
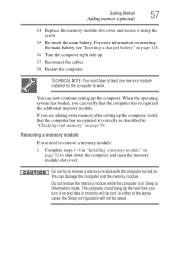
... the computer and the memory module. When the operating system has loaded, you are adding extra memory after setting up . 17 Reconnect the cables. 18 Restart the computer. You can now continue setting up the next time you need to work. In either of the above cases, the Sleep configuration will be saved. Getting Started 57 Adding memory (optional) 14 Replace the memory module slot cover and secure it...
... the computer and the memory module. When the operating system has loaded, you are adding extra memory after setting up . 17 Reconnect the cables. 18 Restart the computer. You can now continue setting up the next time you need to work. In either of the above cases, the Sleep configuration will be saved. Getting Started 57 Adding memory (optional) 14 Replace the memory module slot cover and secure it...

User Guide
Page 59
... not recognize the memory configuration, turn off the computer and remove the memory module slot cover (complete steps 1-8 in "Installing a memory module" on your computer without your permission to perform the action, click Continue; Getting Started 59 Adding memory (optional) 4 Replace the memory module slot cover and secure it using the screw. 5 Re-insert the main battery. The System window appears. 2 The total memory is displayed below the System heading under Memory (RAM). If unsure, cancel...
... not recognize the memory configuration, turn off the computer and remove the memory module slot cover (complete steps 1-8 in "Installing a memory module" on your computer without your permission to perform the action, click Continue; Getting Started 59 Adding memory (optional) 4 Replace the memory module slot cover and secure it using the screw. 5 Re-insert the main battery. The System window appears. 2 The total memory is displayed below the System heading under Memory (RAM). If unsure, cancel...
User Guide
Page 62
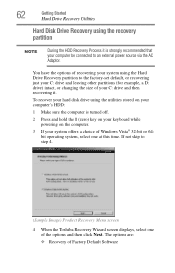
...'s HDD: 1 Make sure the computer is strongly recommended that your computer be connected to an external power source via the AC Adaptor. To recover your hard disk drive using the utilities stored on the computer. 3 If your system offers a choice of Windows Vista® 32-bit or 64bit operating system, select one of Factory Default Software If not skip to step 4. (Sample Image) Product Recovery Menu screen 4 When the Toshiba Recovery Wizard screen displays...
...'s HDD: 1 Make sure the computer is strongly recommended that your computer be connected to an external power source via the AC Adaptor. To recover your hard disk drive using the utilities stored on the computer. 3 If your system offers a choice of Windows Vista® 32-bit or 64bit operating system, select one of Factory Default Software If not skip to step 4. (Sample Image) Product Recovery Menu screen 4 When the Toshiba Recovery Wizard screen displays...
User Guide
Page 71
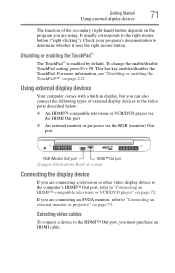
... mouse button ("right-clicking"). Selecting video cables To connect a device to the HDMI™ Out port, you are using. To change the enable/disable TouchPad setting, press Fn + F9. Getting Started 71 Using external display devices The function of system Connecting the display device If you are connecting a television or other video display device to the computer's HDMI™ Out port, refer to "Connecting an HDMI™-compatible television or VCR/DVD player" on page 72. This hot key enables/disables the TouchPad. Disabling or enabling the TouchPad™ The TouchPad...
... mouse button ("right-clicking"). Selecting video cables To connect a device to the HDMI™ Out port, you are using. To change the enable/disable TouchPad setting, press Fn + F9. Getting Started 71 Using external display devices The function of system Connecting the display device If you are connecting a television or other video display device to the computer's HDMI™ Out port, refer to "Connecting an HDMI™-compatible television or VCR/DVD player" on page 72. This hot key enables/disables the TouchPad. Disabling or enabling the TouchPad™ The TouchPad...

User Guide
Page 72
.... Connecting the sound to a TV or stereo system At times you may need to be installed) dedicated to take advantage of its capabilities which allows devices to a TV using HDMI™-CEC (Available on certain models) HDMI™-CEC (Consumer Electronics Control) is selected using the Fn+F5 key. ❖ Switch the video output (HDMI or LCD) when executing certain desktop icons. ❖ Enable/Disable the HDMI-CEC function on...
.... Connecting the sound to a TV or stereo system At times you may need to be installed) dedicated to take advantage of its capabilities which allows devices to a TV using HDMI™-CEC (Available on certain models) HDMI™-CEC (Consumer Electronics Control) is selected using the Fn+F5 key. ❖ Switch the video output (HDMI or LCD) when executing certain desktop icons. ❖ Enable/Disable the HDMI-CEC function on...
User Guide
Page 149
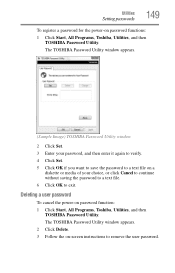
...to remove the user password. Deleting a user password To cancel the power-on password functions: 1 Click Start, All Programs, Toshiba, Utilities, and then TOSHIBA Password Utility. The TOSHIBA Password Utility window appears. (Sample Image) TOSHIBA Password Utility window 2 Click Set. 3 Enter your password, and then enter it again to verify. 4 Click Set. 5 Click OK if you want to save the password to a text file on -screen instructions to exit. Utilities Setting passwords 149 To register a password for the power-on password function: 1 Click Start, All Programs, Toshiba, Utilities...
...to remove the user password. Deleting a user password To cancel the power-on password functions: 1 Click Start, All Programs, Toshiba, Utilities, and then TOSHIBA Password Utility. The TOSHIBA Password Utility window appears. (Sample Image) TOSHIBA Password Utility window 2 Click Set. 3 Enter your password, and then enter it again to verify. 4 Click Set. 5 Click OK if you want to save the password to a text file on -screen instructions to exit. Utilities Setting passwords 149 To register a password for the power-on password function: 1 Click Start, All Programs, Toshiba, Utilities...
User Guide
Page 156
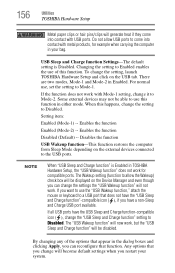
... setting to Enabled enables the use , set the setting to Disabled. If the function does not work with USB ports. By changing any of this happens, change the setting, launch TOSHIBA Hardware Setup and click on the external devices connected to Mode-2. USB Sleep and Charge function Settings-The default setting is Enabled in Enabled. To change the setting to Disabled. Any options that function. Do not allow the Wakeup) check box will be able to come into contact with metal products, for compatible ports. Enables the function Disabled (Default...
... setting to Enabled enables the use , set the setting to Disabled. If the function does not work with USB ports. By changing any of this happens, change the setting, launch TOSHIBA Hardware Setup and click on the external devices connected to Mode-2. USB Sleep and Charge function Settings-The default setting is Enabled in Enabled. To change the setting to Disabled. Any options that function. Do not allow the Wakeup) check box will be able to come into contact with metal products, for compatible ports. Enables the function Disabled (Default...
User Guide
Page 172
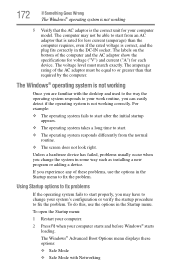
... for each device. To open the Startup menu: 1 Restart your computer. 2 Press F8 when your system's configuration or verify the startup procedure to fix the problem. The computer may have to change the system in the DC-IN socket. Unless a hardware device has failed, problems usually occur when you change your computer starts and before Windows® starts loading. To do this, use the options in the Startup menu. The...
... for each device. To open the Startup menu: 1 Restart your computer. 2 Press F8 when your system's configuration or verify the startup procedure to fix the problem. The computer may have to change the system in the DC-IN socket. Unless a hardware device has failed, problems usually occur when you change your computer starts and before Windows® starts loading. To do this, use the options in the Startup menu. The...

User Guide
Page 176
... using functions. Memory problems Incorrectly connected or faulty memory modules may be hardware or even software related. The Shut Down menu appears. 2 Click Shut Down. The tabs that seem to be faulty. For more information about Device Manager, refer to another. The computer shuts down completely. 3 Remove the memory module, following the instructions in "Removing a memory module" on page 52, and making sure the module is not caused by the device. If removing...
... using functions. Memory problems Incorrectly connected or faulty memory modules may be hardware or even software related. The Shut Down menu appears. 2 Click Shut Down. The tabs that seem to be faulty. For more information about Device Manager, refer to another. The computer shuts down completely. 3 Remove the memory module, following the instructions in "Removing a memory module" on page 52, and making sure the module is not caused by the device. If removing...
User Guide
Page 179
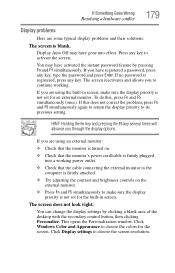
... 179 Display problems Here are using the built-in screen, make sure the display priority is not set for an external monitor. Display Auto Off may have activated the instant password feature by clicking a blank area of the desktop with the secondary control button, then clicking Personalize. Press any key. The screen does not look right. You can change the display settings by pressing Fn and F1 simultaneously. This opens...
... 179 Display problems Here are using the built-in screen, make sure the display priority is not set for an external monitor. Display Auto Off may have activated the instant password feature by clicking a blank area of the desktop with the secondary control button, then clicking Personalize. Press any key. The screen does not look right. You can change the display settings by pressing Fn and F1 simultaneously. This opens...
User Guide
Page 187
.... For more advanced users. It should be set up to someone else. If Something Goes Wrong Resolving a hardware conflict 187 Modem problems (Available on certain models) This section lists common modem problems. The modem will be lit). ❖ Verify that the Wireless antenna ON/OFF switch is on how to the computer's modem port and the telephone line jack. Connect a telephone handset...
.... For more advanced users. It should be set up to someone else. If Something Goes Wrong Resolving a hardware conflict 187 Modem problems (Available on certain models) This section lists common modem problems. The modem will be lit). ❖ Verify that the Wireless antenna ON/OFF switch is on how to the computer's modem port and the telephone line jack. Connect a telephone handset...
User Guide
Page 195
..., please try one item of "USB Sleep and Charge function" may be Disabled. Cannot use the "USB Sleep and Charge function". Always restart the Windows® operating system after each successive installation. It is connected first, it much easier to use the "USB Sleep and Charge function." (Available on certain models) ❖ The setting of hardware or software. 4 Restart the Windows® operating system. 5 Use the new hardware or software for a while, noting any new problems. Make sure that your critical applications...
..., please try one item of "USB Sleep and Charge function" may be Disabled. Cannot use the "USB Sleep and Charge function". Always restart the Windows® operating system after each successive installation. It is connected first, it much easier to use the "USB Sleep and Charge function." (Available on certain models) ❖ The setting of hardware or software. 4 Restart the Windows® operating system. 5 Use the new hardware or software for a while, noting any new problems. Make sure that your critical applications...

User Guide
Page 224
... other services. hot key - (1) A feature in combination with any device to the same state it was when the computer was turned off . A small image displayed on the motherboard to the internal storage drive the current state of many Toshiba computers that activates a memory resident program. Internet - 224 Glossary Hibernation - When you turn the computer off . L L1 (level one) cache - Memory cache installed on the screen that represents a function...
... other services. hot key - (1) A feature in combination with any device to the same state it was when the computer was turned off . A small image displayed on the motherboard to the internal storage drive the current state of many Toshiba computers that activates a memory resident program. Internet - 224 Glossary Hibernation - When you turn the computer off . L L1 (level one) cache - Memory cache installed on the screen that represents a function...
User Guide
Page 230
... battery changing 116 charge indicator light 48, 110 charge not lasting 178 charging 46, 48 conserving power 113 disposal 121 low charge 112 monitoring power 48, 110 not charging 177 230 notifications 112 power plan 206 power plan hot key 115 real-time clock (RTC) 107 removing 116 BIOS Setup see TOSHIBA Hardware Setup Bridge Media Adapter inserting memory media 135 removing memory media 136 button power 51, 61 start 125 C character keys 92 charging the battery 48 checking device properties 175 click 70 communications network connection 127 set...
... battery changing 116 charge indicator light 48, 110 charge not lasting 178 charging 46, 48 conserving power 113 disposal 121 low charge 112 monitoring power 48, 110 not charging 177 230 notifications 112 power plan 206 power plan hot key 115 real-time clock (RTC) 107 removing 116 BIOS Setup see TOSHIBA Hardware Setup Bridge Media Adapter inserting memory media 135 removing memory media 136 button power 51, 61 start 125 C character keys 92 charging the battery 48 checking device properties 175 click 70 communications network connection 127 set...
User Guide
Page 231
... connecting to a power source 46 connection set up 127 control buttons 70 Ctrl keys 92 D desktop creating new icon 124 major features 124 desktop exploration 123 desktop icons 124 Device Manager 175 checking properties 175 devices keyboard 75 mouse 75 Disk Defragmenter 181 disk drive corrupted/damaged data files 182 missing files/trouble accessing a disk 181 running slow 181 diskette drive cannot insert a diskette 182 cannot read a diskette 182 connecting 77 external, connecting 77 display...
... connecting to a power source 46 connection set up 127 control buttons 70 Ctrl keys 92 D desktop creating new icon 124 major features 124 desktop exploration 123 desktop icons 124 Device Manager 175 checking properties 175 devices keyboard 75 mouse 75 Disk Defragmenter 181 disk drive corrupted/damaged data files 182 missing files/trouble accessing a disk 181 running slow 181 diskette drive cannot insert a diskette 182 cannot read a diskette 182 connecting 77 external, connecting 77 display...
User Guide
Page 233
... mouse installing 75 mouse utility 152 N network accessing 127 Connect to the Internet 127 networking wireless 126 Notification Area 125 O Opening the display panel 49 optical disc positioning 102 optical discs handling 103 inserting 102 removing 104, 105 optical drive problems 182 troubleshooting 182 using 99 optical media recording 104 other documentation 39 P password deleting a supervisor 148 disabling a user 149 setting a user 148 supervisor set up 147 types 146 passwords instant, using 146 setting 146 port RGB 71 power computer will not start 169 connecting cable...
... mouse installing 75 mouse utility 152 N network accessing 127 Connect to the Internet 127 networking wireless 126 Notification Area 125 O Opening the display panel 49 optical disc positioning 102 optical discs handling 103 inserting 102 removing 104, 105 optical drive problems 182 troubleshooting 182 using 99 optical media recording 104 other documentation 39 P password deleting a supervisor 148 disabling a user 149 setting a user 148 supervisor set up 147 types 146 passwords instant, using 146 setting 146 port RGB 71 power computer will not start 169 connecting cable...

User Guide
Page 234
... files 182 Device Manager 175 disk drive is slow 181 display is blank 179 ExpressCard® 184 checklist 184 error occurs 186 hot swapping fails 185 not recognized 185 slot appears dead 184 external display not working 180 external monitor 179 faulty memory 176 hardware conflict 174 high-pitched noise 184 Internet bookmarked site not found 173 Internet connection is slow 173 keyboard not responding 170 missing files/trouble accessing a disk 181...
... files 182 Device Manager 175 disk drive is slow 181 display is blank 179 ExpressCard® 184 checklist 184 error occurs 186 hot swapping fails 185 not recognized 185 slot appears dead 184 external display not working 180 external monitor 179 faulty memory 176 hardware conflict 174 high-pitched noise 184 Internet bookmarked site not found 173 Internet connection is slow 173 keyboard not responding 170 missing files/trouble accessing a disk 181...
User Guide
Page 235
... 122 troubleshooting DVD player general problems 190 external keyboard 178 keyboard 178 optical drive 182 turning on the computer 50 turning on the power 50 U user password, disabling 149 user password, setting 148 using 131 using a file extension 97 Utilities 139 V video cables 71 video display device connecting 71 video projector adjusting display 75 W warranty standard limited warranty 39 Web 129 Web Camera 133 Web sites 197 Wi-Fi® wireless networking 126 Windows® Explorer 94 Windows® operating system Help and Support 174 problem...
... 122 troubleshooting DVD player general problems 190 external keyboard 178 keyboard 178 optical drive 182 turning on the computer 50 turning on the power 50 U user password, disabling 149 user password, setting 148 using 131 using a file extension 97 Utilities 139 V video cables 71 video display device connecting 71 video projector adjusting display 75 W warranty standard limited warranty 39 Web 129 Web Camera 133 Web sites 197 Wi-Fi® wireless networking 126 Windows® Explorer 94 Windows® operating system Help and Support 174 problem...


