User Guide
Page 5
... unless such message clearly contains in their equipment, operations or procedures. In order to do this change. or an authorized representative of this , it may not be necessary for repair or limited warranty information, please contact Toshiba Corporation, Toshiba America Information Systems, Inc. Contact the state public utility commission, public service commission or corporation commission for which charges exceed local...
... unless such message clearly contains in their equipment, operations or procedures. In order to do this change. or an authorized representative of this , it may not be necessary for repair or limited warranty information, please contact Toshiba Corporation, Toshiba America Information Systems, Inc. Contact the state public utility commission, public service commission or corporation commission for which charges exceed local...
User Guide
Page 33
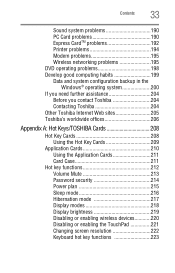
... you contact Toshiba 204 Contacting Toshiba 204 Other Toshiba Internet Web sites 205 Toshiba's worldwide offices 206 Appendix A: Hot Keys/TOSHIBA Cards 208 Hot Key Cards 208 Using the Hot Key Cards 209 Application Cards 210 Using the Application Cards 211 Card Case 211 Hot key functions 212 Volume Mute 213 Password security 214 Power plan 215 Sleep mode 216 Hibernation mode 217 Display modes 218 Display brightness 219 Disabling or enabling wireless devices............220 Disabling or enabling the TouchPad 221 Changing screen resolution 222 Keyboard hot key functions 223
... you contact Toshiba 204 Contacting Toshiba 204 Other Toshiba Internet Web sites 205 Toshiba's worldwide offices 206 Appendix A: Hot Keys/TOSHIBA Cards 208 Hot Key Cards 208 Using the Hot Key Cards 209 Application Cards 210 Using the Application Cards 211 Card Case 211 Hot key functions 212 Volume Mute 213 Password security 214 Power plan 215 Sleep mode 216 Hibernation mode 217 Display modes 218 Display brightness 219 Disabling or enabling wireless devices............220 Disabling or enabling the TouchPad 221 Changing screen resolution 222 Keyboard hot key functions 223
User Guide
Page 50
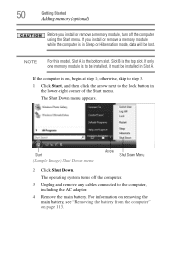
... memory (optional) Before you install or remove a memory module while the computer is to be installed, it must be lost. Slot B is on page 113. If the computer is the top slot. The Shut Down menu appears. The operating system turns off the computer using the Start menu. otherwise, skip to step 3. 1 Click Start, and then click the arrow next to the lock button in Slot A. NOTE For this model, Slot...
... memory (optional) Before you install or remove a memory module while the computer is to be installed, it must be lost. Slot B is on page 113. If the computer is the top slot. The Shut Down menu appears. The operating system turns off the computer using the Start menu. otherwise, skip to step 3. 1 Click Start, and then click the arrow next to the lock button in Slot A. NOTE For this model, Slot...
User Guide
Page 55
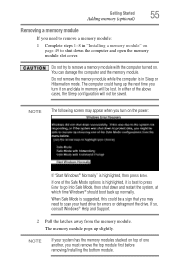
... and Support. 2 Pull the latches away from the memory module. The computer could be lost. Getting Started Adding memory (optional) 55 Removing a memory module If you turn it is best to press Enter to go into Safe Mode, then shut down the computer and open the memory module slot cover. Do not try to remove a memory module with the computer turned on the power: If "Start Windows® Normally" is highlighted, then press Enter. When Safe Mode is...
... and Support. 2 Pull the latches away from the memory module. The computer could be lost. Getting Started Adding memory (optional) 55 Removing a memory module If you turn it is best to press Enter to go into Safe Mode, then shut down the computer and open the memory module slot cover. Do not try to remove a memory module with the computer turned on the power: If "Start Windows® Normally" is highlighted, then press Enter. When Safe Mode is...
User Guide
Page 56
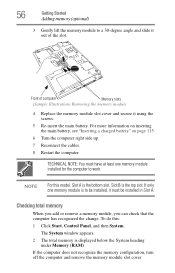
... total memory is the top slot. If the computer does not recognize the memory configuration, turn off the computer and remove the memory module slot cover NOTE For this : 1 Click Start, Control Panel, and then System. 56 Getting Started Adding memory (optional) 3 Gently lift the memory module to a 30-degree angle and slide it using the screws. 5 Re-insert the main battery. If only one memory module installed for the computer to work. TECHNICAL...
... total memory is the top slot. If the computer does not recognize the memory configuration, turn off the computer and remove the memory module slot cover NOTE For this : 1 Click Start, Control Panel, and then System. 56 Getting Started Adding memory (optional) 3 Gently lift the memory module to a 30-degree angle and slide it using the screws. 5 Re-insert the main battery. If only one memory module installed for the computer to work. TECHNICAL...
User Guide
Page 58
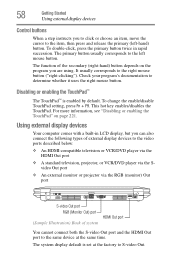
... change the enable/disable TouchPad setting, press Fn + F9. The system display default is enabled by default. For more information, see "Disabling or enabling the TouchPad" on the program you to click or choose an item, move the cursor to S-video Out. 58 Getting Started Using external display devices Control buttons When a step instructs you are using. It usually corresponds to determine whether it uses the right mouse button. The function of system HDMI Out port You cannot connect...
... change the enable/disable TouchPad setting, press Fn + F9. The system display default is enabled by default. For more information, see "Disabling or enabling the TouchPad" on the program you to click or choose an item, move the cursor to S-video Out. 58 Getting Started Using external display devices Control buttons When a step instructs you are using. It usually corresponds to determine whether it uses the right mouse button. The function of system HDMI Out port You cannot connect...
User Guide
Page 59
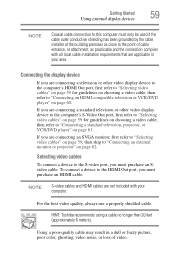
For the best video quality, always use a properly shielded cable. NOTE S-video cables and HDMI cables are connecting a television or other video display device to the computer's S-Video Out port, first refer to "Selecting video cables" on page 59 for guidelines on choosing a video cable, then refer to "Connecting an HDMI-compatible television or VCR/DVD player" on page 62. If you are connecting an SVGA monitor, first refer to "Selecting video cables" on page...
For the best video quality, always use a properly shielded cable. NOTE S-video cables and HDMI cables are connecting a television or other video display device to the computer's S-Video Out port, first refer to "Selecting video cables" on page 59 for guidelines on choosing a video cable, then refer to "Connecting an HDMI-compatible television or VCR/DVD player" on page 62. If you are connecting an SVGA monitor, first refer to "Selecting video cables" on page...

User Guide
Page 60
... can connect the sound to external audio devices in two ways: ❖ Using the headphone jack on the other external display device you can accept the digital optical signal from a headphone output. Choose the settings you may prefer to use external audio instead of the computer-This lets you connect directly to external speakers or a stereo sound system for more information. Connecting the sound to a sound system that can use that supports...
... can connect the sound to external audio devices in two ways: ❖ Using the headphone jack on the other external display device you can accept the digital optical signal from a headphone output. Choose the settings you may prefer to use external audio instead of the computer-This lets you connect directly to external speakers or a stereo sound system for more information. Connecting the sound to a sound system that can use that supports...
User Guide
Page 147
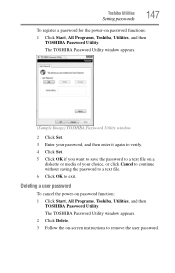
Toshiba Utilities Setting passwords 147 To register a password for the power-on -screen instructions to remove the user password. The TOSHIBA Password Utility window appears. 2 Click Delete. 3 Follow the on password functions: 1 Click Start, All Programs, Toshiba, Utilities, and then TOSHIBA Password Utility. Deleting a user password To cancel the power-on a diskette or media of your choice, or click Cancel to continue without saving the password to a text file. 6 Click OK to a text file on password function: 1 Click Start, All Programs, Toshiba, Utilities, and...
Toshiba Utilities Setting passwords 147 To register a password for the power-on -screen instructions to remove the user password. The TOSHIBA Password Utility window appears. 2 Click Delete. 3 Follow the on password functions: 1 Click Start, All Programs, Toshiba, Utilities, and then TOSHIBA Password Utility. Deleting a user password To cancel the power-on a diskette or media of your choice, or click Cancel to continue without saving the password to a text file. 6 Click OK to a text file on password function: 1 Click Start, All Programs, Toshiba, Utilities, and...
User Guide
Page 178
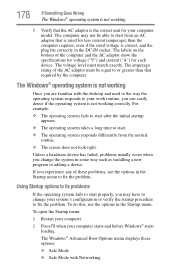
... correct unit for each device. The Windows® Advanced Boot Options menu displays these problems, use the options in some way such as installing a new program or adding a device. The computer may have to your computer starts and before Windows® starts loading. To open the Startup menu: 1 Restart your computer. 2 Press F8 when your work routine, you can easily detect if the operating system is not working correctly. The labels...
... correct unit for each device. The Windows® Advanced Boot Options menu displays these problems, use the options in some way such as installing a new program or adding a device. The computer may have to your computer starts and before Windows® starts loading. To open the Startup menu: 1 Restart your computer. 2 Press F8 when your work routine, you can easily detect if the operating system is not working correctly. The labels...
User Guide
Page 182
... the Lock button in "Installing a memory module" on page 55. 4 Reinstall the memory module, following the instructions in the lower-right part of the Start menu. This tab also provides options for updating the driver or rolling back the driver in the dialog box vary from one memory module installed for the error again. For more information about Device Manager, refer to another. The tabs that seem to work. If the error recurs...
... the Lock button in "Installing a memory module" on page 55. 4 Reinstall the memory module, following the instructions in the lower-right part of the Start menu. This tab also provides options for updating the driver or rolling back the driver in the dialog box vary from one memory module installed for the error again. For more information about Device Manager, refer to another. The tabs that seem to work. If the error recurs...
User Guide
Page 185
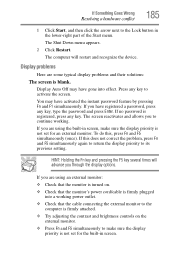
... working power outlet. ❖ Check that the cable connecting the external monitor to the computer is firmly attached. ❖ Try adjusting the contrast and brightness controls on . ❖ Check that the monitor's power cord/cable is firmly plugged into effect. If Something Goes Wrong Resolving a hardware conflict 185 1 Click Start, and then click the arrow next to the Lock button in screen, make sure the display priority is not set...
... working power outlet. ❖ Check that the cable connecting the external monitor to the computer is firmly attached. ❖ Try adjusting the contrast and brightness controls on . ❖ Check that the monitor's power cord/cable is firmly plugged into effect. If Something Goes Wrong Resolving a hardware conflict 185 1 Click Start, and then click the arrow next to the Lock button in screen, make sure the display priority is not set...

User Guide
Page 195
...'s documentation and the modem manual for networking problems, specifically wireless (Wi-Fi®) networking. Connect a telephone handset to the line to the same COM port. Modem problems (Available on certain models) This section lists common modem problems. The modem will print. It should be busy or off line. Wireless networking problems NOTE This section provides general troubleshooting tips for information on , set up properly but still does...
...'s documentation and the modem manual for networking problems, specifically wireless (Wi-Fi®) networking. Connect a telephone handset to the line to the same COM port. Modem problems (Available on certain models) This section lists common modem problems. The modem will print. It should be busy or off line. Wireless networking problems NOTE This section provides general troubleshooting tips for information on , set up properly but still does...
User Guide
Page 233
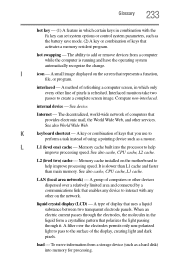
... memory. 233 Glossary hot key - (1) A feature in which only every other services. interlaced - Interlaced monitors take two passes to add or remove devices from a storage device (such as a mouse. Internet - See also World Wide Web. See also cache, CPU cache, L1 cache. It is running and have the operating system automatically recognize the change. LAN (local area network) - A type of the display, creating light and dark pixels. A small image displayed...
... memory. 233 Glossary hot key - (1) A feature in which only every other services. interlaced - Interlaced monitors take two passes to add or remove devices from a storage device (such as a mouse. Internet - See also World Wide Web. See also cache, CPU cache, L1 cache. It is running and have the operating system automatically recognize the change. LAN (local area network) - A type of the display, creating light and dark pixels. A small image displayed...
User Guide
Page 239
... 80 battery changing 113 charge indicator light 46, 107 charge not lasting 184 charging 44, 46 conserving power 110 disposal 117 low charge 109 monitoring power 46, 107 not charging 183 notification 110 power plan 215 power plan hot key 112 real-time clock (RTC) 104 removing 113 BIOS Setup see Toshiba Hardware Setup Bridge Media Adapter inserting memory media 135 removing memory media 136 button power 48 start 122 C CD creating 100 playing an audio 99 CD, using 93 character keys 81 charging the battery 46 checking device...
... 80 battery changing 113 charge indicator light 46, 107 charge not lasting 184 charging 44, 46 conserving power 110 disposal 117 low charge 109 monitoring power 46, 107 not charging 183 notification 110 power plan 215 power plan hot key 112 real-time clock (RTC) 104 removing 113 BIOS Setup see Toshiba Hardware Setup Bridge Media Adapter inserting memory media 135 removing memory media 136 button power 48 start 122 C CD creating 100 playing an audio 99 CD, using 93 character keys 81 charging the battery 46 checking device...
User Guide
Page 240
... connecting to a power source 44 connection set up 126 control buttons 58 Ctrl keys 82 D desktop creating new icon 121 major features 121 desktop exploration 120 desktop icons 121 Device Manager 181 checking properties 181 devices keyboard 64 mouse 64 Disk Defragmenter 188 disk drive corrupted/damaged data files 188 missing files/trouble accessing a disk 187 running slow 188 diskette drive cannot insert a diskette 188 cannot read a diskette 188 connecting 66 external, connecting 66 display...
... connecting to a power source 44 connection set up 126 control buttons 58 Ctrl keys 82 D desktop creating new icon 121 major features 121 desktop exploration 120 desktop icons 121 Device Manager 181 checking properties 181 devices keyboard 64 mouse 64 Disk Defragmenter 188 disk drive corrupted/damaged data files 188 missing files/trouble accessing a disk 187 running slow 188 diskette drive cannot insert a diskette 188 cannot read a diskette 188 connecting 66 external, connecting 66 display...
User Guide
Page 241
... Support Windows® operating system 180 Hibernation mode 67 configuring 71 starting again from 73 hot key display brightness 219 display modes 218 Hibernation mode 217 keyboard overlays 223 password security 214 power plan 215 Sleep mode 216 volume mute 213 zooming 223 Hot Key Cards 208 hot key power plan 112 http 128 I i.LINK port 137 icon 121 desktop 121 Internet Explorer 121 moving to desktop 121 recycle bin 121 safety 37 installation memory module 49 installing memory modules 49 mouse 64 instant passwords, using...
... Support Windows® operating system 180 Hibernation mode 67 configuring 71 starting again from 73 hot key display brightness 219 display modes 218 Hibernation mode 217 keyboard overlays 223 password security 214 power plan 215 Sleep mode 216 volume mute 213 zooming 223 Hot Key Cards 208 hot key power plan 112 http 128 I i.LINK port 137 icon 121 desktop 121 Internet Explorer 121 moving to desktop 121 recycle bin 121 safety 37 installation memory module 49 installing memory modules 49 mouse 64 instant passwords, using...
User Guide
Page 242
... hot keys 223 not working 176 overlay keys 83 special Windows® keys 82 troubleshooting 184 using 81 keyboard, external 64 keyboard, full-size 81 L lock computer, using 77 M main battery removing 113 memory adding 49 problem solving 182 removing expansion slot cover 51 memory module inserting 52 installation 49 removing 56 microphone 130 modem connecting to telephone line 124 determining COM port 123 problem solving 195 resetting port to default settings 123 upgrading 123 monitor 58 connecting 59, 62 not working 185 mouse installing 64 serial 64 mouse utility 153 N network accessing...
... hot keys 223 not working 176 overlay keys 83 special Windows® keys 82 troubleshooting 184 using 81 keyboard, external 64 keyboard, full-size 81 L lock computer, using 77 M main battery removing 113 memory adding 49 problem solving 182 removing expansion slot cover 51 memory module inserting 52 installation 49 removing 56 microphone 130 modem connecting to telephone line 124 determining COM port 123 problem solving 195 resetting port to default settings 123 upgrading 123 monitor 58 connecting 59, 62 not working 185 mouse installing 64 serial 64 mouse utility 153 N network accessing...
User Guide
Page 243
... turning on 48 power button 48 power plan hot key 112 power plans 111 power source 44 connecting 45 powering down using Hibernation 71 using Shut Down 69 using Sleep 73 precautions 40 primary button 58 printer connecting 64 problem solving 194 printing a file 88 problem solving AC power 183 accessing disk drives 176 battery charge does not last 184 battery not charging 183 cannot insert diskette in drive 188 cannot read a diskette 188 changing display properties 186 checking device...
... turning on 48 power button 48 power plan hot key 112 power plans 111 power source 44 connecting 45 powering down using Hibernation 71 using Shut Down 69 using Sleep 73 precautions 40 primary button 58 printer connecting 64 problem solving 194 printing a file 88 problem solving AC power 183 accessing disk drives 176 battery charge does not last 184 battery not charging 183 cannot insert diskette in drive 188 cannot read a diskette 188 changing display properties 186 checking device...
User Guide
Page 244
... S-video port cable selection 59 T Taskbar 122 telephone line connecting to modem 124 television connecting 59 Toshiba registering computer 43 worldwide offices 206 TOSHIBA Assist 139 Toshiba Hardware Setup 154 Toshiba online resources 102 Toshiba utilities 138 traveling tips 119 troubleshooting DVD player general problems 198 external keyboard 184 keyboard 184 keypad overlay 184 optical drive 188 turning on the computer 48 turning on the power 48 U user password, disabling 147 user password, setting 146 using a file extension 88 V video cables 59 video display device connecting...
... S-video port cable selection 59 T Taskbar 122 telephone line connecting to modem 124 television connecting 59 Toshiba registering computer 43 worldwide offices 206 TOSHIBA Assist 139 Toshiba Hardware Setup 154 Toshiba online resources 102 Toshiba utilities 138 traveling tips 119 troubleshooting DVD player general problems 198 external keyboard 184 keyboard 184 keypad overlay 184 optical drive 188 turning on the computer 48 turning on the power 48 U user password, disabling 147 user password, setting 146 using a file extension 88 V video cables 59 video display device connecting...


