User Guide
Page 5
... this equipment, for repair or limited warranty information, please contact Toshiba Corporation, Toshiba America Information Systems, Inc. If Problems Arise If this change. Connection to party line service is to permanently disconnect your right to send any message unless such message clearly contains in their equipment, operations or procedures. If these changes might affect your service or the operation of your equipment...
... this equipment, for repair or limited warranty information, please contact Toshiba Corporation, Toshiba America Information Systems, Inc. If Problems Arise If this change. Connection to party line service is to permanently disconnect your right to send any message unless such message clearly contains in their equipment, operations or procedures. If these changes might affect your service or the operation of your equipment...

User Guide
Page 28
...54 Opening the display panel 54 Your computer's features and specifications ....55 Turning on the power 56 Adding memory (optional 57 Installing a memory module 57 Removing a memory module 63 Checking total memory 65 Using the Dual Mode Pad 65 Using external display devices 68 Connecting the display device 69 Directing the display output when you turn on the computer 73 Adjusting the quality of the external display......75 Connecting External AV Input Devices 75 Using an external keyboard 78 Using a mouse 78 Connecting a printer 78 Setting up a printer 79 Connecting an optional...
...54 Opening the display panel 54 Your computer's features and specifications ....55 Turning on the power 56 Adding memory (optional 57 Installing a memory module 57 Removing a memory module 63 Checking total memory 65 Using the Dual Mode Pad 65 Using external display devices 68 Connecting the display device 69 Directing the display output when you turn on the computer 73 Adjusting the quality of the external display......75 Connecting External AV Input Devices 75 Using an external keyboard 78 Using a mouse 78 Connecting a printer 78 Setting up a printer 79 Connecting an optional...

User Guide
Page 49
..., or to remove a plug from a socket. Never pull on a power cord/cable to charge the computer's battery. Always grasp the plug directly. Failure to follow this instruction may want to: ❖ Add more memory (see "Adding memory (optional)" on page 57) ❖ Connect a mouse (see "Using a mouse" on page 78) ❖ Connect a full-size keyboard (see "Using an external keyboard" on page 78) ❖ Connect an external monitor (see "Using external display devices" on page...
..., or to remove a plug from a socket. Never pull on a power cord/cable to charge the computer's battery. Always grasp the plug directly. Failure to follow this instruction may want to: ❖ Add more memory (see "Adding memory (optional)" on page 57) ❖ Connect a mouse (see "Using a mouse" on page 78) ❖ Connect a full-size keyboard (see "Using an external keyboard" on page 78) ❖ Connect an external monitor (see "Using external display devices" on page...

User Guide
Page 58
.... 4 Remove the main battery. Before you install or remove a memory module while the computer is on, begin at step 1; The Turn off the computer using the Start menu. For information on removing the main battery, see "Removing the battery from the computer" on the system). Memory module slot cover Front of computer (Sample Illustration) Locating the memory module slot cover The operating system turns off the computer. 3 Unplug and remove any cables connected to step 3. 1 Click Start, and then Turn...
.... 4 Remove the main battery. Before you install or remove a memory module while the computer is on, begin at step 1; The Turn off the computer using the Start menu. For information on removing the main battery, see "Removing the battery from the computer" on the system). Memory module slot cover Front of computer (Sample Illustration) Locating the memory module slot cover The operating system turns off the computer. 3 Unplug and remove any cables connected to step 3. 1 Click Start, and then Turn...

User Guide
Page 59
... handle the module, touch a grounded metal surface to discharge any static electricity you can damage the memory module. Static electricity can retrieve it later. Front of computer (Sample Illustration) Unscrewing the memory module slot cover 7 Remove the memory module slot cover. 8 Place the cover in a safe place so that secures the memory module slot cover. Getting Started Adding memory (optional) 59 6 Using a small Phillips screwdriver, loosen the captive screw that you may cause memory access problems.
... handle the module, touch a grounded metal surface to discharge any static electricity you can damage the memory module. Static electricity can retrieve it later. Front of computer (Sample Illustration) Unscrewing the memory module slot cover 7 Remove the memory module slot cover. 8 Place the cover in a safe place so that secures the memory module slot cover. Getting Started Adding memory (optional) 59 6 Using a small Phillips screwdriver, loosen the captive screw that you may cause memory access problems.

User Guide
Page 62
... a charged battery" on page 129. 16 Turn the computer right side up. 17 Reconnect the cables. 18 Restart the computer. 62 Getting Started Adding memory (optional) Do not force the memory module into the socket and level when secured in place. The memory module should be completely inserted into position. Memory slots Front of computer (Sample Illustration) Inserting the memory module into the slot 14 Replace the memory module slot cover...
... a charged battery" on page 129. 16 Turn the computer right side up. 17 Reconnect the cables. 18 Restart the computer. 62 Getting Started Adding memory (optional) Do not force the memory module into the socket and level when secured in place. The memory module should be completely inserted into position. Memory slots Front of computer (Sample Illustration) Inserting the memory module into the slot 14 Replace the memory module slot cover...

User Guide
Page 64
... on inserting the main battery, see "Inserting a charged battery" on top of the slot. NOTE If your system has the memory modules stacked on page 129. 6 Turn the computer right side up slightly. 64 Getting Started Adding memory (optional) 2 Pull the latches away from the memory module. The memory module pops up . 7 Reconnect the cables. Memory slots Front of computer (Sample Illustration) Removing the memory module 4 Replace the memory module slot cover and secure it...
... on inserting the main battery, see "Inserting a charged battery" on top of the slot. NOTE If your system has the memory modules stacked on page 129. 6 Turn the computer right side up slightly. 64 Getting Started Adding memory (optional) 2 Pull the latches away from the memory module. The memory module pops up . 7 Reconnect the cables. Memory slots Front of computer (Sample Illustration) Removing the memory module 4 Replace the memory module slot cover and secure it...

User Guide
Page 65
... remove a memory module, you can be configured to adjust the system volume quickly and easily. To do this: 1 Click Start, Control Panel, Performance and Maintenance, and then System. 2 The General tab view automatically appears and shows total memory. Using the Dual Mode Pad The Dual Mode feature allows you to work. TECHNICAL NOTE: You must have at least one memory module installed for the computer to switch between Cursor Mode (the default mode) and Button Mode...
... remove a memory module, you can be configured to adjust the system volume quickly and easily. To do this: 1 Click Start, Control Panel, Performance and Maintenance, and then System. 2 The General tab view automatically appears and shows total memory. Using the Dual Mode Pad The Dual Mode feature allows you to work. TECHNICAL NOTE: You must have at least one memory module installed for the computer to switch between Cursor Mode (the default mode) and Button Mode...

User Guide
Page 69
... a video cable, then refer to "Connecting a standard television, projector, or VCR/DVD player" on page 71. HINT: Toshiba recommends using a cable no longer than 20 feet (approximately 6 meters). Getting Started Using external display devices 69 Connecting the display device If you are connecting a television or other video display device to the computer's S-Video Out port, first refer to "Selecting video cables" on page 69 for guidelines on choosing a video cable, then refer to "Connecting an external monitor or...
... a video cable, then refer to "Connecting a standard television, projector, or VCR/DVD player" on page 71. HINT: Toshiba recommends using a cable no longer than 20 feet (approximately 6 meters). Getting Started Using external display devices 69 Connecting the display device If you are connecting a television or other video display device to the computer's S-Video Out port, first refer to "Selecting video cables" on page 69 for guidelines on choosing a video cable, then refer to "Connecting an external monitor or...
User Guide
Page 220
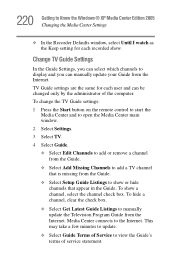
... Guide. To hide a channel, clear the check box. ❖ Select Get Latest Guide Listings to manually update the Television Program Guide from the Guide. ❖ Select Setup Guide Listings to add a TV channel that is missing from the Internet. This may take a few minutes to update. ❖ Select Guide Terms of Service to display and you can manually update your Guide from the Internet. TV Guide settings are the same for each user...
... Guide. To hide a channel, clear the check box. ❖ Select Get Latest Guide Listings to manually update the Television Program Guide from the Guide. ❖ Select Setup Guide Listings to add a TV channel that is missing from the Internet. This may take a few minutes to update. ❖ Select Guide Terms of Service to display and you can manually update your Guide from the Internet. TV Guide settings are the same for each user...
User Guide
Page 261
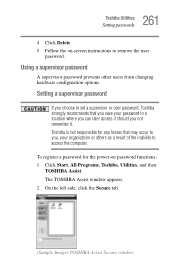
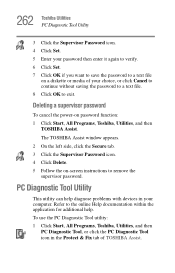
... you choose to set a supervisor or user password, Toshiba strongly recommends that may occur to you, your password in a location where you can later access it should you save your organization or others as a result of the inability to remove the user password. 261 Toshiba Utilities Setting passwords 4 Click Delete. 5 Follow the on password functions: 1 Click Start, All Programs, Toshiba, Utilities, and then TOSHIBA Assist. Using a supervisor password A supervisor password prevents other users from changing hardware configuration options.
... you choose to set a supervisor or user password, Toshiba strongly recommends that may occur to you, your password in a location where you can later access it should you save your organization or others as a result of the inability to remove the user password. 261 Toshiba Utilities Setting passwords 4 Click Delete. 5 Follow the on password functions: 1 Click Start, All Programs, Toshiba, Utilities, and then TOSHIBA Assist. Using a supervisor password A supervisor password prevents other users from changing hardware configuration options.
User Guide
Page 262
Deleting a supervisor password To cancel the power-on -screen instructions to remove the supervisor password. Refer to the online Help documentation within the application for additional help diagnose problems with devices in the Protect & Fix tab of your computer. PC Diagnostic Tool Utility This utility can help . To use the PC Diagnostic Tool utility: 1 Click Start, All Programs, Toshiba, Utilities, and then PC Diagnostic Tool, or click...
Deleting a supervisor password To cancel the power-on -screen instructions to remove the supervisor password. Refer to the online Help documentation within the application for additional help diagnose problems with devices in the Protect & Fix tab of your computer. PC Diagnostic Tool Utility This utility can help . To use the PC Diagnostic Tool utility: 1 Click Start, All Programs, Toshiba, Utilities, and then PC Diagnostic Tool, or click...
User Guide
Page 299
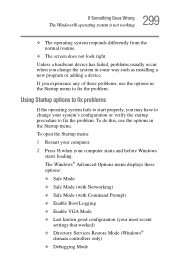
... to change the system in some way such as installing a new program or adding a device. Unless a hardware device has failed, problems usually occur when you experience any of these options: ❖ Safe Mode ❖ Safe Mode (with Networking) ❖ Safe Mode (with Command Prompt) ❖ Enable Boot Logging ❖ Enable VGA Mode ❖ Last known good configuration (your most recent settings that worked) ❖ Directory Services Restore Mode (Windows® domain controllers only) ❖ Debugging Mode To open the Startup menu...
... to change the system in some way such as installing a new program or adding a device. Unless a hardware device has failed, problems usually occur when you experience any of these options: ❖ Safe Mode ❖ Safe Mode (with Networking) ❖ Safe Mode (with Command Prompt) ❖ Enable Boot Logging ❖ Enable VGA Mode ❖ Last known good configuration (your most recent settings that worked) ❖ Directory Services Restore Mode (Windows® domain controllers only) ❖ Debugging Mode To open the Startup menu...

User Guide
Page 309
... external keyboard in screen, make of the keys. Display problems Here are using a different make sure the display priority is not set for an external monitor. Press any key, type the password and press Enter. The screen reactivates and allows you have connected an external keyboard and the operating system displays one or more keyboard error messages. 309 If Something Goes Wrong Resolving a hardware conflict keyboard. If you to any key. You have registered a password, press any key to activate the screen...
... external keyboard in screen, make of the keys. Display problems Here are using a different make sure the display priority is not set for an external monitor. Press any key, type the password and press Enter. The screen reactivates and allows you have connected an external keyboard and the operating system displays one or more keyboard error messages. 309 If Something Goes Wrong Resolving a hardware conflict keyboard. If you to any key. You have registered a password, press any key to activate the screen...

User Guide
Page 387
... up files 94 battery alarms 123 changing 127 charge indicator light 52, 120 charge not lasting 308 charging 49, 53 conserving power 124 disposal 133 low charge 123 monitoring power 52, 120 not charging 307 power profile 341 power profile hot key 126 real-time clock (RTC) 117 removing 127 BIOS Setup see Toshiba Hardware Setup Bridge Media Adapter inserting memory media 154 removing memory media 155 button power 56 start 137 C CD creating 111 playing an audio 110 CD, using 105 channels DMA 302...
... up files 94 battery alarms 123 changing 127 charge indicator light 52, 120 charge not lasting 308 charging 49, 53 conserving power 124 disposal 133 low charge 123 monitoring power 52, 120 not charging 307 power profile 341 power profile hot key 126 real-time clock (RTC) 117 removing 127 BIOS Setup see Toshiba Hardware Setup Bridge Media Adapter inserting memory media 154 removing memory media 155 button power 56 start 137 C CD creating 111 playing an audio 110 CD, using 105 channels DMA 302...

User Guide
Page 388
... connecting to a power source 49 connection set up 142 Ctrl keys 96 D desktop creating new icon 136 major features 136 desktop exploration 135 desktop icons 136 Device Manager 304 checking properties 304 disabling a device 304 devices keyboard 78 mouse 78 Disk Defragmenter 313 disk drive corrupted/damaged data files 313 missing files/trouble accessing a disk 312 running slow 313 diskette drive cannot insert a diskette 313 cannot read a diskette 314 connecting 80 external, connecting 80 display...
... connecting to a power source 49 connection set up 142 Ctrl keys 96 D desktop creating new icon 136 major features 136 desktop exploration 135 desktop icons 136 Device Manager 304 checking properties 304 disabling a device 304 devices keyboard 78 mouse 78 Disk Defragmenter 313 disk drive corrupted/damaged data files 313 missing files/trouble accessing a disk 312 running slow 313 diskette drive cannot insert a diskette 313 cannot read a diskette 314 connecting 80 external, connecting 80 display...

User Guide
Page 389
... Support Windows XP 301 Hibernation mode 82 configuring 87 starting again from 88 hot key display brightness 344 display modes 343 Hibernation mode 342 keyboard overlays 344, 346 password security 339 power profile 341 Standby mode 341 volume mute 338 zooming 345 hot key power profile 126 hot key utility 268 http 144 I i.LINK port 156 icon 136, 137 desktop 137 Internet Explorer 137 moving to desktop 136 recycle bin 137 safety 39 Windows Media Player 137 installation memory module...
... Support Windows XP 301 Hibernation mode 82 configuring 87 starting again from 88 hot key display brightness 344 display modes 343 Hibernation mode 342 keyboard overlays 344, 346 password security 339 power profile 341 Standby mode 341 volume mute 338 zooming 345 hot key power profile 126 hot key utility 268 http 144 I i.LINK port 156 icon 136, 137 desktop 137 Internet Explorer 137 moving to desktop 136 recycle bin 137 safety 39 Windows Media Player 137 installation memory module...

User Guide
Page 390
... Windows special keys 97 keyboard, external 78 keyboard, full-size 95 L lock computer, using 92 M main battery removing 127 memory adding 57 problem solving 306 removing expansion slot cover 59 memory module inserting 60 installation 57 removing 64 microphone 147 modem connecting to telephone line 140 determining COM port 139 problem solving 320 resetting port to default settings 139 upgrading 139 monitor 68 connecting 69, 73 not working 310 mouse installing 78 serial 78 mouse utility 272 N network accessing 141 Dial-Up Networking Wizard 141 networking wireless 143 O opening the display panel...
... Windows special keys 97 keyboard, external 78 keyboard, full-size 95 L lock computer, using 92 M main battery removing 127 memory adding 57 problem solving 306 removing expansion slot cover 59 memory module inserting 60 installation 57 removing 64 microphone 147 modem connecting to telephone line 140 determining COM port 139 problem solving 320 resetting port to default settings 139 upgrading 139 monitor 68 connecting 69, 73 not working 310 mouse installing 78 serial 78 mouse utility 272 N network accessing 141 Dial-Up Networking Wizard 141 networking wireless 143 O opening the display panel...
User Guide
Page 391
... keys 97 P password deleting a supervisor 262 disabling a user 260 supervisor set up 261 types 259 user set up 260 passwords instant, using 259 setting 259 PC Card checklist 317 CIS (Card Information Structure) 316 computer stops working 317 configuring 152 errors 318 hot swapping fails 318 inserting 150 not recognized 318 problem solving 316, 317 removing 151 setting up 152 Plug and Play 303 port COM 139 Ethernet LAN 142 RGB 68 S-video...
... keys 97 P password deleting a supervisor 262 disabling a user 260 supervisor set up 261 types 259 user set up 260 passwords instant, using 259 setting 259 PC Card checklist 317 CIS (Card Information Structure) 316 computer stops working 317 configuring 152 errors 318 hot swapping fails 318 inserting 150 not recognized 318 problem solving 316, 317 removing 151 setting up 152 Plug and Play 303 port COM 139 Ethernet LAN 142 RGB 68 S-video...
User Guide
Page 393
... troubleshooting DVD player general problems 324 external keyboard 309 keyboard 308 keypad overlay 308 optical drive 314 turning on the computer 56 turning on the power 56 TV antenna port 75 U user password, disabling 260 user password, set up 260 using a file extension 103 V video cables 69 video display device connecting 69 W warranty limited warranty 41 Web 144 Web sites 335 Wi-Fi wireless networking 143 Windows Explorer 99 Windows Media Player 110 Windows Media Player icon 137 Windows operating system desktop 135 Windows Start menu...
... troubleshooting DVD player general problems 324 external keyboard 309 keyboard 308 keypad overlay 308 optical drive 314 turning on the computer 56 turning on the power 56 TV antenna port 75 U user password, disabling 260 user password, set up 260 using a file extension 103 V video cables 69 video display device connecting 69 W warranty limited warranty 41 Web 144 Web sites 335 Wi-Fi wireless networking 143 Windows Explorer 99 Windows Media Player 110 Windows Media Player icon 137 Windows operating system desktop 135 Windows Start menu...


