
User Guide
Page 14
...Toshiba's energy-saver design 61 Power management 61 Charging the RTC battery 62 Power Plans 63 Using the eco power plan 64 Chapter 4: Exploring Your Computer's Features.... 65 Exploring the Start screen 65 Charms 66 Tiles 67 Exploring the desktop 67 Finding your way around the desktop.......... 72 Using the Web Camera 72 Using the Memory card reader 73 Inserting memory media 73 Removing memory media 74 Chapter 5: Utilities 76 Desktop Assist 77 Media & Entertainment 78 Tools & Utilities 79 Support & Recovery 80 eco Utility 81 Password Utility 82 Using a supervisor password 82...
...Toshiba's energy-saver design 61 Power management 61 Charging the RTC battery 62 Power Plans 63 Using the eco power plan 64 Chapter 4: Exploring Your Computer's Features.... 65 Exploring the Start screen 65 Charms 66 Tiles 67 Exploring the desktop 67 Finding your way around the desktop.......... 72 Using the Web Camera 72 Using the Memory card reader 73 Inserting memory media 73 Removing memory media 74 Chapter 5: Utilities 76 Desktop Assist 77 Media & Entertainment 78 Tools & Utilities 79 Support & Recovery 80 eco Utility 81 Password Utility 82 Using a supervisor password 82...

User Guide
Page 29
... site at register.toshiba.com: Type in the requested information and complete the registration process. 2 From the Start screen: Type Registration while in the Start screen, locate and complete the registration process. 3 From the Desktop: Move your pointer to the upper-right corner of... the power button before shutting down your computer 1 From the Start or Desktop screen, move your pointer to lose your work. Getting Started Registering your computer with Toshiba 29 Registering your computer with Toshiba Product registration is required. NOTE To register online, an Internet connection is...
... site at register.toshiba.com: Type in the requested information and complete the registration process. 2 From the Start screen: Type Registration while in the Start screen, locate and complete the registration process. 3 From the Desktop: Move your pointer to the upper-right corner of... the power button before shutting down your computer 1 From the Start or Desktop screen, move your pointer to lose your work. Getting Started Registering your computer with Toshiba 29 Registering your computer with Toshiba Product registration is required. NOTE To register online, an Internet connection is...
User Guide
Page 30
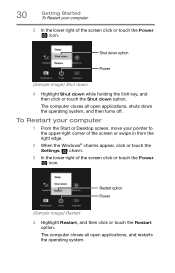
... operating system, and then turns off. The computer closes all open applications, and restarts the operating system. To Restart your computer 1 From the Start or Desktop screen, move your computer 3 In the lower right of the screen click or touch the Power ( ) icon. 30 Getting Started To Restart your pointer to...
... operating system, and then turns off. The computer closes all open applications, and restarts the operating system. To Restart your computer 1 From the Start or Desktop screen, move your computer 3 In the lower right of the screen click or touch the Power ( ) icon. 30 Getting Started To Restart your pointer to...
User Guide
Page 31
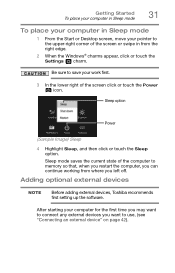
... ( ) icon. Be sure to save your work first. 3 In the lower right of the screen or swipe in Sleep mode 1 From the Start or Desktop screen, move your computer for the first time you may want to connect any external devices you want to memory so that, when you restart... the right edge. 2 When the Windows® charms appear, click or touch the Settings ( ) charm. Adding optional external devices NOTE Before adding external devices, Toshiba recommends first setting up the software. Sleep mode saves the current state of the computer to use, (see "Connecting an external device" on page 42...
... ( ) icon. Be sure to save your work first. 3 In the lower right of the screen or swipe in Sleep mode 1 From the Start or Desktop screen, move your computer for the first time you may want to connect any external devices you want to memory so that, when you restart... the right edge. 2 When the Windows® charms appear, click or touch the Settings ( ) charm. Adding optional external devices NOTE Before adding external devices, Toshiba recommends first setting up the software. Sleep mode saves the current state of the computer to use, (see "Connecting an external device" on page 42...

User Guide
Page 34
...To create recovery media: 1 From the Start screen begin typing Recovery Media Creator and click or touch your selection. The TOSHIBA Recovery Media Creator dialog box displays. (Sample Image) TOSHIBA Recovery Media Creator dialog box 2 Select DVD or USB Flash from the right edge. When the Windows® charms appear... media you want to use. 3 Check the "Information" area of the dialog box to determine the number of DVDs you are in the Desktop, move your pointer to the upper-right corner of storage space required for copying your system's recovery files to USB flash drive(s). In the ...
...To create recovery media: 1 From the Start screen begin typing Recovery Media Creator and click or touch your selection. The TOSHIBA Recovery Media Creator dialog box displays. (Sample Image) TOSHIBA Recovery Media Creator dialog box 2 Select DVD or USB Flash from the right edge. When the Windows® charms appear... media you want to use. 3 Check the "Information" area of the dialog box to determine the number of DVDs you are in the Desktop, move your pointer to the upper-right corner of storage space required for copying your system's recovery files to USB flash drive(s). In the ...

User Guide
Page 37
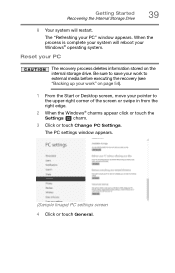
For more information, see "Backing up your work" on your computer's internal storage drive: TECHNICAL NOTE: Your data will be retained. 1 From the Start or Desktop screen, move your pointer to the upper-right corner of your PC), while the computer will be copied into the backup folder. All of the ... stored on page 54. The PC settings window appears. (Sample Image) PC settings screen 4 Click or touch General. Please make a complete back up your data. Toshiba does not guarantee successful data backup.
For more information, see "Backing up your work" on your computer's internal storage drive: TECHNICAL NOTE: Your data will be retained. 1 From the Start or Desktop screen, move your pointer to the upper-right corner of your PC), while the computer will be copied into the backup folder. All of the ... stored on page 54. The PC settings window appears. (Sample Image) PC settings screen 4 Click or touch General. Please make a complete back up your data. Toshiba does not guarantee successful data backup.
User Guide
Page 39
The "Refreshing your PC The recovery process deletes information stored on page 54). 1 From the Start or Desktop screen, move your Windows® operating system. Reset your PC" window appears. The PC settings window appears. (Sample Image) PC settings screen 4 Click or touch ...
The "Refreshing your PC The recovery process deletes information stored on page 54). 1 From the Start or Desktop screen, move your Windows® operating system. Reset your PC" window appears. The PC settings window appears. (Sample Image) PC settings screen 4 Click or touch ...
User Guide
Page 41
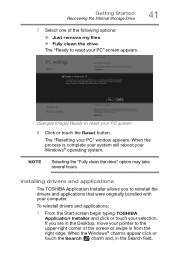
... may take several hours. To reinstall drivers and applications: 1 From the Start screen begin typing TOSHIBA Application Installer and click or touch your computer. Installing drivers and applications The TOSHIBA Application Installer allows you are in the Desktop, move your PC" window appears. If you to reset your Windows® operating system. When...
... may take several hours. To reinstall drivers and applications: 1 From the Start screen begin typing TOSHIBA Application Installer and click or touch your computer. Installing drivers and applications The TOSHIBA Application Installer allows you are in the Desktop, move your PC" window appears. If you to reset your Windows® operating system. When...
User Guide
Page 44
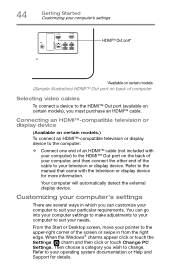
... edge. When the Windows® charms appear click or touch the Settings ( ) charm and then click or touch Change PC Settings. From the Start or Desktop screen, move your pointer to the HDMI™ Out port (available on certain models), you wish to the manual that came with your computer) to...
... edge. When the Windows® charms appear click or touch the Settings ( ) charm and then click or touch Change PC Settings. From the Start or Desktop screen, move your pointer to the HDMI™ Out port (available on certain models), you wish to the manual that came with your computer) to...
User Guide
Page 48
For more information, see "Data and system configuration backup in a safe place. Turning off backing up your desktop setup, during its shutdown procedure. The wireless receiver comes installed on it is reading from the Internet. ❖ Take frequent breaks to put off the ...
For more information, see "Data and system configuration backup in a safe place. Turning off backing up your desktop setup, during its shutdown procedure. The wireless receiver comes installed on it is reading from the Internet. ❖ Take frequent breaks to put off the ...
User Guide
Page 52
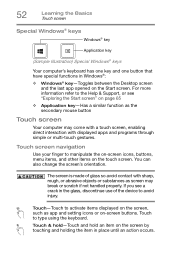
...® keys Your computer's keyboard has one key and one button that have special functions in Windows®: ❖ Windows® key-Toggles between the Desktop screen and the last app opened on the touch screen. Touch screen navigation Use your finger to manipulate the on-screen icons, buttons, menu items...
...® keys Your computer's keyboard has one key and one button that have special functions in Windows®: ❖ Windows® key-Toggles between the Desktop screen and the last app opened on the touch screen. Touch screen navigation Use your finger to manipulate the on-screen icons, buttons, menu items...
User Guide
Page 53
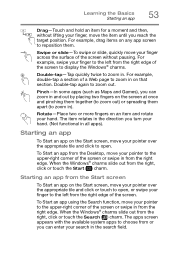
... app using the Search function, move your pointer over the appropriate tile and click to open , or swipe your finger to the left from the Desktop, move the item until you turn your hand. For example, drag items on the Start screen, move your pointer to the upper-right corner of...
... app using the Search function, move your pointer over the appropriate tile and click to open , or swipe your finger to the left from the Desktop, move the item until you turn your hand. For example, drag items on the Start screen, move your pointer to the upper-right corner of...
User Guide
Page 63
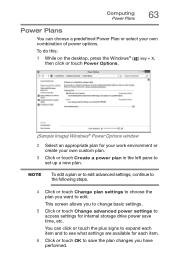
.... 6 Click or touch OK to access settings for your work environment or create your own combination of power options. To do this: 1 While on the desktop, press the Windows® ( ) key + X, then click or touch Power Options. (Sample Image) Windows® Power Options window 2 Select an appropriate plan for internal storage...
.... 6 Click or touch OK to access settings for your work environment or create your own combination of power options. To do this: 1 While on the desktop, press the Windows® ( ) key + X, then click or touch Power Options. (Sample Image) Windows® Power Options window 2 Select an appropriate plan for internal storage...
User Guide
Page 65
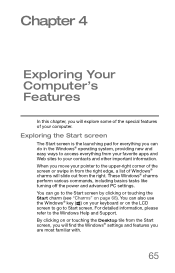
Exploring the Start screen The Start screen is the launching pad for everything from the right. By clicking on or touching the Desktop tile from the Start screen, you will find the Windows® settings and features you move your pointer to the upper-right corner of the ...
Exploring the Start screen The Start screen is the launching pad for everything from the right. By clicking on or touching the Desktop tile from the Start screen, you will find the Windows® settings and features you move your pointer to the upper-right corner of the ...
User Guide
Page 67
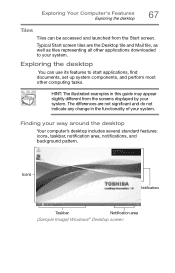
...to start applications, find documents, set up system components, and perform most other applications downloaded to your way around the desktop Your computer's desktop includes several standard features: icons, taskbar, notification area, notifications, and background pattern. Typical Start screen tiles are not ...indicate any change in this guide may appear slightly different from the Start screen. Finding your system. The differences are the Desktop tile and Mail tile, as well as tiles representing all other computing tasks. HINT: The illustrated examples in the functionality...
...to start applications, find documents, set up system components, and perform most other applications downloaded to your way around the desktop Your computer's desktop includes several standard features: icons, taskbar, notification area, notifications, and background pattern. Typical Start screen tiles are not ...indicate any change in this guide may appear slightly different from the Start screen. Finding your system. The differences are the Desktop tile and Mail tile, as well as tiles representing all other computing tasks. HINT: The illustrated examples in the functionality...
User Guide
Page 68
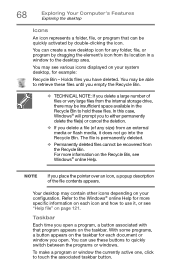
...❖ If you open a program, a button associated with that can be recovered from its location in the Recycle Bin to the desktop area. Your desktop may see Windows® online Help. Holds files you place the pointer over an icon, a popup description of files or very large...contain other icons depending on the Recycle Bin, see various icons displayed on your configuration. You can create a new desktop icon for more information on your system desktop, for each icon and how to touch the associated taskbar button. Taskbar Each time you delete a large number of...
...❖ If you open a program, a button associated with that can be recovered from its location in the Recycle Bin to the desktop area. Your desktop may see Windows® online Help. Holds files you place the pointer over an icon, a popup description of files or very large...contain other icons depending on the Recycle Bin, see various icons displayed on your configuration. You can create a new desktop icon for more information on your system desktop, for each icon and how to touch the associated taskbar button. Taskbar Each time you delete a large number of...
User Guide
Page 71
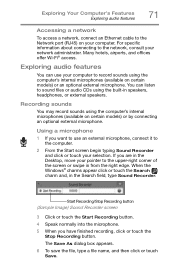
... the Start screen begin typing Sound Recorder and click or touch your pointer to the upper-right corner of the screen or swipe in the Desktop, move your selection. If you want to use your computer to record sounds using the computer's internal microphones (available on certain models) or by connecting...
... the Start screen begin typing Sound Recorder and click or touch your pointer to the upper-right corner of the screen or swipe in the Desktop, move your selection. If you want to use your computer to record sounds using the computer's internal microphones (available on certain models) or by connecting...
User Guide
Page 74
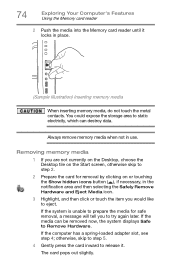
... step 5. 4 Gently press the card inward to Remove Hardware. The card pops out slightly. Removing memory media 1 If you are not currently on the Desktop, choose the Desktop tile on the Start screen, otherwise skip to step 2. 2 Prepare the card for safe removal, a message will tell you would like to try again...
... step 5. 4 Gently press the card inward to Remove Hardware. The card pops out slightly. Removing memory media 1 If you are not currently on the Desktop, choose the Desktop tile on the Start screen, otherwise skip to step 2. 2 Prepare the card for safe removal, a message will tell you would like to try again...
User Guide
Page 76
... utilities designed to help you to best meet your system. ❖ Desktop Assist ❖ eco Utility® ❖ Supervisor password ❖ User password ❖ System Settings ❖ Sleep Utilities ❖ TOSHIBA function key ❖ Recovery Media Creator ❖ Service Station ❖ TOSHIBA Application Installer 76 Together, these allow you to reconfigure your system...
... utilities designed to help you to best meet your system. ❖ Desktop Assist ❖ eco Utility® ❖ Supervisor password ❖ User password ❖ System Settings ❖ Sleep Utilities ❖ TOSHIBA function key ❖ Recovery Media Creator ❖ Service Station ❖ TOSHIBA Application Installer 76 Together, these allow you to reconfigure your system...
User Guide
Page 77
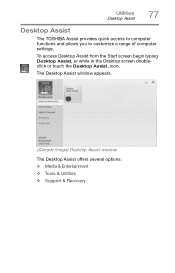
To access Desktop Assist from the Start screen begin typing Desktop Assist, or while in the Desktop screen doubleclick or touch the Desktop Assist, icon. Utilities Desktop Assist 77 Desktop Assist The TOSHIBA Assist provides quick access to computer functions and allows you to customize a range of computer settings. The Desktop Assist window appears. (Sample Image) Desktop Assist window The Desktop Assist offers several options: ❖ Media & Entertainment ❖ Tools & Utilities ❖ Support & Recovery
To access Desktop Assist from the Start screen begin typing Desktop Assist, or while in the Desktop screen doubleclick or touch the Desktop Assist, icon. Utilities Desktop Assist 77 Desktop Assist The TOSHIBA Assist provides quick access to computer functions and allows you to customize a range of computer settings. The Desktop Assist window appears. (Sample Image) Desktop Assist window The Desktop Assist offers several options: ❖ Media & Entertainment ❖ Tools & Utilities ❖ Support & Recovery
