
User Guide
Page 9
... Taking Photos 25 Using Digital Zoom 25 Using the Anti-Glare function 25 Using Underwater Mode 26 Menu options/operations 26 Video Setting options 27 Photo Settings 29 Effects 31 Settings 32 Chapter 4: Playback Mode 34 Button functions 34 LCD touch screen ...Playback mode operations 36 Video Playback 36 Photo Playback 37 Delete Files in Playback Mode 37 Chapter 5: Viewing Photos and Videos on a Computer 38 Installing bundled software 38 Transferring photos and videos to a computer .......39 Chapter 6: Uploading Video and Photo Files to the Internet 40 CAMILEO® Uploader 41 ...
... Taking Photos 25 Using Digital Zoom 25 Using the Anti-Glare function 25 Using Underwater Mode 26 Menu options/operations 26 Video Setting options 27 Photo Settings 29 Effects 31 Settings 32 Chapter 4: Playback Mode 34 Button functions 34 LCD touch screen ...Playback mode operations 36 Video Playback 36 Photo Playback 37 Delete Files in Playback Mode 37 Chapter 5: Viewing Photos and Videos on a Computer 38 Installing bundled software 38 Transferring photos and videos to a computer .......39 Chapter 6: Uploading Video and Photo Files to the Internet 40 CAMILEO® Uploader 41 ...

User Guide
Page 10
10 Contents Chapter 7: Webcam Mode 45 Chapter 8: Viewing Photos and Videos on TV 46 Connecting to a high-definition 16:9 (wide) TV.......46 Chapter 9: Specifications 48 Operating Environment Conditions 49 Chapter 10: Troubleshooting 50 Chapter 11: Other Information 53 Toshiba Support 53 Before you call 53 Contacting Toshiba 54 Toshiba's technical support web site 54 Toshiba voice contact 54 Warranty 54 Online Warranty Information 54 Warranty Service 54
10 Contents Chapter 7: Webcam Mode 45 Chapter 8: Viewing Photos and Videos on TV 46 Connecting to a high-definition 16:9 (wide) TV.......46 Chapter 9: Specifications 48 Operating Environment Conditions 49 Chapter 10: Troubleshooting 50 Chapter 11: Other Information 53 Toshiba Support 53 Before you call 53 Contacting Toshiba 54 Toshiba's technical support web site 54 Toshiba voice contact 54 Warranty 54 Online Warranty Information 54 Warranty Service 54

User Guide
Page 11
NOTE The camcorder has a small amount of your CAMILEO® BW20 camcorder are: ❖ High quality images up to record multiple moments in memory, which allows for extended video recording with a 5 megapixel sensor that can take H.264 format videos, which is usable for water activities. ❖ Various effects options, such as Time Lapse and Slow...
NOTE The camcorder has a small amount of your CAMILEO® BW20 camcorder are: ❖ High quality images up to record multiple moments in memory, which allows for extended video recording with a 5 megapixel sensor that can take H.264 format videos, which is usable for water activities. ❖ Various effects options, such as Time Lapse and Slow...

User Guide
Page 12
Check the components Unpack the box and make sure all items listed below are included: (Sample Illustration) Components NOTE Be sure to Know Your Camcorder Overview NOTE Install the bundled software application for viewing the videos correctly on the lens before using. 12 Getting to remove the protective film on a PC.
Check the components Unpack the box and make sure all items listed below are included: (Sample Illustration) Components NOTE Be sure to Know Your Camcorder Overview NOTE Install the bundled software application for viewing the videos correctly on the lens before using. 12 Getting to remove the protective film on a PC.

User Guide
Page 13
... and/or bright dots (white, red, blue or green) may appear on the LCD touch screen. up to 16' (5 meters) ❖ The camcorder can record videos or photos under water. ❖ The camcorder is not guaranteed to 5' (1.5 meters), and dustproof.
... and/or bright dots (white, red, blue or green) may appear on the LCD touch screen. up to 16' (5 meters) ❖ The camcorder can record videos or photos under water. ❖ The camcorder is not guaranteed to 5' (1.5 meters), and dustproof.

User Guide
Page 18
NOTE When a Micro SD™ Card is caught in memory. is inserted, photos and videos are saved onto the Micro SD™ Card rather than in the built-in the rubber seal. Remove moisture from all data is formatted. When ...
NOTE When a Micro SD™ Card is caught in memory. is inserted, photos and videos are saved onto the Micro SD™ Card rather than in the built-in the rubber seal. Remove moisture from all data is formatted. When ...

User Guide
Page 19
... cover, make sure that no longer be waterproof. To take a photo: In Photo Mode, press the Record/OK ( ) button to begin recording video. To record video: Press the Record/OK ( ) button to take a photo. To resume recording, press it again to immersion in the rubber seal. See the ...on the camcorder, press the Power ( ) button for approximately one second. To view stored videos and photos: Press the Playback ( ) button to switch to pause recording. To pause recording video: Press the Right button to Playback mode. Getting Started 19 Turning the camcorder on and getting...
... cover, make sure that no longer be waterproof. To take a photo: In Photo Mode, press the Record/OK ( ) button to begin recording video. To record video: Press the Record/OK ( ) button to take a photo. To resume recording, press it again to immersion in the rubber seal. See the ...on the camcorder, press the Power ( ) button for approximately one second. To view stored videos and photos: Press the Playback ( ) button to switch to pause recording. To pause recording video: Press the Right button to Playback mode. Getting Started 19 Turning the camcorder on and getting...

User Guide
Page 22
... 1 In preview mode, press to toggle ANTI GLARE ON / ANTI GLARE OFF. 2 While recording video, press to view selected videos 4 Confirm the menu selection. Mode Switch between menu option items. 1 In Video mode, press to take a photo. 3 In Playback mode, press to pause the recording. Menu... delete photos. Press again to stop recording. 2 In Photo mode, press to resume recording. 3 Move between Video mode and Photo mode. Press again to take video. 22 Record Mode Button functions Button functions Power Press for one second to review recorded photos. Press the Delete...
... 1 In preview mode, press to toggle ANTI GLARE ON / ANTI GLARE OFF. 2 While recording video, press to view selected videos 4 Confirm the menu selection. Mode Switch between menu option items. 1 In Video mode, press to take a photo. 3 In Playback mode, press to pause the recording. Menu... delete photos. Press again to stop recording. 2 In Photo mode, press to resume recording. 3 Move between Video mode and Photo mode. Press again to take video. 22 Record Mode Button functions Button functions Power Press for one second to review recorded photos. Press the Delete...

User Guide
Page 23
VIDEO RESOLUTION FHD FULL HD 1080/30 HD60 HD 720/60 HD30 HD 720/30 2 VGA VGA 480/30 PHOTO RESOLUTION 16MP High-16MP (interpolated) 5MP Standard-5MP 3MP Low-3MP ANTI GLARE ON 3 Underwater mode ON 01:22:23 Remaining recordable time 4 0015 The number of photos that can still be taken at the current resolution Record Mode 23 LCD screen information LCD screen information The indicators shown below may display on the LCD screen when videos and photos are recorded: (Sample Image) LCD screen information 1 Battery: Shows the battery charge level.
VIDEO RESOLUTION FHD FULL HD 1080/30 HD60 HD 720/60 HD30 HD 720/30 2 VGA VGA 480/30 PHOTO RESOLUTION 16MP High-16MP (interpolated) 5MP Standard-5MP 3MP Low-3MP ANTI GLARE ON 3 Underwater mode ON 01:22:23 Remaining recordable time 4 0015 The number of photos that can still be taken at the current resolution Record Mode 23 LCD screen information LCD screen information The indicators shown below may display on the LCD screen when videos and photos are recorded: (Sample Image) LCD screen information 1 Battery: Shows the battery charge level.

User Guide
Page 24
... Photo mode 6 Digital Zoom meter NOTE Some features may not be used in combination with others. Video recording Operation 1 In Video mode, press the Record ( ) button to start recording. 2 When a video is being recorded, a time indicator will display on the screen, please turn off the Digital Light function after you use it again...
... Photo mode 6 Digital Zoom meter NOTE Some features may not be used in combination with others. Video recording Operation 1 In Video mode, press the Record ( ) button to start recording. 2 When a video is being recorded, a time indicator will display on the screen, please turn off the Digital Light function after you use it again...

User Guide
Page 25
This effect is only applied to the image on this function to the video or photo you see the subject on the screen.) 2 Press the Right button again to take photo. Using the Anti-Glare function Turn on the ... in , press the Up button. Display Screen Record Mode 25 Taking Photos Display Screen Using Digital Zoom The Digital Zoom function magnifies images when recording videos or taking photos. ❖ To zoom in bright or reflective outdoor conditions. Operation 1 In preview mode, press the Right button to enable the ANTI GLARE...
This effect is only applied to the image on this function to the video or photo you see the subject on the screen.) 2 Press the Right button again to take photo. Using the Anti-Glare function Turn on the ... in , press the Up button. Display Screen Record Mode 25 Taking Photos Display Screen Using Digital Zoom The Digital Zoom function magnifies images when recording videos or taking photos. ❖ To zoom in bright or reflective outdoor conditions. Operation 1 In preview mode, press the Right button to enable the ANTI GLARE...
User Guide
Page 26
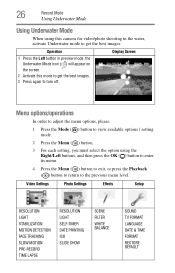
... ) button to enter its menu. 4 Press the Menu ( ) button to exit, or press the Playback ( ) button to return to the previous menu level. Video Settings Photo Settings Effects Setup RESOLUTION LlGHT STABILIZATION MOTION DETECTION FACE TRACKING SLOW MOTION PRE-RECORD TIME LAPSE RESOLUTION LlGHT SELF-TIMER DATE PRINTING ISO... off. Operation 1 Press the Left button in preview mode, the Underwater Mode icon ( ) will appear on the screen. 2 Activate this camera for video/photo shooting in the water, activate Underwater mode to get the best images. 3 Press again to get the best images.
... ) button to enter its menu. 4 Press the Menu ( ) button to exit, or press the Playback ( ) button to return to the previous menu level. Video Settings Photo Settings Effects Setup RESOLUTION LlGHT STABILIZATION MOTION DETECTION FACE TRACKING SLOW MOTION PRE-RECORD TIME LAPSE RESOLUTION LlGHT SELF-TIMER DATE PRINTING ISO... off. Operation 1 Press the Left button in preview mode, the Underwater Mode icon ( ) will appear on the screen. 2 Activate this camera for video/photo shooting in the water, activate Underwater mode to get the best images. 3 Press again to get the best images.

User Guide
Page 27
... The remaining time will vary based on the resolution selected. ON Turns the light ON, providing illumination when recording. VGA 480/30 Records videos at 1280 x 720p, 60 fps. Light In this option, select a mode to brighten the shooting area or to extend the brightness ... clearer. OFF Turns the light OFF. Displays the Photo Settings options. Video Setting options Resolution The Resolution settings available are: Full HD 1080/30 Records videos at 1280 x 720p, 30 fps. HD 720/30 Records videos at 1920 x 1080p, 30 fps. Digital Light Extends the dynamic range...
... The remaining time will vary based on the resolution selected. ON Turns the light ON, providing illumination when recording. VGA 480/30 Records videos at 1280 x 720p, 60 fps. Light In this option, select a mode to brighten the shooting area or to extend the brightness ... clearer. OFF Turns the light OFF. Displays the Photo Settings options. Video Setting options Resolution The Resolution settings available are: Full HD 1080/30 Records videos at 1280 x 720p, 30 fps. HD 720/30 Records videos at 1920 x 1080p, 30 fps. Digital Light Extends the dynamic range...
User Guide
Page 28
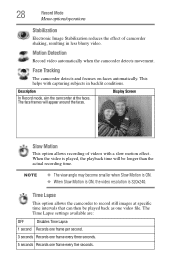
.... NOTE ❖ The view angle may become smaller when Slow Motion is ON. ❖ When Slow Motion is ON, the video resolution is played, the playback time will appear around the faces. Time Lapse This option allows the camcorder to record still images at...: OFF Disables Time Lapse. 1 second Records one frame per second. 3 seconds Records one frame every three seconds. 5 seconds Records one video file. Face Tracking The camcorder detects and focuses on faces automatically. Slow Motion This option allows recording of camcorder shaking, resulting in backlit conditions...
.... NOTE ❖ The view angle may become smaller when Slow Motion is ON. ❖ When Slow Motion is ON, the video resolution is played, the playback time will appear around the faces. Time Lapse This option allows the camcorder to record still images at...: OFF Disables Time Lapse. 1 second Records one frame per second. 3 seconds Records one frame every three seconds. 5 seconds Records one video file. Face Tracking The camcorder detects and focuses on faces automatically. Slow Motion This option allows recording of camcorder shaking, resulting in backlit conditions...

User Guide
Page 31
The Scene settings available are : Auto Automatically adjusts white balance. Skin Adjusts skin tones to sepia. Underwater Adjusts color tones for pictures / video taken while submerged in Night mode, place the camcorder on a flat, steady surface, or use a tripod. Classic The image is converted to appear more natural. ... balance for low light conditions or at night. Record Mode 31 Menu options/operations Effects Scene You can select a special filter effect for photos and videos. Night Adjusts for tungsten lighting.
The Scene settings available are : Auto Automatically adjusts white balance. Skin Adjusts skin tones to sepia. Underwater Adjusts color tones for pictures / video taken while submerged in Night mode, place the camcorder on a flat, steady surface, or use a tripod. Classic The image is converted to appear more natural. ... balance for low light conditions or at night. Record Mode 31 Menu options/operations Effects Scene You can select a special filter effect for photos and videos. Night Adjusts for tungsten lighting.

User Guide
Page 33
...lists the camcorder's default factory settings. Make sure that all files are copied to delete all photos and videos in the built-in memory. SETTING RESOLUTION DEFAULT FACTORY SETTING Video: Full HD 1080p/30 Photo: STANDARD-5MP STABILIZATION Off MOTION DETECTION Off LIGHT Off FACE TRACKING Off ...if no Micro SD™ Card is formatted. Record Mode 33 Menu options/operations Format Use this option. YES Deletes all photos and videos on the installed Micro SD™ Card, or deletes all data on shipping area Restore default To restore the default factory setting, select...
...lists the camcorder's default factory settings. Make sure that all files are copied to delete all photos and videos in the built-in memory. SETTING RESOLUTION DEFAULT FACTORY SETTING Video: Full HD 1080p/30 Photo: STANDARD-5MP STABILIZATION Off MOTION DETECTION Off LIGHT Off FACE TRACKING Off ...if no Micro SD™ Card is formatted. Record Mode 33 Menu options/operations Format Use this option. YES Deletes all photos and videos on the installed Micro SD™ Card, or deletes all data on shipping area Restore default To restore the default factory setting, select...

User Guide
Page 34
Up Down Left Right Record / OK Playback 1 In Playback Mode, go to Preview mode. 2 In Photo Playback mode, start slideshow. 3 In Video Playback mode, play back the videos continuously. 34 Go to the next video or photo. 1 Play / pause the video. 2 Confirm the setting. 1 In Menu mode, return to the information screen. 2 When playing video, increase volume. Chapter 4 Playback Mode Button functions The buttons have the following functions in Playback mode. When playing video, decrease volume. Go to Preview mode. Menu 1 Turn on Menu. 2 Return to the previous video or photo.
Up Down Left Right Record / OK Playback 1 In Playback Mode, go to Preview mode. 2 In Photo Playback mode, start slideshow. 3 In Video Playback mode, play back the videos continuously. 34 Go to the next video or photo. 1 Play / pause the video. 2 Confirm the setting. 1 In Menu mode, return to the information screen. 2 When playing video, increase volume. Chapter 4 Playback Mode Button functions The buttons have the following functions in Playback mode. When playing video, decrease volume. Go to Preview mode. Menu 1 Turn on Menu. 2 Return to the previous video or photo.

User Guide
Page 35
Playback Mode 35 LCD touch screen information LCD touch screen information The indicators shown below may appear on the LCD screen while in Playback mode: (Sample Image) LCD screen indicators (Information screen) Notification icons 1 Battery: Shows the battery charge level. 2 Press the Up button to switch to the Information screen. 3 Press the Left / Right button to go to previous / next video or photo. 4 3MP 0022/0025 Selected Resolution and number of current videos or photos / total number of videos or photos. 5 This icon shows that a video is ready for playback.
Playback Mode 35 LCD touch screen information LCD touch screen information The indicators shown below may appear on the LCD screen while in Playback mode: (Sample Image) LCD screen indicators (Information screen) Notification icons 1 Battery: Shows the battery charge level. 2 Press the Up button to switch to the Information screen. 3 Press the Left / Right button to go to previous / next video or photo. 4 3MP 0022/0025 Selected Resolution and number of current videos or photos / total number of videos or photos. 5 This icon shows that a video is ready for playback.

User Guide
Page 36
... to play the files in continuous mode. 3 While playing video, press the Right / Left buttons to fast forward / rewind. 4 Press the Up / Down button to adjust the video playback volume. 5 Press the Menu ( ) button to Video / Photo mode. 36 Playback Mode Playback mode operations Playback ...mode operations Operation 1 In Video / Photo mode, press the Playback ( ) button to switch to Video / Photo Playback mode. 2 Use the Right ...
... to play the files in continuous mode. 3 While playing video, press the Right / Left buttons to fast forward / rewind. 4 Press the Up / Down button to adjust the video playback volume. 5 Press the Menu ( ) button to Video / Photo mode. 36 Playback Mode Playback mode operations Playback ...mode operations Operation 1 In Video / Photo mode, press the Playback ( ) button to switch to Video / Photo Playback mode. 2 Use the Right ...

User Guide
Page 37
... Menu ( ) button to cancel and exit. Display Screen 2 Press the Left button to select Yes, and then press the OK ( ) button to delete the current video or photo file, or press the Menu ( ) button, or select No, and then press the OK ( ) button to exit. Playback Mode 37 Photo Playback Photo...
... Menu ( ) button to cancel and exit. Display Screen 2 Press the Left button to select Yes, and then press the OK ( ) button to delete the current video or photo file, or press the Menu ( ) button, or select No, and then press the OK ( ) button to exit. Playback Mode 37 Photo Playback Photo...