
User Manual
Page 11
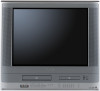
SKIP button "% PLAY button "# STOP button "# SKIP button "% VOLUME ▲/▼ buttons 24 OPEN/CLOSE button "# Model MW27F51 has a door on the front panel. Rear panel VHF/UHF OUT PUT VIDEO DIGITAL AUDIO COAXIAL L AUDIO R LINE 1 IN VIDEO L(MONO) AUDIO R RF IN ...IN (LINE 1 IN) jacks 43 AUDIO (L/R)/VIDEO OUT jacks 16 11 5T80101B [E]p06-13 11 3/8/05, 9:55 AM Introduction Identification of MW27F51 Cassette loading slot 34 TIMER REC indicator 41 Remote sensor 13 Disc tray "# *PHONES jack 25 MEDIA CARD slot ## POWER button *AUDIO (L/R)/VIDEO IN (LINE IN 2) jacks 43 REW ...
SKIP button "% PLAY button "# STOP button "# SKIP button "% VOLUME ▲/▼ buttons 24 OPEN/CLOSE button "# Model MW27F51 has a door on the front panel. Rear panel VHF/UHF OUT PUT VIDEO DIGITAL AUDIO COAXIAL L AUDIO R LINE 1 IN VIDEO L(MONO) AUDIO R RF IN ...IN (LINE 1 IN) jacks 43 AUDIO (L/R)/VIDEO OUT jacks 16 11 5T80101B [E]p06-13 11 3/8/05, 9:55 AM Introduction Identification of MW27F51 Cassette loading slot 34 TIMER REC indicator 41 Remote sensor 13 Disc tray "# *PHONES jack 25 MEDIA CARD slot ## POWER button *AUDIO (L/R)/VIDEO IN (LINE IN 2) jacks 43 REW ...

User Manual
Page 12
... button 36 TOP MENU button 51 OPEN/CLOSE button 45 *DVD MENU button Use the DVD MENU button to display the menu included on the remote control. DVD button 45 TV/VCR button 20 Direct channel selection buttons (0-9) 24 Number buttons (0-9) 28 DISPLAY button 23 CH / buttons 25 ZERO RETURN button... 30 REPEAT A-B button 49 DVD/CARD button 55 SPEED button 39 RETURN button 57 EJECT button 34 3/8/05, 9:55 AM Introduction Identification of controls (Continued) Remote control The instructions in this manual describe the function on many DVD video discs.
... button 36 TOP MENU button 51 OPEN/CLOSE button 45 *DVD MENU button Use the DVD MENU button to display the menu included on the remote control. DVD button 45 TV/VCR button 20 Direct channel selection buttons (0-9) 24 Number buttons (0-9) 28 DISPLAY button 23 CH / buttons 25 ZERO RETURN button... 30 REPEAT A-B button 49 DVD/CARD button 55 SPEED button 39 RETURN button 57 EJECT button 34 3/8/05, 9:55 AM Introduction Identification of controls (Continued) Remote control The instructions in this manual describe the function on many DVD video discs.

User Manual
Page 13
...operating range becomes reduced, replace both batteries with new ones. • If the batteries are also used to navigate on either side of the remote sensor, up to a distance of batteries in the battery compartment. 3 Replace the compartment cover. Notes: • Be sure to prevent ...battery acid from leaking into a fire. Illustration of MW27F51 Operation: • Aim the remote control at a time. • The Direction buttons ( / / / ) are dead or if you will not be using the remote control for a long time, remove the batteries to use AAA size batteries. &#...
...operating range becomes reduced, replace both batteries with new ones. • If the batteries are also used to navigate on either side of the remote sensor, up to a distance of batteries in the battery compartment. 3 Replace the compartment cover. Notes: • Be sure to prevent ...battery acid from leaking into a fire. Illustration of MW27F51 Operation: • Aim the remote control at a time. • The Direction buttons ( / / / ) are dead or if you will not be using the remote control for a long time, remove the batteries to use AAA size batteries. &#...

User Manual
Page 20
... clock may affect the player's operation. Notes: • If the unit does not operate properly, or No key operation (by the unit and/or the remote control): Static electricity, etc., may not function properly if the reception condition is a difference of more than 60 seconds, the TV/VCR menu screen will...
... clock may affect the player's operation. Notes: • If the unit does not operate properly, or No key operation (by the unit and/or the remote control): Static electricity, etc., may not function properly if the reception condition is a difference of more than 60 seconds, the TV/VCR menu screen will...
User Manual
Page 25
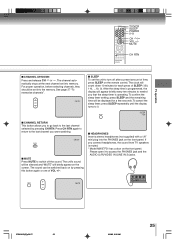
...VOL +/-. ■ HEADPHONES Insert a stereo headphones (not supplied) with a 1/8" mini plug into memory. The unit's sound will briefly appear on the remote control. MUTE CH RTN ■ CHANNEL UP/DOWN Press and release CH or . For proper operation, before selecting channels, they should be silenced and ... Press MUTE to remind you connect headphones, the sound from TV speakers is operating. If you that the sleep timer is muted. * Model MW27F51 has a door on the front panel. Please open it to 0. To confirm the sleep timer setting, press SLEEP and the remaining time will...
...VOL +/-. ■ HEADPHONES Insert a stereo headphones (not supplied) with a 1/8" mini plug into memory. The unit's sound will briefly appear on the remote control. MUTE CH RTN ■ CHANNEL UP/DOWN Press and release CH or . For proper operation, before selecting channels, they should be silenced and ... Press MUTE to remind you connect headphones, the sound from TV speakers is operating. If you that the sleep timer is muted. * Model MW27F51 has a door on the front panel. Please open it to 0. To confirm the sleep timer setting, press SLEEP and the remaining time will...

User Manual
Page 34
... inverted cassette tape cannot be ejected even if the POWER is automatically inserted. Unloading 1 Press STOP/EJECT on the front panel or EJECT on the remote control. 2 Remove the cassette tape. Notes: • Always eject the tape when not in use. • The cassette tape can be inserted...
... inverted cassette tape cannot be ejected even if the POWER is automatically inserted. Unloading 1 Press STOP/EJECT on the front panel or EJECT on the remote control. 2 Remove the cassette tape. Notes: • Always eject the tape when not in use. • The cassette tape can be inserted...
User Manual
Page 35
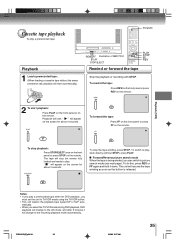
... selects the playback tape speed SP or SLP auto- To stop playback: Press STOP/EJECT once on the front panel or press STOP on the remote. matically. • When you must set the unit to the resuming playback mode automatically. 5T80101B [E]p34-38 35 3/8/05, 9:57 AM 35 TV/VCR Playback... search mode When the tape is released. To do this, press REV or FF again and hold it will start automatically). REW FF Illustration of MW27F51 PLAY STOP/EJECT PLAY STOP FF REV Rewind or forward the tape Stop the playback or recording with STOP. To stop the tape-winding, press...
... selects the playback tape speed SP or SLP auto- To stop playback: Press STOP/EJECT once on the front panel or press STOP on the remote. matically. • When you must set the unit to the resuming playback mode automatically. 5T80101B [E]p34-38 35 3/8/05, 9:57 AM 35 TV/VCR Playback... search mode When the tape is released. To do this, press REV or FF again and hold it will start automatically). REW FF Illustration of MW27F51 PLAY STOP/EJECT PLAY STOP FF REV Rewind or forward the tape Stop the playback or recording with STOP. To stop the tape-winding, press...
User Manual
Page 41
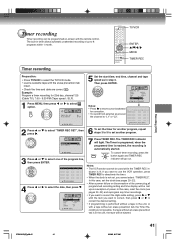
TV/VCR ENTER /// MENU TIMER REC Timer recording Preparation: • Press TV/VCR to select the TV/VCR mode. • Load a cassette tape with the remote control. Notes: • The VCR section cannot be lost upon resumption of the power plug,all programmed recording setting and time display will be used ...
TV/VCR ENTER /// MENU TIMER REC Timer recording Preparation: • Press TV/VCR to select the TV/VCR mode. • Load a cassette tape with the remote control. Notes: • The VCR section cannot be lost upon resumption of the power plug,all programmed recording setting and time display will be used ...
User Manual
Page 45
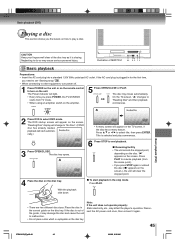
...already loaded, playback will clear the stopped point. 4 Place the disc on the disc tray. Basic playback (DVD) CAUTION Keep your fingers well clear of MW27F51 3,5 6 5 1 4 DVD VCD Basic playback CD Preparations: • Insert the AC cord plug into a standard 120V 60Hz polarized AC outlet. Illustration ... need to set "Starting setup" ' . • When connecting to other equipment, turn power off. 1 Press POWER on the unit or on the remote control to turn on the disc tray. Reading Disc cally.) • A menu screen will appear on the amplifier. 5 Press OPEN/CLOSE or PLAY. The...
...already loaded, playback will clear the stopped point. 4 Place the disc on the disc tray. Basic playback (DVD) CAUTION Keep your fingers well clear of MW27F51 3,5 6 5 1 4 DVD VCD Basic playback CD Preparations: • Insert the AC cord plug into a standard 120V 60Hz polarized AC outlet. Illustration ... need to set "Starting setup" ' . • When connecting to other equipment, turn power off. 1 Press POWER on the unit or on the remote control to turn on the disc tray. Reading Disc cally.) • A menu screen will appear on the amplifier. 5 Press OPEN/CLOSE or PLAY. The...

User Manual
Page 46
... continue to be displayed. • Some discs may appear on the TV screen while playing a DVD video disc because the high resolution pictures on your remote control once the movie is completed. • There may take a minute or so to start playback. • When you should generally reduce the sharpness adjustment...
... continue to be displayed. • Some discs may appear on the TV screen while playing a DVD video disc because the high resolution pictures on your remote control once the movie is completed. • There may take a minute or so to start playback. • When you should generally reduce the sharpness adjustment...

User Manual
Page 61
...... 1. Select Files When playing back a CD or Media card containing a mixture of rating level by DVD disc" on page 62.) Notes: • Depending on the remote control. All: Displays all files. Music Only: Displays only MP3/WMA files. Each setup will be played back. Function setup (DVD) 5T80101B [E]p57-62 61...
...... 1. Select Files When playing back a CD or Media card containing a mixture of rating level by DVD disc" on page 62.) Notes: • Depending on the remote control. All: Displays all files. Music Only: Displays only MP3/WMA files. Each setup will be played back. Function setup (DVD) 5T80101B [E]p57-62 61...

User Manual
Page 66
...path of the beam. 13 Replace the batteries. 13 Insert correctly. 13 66 5T80101B [E]p63-67 66 3/8/05, 9:59 AM appears on the remote control. The remote control is set correctly. The batteries are dirty. Reset the start playback. This is broken off. Insert a playable disc (Check the disc ...the TIMER REC indicator is inserted. Video heads are not inserted correctly. No disc is not lit). The unit does not start /end time. REMOTE CONTROL Remote control does not operate. There is not placed within 5 m or reduce the light of the room. 13 Clear the path of the beam....
...path of the beam. 13 Replace the batteries. 13 Insert correctly. 13 66 5T80101B [E]p63-67 66 3/8/05, 9:59 AM appears on the remote control. The remote control is set correctly. The batteries are dirty. Reset the start playback. This is broken off. Insert a playable disc (Check the disc ...the TIMER REC indicator is inserted. Video heads are not inserted correctly. No disc is not lit). The unit does not start /end time. REMOTE CONTROL Remote control does not operate. There is not placed within 5 m or reduce the light of the room. 13 Clear the path of the beam....

User Manual
Page 67
... output -8 dBm, 1 kΩ, negative sync., pin jack (L/R) x 1 Audio output 0.5 V (p-p), 75 Ω, pin jack x 1 (DIGITAL COAXIAL) Supplied accessories Remote control (WC-SB1 1 Batteries (R03/AAA 2 300-75 Ω matching transformer 1 * Screen size is approximate. • This model complies with the above specifications. ...15/16 inches (481 mm) 18-5/8 inches (472.5 mm) 19-7/16 inches (493 mm) Tuner 181 channel freq. Specifications MW20F51 MW24F51 MW27F51 General Power supply AC 120 V 60 Hz Power consumption Operation: 110 W 135 W 145 W Stand by: 4 W Picture tube 20...
... output -8 dBm, 1 kΩ, negative sync., pin jack (L/R) x 1 Audio output 0.5 V (p-p), 75 Ω, pin jack x 1 (DIGITAL COAXIAL) Supplied accessories Remote control (WC-SB1 1 Batteries (R03/AAA 2 300-75 Ω matching transformer 1 * Screen size is approximate. • This model complies with the above specifications. ...15/16 inches (481 mm) 18-5/8 inches (472.5 mm) 19-7/16 inches (493 mm) Tuner 181 channel freq. Specifications MW20F51 MW24F51 MW27F51 General Power supply AC 120 V 60 Hz Power consumption Operation: 110 W 135 W 145 W Stand by: 4 W Picture tube 20...

Service Manual
Page 9
...the 'STOP(DVD)' key on the front panel. 5. It is setting. The On Screen Display message ' ' will appear. 5. NOTE: No indications on the remote control unit. 5. Turn Unit ON. 2. Turn Unit ON. 2. To unlock the Tray Lock, please follow the steps below . 1. Tray cannot be cancelled, ... Stop Mode. 3. Simultaneously press and hold the 'STOP(DVD)' key on the front panel to the Stop Mode. 3. NOTE: No indications on the remote control unit. 6. To unlock the Tray Lock, please follow the steps below . 1. RATING LEVEL 4 DIGIT PASSWORD CANCELLATION If the stored 4 digit password...
...the 'STOP(DVD)' key on the front panel. 5. It is setting. The On Screen Display message ' ' will appear. 5. NOTE: No indications on the remote control unit. 5. Turn Unit ON. 2. Turn Unit ON. 2. To unlock the Tray Lock, please follow the steps below . 1. Tray cannot be cancelled, ... Stop Mode. 3. Simultaneously press and hold the 'STOP(DVD)' key on the front panel to the Stop Mode. 3. NOTE: No indications on the remote control unit. 6. To unlock the Tray Lock, please follow the steps below . 1. RATING LEVEL 4 DIGIT PASSWORD CANCELLATION If the stored 4 digit password...

Service Manual
Page 16
Closed Caption / Skip+ TIMER REC Rec/OTR Slow+ Play Stop REV(Rew) FF(F. Min 5 Sec RC-KH Yes TOSHIBA TOSHIBA 40-BFh, 44-BBh, 45-Bah 3V UM-4 x 2 pcs 49 Key Yes Yes Yes Yes Yes Yes Yes Yes Yes Yes Yes Yes Yes Yes ... 1990/1/1 ~ 2081/12/31 8 Program/ 1 Month 6 Hours 120 Min 10 Min 1 Program 15 Min - G-12 G-13 OSD Language Clock,Timer and Timer Back-up G-14 Remote Control Unit GENERAL SPECIFICATIONS Calendar Timer Events One Touch Recording Max Time Sleep Timer Max Time Step On/Off Timer Program(On Timer / Off Timer...
Closed Caption / Skip+ TIMER REC Rec/OTR Slow+ Play Stop REV(Rew) FF(F. Min 5 Sec RC-KH Yes TOSHIBA TOSHIBA 40-BFh, 44-BBh, 45-Bah 3V UM-4 x 2 pcs 49 Key Yes Yes Yes Yes Yes Yes Yes Yes Yes Yes Yes Yes Yes Yes ... 1990/1/1 ~ 2081/12/31 8 Program/ 1 Month 6 Hours 120 Min 10 Min 1 Program 15 Min - G-12 G-13 OSD Language Clock,Timer and Timer Back-up G-14 Remote Control Unit GENERAL SPECIFICATIONS Calendar Timer Events One Touch Recording Max Time Sleep Timer Max Time Step On/Off Timer Program(On Timer / Off Timer...

Service Manual
Page 18
... 44.0kg (97.0lbs) 48.5kg (107.0lbs) A3-7 G-16 Accessories G-17 Interface G-18 Set Size G-19 Weight GENERAL SPECIFICATIONS Owner's Manual Language w/Guarantee Card Remote Control Unit Battery UM size x pcs OEM Brand Rod Antenna Poles Terminal Loop Antenna Terminal U/V Mixer 300 ohm to 75 ohm Antenna Adapter Antenna Change...
... 44.0kg (97.0lbs) 48.5kg (107.0lbs) A3-7 G-16 Accessories G-17 Interface G-18 Set Size G-19 Weight GENERAL SPECIFICATIONS Owner's Manual Language w/Guarantee Card Remote Control Unit Battery UM size x pcs OEM Brand Rod Antenna Poles Terminal Loop Antenna Terminal U/V Mixer 300 ohm to 75 ohm Antenna Adapter Antenna Change...

Service Manual
Page 36
... : Cylinder-Motor : Cylinder-Sensor : Data (Syscon to Peak : Right : Recording : Recording-Chrominance : Recording-Luminance : Reel Brake : Reel Sensor : Reference : Regulated, Regulator : Rewind : Reverse : Radio Frequency : Remote Control : Relay : Serial Clock : Sensor Common : Serial Data : Segment : Select, Selector : Sensor : Search Mode : Serial Input : Sound Intermediate Frequency : Serial Output : Solenoid : Standard Play CLK S.
... : Cylinder-Motor : Cylinder-Sensor : Data (Syscon to Peak : Right : Recording : Recording-Chrominance : Recording-Luminance : Reel Brake : Reel Sensor : Reference : Regulated, Regulator : Rewind : Reverse : Radio Frequency : Remote Control : Relay : Serial Clock : Sensor Common : Serial Data : Segment : Select, Selector : Sensor : Search Mode : Serial Input : Sound Intermediate Frequency : Serial Output : Solenoid : Standard Play CLK S.

Service Manual
Page 38
... SHIFTER). Refer to the SERVICE MODE function, press and hold both buttons simultaneously on the main unit or on the main unit and on the remote control for data normal servicing. 2 If you can be checked of the INITIAL DATA of PARENTAL LOCK. 3 Refer to the "TRAY LOCK". VCR mode (Playback...
... SHIFTER). Refer to the SERVICE MODE function, press and hold both buttons simultaneously on the main unit or on the main unit and on the remote control for data normal servicing. 2 If you can be checked of the INITIAL DATA of PARENTAL LOCK. 3 Refer to the "TRAY LOCK". VCR mode (Playback...

Service Manual
Page 39
... the life span for more than 2 seconds. 4. CONFIRMATION OF HOURS USED POWER ON total hours and PLAY/REC total hours can be checked on the remote control for individual parts.
... the life span for more than 2 seconds. 4. CONFIRMATION OF HOURS USED POWER ON total hours and PLAY/REC total hours can be checked on the remote control for individual parts.

Service Manual
Page 41
... MEMORY IC, the following steps should be taken to ensure correct data settings while making reference to be changed is reached. 5. DOWN button on the remote, step through the DATA using RIGHT or LEFT button until all data has been checked. 9. Turn on the POWER, and set and the Channel button... (6) on the remote control for after position INI 44 due to set data for the new MEMORY IC. Press both VOL. The unit will now have the correct...
... MEMORY IC, the following steps should be taken to ensure correct data settings while making reference to be changed is reached. 5. DOWN button on the remote, step through the DATA using RIGHT or LEFT button until all data has been checked. 9. Turn on the POWER, and set and the Channel button... (6) on the remote control for after position INI 44 due to set data for the new MEMORY IC. Press both VOL. The unit will now have the correct...


