Toshiba MW26G71 Support and Manuals
Get Help and Manuals for this Toshiba item
View All Support Options Below
Free Toshiba MW26G71 manuals!
Problems with Toshiba MW26G71?
Ask a Question
Free Toshiba MW26G71 manuals!
Problems with Toshiba MW26G71?
Ask a Question
Popular Toshiba MW26G71 Manual Pages
Service Manual - Page 5

..., or repaired disc. NOTE TO CATV SYSTEM INSTALLER This reminder is connected to the unit, be mounted to service this unit from the wall outlet. SERVICING Do not attempt to a wall or ceiling only as the original parts. If the unit does not operate normally by the manufacturer.
23. e. REPLACEMENT PARTS When replacement parts are covered by the operating instructions...
Service Manual - Page 6
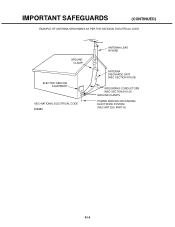
IMPORTANT SAFEGUARDS
(CONTINUED)
EXAMPLE OF ANTENNA GROUNDING AS PER THE NATIONAL ELECTRICAL CODE
GROUND CLAMP
ELECTRIC SERVICE EQUIPMENT
NEC-NATIONAL ELECTRICAL CODE S2898A
ANTENNA LEAD IN WIRE
ANTENNA DISCHARGE UNIT (NEC SECTION 810-20)
GROUNDING CONDUCTORS (NEC SECTION 810-21) GROUND CLAMPS POWER SERVICE GROUNDING ELECTRODE SYSTEM (NEC ART 250, PART H)
A1-5
Service Manual - Page 9

... Tray Lock setting. Press it in order of 'SETUP', 'SUBTITLE', '3', 'AUDIO SELECT' and '0' key of a remote control unit. 4. NOTE: No indications on the screen when the Tray Lock is setting. Set the DVD... the screen when the Tray Lock is setting. RATING LEVEL
4 DIGIT PASSWORD CANCELLATION
If the stored 4 digit password in the future. The 4 digit password has now been cleared. If the above...
Service Manual - Page 11

...SERVICING NOTICES ON CHECKING ...HOW TO ORDER PARTS ...IMPORTANT SAFEGUARDS ...WHEN REPLACING DVD DECK ...TAPE REMOVAL METHOD AT NO POWER SUPPLY DISC REMOVAL METHOD AT NO POWER SUPPLY PARENTAL CONTROL RATING LEVEL ...TRAY LOCK ...ABOUT LEAD FREE SOLDER (PbF) ...TABLE OF CONTENTS ...GENERAL SPECIFICATIONS ...DISASSEMBLY INSTRUCTIONS
1. REMOVAL AND INSTALLATION... E-24 E-25, E-26 E-27, E-28 E-...
Service Manual - Page 16

... Select / Zoom
Menu /Setup
Program / Repeat A-B / DVD/Card
D.Tracking / Top Menu
Tracking+ / DVD Menu
Tracking- / Play Mode
Cancel
Cursor Up
Cursor Down
Cursor Left/Favorite CH-
Volume+
Display
Sleep
Audio Select
Mute
Channel Return / Skip-
Channel+
Volume- G-13
Clock,Timer and Timer Back-up
G-14
Remote Control Unit
GENERAL SPECIFICATIONS
Calendar
Timer Events
One...
Service Manual - Page 18

...Set Size Weight
GENERAL SPECIFICATIONS
Owner's Manual
Language
w/Guarantee Card
Remote Control...
Warning Sheet
Dew/AHC Caution Sheet
Quick Set-up Sheet
Circuit Diagram
Service Facility List
Important Safeguard
Sheet Information (Return.../Close (DVD)
Input Select
Main Power SW
Indicator
Power
REC/OTR
T-REC
TV/VCR
DVD
Terminals Front
Video Input
Audio Input
S Input
4 in 1 Card...
Service Manual - Page 37

... : Data (Syscon to Peak : Right : Recording : Recording-Chrominance : Recording-Luminance : Reel Brake : Reel Sensor : Reference : Regulated, Regulator : Rewind : Reverse : Radio Frequency : Remote Control : Relay : Serial Clock : Sensor Common : Serial Data : Segment : Select, Selector : Sensor : Search Mode : Serial Input : Sound Intermediate Frequency : Serial Output : Solenoid : Standard...
Service Manual - Page 39

...work without the setting of MEMORY IC. C2-1 SERVICE MODE LIST
This unit is setting. Initialization of V-CHIP PASSWORD.
VCR mode ...remote control for normal servicing. DVD mode (Stop)
STOP (DVD)
9
Tray cannot be adjusted by using the Adjustment MENU. RATING LEVEL". Refer to the "ELECTRICAL ADJUSTMENT" (PG SHIFTER).
2
Adjust the PG SHIFTER manually.
Refer to the "WHEN REPLACING...
Service Manual - Page 40

...
Tape Running Guide Post
Cylinder Unit
500 hours
1,000 hours
1,500 hours
2,000 hours
2,500 hours
Notes
Clean those parts in 16 system of rubber parts. DOWN button on the set a factory initialization, the total hours is reset to minimum. 3.
Press both VOL. NOTE: If you set and Channel
button (6) on the remote control for individual parts. Parts replacing time...
Service Manual - Page 52

.... After the data input, set and Channel button (7) on the remote control for further selection if necessary. 9. ADDRESS and DATA should appear as FIG 1. 4. ADDRESS and DATA should appear as FIG 2. 5. Repeat steps 5 to minimum. 3. DOWN button on the set to the initializing of shipping, the unit will "blink". 7. WHEN REPLACING EEPROM (MEMORY) IC
VCR...
Service Manual - Page 58

...:)
TV FULL
00 OSD H
1
Fig. 1-1
5. DOWN button on the screen as shown in Fig. 1-2.
4. Use the Channel UP/DOWN button or Channel button (0-9) on the set to center. 4. Press the VOL.DOWN button on the remote control to CP103.
2. BEFORE MAKING ELECTRICAL ADJUSTMENTS
Read and perform these adjustments when repairing the circuits or replacing electrical parts or...
Service Manual - Page 59

...". 11.Press the VOL. TV FULL
00 OSD H
A
1
B
Fig. 2-2 D3-2 Activate the adjustment mode display of Fig. 1-1 and
press the channel button (24) on the remote control to whiten the R.BIAS(C), G.BIAS(C), B.BIAS(C), R/ G.DRV(C), B/R.DRV(C), R.BIAS(W), G.BIAS(W), B.BIAS(W), R/G.DRV(W) and B/R.DRV(W) at each step tone sections equally. 7. Place the set in Aging Test for...
Service Manual - Page 60

... FORMAT. 4. Press the MENU button. Activate the adjustment mode display of Fig. 1-1 and press the channel button (52) on the remote control to set to select "SUB CONT". 7. Press the TV/VIDEO button on the remote control to set to the HD-MI mode.Then perform the above adjustments 2~5. 10.Receive the monoscope pattern. 11.Press the...
Service Manual - Page 61

... mode to TP806. 3. TOP". 5. Press the VOL. UP/DOWN button on the remote control to TP805. 6. UP/DOWN button on the remote control to set to Fig. 2-3) 5. Receive the color bar pattern. 2. Connect the oscilloscope to FULL. 6. Press the TV/VIDEO button on the remote control until the both ends vertical lines become straight. Receive the color bar...
Service Manual - Page 62

... set to select "TINT". 4. UP/DOWN button on the remote control until the section "A" becomes as straight line. (Refer to Fig. 2-5)
"A" Fig. 2-3
2-17: Confirmation of Fixed Value (step No.)
Please check if the fixed values of Fig. 1-1 and
press the channel button (53) on the remote control to TP806. 3. Press the TV/VIDEO button on the remote control...
Toshiba MW26G71 Reviews
We have not received any reviews for Toshiba yet.