
User Manual
Page 2
... is connected. - SHOULD THE UNIT REQUIRE MAINTENANCE, CONTACT AN AUTHORIZED SERVICE LOCATION. NO USER-SERVICEABLE PARTS INSIDE. Consult the dealer or an experienced radio/TV technician for help. REFER SERVICING TO QUALIFIED SERVICE PERSONNEL. TO ENSURE PROPER USE OF THIS PRODUCT, PLEASE READ THIS OWNER'S MANUAL CAREFULLY AND RETAIN FOR FUTURE REFERENCE. TO PREVENT DIRECT EXPOSURE TO LASER BEAM, DO NOT TRY TO OPEN...
... is connected. - SHOULD THE UNIT REQUIRE MAINTENANCE, CONTACT AN AUTHORIZED SERVICE LOCATION. NO USER-SERVICEABLE PARTS INSIDE. Consult the dealer or an experienced radio/TV technician for help. REFER SERVICING TO QUALIFIED SERVICE PERSONNEL. TO ENSURE PROPER USE OF THIS PRODUCT, PLEASE READ THIS OWNER'S MANUAL CAREFULLY AND RETAIN FOR FUTURE REFERENCE. TO PREVENT DIRECT EXPOSURE TO LASER BEAM, DO NOT TRY TO OPEN...

User Manual
Page 4
... output distorted sound for service. 19. f. SAFETY CHECK Upon completion of the National Electrical Code (NEC), ANSI/NFPA 70, provides information with them might be taken to keep the volume at a moderate level. When installing an outside antenna or cable system is connected to lightning and power line surges. 14. If the unit does not operate normally by following the operating instructions...
... output distorted sound for service. 19. f. SAFETY CHECK Upon completion of the National Electrical Code (NEC), ANSI/NFPA 70, provides information with them might be taken to keep the volume at a moderate level. When installing an outside antenna or cable system is connected to lightning and power line surges. 14. If the unit does not operate normally by following the operating instructions...

User Manual
Page 5
.... It is plugged in . DISC Do not use a cracked, deformed, or repaired disc. Please contact your community there might be regulations that the cable ground shall be connected to the grounding system of the building, as close to the point of cable entry as practical. Use the attached power cord only. • If the polarized AC cord does not fit into a standard...
.... It is plugged in . DISC Do not use a cracked, deformed, or repaired disc. Please contact your community there might be regulations that the cable ground shall be connected to the grounding system of the building, as close to the point of cable entry as practical. Use the attached power cord only. • If the polarized AC cord does not fit into a standard...
User Manual
Page 7
...set the off timer 31 Picture control adjustment 32 Adjusting the picture preference 32 Sound control adjustment 33 Stereo and Second Audio Program (SAP) ..... 33 Basic playback (DVD) Playing a disc 45 Advanced playback (DVD) Zooming 48 Locating desired scene 48 Repeat playback 49 A-B Repeat playback 49 Program playback 50 Random playback 50 Changing angles 51 Title selection 51 DVD menu 51 Changing soundtrack language 52 Subtitles 52 Disc status 53 To turn off the PBC 53 MP3/WMA/JPEG operation 54 Function setup (DVD) Customizing the function settings 57 Temporary disabling...
...set the off timer 31 Picture control adjustment 32 Adjusting the picture preference 32 Sound control adjustment 33 Stereo and Second Audio Program (SAP) ..... 33 Basic playback (DVD) Playing a disc 45 Advanced playback (DVD) Zooming 48 Locating desired scene 48 Repeat playback 49 A-B Repeat playback 49 Program playback 50 Random playback 50 Changing angles 51 Title selection 51 DVD menu 51 Changing soundtrack language 52 Subtitles 52 Disc status 53 To turn off the PBC 53 MP3/WMA/JPEG operation 54 Function setup (DVD) Customizing the function settings 57 Temporary disabling...

User Manual
Page 9
... ALL , disc playback will display a message on-screen.) On Video CDs This DVD supports Video CDs equipped with some discs. Some DVD video discs are printed on your DVD video disc and you happen to experience any difficulty playing a DVD on a Toshiba DVD player, please feel free to call our Contact listed in any other than those listed above . • Some CD-R/RWs cannot be played back depending on region numbers The region number of this owner's manual may appear...
... ALL , disc playback will display a message on-screen.) On Video CDs This DVD supports Video CDs equipped with some discs. Some DVD video discs are printed on your DVD video disc and you happen to experience any difficulty playing a DVD on a Toshiba DVD player, please feel free to call our Contact listed in any other than those listed above . • Some CD-R/RWs cannot be played back depending on region numbers The region number of this owner's manual may appear...

User Manual
Page 12
... 12 POWER button 19 SLEEP button 25 CM SKIP button 36 JUMP button 48 VOL +/- button 36 PLAY MODE button 49 Direction buttons ( / / / ) 19 MENU button 20 SETUP button 57 PLAY button 35 45 PAUSE/STILL button 36 46 CH RTN button 25 SKIP button 47 COUNTER RESET button 37 ANGLE button 51 REC button 39 D.TRACKING button 36 TOP MENU button 51 OPEN/CLOSE button 45 *DVD MENU button Use the DVD MENU button to display the menu included on the remote control. DVD button 45 TV/VCR button 20 Direct channel selection buttons (0-9) 24 Number buttons (0-9) 28 DISPLAY button 23 CH / buttons...
... 12 POWER button 19 SLEEP button 25 CM SKIP button 36 JUMP button 48 VOL +/- button 36 PLAY MODE button 49 Direction buttons ( / / / ) 19 MENU button 20 SETUP button 57 PLAY button 35 45 PAUSE/STILL button 36 46 CH RTN button 25 SKIP button 47 COUNTER RESET button 37 ANGLE button 51 REC button 39 D.TRACKING button 36 TOP MENU button 51 OPEN/CLOSE button 45 *DVD MENU button Use the DVD MENU button to display the menu included on the remote control. DVD button 45 TV/VCR button 20 Direct channel selection buttons (0-9) 24 Number buttons (0-9) 28 DISPLAY button 23 CH / buttons...
User Manual
Page 15
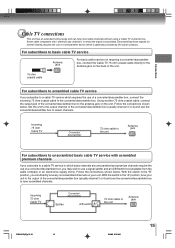
... these signals for normal viewing requires the use of a descrambler device which requires the use the converter/descrambler box to the unit Antenna jack 5T80101B [E]p14-18 15 3/8/05, 9:55 AM 15 Incoming 75 ohm Cable TV Converter/ descrambler Splitter A/B switch A B 75 ohm cable to select channels. Connections Cable TV connections This unit has an extended tuning range and can directly tune any nonscrambled channels on...
... these signals for normal viewing requires the use of a descrambler device which requires the use the converter/descrambler box to the unit Antenna jack 5T80101B [E]p14-18 15 3/8/05, 9:55 AM 15 Incoming 75 ohm Cable TV Converter/ descrambler Splitter A/B switch A B 75 ohm cable to select channels. Connections Cable TV connections This unit has an extended tuning range and can directly tune any nonscrambled channels on...

User Manual
Page 17
... Dolby Surround Pro Logic VHF/UHF OUT PUT VIDEO DIGITAL AUDIO COAXIAL L AUDIO R LINE 1 IN VIDEO L(MONO) AUDIO R To audio input To AUDIO (L/R) OUT Audio cable (not supplied) Connect one or two rear speakers). 3 With an amplifier equipped with Dolby Digital Connect the equipment the same way as from Dolby Laboratories. The output sound from the same DVD movies that amplifier's owner's manual and set the amplifier so you can enjoy motion picture and live concert DVD video discs...
... Dolby Surround Pro Logic VHF/UHF OUT PUT VIDEO DIGITAL AUDIO COAXIAL L AUDIO R LINE 1 IN VIDEO L(MONO) AUDIO R To audio input To AUDIO (L/R) OUT Audio cable (not supplied) Connect one or two rear speakers). 3 With an amplifier equipped with Dolby Digital Connect the equipment the same way as from Dolby Laboratories. The output sound from the same DVD movies that amplifier's owner's manual and set the amplifier so you can enjoy motion picture and live concert DVD video discs...

User Manual
Page 20
... TIMER AUTO CLOCK STANDARD TIME DAYLIGHT SAVING TIME / / / / MENU OFF 4 Press MENU repeatedly until the menu screen is cleared. • When the AUTO CLOCK is set to select option. 1 Make sure the unit is turned off the unit. • If you use a cable box and you use a cable box, turn off . • If you do not want Auto Clock adjust- But if you press POWER, the Auto Clock set (Adjustment): 1 Press MENU, then press or to "OFF", the Auto Clock adjustment does not function. • Set the clock manually...
... TIMER AUTO CLOCK STANDARD TIME DAYLIGHT SAVING TIME / / / / MENU OFF 4 Press MENU repeatedly until the menu screen is cleared. • When the AUTO CLOCK is set to select option. 1 Make sure the unit is turned off the unit. • If you use a cable box and you use a cable box, turn off . • If you do not want Auto Clock adjust- But if you press POWER, the Auto Clock set (Adjustment): 1 Press MENU, then press or to "OFF", the Auto Clock adjustment does not function. • Set the clock manually...
User Manual
Page 35
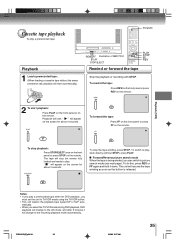
... FF Illustration of MW27F51 PLAY STOP/EJECT PLAY STOP FF REV Rewind or forward the tape Stop the playback or recording with STOP. " " will appear on the remote. To switch to picture search mode (see next page). The tape will start. To stop playback: Press STOP/EJECT once on the front panel or press STOP on the screen for about 4 seconds. Playback will stop but remain fully loaded and ready to play. To forward the tape: Press...
... FF Illustration of MW27F51 PLAY STOP/EJECT PLAY STOP FF REV Rewind or forward the tape Stop the playback or recording with STOP. " " will appear on the remote. To switch to picture search mode (see next page). The tape will start. To stop playback: Press STOP/EJECT once on the front panel or press STOP on the screen for about 4 seconds. Playback will stop but remain fully loaded and ready to play. To forward the tape: Press...
User Manual
Page 39
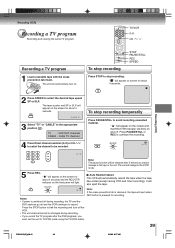
... "CABLE" to TV/VCR mode using the TV/VCR button. 39 5T80101B [E]p39-42 39 3/8/05, 9:57 AM " " will appear on the screen and the REC/OTR indicator will appear on the screen for about 4 seconds. Auto Rewind feature This VCR will also eject the tape. Recording (VCR) 2 Press SPEED to be changed during OTR and timer recording). VHF/UHF channels CABLE - Cable TV channels 4 Press Direct channel selection (0-9) or CH / to select the channel...
... "CABLE" to TV/VCR mode using the TV/VCR button. 39 5T80101B [E]p39-42 39 3/8/05, 9:57 AM " " will appear on the screen and the REC/OTR indicator will appear on the screen for about 4 seconds. Auto Rewind feature This VCR will also eject the tape. Recording (VCR) 2 Press SPEED to be changed during OTR and timer recording). VHF/UHF channels CABLE - Cable TV channels 4 Press Direct channel selection (0-9) or CH / to select the channel...

User Manual
Page 48
... then make selections by switching the position of the frame. 1 Press ZOOM during playback or stop mode. 2 Press / / / to a 1:1 view ( Off). Playback starts. • When you change the title, playback starts from the center position to UP, DOWN, LEFT or RIGHT direction. 3 Press Number buttons (0-9) to change the ZOOM 1 (x 1.3), 2 (x 1.5) and 3 (x 2.0). 1 Use the title, chapter and time recorded on the frame image. Note: In case of VCD/CD disc, time...
... then make selections by switching the position of the frame. 1 Press ZOOM during playback or stop mode. 2 Press / / / to a 1:1 view ( Off). Playback starts. • When you change the title, playback starts from the center position to UP, DOWN, LEFT or RIGHT direction. 3 Press Number buttons (0-9) to change the ZOOM 1 (x 1.3), 2 (x 1.5) and 3 (x 2.0). 1 Use the title, chapter and time recorded on the frame image. Note: In case of VCD/CD disc, time...

User Manual
Page 60
... files automatically. Video: The DVD player filters video signal, and converts it is toned down slightly when played back. Notes: • This function works only during playback of Dolby Digital recorded discs. • The level of Dynamic Range Reduction may be most effective under this selection according to control the dynamic range so as explosion or similar is connected to achieve a suitable sound for when it in the progressive output format...
... files automatically. Video: The DVD player filters video signal, and converts it is toned down slightly when played back. Notes: • This function works only during playback of Dolby Digital recorded discs. • The level of Dynamic Range Reduction may be most effective under this selection according to control the dynamic range so as explosion or similar is connected to achieve a suitable sound for when it in the progressive output format...
User Manual
Page 62
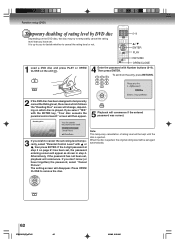
... disc is ejected. If the 4-digit password at step 2 on page 61 has been set rating level temporarily, select "Parental Control Level" with or , then press ENTER. Function setup (DVD) Temporary disabling of rating level will disappear. If you don't know (or have set. screen will then appear. 5 Playback will change, depending on the unit "# . Parental Control Level Cancel Picture /Enter/Return 3 If you select "YES" with Number buttons (0-9). Reading Disc Your disc exceeds the parental control...
... disc is ejected. If the 4-digit password at step 2 on page 61 has been set rating level temporarily, select "Parental Control Level" with or , then press ENTER. Function setup (DVD) Temporary disabling of rating level will disappear. If you don't know (or have set. screen will then appear. 5 Playback will change, depending on the unit "# . Parental Control Level Cancel Picture /Enter/Return 3 If you select "YES" with Number buttons (0-9). Reading Disc Your disc exceeds the parental control...

User Manual
Page 66
... not work . The parental lock function is not set correctly. memory playback, etc. The remote control is dirty. The batteries are dirty. Place the disc with the unit or the disc. The disc is not aimed at the remote 13 sensor. Playback does not follow the It is in the mode of repeat playback, course of the disc's program. Press the TIMER REC button (the TIMER REC indicator is broken off. Adjust tracking manually using...
... not work . The parental lock function is not set correctly. memory playback, etc. The remote control is dirty. The batteries are dirty. Place the disc with the unit or the disc. The disc is not aimed at the remote 13 sensor. Playback does not follow the It is in the mode of repeat playback, course of the disc's program. Press the TIMER REC button (the TIMER REC indicator is broken off. Adjust tracking manually using...

User Manual
Page 67
...˚F), Operating status: Horizontal Input/Output Video input 1.0 V (p-p), 75 Ω, negative sync., pin jack x 2 Video output 1.0 V (p-p), 75 Ω, negative sync., pin jack x 1 Audio input -8 dBm, 50 kΩ, negative sync., pin jack (L/R) x 2 Audio output -8 dBm, 1 kΩ, negative sync., pin jack (L/R) x 1 Audio output 0.5 V (p-p), 75 Ω, pin jack x 1 (DIGITAL COAXIAL) Supplied accessories Remote control (WC-SB1 1 Batteries (R03/AAA 2 300-75 Ω matching transformer 1 * Screen size is approximate. • This model complies...
...˚F), Operating status: Horizontal Input/Output Video input 1.0 V (p-p), 75 Ω, negative sync., pin jack x 2 Video output 1.0 V (p-p), 75 Ω, negative sync., pin jack x 1 Audio input -8 dBm, 50 kΩ, negative sync., pin jack (L/R) x 2 Audio output -8 dBm, 1 kΩ, negative sync., pin jack (L/R) x 1 Audio output 0.5 V (p-p), 75 Ω, pin jack x 1 (DIGITAL COAXIAL) Supplied accessories Remote control (WC-SB1 1 Batteries (R03/AAA 2 300-75 Ω matching transformer 1 * Screen size is approximate. • This model complies...

User Manual
Page 68
... will replace a defective part without charge to you pay labor charges involved in the U.S.A. Your Responsibility The above and do not extend to any person receiving this product must deliver the entire set as lightning or fluctuations in electric power, improper installation, improper maintenance or use have been altered or modified without charge to and from the Service Station. Reception problems caused...
... will replace a defective part without charge to you pay labor charges involved in the U.S.A. Your Responsibility The above and do not extend to any person receiving this product must deliver the entire set as lightning or fluctuations in electric power, improper installation, improper maintenance or use have been altered or modified without charge to and from the Service Station. Reception problems caused...

Service Manual
Page 5
... the operating instructions, as it may expose you turn off the power and unplug all servicing to proper grounding of the mast and supporting structure, grounding of the lead-in performance, this unit from the wall outlet. Read the owner's manual of cable entry as to provide some protection against voltage surges and built-up static charges. Otherwise, sudden high volume sound may...
... the operating instructions, as it may expose you turn off the power and unplug all servicing to proper grounding of the mast and supporting structure, grounding of the lead-in performance, this unit from the wall outlet. Read the owner's manual of cable entry as to provide some protection against voltage surges and built-up static charges. Otherwise, sudden high volume sound may...

Service Manual
Page 11
.../SW SCHEMATIC DIAGRAMS RF AMP/MOTOR DRIVE ...MPEG/MICON ...MEMORY ...MEMORY CARD ...AUDIO/JACK ...MEMORY CARD2 ...Y/C/AUDIO/HEAD AMP ...MICON ...IN/OUT ...CHROMA/IF ...SOUND AMP/SURROUND ...Hi-Fi/DEMODULATOR ...DIGITAL COMB FILTER ...DVD IN/OUT ...REGULATOR1 ...TV POWER ...DEFLECTION ...CRT/OPERATION ...CRT/SVM ...LOADING MOTOR/SW ...INTERCONNECTION DIAGRAM ...WAVEFORMS ...MECHANICAL EXPLODED VIEWS ...CHASSIS EXPLODED VIEWS ...DVD DECK EXPLODED VIEWS ...MECHANICAL REPLACEMENT PARTS LIST CHASSIS REPLACEMENT PARTS LIST DVD DECK REPLACEMENT PARTS LIST ELECTRICAL REPLACEMENT PARTS LIST A1...
.../SW SCHEMATIC DIAGRAMS RF AMP/MOTOR DRIVE ...MPEG/MICON ...MEMORY ...MEMORY CARD ...AUDIO/JACK ...MEMORY CARD2 ...Y/C/AUDIO/HEAD AMP ...MICON ...IN/OUT ...CHROMA/IF ...SOUND AMP/SURROUND ...Hi-Fi/DEMODULATOR ...DIGITAL COMB FILTER ...DVD IN/OUT ...REGULATOR1 ...TV POWER ...DEFLECTION ...CRT/OPERATION ...CRT/SVM ...LOADING MOTOR/SW ...INTERCONNECTION DIAGRAM ...WAVEFORMS ...MECHANICAL EXPLODED VIEWS ...CHASSIS EXPLODED VIEWS ...DVD DECK EXPLODED VIEWS ...MECHANICAL REPLACEMENT PARTS LIST CHASSIS REPLACEMENT PARTS LIST DVD DECK REPLACEMENT PARTS LIST ELECTRICAL REPLACEMENT PARTS LIST A1...

Service Manual
Page 38
... disc) STOP (DVD) 7 DVD mode (Stop) STOP (DVD) 9 Can be opened. 3 Refer to the "TRAY LOCK". Initialization of factory on the screen. RATING LEVEL". NOTE: The function will only work without the setting of MEMORY IC. Tray cannot be checked of the INITIAL DATA of DVD disc at DVD mode. Refer to the "PARENTAL CONTROL - Releasing of DVD disc at DVD mode. TV mode VOL. (-) MIN 6 POWER ON total hours and PLAY/REC total hours are reset such as the clock setting, the channel setting...
... disc) STOP (DVD) 7 DVD mode (Stop) STOP (DVD) 9 Can be opened. 3 Refer to the "TRAY LOCK". Initialization of factory on the screen. RATING LEVEL". NOTE: The function will only work without the setting of MEMORY IC. Tray cannot be checked of the INITIAL DATA of DVD disc at DVD mode. Refer to the "PARENTAL CONTROL - Releasing of DVD disc at DVD mode. TV mode VOL. (-) MIN 6 POWER ON total hours and PLAY/REC total hours are reset such as the clock setting, the channel setting...


