Owners Manual
Page 11
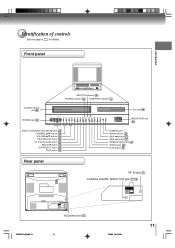
...; buttons 25 VOLUME ▲/▼ buttons 24 REW (Rewind) button !# FF (Fast Forward) button !# REC/OTR button !' STOP/EJECT button 34 PLAY button !# POWER button Remote sensor 13 SKIP button "% SKIP button "% OPEN/CLOSE button "# STOP button "# PLAY button "# Rear panel RF IN jack " COAXIAL DIGITAL AUDIO OUT jack % & 5T90101A [E]p06...
...; buttons 25 VOLUME ▲/▼ buttons 24 REW (Rewind) button !# FF (Fast Forward) button !# REC/OTR button !' STOP/EJECT button 34 PLAY button !# POWER button Remote sensor 13 SKIP button "% SKIP button "% OPEN/CLOSE button "# STOP button "# PLAY button "# Rear panel RF IN jack " COAXIAL DIGITAL AUDIO OUT jack % & 5T90101A [E]p06...

Owners Manual
Page 12
... ## SPEED button !' D.TRACKING button !$ TOP MENU button # OPEN/CLOSE button "# *DVD MENU button Use the DVD MENU button to display the menu included on the remote control. Introduction Identification of controls (Continued) Remote control The instructions in this manual describe the function on many DVD video discs.
... ## SPEED button !' D.TRACKING button !$ TOP MENU button # OPEN/CLOSE button "# *DVD MENU button Use the DVD MENU button to display the menu included on the remote control. Introduction Identification of controls (Continued) Remote control The instructions in this manual describe the function on many DVD video discs.
Owners Manual
Page 13
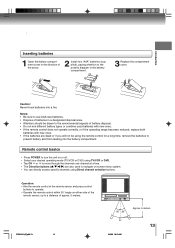
...), paying attention to the polarity diagram in a designated disposal area. • Attention should be using Direct channel selection buttons. Operation: • Aim the remote control at a time. • The Direction buttons ( / / / ) are dead or if you will not be drawn to the environmental aspects of battery... disposal. • Do not mix different battery types or combine used batteries with new ones. • If the remote control does not operate correctly, or if the operating range becomes reduced, replace both batteries with new ones. • If the batteries...
...), paying attention to the polarity diagram in a designated disposal area. • Attention should be using Direct channel selection buttons. Operation: • Aim the remote control at a time. • The Direction buttons ( / / / ) are dead or if you will not be drawn to the environmental aspects of battery... disposal. • Do not mix different battery types or combine used batteries with new ones. • If the remote control does not operate correctly, or if the operating range becomes reduced, replace both batteries with new ones. • If the batteries...

Owners Manual
Page 20
... it may affect the player's operation. Notes: • If the unit does not operate properly, or No key operation (by the unit and/or the remote control): Static electricity, etc., may take approx. TV/VCR 8 : 47AM MON STEREO SAP CH 125 CLOCK SET ON/OFF TIMER AUTO CLOCK ON STANDARD TIME DAYLIGHT...
... it may affect the player's operation. Notes: • If the unit does not operate properly, or No key operation (by the unit and/or the remote control): Static electricity, etc., may take approx. TV/VCR 8 : 47AM MON STEREO SAP CH 125 CLOCK SET ON/OFF TIMER AUTO CLOCK ON STANDARD TIME DAYLIGHT...
Owners Manual
Page 25
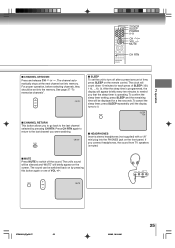
... Insert a stereo headphones (not supplied) with a 1/8" mini plug into memory. The channel automatically stops at the next channel set into the PHONES jack on the remote control. See page 27 "To memorize channels". ■ SLEEP To set into the memory. To cancel the sleep timer, press SLEEP repeatedly until the display turns...
... Insert a stereo headphones (not supplied) with a 1/8" mini plug into memory. The channel automatically stops at the next channel set into the PHONES jack on the remote control. See page 27 "To memorize channels". ■ SLEEP To set into the memory. To cancel the sleep timer, press SLEEP repeatedly until the display turns...
Owners Manual
Page 34
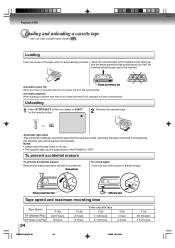
... until it is "OFF". Screwdriver To record again Cover the hole with a screwdriver. Unloading 1 Press STOP/EJECT on the front panel or EJECT on the remote control. 2 Remove the cassette tape. Automatic power ON Erase prevention tab When you insert a cassette tape the unit power will be inserted. Loading Push the center...
... until it is "OFF". Screwdriver To record again Cover the hole with a screwdriver. Unloading 1 Press STOP/EJECT on the front panel or EJECT on the remote control. 2 Remove the cassette tape. Automatic power ON Erase prevention tab When you insert a cassette tape the unit power will be inserted. Loading Push the center...

Owners Manual
Page 41
... of power. TIMER REC SET AUTO REPEAT OFF 5 Set the start time, end time, channel and tape speed as in the unit, or with the remote control. dicator is automatically started.
... of power. TIMER REC SET AUTO REPEAT OFF 5 Set the start time, end time, channel and tape speed as in the unit, or with the remote control. dicator is automatically started.

Owners Manual
Page 45
... first time, you need to set "Starting setup" ' . • When connecting to other equipment, turn power off. 1 Press POWER on the unit or on the remote control to turn on how to resume playback (from TV mode. • When using an amplifier, switch on the TV screen, if the disc has a menu...
... first time, you need to set "Starting setup" ' . • When connecting to other equipment, turn power off. 1 Press POWER on the unit or on the remote control to turn on how to resume playback (from TV mode. • When using an amplifier, switch on the TV screen, if the disc has a menu...
Owners Manual
Page 46
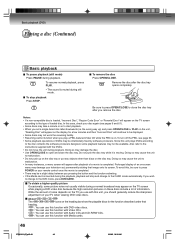
... then "Incorrect Disc" will appear on the disc tray. Since this function with Audio CDs and CD-R/RW CDs. To avoid this case, check your remote control once the movie is completed. • There may be available. In this , be sure to press POWER on your disc again (see page 53. •...
... then "Incorrect Disc" will appear on the disc tray. Since this function with Audio CDs and CD-R/RW CDs. To avoid this case, check your remote control once the movie is completed. • There may be available. In this , be sure to press POWER on your disc again (see page 53. •...

Owners Manual
Page 61
... disabling of rating level by DVD disc" on page 62.) Notes: • Depending on the screen. 4. "PASSWORD CLEAR" appears on the remote control. Note: If each setup (pages 59~62) has been completed, the unit can change the password if you forget the password... 1. To... the parental level Password ---- Press Number buttons (0-9) to level 8. Parental Off Select Files All /0Ð9/Enter/Cancel/Setup/Return Parental control setting Some discs are specified not suitable for adults cannot be limited not to play back with specific rating level information though its disc...
... disabling of rating level by DVD disc" on page 62.) Notes: • Depending on the screen. 4. "PASSWORD CLEAR" appears on the remote control. Note: If each setup (pages 59~62) has been completed, the unit can change the password if you forget the password... 1. To... the parental level Password ---- Press Number buttons (0-9) to level 8. Parental Off Select Files All /0Ð9/Enter/Cancel/Setup/Return Parental control setting Some discs are specified not suitable for adults cannot be limited not to play back with specific rating level information though its disc...

Owners Manual
Page 66
...reduce the light of the room. 13 Clear the path of the contents. 8 - 45 9 45 45 8 61, 62 - - 9 Aim the remote control at the sensor. The disc is not set . POSSIBLE SOLUTIONS PAGE Place a piece of the disc's program. buttons on the disc tray. These operations may.... memory playback, etc. This is inserted. Place the disc correctly inside the guide on the remote control. The video cassette's erase prevention tab is dirty. Reset the start/end time. REMOTE CONTROL Remote control does not operate. Video heads are dirty. The disc is broken off. The TIMER REC button...
...reduce the light of the room. 13 Clear the path of the contents. 8 - 45 9 45 45 8 61, 62 - - 9 Aim the remote control at the sensor. The disc is not set . POSSIBLE SOLUTIONS PAGE Place a piece of the disc's program. buttons on the disc tray. These operations may.... memory playback, etc. This is inserted. Place the disc correctly inside the guide on the remote control. The video cassette's erase prevention tab is dirty. Reset the start/end time. REMOTE CONTROL Remote control does not operate. Video heads are dirty. The disc is broken off. The TIMER REC button...

Owners Manual
Page 67
... 1.0 V (p-p), 75 Ω, negative sync., pin jack x 1 Audio input -8 dBm, 50 kΩ, negative sync., pin jack (L/R) x 1 Audio output 0.5 V (p-p), 75 Ω, pin jack x 1 (DIGITAL COAXIAL) Supplied accessories Remote control (WC-SBC1 1 Batteries (R03/AAA 2 300-75 Ω matching transformer 1 * Screen size is approximate. • This model complies with the above specifications. • Designs and...
... 1.0 V (p-p), 75 Ω, negative sync., pin jack x 1 Audio input -8 dBm, 50 kΩ, negative sync., pin jack (L/R) x 1 Audio output 0.5 V (p-p), 75 Ω, pin jack x 1 (DIGITAL COAXIAL) Supplied accessories Remote control (WC-SBC1 1 Batteries (R03/AAA 2 300-75 Ω matching transformer 1 * Screen size is approximate. • This model complies with the above specifications. • Designs and...


