

User Manual
Page 6
... Recording format 10 Disc playback in other players 11 • On Video CDs 11 Parts and functions 12 Front 12 Rear 12 Display window 13 Remote control 14 ••• Power Source 15 Antenna connections 16 Cable TV connections 18 Connections with the TV or audio •• component 20...
... Recording format 10 Disc playback in other players 11 • On Video CDs 11 Parts and functions 12 Front 12 Rear 12 Display window 13 Remote control 14 ••• Power Source 15 Antenna connections 16 Cable TV connections 18 Connections with the TV or audio •• component 20...

User Manual
Page 12
... indicator EJECT button REW (Rewind) button DV IN terminal S-VIDEO IN (INPUT 2) jack FWD (Fast Forward) button AUDIO (L/R) IN (INPUT 2) jacks VIDEO IN (INPUT 2) jack Remote senser REC button CHANNEL / buttons Rear AC power cord COMPONENT OUT jacks (DVD Priority) RF OUT jack RF IN jack COAXIAL DIGITAL AUDIO OUT jack...
... indicator EJECT button REW (Rewind) button DV IN terminal S-VIDEO IN (INPUT 2) jack FWD (Fast Forward) button AUDIO (L/R) IN (INPUT 2) jacks VIDEO IN (INPUT 2) jack Remote senser REC button CHANNEL / buttons Rear AC power cord COMPONENT OUT jacks (DVD Priority) RF OUT jack RF IN jack COAXIAL DIGITAL AUDIO OUT jack...
User Manual
Page 14
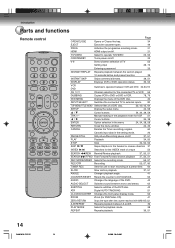
... PLAY MODE REPEAT Selects the playback mode. Repeats playback. 38 39, 51 14 2J40101A P12-22 14 3/4/06, 10:43 AM Introduction Parts and functions Remote control Page OPEN/CLOSE Opens or Closes the tray. 34 EJECT Ejects the cassette tapes 49 PROG Activates the progressive scanning mode. 21 HDMI HDMI...
... PLAY MODE REPEAT Selects the playback mode. Repeats playback. 38 39, 51 14 2J40101A P12-22 14 3/4/06, 10:43 AM Introduction Parts and functions Remote control Page OPEN/CLOSE Opens or Closes the tray. 34 EJECT Ejects the cassette tapes 49 PROG Activates the progressive scanning mode. 21 HDMI HDMI...

User Manual
Page 15
... replace the obsolete outlet. • If you cause a static discharge when touching the unit and the unit fails to replace batteries in the remote control, always replace both batteries with the environment in for the first time, wait for an extended period of with new ones. Insert the...specified voltage (120V 60Hz). Never mix battery types or use AAA size batteries. • Dispose of batteries in combination. • Always remove batteries from remote control if they are also used for approximate 3 minutes before operating the unit. 15 3/4/06, 10:43 AM Notes: • Be sure to ...
... replace the obsolete outlet. • If you cause a static discharge when touching the unit and the unit fails to replace batteries in the remote control, always replace both batteries with the environment in for the first time, wait for an extended period of with new ones. Insert the...specified voltage (120V 60Hz). Never mix battery types or use AAA size batteries. • Dispose of batteries in combination. • Always remove batteries from remote control if they are also used for approximate 3 minutes before operating the unit. 15 3/4/06, 10:43 AM Notes: • Be sure to ...
User Manual
Page 21
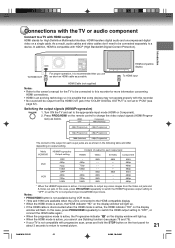
... S-Video out jack. Press PROG/HDMI on a single cable. Switching the output signals (HDMI/Progressive) 1. HDMI transfers digital audio and uncompressed digital video on the remote control to "OFF", or connect the HDMI cable again. • When the progressive mode is active, the Progressive indicator " P " on the display window will light...
... S-Video out jack. Press PROG/HDMI on a single cable. Switching the output signals (HDMI/Progressive) 1. HDMI transfers digital audio and uncompressed digital video on the remote control to "OFF", or connect the HDMI cable again. • When the progressive mode is active, the Progressive indicator " P " on the display window will light...

User Manual
Page 23
...VCR after the auto clock operation completed. • When shipped from the video cassette recorder. NOTES: • When shipped from the unit and/or the remote control: Static electricity, etc., may have to set the Standard Time (time zone) and Daylight Saving Time. (See 27.) Press ON/STANDBY to turn... set the clock manually. (See page 27.) Setting the video channel To view playback of the power plug, the clock will appear on the remote control for the auto clock feature to select the VIDEO position. Refer to receive a TV station in the standby mode to the power source. ...
...VCR after the auto clock operation completed. • When shipped from the video cassette recorder. NOTES: • When shipped from the unit and/or the remote control: Static electricity, etc., may have to set the Standard Time (time zone) and Daylight Saving Time. (See 27.) Press ON/STANDBY to turn... set the clock manually. (See page 27.) Setting the video channel To view playback of the power plug, the clock will appear on the remote control for the auto clock feature to select the VIDEO position. Refer to receive a TV station in the standby mode to the power source. ...

User Manual
Page 24
.... SETUP MENU TIMER REC SET SYSTEM SETUP AV SETUP REC SETUP CH SETUP OTHER 3 Press or to select the desired submenu and press ENTER. The remote control keys that require setting just after purchase. For details of each individual section. • The item which is indicated by blue color cannot be...
.... SETUP MENU TIMER REC SET SYSTEM SETUP AV SETUP REC SETUP CH SETUP OTHER 3 Press or to select the desired submenu and press ENTER. The remote control keys that require setting just after purchase. For details of each individual section. • The item which is indicated by blue color cannot be...
User Manual
Page 26
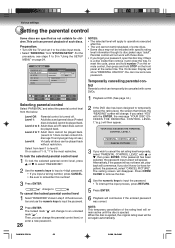
... "PASSWORD" shown in "Using the SETUP MENU" on the front panel at the same time. To reset the code, press and hold number 7 on the remote control, then press and hold STOP on page 24. The On-Screen Display will appear. PARENTAL CONTROL LEVEL CANCEL PICTURE 3 If you can change . If...
... "PASSWORD" shown in "Using the SETUP MENU" on the front panel at the same time. To reset the code, press and hold number 7 on the remote control, then press and hold STOP on page 24. The On-Screen Display will appear. PARENTAL CONTROL LEVEL CANCEL PICTURE 3 If you can change . If...

User Manual
Page 27
... the clock manually, the time zone setting is not available. DAYLIGHT SAVING TIME You can manually set the date, year and present time with the remote control. SETUP MENU TIMER REC SET CLOCK SYSTEM SETUCPLOCK (MM/DD/YY) AV SETUP AUTO CLOCK REC SETUP STANDARD TIME CH SETUP DAYLIGHT SAVING TIME...
... the clock manually, the time zone setting is not available. DAYLIGHT SAVING TIME You can manually set the date, year and present time with the remote control. SETUP MENU TIMER REC SET CLOCK SYSTEM SETUCPLOCK (MM/DD/YY) AV SETUP AUTO CLOCK REC SETUP STANDARD TIME CH SETUP DAYLIGHT SAVING TIME...

User Manual
Page 32
... recording mode by "INITIAL REC MODE", the recording mode on the display window does not change the recording mode, press REC MODE/SPEED on the remote control. This section describes recording settings. Select "INITIAL REC TO" and select "DVD" or "VCR". Select "AUTO CHAPTER" and select the interval between chapter marks...
... recording mode by "INITIAL REC MODE", the recording mode on the display window does not change the recording mode, press REC MODE/SPEED on the remote control. This section describes recording settings. Select "INITIAL REC TO" and select "DVD" or "VCR". Select "AUTO CHAPTER" and select the interval between chapter marks...

User Manual
Page 49
... and . • Cassettes marked "VHS" (or "S-VHS") can eject the video tape while the unit is turned off. 1 Press EJECT on the unit or the remote control. 2 Remove the cassette tape. Automatic playback When loading a cassette tape without an erase prevention tab, playback will turn ON automatically. An inverted cassette tape...
... and . • Cassettes marked "VHS" (or "S-VHS") can eject the video tape while the unit is turned off. 1 Press EJECT on the unit or the remote control. 2 Remove the cassette tape. Automatic playback When loading a cassette tape without an erase prevention tab, playback will turn ON automatically. An inverted cassette tape...
User Manual
Page 85
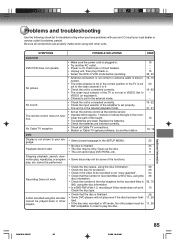
... in order to the video channel 3 or 4. • Check the unit is not shown in your local dealer or service outlet if problems persist. The remote control does not function. Clean up the disc. 9 • The unit cannot play , etc. Recording Does not work . SYMPTOMS POSSIBLE SOLUTIONS PAGE DVD/VCR ...; Check the input selector of the amplifier is set properly. • The unit is in the Special playback mode. • Aim at the remote control at the remote sensor. • Operate within Approx. 7 meters or reduce the light in the correct position or the TV is 99 or less, using the...
... in order to the video channel 3 or 4. • Check the unit is not shown in your local dealer or service outlet if problems persist. The remote control does not function. Clean up the disc. 9 • The unit cannot play , etc. Recording Does not work . SYMPTOMS POSSIBLE SOLUTIONS PAGE DVD/VCR ...; Check the input selector of the amplifier is set properly. • The unit is in the Special playback mode. • Aim at the remote control at the remote sensor. • Operate within Approx. 7 meters or reduce the light in the correct position or the TV is 99 or less, using the...

User Manual
Page 86
...; The setup does not match your stereo system. • Turn off . • The unit is in the display window No surround sound The unit or remote operation key is worn or damaged. - Discard worn out tapes. 86 2J40101A P82-87 86 3/4/06, 10:46 AM If this is connected to be...
...; The setup does not match your stereo system. • Turn off . • The unit is in the display window No surround sound The unit or remote operation key is worn or damaged. - Discard worn out tapes. 86 2J40101A P82-87 86 3/4/06, 10:46 AM If this is connected to be...

User Manual
Page 88
.../1k ohm Digital Audio : 0.5Vp-p/75 ohm CD : Wavelength: 780 nm Maximum output power: 8.5 mW DVD : Wavelength: 660 nm Maximum output power: 120 mW ACCESSORIES: Remote control (SE-R0227) x 1 75 ohm Coaxial Cable x 1 AUDIO/VIDEO Cable x 1 Battery R03/AAA x 2 • This model complies with the above specifications. • Designs and specifications...
.../1k ohm Digital Audio : 0.5Vp-p/75 ohm CD : Wavelength: 780 nm Maximum output power: 8.5 mW DVD : Wavelength: 660 nm Maximum output power: 120 mW ACCESSORIES: Remote control (SE-R0227) x 1 75 ohm Coaxial Cable x 1 AUDIO/VIDEO Cable x 1 Battery R03/AAA x 2 • This model complies with the above specifications. • Designs and specifications...


