
Installation Guide - English
Page 1
Basic Setup P000416400 H PM0020460011 © 2005 Toshiba Corporation Introduction Connections DIGITAL VIDEO DVD VIDEO RECORDER D-R4SU D-R4SC D-KR4SU OWNER'S MANUAL INSTALLATION GUIDE Read this booklet first.
Basic Setup P000416400 H PM0020460011 © 2005 Toshiba Corporation Introduction Connections DIGITAL VIDEO DVD VIDEO RECORDER D-R4SU D-R4SC D-KR4SU OWNER'S MANUAL INSTALLATION GUIDE Read this booklet first.

Installation Guide - English
Page 2
... enclosure. If this equipment does cause harmful interference to the presence of this product, please read this equipment, not expressly approved by Toshiba, or parties authorized by one or more of important operating and maintenance (servicing) instructions in a residential installation. The lightning flash with...operate the equipment. 2 Connect the equipment into an outlet on , the user is intended to alert the user to this owner's manual carefully and retain for CLASS II (Double Insulation) WARNING: TO REDUCE THE RISK OF FIRE OR ELECTRIC SHOCK, DO NOT EXPOSE THIS...
... enclosure. If this equipment does cause harmful interference to the presence of this product, please read this equipment, not expressly approved by Toshiba, or parties authorized by one or more of important operating and maintenance (servicing) instructions in a residential installation. The lightning flash with...operate the equipment. 2 Connect the equipment into an outlet on , the user is intended to alert the user to this owner's manual carefully and retain for CLASS II (Double Insulation) WARNING: TO REDUCE THE RISK OF FIRE OR ELECTRIC SHOCK, DO NOT EXPOSE THIS...

Installation Guide - English
Page 6
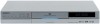
... depending on signal reception. When you place this event, consult your dealer, or purchase a commercially available antenna booster. or areas subject to the booster's instruction manual for installation details. Introduction Precautions Notes on handling Never disconnect the power cord from a wall outlet while the recorder is turned on, unless it is...
... depending on signal reception. When you place this event, consult your dealer, or purchase a commercially available antenna booster. or areas subject to the booster's instruction manual for installation details. Introduction Precautions Notes on handling Never disconnect the power cord from a wall outlet while the recorder is turned on, unless it is...
Installation Guide - English
Page 7
...as profit loss or interruption of the recording level when necessary. Adjust the initial setting of business, etc.) produced in the owner's manual. When the power cord is not liable for content which were not recorded/edited because of some malfunction of this product or discs ... damage caused by third parties, accidents, owner's intentional or unintentional misuse, or uses in a place where the temperature rises or changes rapidly. Toshiba is not liable for incidental damages (such as thunder, earthquake, etc.), acts by neglect of this product. Set the clock to use in ...
...as profit loss or interruption of the recording level when necessary. Adjust the initial setting of business, etc.) produced in the owner's manual. When the power cord is not liable for content which were not recorded/edited because of some malfunction of this product or discs ... damage caused by third parties, accidents, owner's intentional or unintentional misuse, or uses in a place where the temperature rises or changes rapidly. Toshiba is not liable for incidental damages (such as thunder, earthquake, etc.), acts by neglect of this product. Set the clock to use in ...

Installation Guide - English
Page 10
.... ( page 30) Your recorder is ready. Read the separate volume "OPERATIONS GUIDE". 10 Accessories Remote control Batteries (AAA) x 2 Coaxial cable Video/audio cable • Owner's manual (INSTALLATION GUIDE) • Owner...
.... ( page 30) Your recorder is ready. Read the separate volume "OPERATIONS GUIDE". 10 Accessories Remote control Batteries (AAA) x 2 Coaxial cable Video/audio cable • Owner's manual (INSTALLATION GUIDE) • Owner...

Installation Guide - English
Page 11
...problems and errors that allows specific or limited operation during the creation or recording of DVD and other reasons, to record on this manual. Likewise, other functions may not fully and properly play back all features or as intended by the recorder or the disc. Compatibility... software that the operation is prohibited under the Copyright Laws of the United States and other AV equipment. Playback Restrictions This owner's manual explains the basic instructions for this DVD recorder operates more time. This transfer can be performed as quickly as you use the DVD...
...problems and errors that allows specific or limited operation during the creation or recording of DVD and other reasons, to record on this manual. Likewise, other functions may not fully and properly play back all features or as intended by the recorder or the disc. Compatibility... software that the operation is prohibited under the Copyright Laws of the United States and other AV equipment. Playback Restrictions This owner's manual explains the basic instructions for this DVD recorder operates more time. This transfer can be performed as quickly as you use the DVD...
Installation Guide - English
Page 12
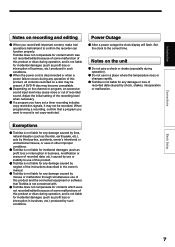
...a way that all DVD-RAM/R/RW discs recorded on this recorder. Notes • Handle the disc according to the disc instruction manual. • Toshiba cannot guarantee that shows a statement on its large capacity of 9.4 GB allows more recording space. Select a DVD-RAM disc that...You can rewrite repeatedly without deterioration of an image quality, erase unnecessary parts, divide a chapter, or specify playback area by frame. Additionally, Toshiba cannot guarantee that discs recorded in .)) Remarks Read carefully the section "On DVD-RAM discs" ( page 14). Read carefully the section "...
...a way that all DVD-RAM/R/RW discs recorded on this recorder. Notes • Handle the disc according to the disc instruction manual. • Toshiba cannot guarantee that shows a statement on its large capacity of 9.4 GB allows more recording space. Select a DVD-RAM disc that...You can rewrite repeatedly without deterioration of an image quality, erase unnecessary parts, divide a chapter, or specify playback area by frame. Additionally, Toshiba cannot guarantee that discs recorded in .)) Remarks Read carefully the section "On DVD-RAM discs" ( page 14). Read carefully the section "...

Installation Guide - English
Page 14
... titles, or have been tested with a soft tip. DVD-RAM discs formatted in this recorder, but cannot be edited or erased. Refer to the instruction manual that comes with the disc if it becomes dirty. Some commercially available cartridge discs cannot be allowed. When using them on a disc, use a pen with...
... titles, or have been tested with a soft tip. DVD-RAM discs formatted in this recorder, but cannot be edited or erased. Refer to the instruction manual that comes with the disc if it becomes dirty. Some commercially available cartridge discs cannot be allowed. When using them on a disc, use a pen with...

Installation Guide - English
Page 21
... to a wall outlet. Make sure that the powered recorder lights the LED on the front panel. To wall outlet Notes • Refer to the owner's manual of the recorder to your TV, be distorted due to copy protection. 21 If you connect the recorder to your TV. Watching via the RF...
... to a wall outlet. Make sure that the powered recorder lights the LED on the front panel. To wall outlet Notes • Refer to the owner's manual of the recorder to your TV, be distorted due to copy protection. 21 If you connect the recorder to your TV. Watching via the RF...
Installation Guide - English
Page 25
... an audio system to a moderate listening level. On-screen display Select "Audio out select" "Analog 2ch" Page page 38 Notes • Refer to the owner's manual for the TV to be distorted. Connecting to these inputs allows you place the recorder near a tuner or radio, the radio broadcast sound might be...
... an audio system to a moderate listening level. On-screen display Select "Audio out select" "Analog 2ch" Page page 38 Notes • Refer to the owner's manual for the TV to be distorted. Connecting to these inputs allows you place the recorder near a tuner or radio, the radio broadcast sound might be...
Installation Guide - English
Page 26
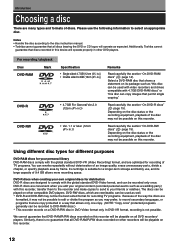
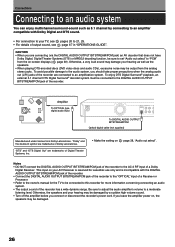
.... • Connect the DIGITAL AUDIO OUTPUT BITSTREAM/PCM jack of the recorder to the "OPTICAL" input of a Receiver or Processor. • Refer to the owner's manual for the TV to be connected to this recorder for more information concerning connecting an audio system. • The output sound of the recorder are...
.... • Connect the DIGITAL AUDIO OUTPUT BITSTREAM/PCM jack of the recorder to the "OPTICAL" input of a Receiver or Processor. • Refer to the owner's manual for the TV to be connected to this recorder for more information concerning connecting an audio system. • The output sound of the recorder are...
Installation Guide - English
Page 28
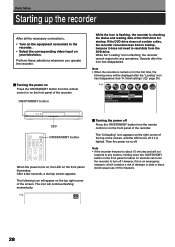
... time to startup, because it is checking the status and reading data of the DVD drive for startup. Initial settings Language English Time & Date setting Manual TV/Cable TV Channel setting LED OPEN/CLOSE DISPLAY FL SELECT DIMMER PROGRESSIVE ANGLE SUBTITLE AUDIO/SAP FREEZE REMAIN REC MODE EXTEND ZOOM SETUP VOL...
... time to startup, because it is checking the status and reading data of the DVD drive for startup. Initial settings Language English Time & Date setting Manual TV/Cable TV Channel setting LED OPEN/CLOSE DISPLAY FL SELECT DIMMER PROGRESSIVE ANGLE SUBTITLE AUDIO/SAP FREEZE REMAIN REC MODE EXTEND ZOOM SETUP VOL...

Installation Guide - English
Page 30
... Channel setting SETUP 3 Press / to select the setting to be adjusted, then press SELECT/ENTER. e.g. e.g. Initial settings Language Time & Date setting English Manual TV/Cable TV Channel setting Auto Manual SETUP When the recorder is operated for the first time, begin from step 3. 1 Press SETUP. 2 Press / to select "Initial settings", then press...
... Channel setting SETUP 3 Press / to select the setting to be adjusted, then press SELECT/ENTER. e.g. e.g. Initial settings Language Time & Date setting English Manual TV/Cable TV Channel setting Auto Manual SETUP When the recorder is operated for the first time, begin from step 3. 1 Press SETUP. 2 Press / to select "Initial settings", then press...
Installation Guide - English
Page 31
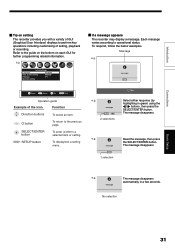
... varies according to the previous page. message No selection Basic Setup 31 To respond, follow the below examples. e.g. e.g. Initial settings Language English Time & Date setting Manual TV/Cable TV Channel setting If a message appears The recorder may display a message. message YOeKs No 2 selections Set Select either response (by highlighting in a few...
... varies according to the previous page. message No selection Basic Setup 31 To respond, follow the below examples. e.g. e.g. Initial settings Language English Time & Date setting Manual TV/Cable TV Channel setting If a message appears The recorder may display a message. message YOeKs No 2 selections Set Select either response (by highlighting in a few...

Installation Guide - English
Page 32
SELECT/ ENTER Initial settings Language English Time & Date setting Manual TV/Cable TV Channel setting English French Spanish SETUP 4 Press / to "2: Time and date setting". ( page 33) 32 "1: Language setting" is operated for on -screen ...
SELECT/ ENTER Initial settings Language English Time & Date setting Manual TV/Cable TV Channel setting English French Spanish SETUP 4 Press / to "2: Time and date setting". ( page 33) 32 "1: Language setting" is operated for on -screen ...

Installation Guide - English
Page 33
... can set Summer time Use FRAME/ADJUST Time zone Auto Channel Auto 33 SELECT/ ENTER Auto clock set the clock manually. e.g. e.g. See "Manual clock setting". Proceed to select a detailed setting. Auto : The recorder will set correctly by "Auto". Auto clock setting 5 Press / to select an ... not set correctly, the recorder cannot perform operations other than playback. SELECT/ ENTER Initial settings Language English Time & Date setting Manual TV/Cable TV Channel setting Auto Manual 4 Press / to set the clock if not set the time and date. page 35 Select...
... can set Summer time Use FRAME/ADJUST Time zone Auto Channel Auto 33 SELECT/ ENTER Auto clock set the clock manually. e.g. e.g. See "Manual clock setting". Proceed to select a detailed setting. Auto : The recorder will set correctly by "Auto". Auto clock setting 5 Press / to select an ... not set correctly, the recorder cannot perform operations other than playback. SELECT/ ENTER Initial settings Language English Time & Date setting Manual TV/Cable TV Channel setting Auto Manual 4 Press / to set the clock if not set the time and date. page 35 Select...

Installation Guide - English
Page 34
... Set "Time zone". Auto Use No Use : The recorder uses clock data Broadcast by the local (PBS) TV stations. : You want to use the "Manual" option. 3) Set "Channel". (When displaying a channel number, the number buttons are also available to change -over point to Daylight-saving time, if the continuous... to a time discrepancy caused by "Auto". If the auto set "Summer time (Daylight-Saving time)" to "Auto" and "Time zone" to "Manual", a small time discrepancy may occur around the hours of DST start :Daylight-saving time begins on the first Sunday in April. The clock setting starts...
... Set "Time zone". Auto Use No Use : The recorder uses clock data Broadcast by the local (PBS) TV stations. : You want to use the "Manual" option. 3) Set "Channel". (When displaying a channel number, the number buttons are also available to change -over point to Daylight-saving time, if the continuous... to a time discrepancy caused by "Auto". If the auto set "Summer time (Daylight-Saving time)" to "Auto" and "Time zone" to "Manual", a small time discrepancy may occur around the hours of DST start :Daylight-saving time begins on the first Sunday in April. The clock setting starts...

Installation Guide - English
Page 35
.../ ENTER TV DVD INSTANT SKIP SKIP REV STOP SKIP FWD REV PLAY FWD REC SEARCH T ADJUST CHP DIVIDE 1 2 3 +10 4560 CLEAR 789 Manual clock setting Select "Manual" at step 4 page 33. e.g. Manual clock set the clock. / buttons: To select "Year", "Date", "Time", "am /pm Summer Time zone pm Use Hawaii 4 Press / and ADJUST...
.../ ENTER TV DVD INSTANT SKIP SKIP REV STOP SKIP FWD REV PLAY FWD REC SEARCH T ADJUST CHP DIVIDE 1 2 3 +10 4560 CLEAR 789 Manual clock setting Select "Manual" at step 4 page 33. e.g. Manual clock set the clock. / buttons: To select "Year", "Date", "Time", "am /pm Summer Time zone pm Use Hawaii 4 Press / and ADJUST...

Installation Guide - English
Page 36
.../ ENTER Cable : To store channels received via the antenna. SELECT/ ENTER Initial settings Language English Time & Date setting Auto TV/Cable TV Channel setting Auto Manual SETUP 36 e.g. OPEN/CLOSE DISPLAY FL SELECT DIMMER PROGRESSIVE ANGLE SUBTITLE AUDIO/SAP FREEZE Start REMAIN REC MODE EXTEND ZOOM SETUP VOL TIMESLIP CH MUTE...
.../ ENTER Cable : To store channels received via the antenna. SELECT/ ENTER Initial settings Language English Time & Date setting Auto TV/Cable TV Channel setting Auto Manual SETUP 36 e.g. OPEN/CLOSE DISPLAY FL SELECT DIMMER PROGRESSIVE ANGLE SUBTITLE AUDIO/SAP FREEZE Start REMAIN REC MODE EXTEND ZOOM SETUP VOL TIMESLIP CH MUTE...

Installation Guide - English
Page 37
... channels If a desired channel cannot be added to the previous screen after setting ENTER is complete. Add : Adding channels Erase : Erasing channels e.g. Channel set Cable manual 1/13 Home CH Add/Erase 1 Add 2 Erase 3 Erase 4 Erase 5 Add 6 Erase 7 Erase 8 Add 9 Erase 10 Erase 4) Press SELECT/ENTER. Go to ...to the memory. Erasing channels You can be scanned automatically because of a weak signal, it can erase a stored channel from the memory. 1) Select "Manual" at step 6. 2) Press / to select a channel you want to add or erase. PP QQ RR SS TT UU VV WW XX YY ...
... channels If a desired channel cannot be added to the previous screen after setting ENTER is complete. Add : Adding channels Erase : Erasing channels e.g. Channel set Cable manual 1/13 Home CH Add/Erase 1 Add 2 Erase 3 Erase 4 Erase 5 Add 6 Erase 7 Erase 8 Add 9 Erase 10 Erase 4) Press SELECT/ENTER. Go to ...to the memory. Erasing channels You can be scanned automatically because of a weak signal, it can erase a stored channel from the memory. 1) Select "Manual" at step 6. 2) Press / to select a channel you want to add or erase. PP QQ RR SS TT UU VV WW XX YY ...


