
User Guide
Page 15
... your Google™ Account 43 Setting up Wi-Fi® and Bluetooth® connections 45 Registering your Toshiba device 46 Backing up your data 46 Backing up data using TOSHIBA File Manager 46 Backing up data using your Google™ Account 46 Restoring your data using your Google&#...8482; Account 47 Navigation and features 48 Home screen 49 Touch screen navigation 50 Navigating the Home screen 51 System bar 51 Securing your tablet...
... your Google™ Account 43 Setting up Wi-Fi® and Bluetooth® connections 45 Registering your Toshiba device 46 Backing up your data 46 Backing up data using TOSHIBA File Manager 46 Backing up data using your Google™ Account 46 Restoring your data using your Google&#...8482; Account 47 Navigation and features 48 Home screen 49 Touch screen navigation 50 Navigating the Home screen 51 System bar 51 Securing your tablet...
User Guide
Page 16
16 Contents Customizing your Home screens 56 Adding an item to a Home screen 56 Moving an item from the Home screen 57 Removing an item from a Home screen............57 Changing the wallpaper 57 Turning off the device 58 Options for turning off the device 58 Using Shut...64 Chapter 2: Settings 65 Customizing your device's settings 65 Apps and Settings menus 65 Wireless and networks settings 70 Sound settings 72 Screen settings 73 Multimedia settings 73 Location and security settings 74 Applications settings 76 Accounts & sync settings 77 Privacy settings 78 Storage settings 79...
16 Contents Customizing your Home screens 56 Adding an item to a Home screen 56 Moving an item from the Home screen 57 Removing an item from a Home screen............57 Changing the wallpaper 57 Turning off the device 58 Options for turning off the device 58 Using Shut...64 Chapter 2: Settings 65 Customizing your device's settings 65 Apps and Settings menus 65 Wireless and networks settings 70 Sound settings 72 Screen settings 73 Multimedia settings 73 Location and security settings 74 Applications settings 76 Accounts & sync settings 77 Privacy settings 78 Storage settings 79...
User Guide
Page 18
... Manager Utility 102 File browsing screen 103 Operation of files/folders 103 TOSHIBA Adaptive display 105 TOSHIBA Resolution 105 Chapter 6: If Something Goes Wrong 106 Problems when you turn on the device 106 The operating system is not working 107 Internet... the batteries 108 Display problems 109 Sound system problems 109 Wireless networking problems 110 If you need further assistance 110 Before you contact Toshiba 111 Contacting Toshiba 111 Other Toshiba Internet Web sites 112 Toshiba's worldwide offices 112 Appendix A: Power Cord/Cable Connectors 114 Glossary 115 Index 125
... Manager Utility 102 File browsing screen 103 Operation of files/folders 103 TOSHIBA Adaptive display 105 TOSHIBA Resolution 105 Chapter 6: If Something Goes Wrong 106 Problems when you turn on the device 106 The operating system is not working 107 Internet... the batteries 108 Display problems 109 Sound system problems 109 Wireless networking problems 110 If you need further assistance 110 Before you contact Toshiba 111 Contacting Toshiba 111 Other Toshiba Internet Web sites 112 Toshiba's worldwide offices 112 Appendix A: Power Cord/Cable Connectors 114 Glossary 115 Index 125
User Guide
Page 27
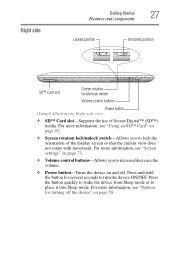
..." on and off the device" on page 92. ❖ Screen rotation lock/unlock switch-Allows you to place it into Sleep mode. Press the button quickly to wake the device from Sleep mode or to ... the orientation of Secure Digital™ (SD™) media. Right side Getting Started 27 Features and components Locked position Unlocked position SD™ Card slot Screen rotation lock/unlock switch Volume control buttons Power button (Sample Illustration) Right side view ❖ SD™ Card slot-Supports the use of the display...
..." on and off the device" on page 92. ❖ Screen rotation lock/unlock switch-Allows you to place it into Sleep mode. Press the button quickly to wake the device from Sleep mode or to ... the orientation of Secure Digital™ (SD™) media. Right side Getting Started 27 Features and components Locked position Unlocked position SD™ Card slot Screen rotation lock/unlock switch Volume control buttons Power button (Sample Illustration) Right side view ❖ SD™ Card slot-Supports the use of the display...
User Guide
Page 37
... need them , touch the Apps ( ) icon, swipe to the second screen, touch the Settings ( ) icon, and then touch Wireless & networks. For more information, see "Screen settings" on the device's power again until an authorized Toshiba service provider has checked it for Gmail™, Calendar, Contact, etc. You...page 73. ❖ If you are some of the following sections offer tips on page 74. ❖ Turn down the screen brightness and set a shorter screen time-out. For more information, see "Wireless and networks settings" on page 70 and "Location and security settings" on how...
... need them , touch the Apps ( ) icon, swipe to the second screen, touch the Settings ( ) icon, and then touch Wireless & networks. For more information, see "Screen settings" on the device's power again until an authorized Toshiba service provider has checked it for Gmail™, Calendar, Contact, etc. You...page 73. ❖ If you are some of the following sections offer tips on page 74. ❖ Turn down the screen brightness and set a shorter screen time-out. For more information, see "Wireless and networks settings" on page 70 and "Location and security settings" on how...
User Guide
Page 38
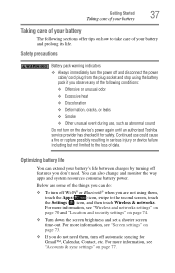
... have extra batteries, rotate their use . The battery status (charging/discharging) and level (as a percentage of fully charged) are displayed at the top of the screen. NOTE For more details on your battery use, touch Battery use . ❖ If you will not be near a Wi-Fi® network for an extended... Getting Started Taking care of your battery ❖ If you know you will not be using the system for some time, switch to the second screen and touch the Settings ( ) icon.
... have extra batteries, rotate their use . The battery status (charging/discharging) and level (as a percentage of fully charged) are displayed at the top of the screen. NOTE For more details on your battery use, touch Battery use . ❖ If you will not be near a Wi-Fi® network for an extended... Getting Started Taking care of your battery ❖ If you know you will not be using the system for some time, switch to the second screen and touch the Settings ( ) icon.
User Guide
Page 40
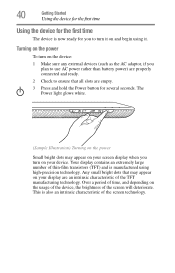
... manufactured using it on your display are properly connected and ready. 2 Check to turn it . This is also an intrinsic characteristic of the screen will deteriorate. The Power light glows white. (Sample Illustration) Turning on the power Small bright dots may appear on and begin using high-precision...ready for several seconds. Your display contains an extremely large number of the TFT manufacturing technology. Turning on the power To turn on your screen display when you turn on the device: 1 Make sure any external devices (such as the AC adaptor, if you to ensure that ...
... manufactured using it on your display are properly connected and ready. 2 Check to turn it . This is also an intrinsic characteristic of the screen will deteriorate. The Power light glows white. (Sample Illustration) Turning on the power Small bright dots may appear on and begin using high-precision...ready for several seconds. Your display contains an extremely large number of the TFT manufacturing technology. Turning on the power To turn on your screen display when you turn on the device: 1 Make sure any external devices (such as the AC adaptor, if you to ensure that ...
User Guide
Page 41
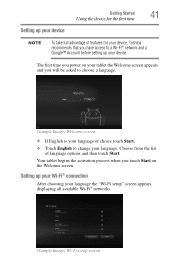
...your device, Toshiba recommends that you have access to a Wi-Fi® network and a Google™ Account before setting up your device. Setting up your device NOTE To take full advantage of choice touch Start. ❖ Touch English to choose a language. (Sample Image) Welcome screen ❖ ...Fi® connection After choosing your tablet the Welcome screen appears and you touch Start on your language the "Wi-Fi setup" screen appears, displaying all available Wi-Fi® networks. (Sample Image) Wi-Fi setup screen Your tablet begins the activation process when you will be...
...your device, Toshiba recommends that you have access to a Wi-Fi® network and a Google™ Account before setting up your device. Setting up your device NOTE To take full advantage of choice touch Start. ❖ Touch English to choose a language. (Sample Image) Welcome screen ❖ ...Fi® connection After choosing your tablet the Welcome screen appears and you touch Start on your language the "Wi-Fi setup" screen appears, displaying all available Wi-Fi® networks. (Sample Image) Wi-Fi setup screen Your tablet begins the activation process when you will be...
User Guide
Page 42
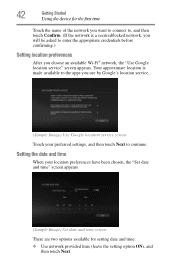
... apps you use by Google's location service. (Sample Image) Use Google location service screen Touch your location preferences have been chosen, the "Set date and time" screen appears. (Sample Image) Set date and time screen There are two options available for the first time Touch the name of the network... you want to connect to, and then touch Confirm. (If the network is a secured/locked network, you choose an available Wi-Fi® network, the "Use Google location service" screen appears.
... apps you use by Google's location service. (Sample Image) Use Google location service screen Touch your location preferences have been chosen, the "Set date and time" screen appears. (Sample Image) Set date and time screen There are two options available for the first time Touch the name of the network... you want to connect to, and then touch Confirm. (If the network is a secured/locked network, you choose an available Wi-Fi® network, the "Use Google location service" screen appears.
User Guide
Page 43
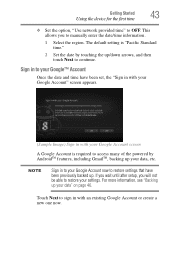
...after setup, you to sign in with an existing Google Account or create a new one now. For more information, see "Backing up your Google Account screen A Google Account is "Pacific Standard time." 2 Set the date by AndroidTM features, including GmailTM, backing up your settings. NOTE Sign in to your...restore your data, etc. This allows you will not be able to restore settings that have been set, the "Sign in with your Google Account" screen appears. (Sample Image) Sign in with your data" on page 46. Touch Next to manually enter the date/time information. 1 Select the region....
...after setup, you to sign in with an existing Google Account or create a new one now. For more information, see "Backing up your Google Account screen A Google Account is "Pacific Standard time." 2 Set the date by AndroidTM features, including GmailTM, backing up your settings. NOTE Sign in to your...restore your data, etc. This allows you will not be able to restore settings that have been set, the "Sign in with your Google Account" screen appears. (Sample Image) Sign in with your data" on page 46. Touch Next to manually enter the date/time information. 1 Select the region....
User Guide
Page 44
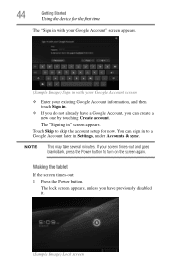
...information, and then touch Sign in. ❖ If you do not already have a Google Account, you have previously disabled it. (Sample Image) Lock screen The "Signing in Settings, under Accounts & sync. Touch Skip to skip the account setup for the first time The "Sign in with your Google Account..." screen appears. (Sample Image) Sign in with your Google Account screen ❖ Enter your screen times-out and goes blank/dark, press the Power button to turn on the screen again. 44 Getting Started Using the device for now. Waking ...
...information, and then touch Sign in. ❖ If you do not already have a Google Account, you have previously disabled it. (Sample Image) Lock screen The "Signing in Settings, under Accounts & sync. Touch Skip to skip the account setup for the first time The "Sign in with your Google Account..." screen appears. (Sample Image) Sign in with your Google Account screen ❖ Enter your screen times-out and goes blank/dark, press the Power button to turn on the screen again. 44 Getting Started Using the device for now. Waking ...
User Guide
Page 45
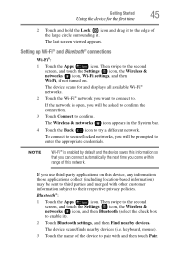
...large circle surrounding it ). 2 Touch Bluetooth settings, and then Find nearby devices. If you use third-party applications on . Then swipe to the second screen, and touch the Settings ( ) icon, the Wireless & networks ( ) icon, Wi-Fi settings, and then Wi-Fi, if not turned on ... Touch the Apps ( ) icon. To connect to secure/locked networks, you will be prompted to enter the appropriate credentials. The last screen viewed appears. Then swipe to the second screen, and touch the Settings ( ) icon, the Wireless & networks ( ) icon, and then Bluetooth (select the check box to enable...
...large circle surrounding it ). 2 Touch Bluetooth settings, and then Find nearby devices. If you use third-party applications on . Then swipe to the second screen, and touch the Settings ( ) icon, the Wireless & networks ( ) icon, Wi-Fi settings, and then Wi-Fi, if not turned on ... Touch the Apps ( ) icon. To connect to secure/locked networks, you will be prompted to enter the appropriate credentials. The last screen viewed appears. Then swipe to the second screen, and touch the Settings ( ) icon, the Wireless & networks ( ) icon, and then Bluetooth (select the check box to enable...
User Guide
Page 46
... up the data you need to replace your device, your data can also back up your settings as well as an SD™ Card (see "TOSHIBA File Manager Utility" on the Home screen. You can be restored to your new one. Product registration is strongly recommended, and allows... Toshiba to send you must be completed by either visiting the Toshiba Web site at http://www.register.toshiba.com, or by touching the Registration ( ) icon on page 102. You can also back...
... up the data you need to replace your device, your data can also back up your settings as well as an SD™ Card (see "TOSHIBA File Manager Utility" on the Home screen. You can be restored to your new one. Product registration is strongly recommended, and allows... Toshiba to send you must be completed by either visiting the Toshiba Web site at http://www.register.toshiba.com, or by touching the Registration ( ) icon on page 102. You can also back...
User Guide
Page 47
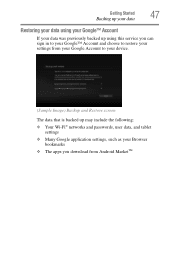
Getting Started 47 Backing up your data Restoring your data using your Google™ Account If your data was previously backed up using this service you can sign in to your Google™ Account and choose to restore your settings from your Google Account to your device. (Sample Image) Backup and Restore screen The data that is backed up may include the following: ❖ Your Wi-Fi® networks and passwords, user data, and tablet settings ❖ Many Google application settings, such as your Browser bookmarks ❖ The apps you download from Android MarketTM
Getting Started 47 Backing up your data Restoring your data using your Google™ Account If your data was previously backed up using this service you can sign in to your Google™ Account and choose to restore your settings from your Google Account to your device. (Sample Image) Backup and Restore screen The data that is backed up may include the following: ❖ Your Wi-Fi® networks and passwords, user data, and tablet settings ❖ Many Google application settings, such as your Browser bookmarks ❖ The apps you download from Android MarketTM
User Guide
Page 48
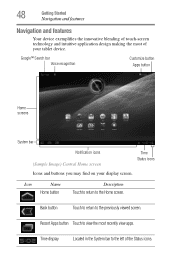
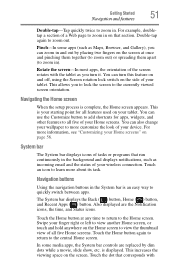
... icons. Time display Located in the System bar to the previously viewed screen. 48 Getting Started Navigation and features Navigation and features Your device exemplifies the innovative blending of touch-screen technology and intuitive application design making the most recently view apps. Icon... Description Touch to return to view the most of your display screen. Google™ Search bar Voice recognition Customize button Apps button Home screens System bar Notification icons (Sample Image) Central Home screen Time Status icons Icons and buttons you may find on your tablet...
... icons. Time display Located in the System bar to the previously viewed screen. 48 Getting Started Navigation and features Navigation and features Your device exemplifies the innovative blending of touch-screen technology and intuitive application design making the most recently view apps. Icon... Description Touch to return to view the most of your display screen. Google™ Search bar Voice recognition Customize button Apps button Home screens System bar Notification icons (Sample Image) Central Home screen Time Status icons Icons and buttons you may find on your tablet...
User Guide
Page 49
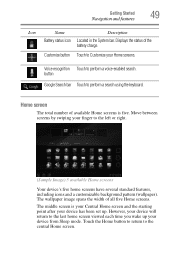
... Customize your finger to the left or right. (Sample Image) 5 available Home screens Your device's five home screens have several standard features, including icons and a customizable background pattern (wallpaper). Home screen The total number of available Home screens is your Central Home screen and the starting point after your device has been set up your...
... Customize your finger to the left or right. (Sample Image) 5 available Home screens Your device's five home screens have several standard features, including icons and a customizable background pattern (wallpaper). Home screen The total number of available Home screens is your Central Home screen and the starting point after your device has been set up your...

User Guide
Page 50
... example of either a widget, application, bookmark, or game that can also change the screen's orientation. Drag-Touch and hold an item on the screen by touching the icon on a Home screen. Each Home screen may break or scratch if not handled properly. Touch-Touch to manipulate the onscreen icons,...Customizing your Gmail webmail account. 50 Getting Started Navigation and features Icons An icon represents a shortcut of an icon located on a Home screen is made of glass so avoid contact with sharp, rough, or abrasive objects or substances as app and setting icons or onscreen buttons....
... example of either a widget, application, bookmark, or game that can also change the screen's orientation. Drag-Touch and hold an item on the screen by touching the icon on a Home screen. Each Home screen may break or scratch if not handled properly. Touch-Touch to manipulate the onscreen icons,...Customizing your Gmail webmail account. 50 Getting Started Navigation and features Icons An icon represents a shortcut of an icon located on a Home screen is made of glass so avoid contact with sharp, rough, or abrasive objects or substances as app and setting icons or onscreen buttons....
User Guide
Page 51
... increases the viewing space on your wireless connection. You can turn it. You can use the Customize button to add shortcuts for all five Home screens. You can zoom in and out by dim dots while a movie, slide show, etc. Navigation buttons Using the navigation buttons in . Touch the ... 56. Touch the dot that run continuously in the background and displays notifications, such as you to lock the screen to the central Home screen. This is your Home screens" on the screen at any time to return to view the thumbnail view of your tablet. Touch the Home button again to return...
... increases the viewing space on your wireless connection. You can turn it. You can use the Customize button to add shortcuts for all five Home screens. You can zoom in and out by dim dots while a movie, slide show, etc. Navigation buttons Using the navigation buttons in . Touch the ... 56. Touch the dot that run continuously in the background and displays notifications, such as you to lock the screen to the central Home screen. This is your Home screens" on the screen at any time to return to view the thumbnail view of your tablet. Touch the Home button again to return...
User Guide
Page 52
... the desired control, or touch a blank area of the System bar. Also available at the top of the screen are located on the far right of the System bar to the left of the screen you may also hear a notification sound. For more information, see "Securing your tablet" on your settings. Status...
... the desired control, or touch a blank area of the System bar. Also available at the top of the screen are located on the far right of the System bar to the left of the screen you may also hear a notification sound. For more information, see "Securing your tablet" on your settings. Status...
User Guide
Page 53
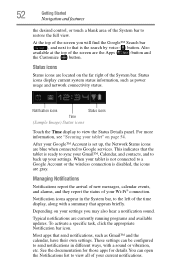
The Notification summary panel opens. (Sample Image) Notification summary panel screen 2 Touch a notification summary to view it or to respond to it , touch its ...progress of currently downloading apps 1 Touch a notification icon in the System bar on the lower right of your Home screen. Touching a blank area of the sender ❖ Media controls to play/pause music or to skip to remove it...and controls, including: ❖ A message summary, with the date and picture of the screen closes the list without viewing it . It will then be cleared from the Notifications list.
The Notification summary panel opens. (Sample Image) Notification summary panel screen 2 Touch a notification summary to view it or to respond to it , touch its ...progress of currently downloading apps 1 Touch a notification icon in the System bar on the lower right of your Home screen. Touching a blank area of the sender ❖ Media controls to play/pause music or to skip to remove it...and controls, including: ❖ A message summary, with the date and picture of the screen closes the list without viewing it . It will then be cleared from the Notifications list.

