
Toshiba Online Users Guide for Tecra A8
Page 56
... mode, data will be lost. The operating system turns off the computer using the Start menu. For information on removing the main battery, see "Removing the battery from the computer" on page 128. 5 Close the display panel and turn off the computer. 3 Unplug and remove any cables connected to locate the memory module slot cover. You can install one or two memory modules. otherwise, skip to step 3. 1 Click Start, then Turn off computer or Shut down window...
... mode, data will be lost. The operating system turns off the computer using the Start menu. For information on removing the main battery, see "Removing the battery from the computer" on page 128. 5 Close the display panel and turn off the computer. 3 Unplug and remove any cables connected to locate the memory module slot cover. You can install one or two memory modules. otherwise, skip to step 3. 1 Click Start, then Turn off computer or Shut down window...

Toshiba Online Users Guide for Tecra A8
Page 60
... the battery. Removing a memory module If you are adding an extra memory module after setting up . 17 Reconnect the cables. 18 Restart the computer. If you need to remove a memory module: 1 Complete steps 1-8 in "Checking total memory" on page 62. TECHNICAL NOTE: You must have at least one memory module installed for the computer to shut down the computer and open the memory module slot cover. 60 Getting Started Adding memory (optional) 14 Replace the memory module slot cover...
... the battery. Removing a memory module If you are adding an extra memory module after setting up . 17 Reconnect the cables. 18 Restart the computer. If you need to remove a memory module: 1 Complete steps 1-8 in "Checking total memory" on page 62. TECHNICAL NOTE: You must have at least one memory module installed for the computer to shut down the computer and open the memory module slot cover. 60 Getting Started Adding memory (optional) 14 Replace the memory module slot cover...
Toshiba Online Users Guide for Tecra A8
Page 62
... inserted completely into the socket and lined up . 7 Reconnect the cables. 8 Restart the computer. If the computer does not recognize the memory configuration, turn off the computer, remove the memory slot cover, and check that the computer has recognized the change. TECHNICAL NOTE: You must have at least one memory module installed for the computer to work. 62 Getting Started Adding memory (optional) 5 Re-insert the battery.
... inserted completely into the socket and lined up . 7 Reconnect the cables. 8 Restart the computer. If the computer does not recognize the memory configuration, turn off the computer, remove the memory slot cover, and check that the computer has recognized the change. TECHNICAL NOTE: You must have at least one memory module installed for the computer to work. 62 Getting Started Adding memory (optional) 5 Re-insert the battery.
Toshiba Online Users Guide for Tecra A8
Page 165
... or user password A supervisor password prevents other users from changing hardware configuration options. Setting a supervisor password If you choose to set a supervisor or user password, Toshiba strongly recommends that may occur to you not remember it. 165 Toshiba Utilities Using a supervisor or user password Disabling a user password To cancel the power-on -screen instructions to remove the user password. The Toshiba Assist window appears. 2 On the left side, select Secure. 3 Select the User Password icon. 4 Click Delete. 5 Follow the on password function: 1 Click Start, All...
... or user password A supervisor password prevents other users from changing hardware configuration options. Setting a supervisor password If you choose to set a supervisor or user password, Toshiba strongly recommends that may occur to you not remember it. 165 Toshiba Utilities Using a supervisor or user password Disabling a user password To cancel the power-on -screen instructions to remove the user password. The Toshiba Assist window appears. 2 On the left side, select Secure. 3 Select the User Password icon. 4 Click Delete. 5 Follow the on password function: 1 Click Start, All...
Toshiba Online Users Guide for Tecra A8
Page 167
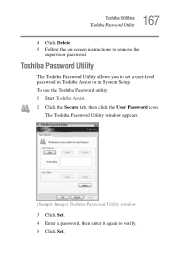
The Toshiba Password Utility window appears. (Sample Image) Toshiba Password Utility window 3 Click Set. 4 Enter a password, then enter it again to set a user-level password in Toshiba Assist or in System Setup. Toshiba Password Utility The Toshiba Password Utility allows you to verify. 5 Click Set. To use the Toshiba Password utility: 1 Start Toshiba Assist. 2 Click the Secure tab, then click the User Password icon. 167 Toshiba Utilities Toshiba Password Utility 4 Click Delete. 5 Follow the on-screen instructions to remove the supervisor password.
The Toshiba Password Utility window appears. (Sample Image) Toshiba Password Utility window 3 Click Set. 4 Enter a password, then enter it again to set a user-level password in Toshiba Assist or in System Setup. Toshiba Password Utility The Toshiba Password Utility allows you to verify. 5 Click Set. To use the Toshiba Password utility: 1 Start Toshiba Assist. 2 Click the Secure tab, then click the User Password icon. 167 Toshiba Utilities Toshiba Password Utility 4 Click Delete. 5 Follow the on-screen instructions to remove the supervisor password.

Toshiba Online Users Guide for Tecra A8
Page 209
... accessing the hard disk or the optional external diskette drive." Unless a hardware device has failed, problems usually occur when you change the system in the optional external diskette drive. on page 208. For more information see "Charging batteries" on page 119. For example: ❖ The operating system fails to start . ❖ The operating system responds differently from the normal routine. ❖ The screen does not look right. The Windows® operating...
... accessing the hard disk or the optional external diskette drive." Unless a hardware device has failed, problems usually occur when you change the system in the optional external diskette drive. on page 208. For more information see "Charging batteries" on page 119. For example: ❖ The operating system fails to start . ❖ The operating system responds differently from the normal routine. ❖ The screen does not look right. The Windows® operating...

Toshiba Online Users Guide for Tecra A8
Page 220
... that the monitor's power cord/cable is firmly plugged into effect. Display problems Here are using the TouchPad on the external keyboard. Press any key. If no password is blank. The screen reactivates and allows you are some typical display problems and their solutions: The screen is registered, press any key to continue working power outlet. ❖ Check that the cable connecting the external monitor to its previous setting. If you to activate the screen.
... that the monitor's power cord/cable is firmly plugged into effect. Display problems Here are using the TouchPad on the external keyboard. Press any key. If no password is blank. The screen reactivates and allows you are some typical display problems and their solutions: The screen is registered, press any key to continue working power outlet. ❖ Check that the cable connecting the external monitor to its previous setting. If you to activate the screen.

Toshiba Online Users Guide for Tecra A8
Page 301
... disk or disk error message 209 not accessing disk drives 208 running on battery power 116 setting up 44, 56 warning resume failure message 208 computing tips 95 connecting to a power source 47 connection set up 142 control buttons 76 critical applications 3 Ctrl keys 98 D desktop creating new icon 136 major features 136 desktop exploration 135 desktop icons 136 Device Manager 214 checking properties 215 disabling a device 215 devices keyboard 80 mouse 80 Disk Defragmenter 223 disk drive...
... disk or disk error message 209 not accessing disk drives 208 running on battery power 116 setting up 44, 56 warning resume failure message 208 computing tips 95 connecting to a power source 47 connection set up 142 control buttons 76 critical applications 3 Ctrl keys 98 D desktop creating new icon 136 major features 136 desktop exploration 135 desktop icons 136 Device Manager 214 checking properties 215 disabling a device 215 devices keyboard 80 mouse 80 Disk Defragmenter 223 disk drive...
Toshiba Online Users Guide for Tecra A8
Page 302
... change/remove key assignments 175 starting 171 Fn-esse program 171 assigning a key 171 using drag-and-drop 172 function keys 98 H hardware conflicts 212 resolving 214 headphones using 149 Help and Support Windows XP 211 Hibernation mode 85 configuring 89 starting again from 91 hot key display brightness 257 display modes 256 Hibernation mode 255 instant password security 251 keyboard 258 keyboard overlays 257, 259 password security 251 power usage mode 253 Standby mode 254 volume mute 250 hot key power usage mode...
... change/remove key assignments 175 starting 171 Fn-esse program 171 assigning a key 171 using drag-and-drop 172 function keys 98 H hardware conflicts 212 resolving 214 headphones using 149 Help and Support Windows XP 211 Hibernation mode 85 configuring 89 starting again from 91 hot key display brightness 257 display modes 256 Hibernation mode 255 instant password security 251 keyboard 258 keyboard overlays 257, 259 password security 251 power usage mode 253 Standby mode 254 volume mute 250 hot key power usage mode...

Toshiba Online Users Guide for Tecra A8
Page 303
... slot cover 57 memory module installation 55 installing inserting into socket 58 removing 61 microphone 148 modem determining COM port 139 problem solving 231 resetting port to default settings 139 upgrading 139 monitor 78 connecting 78 not working 220 mouse installing 80 serial 80 N network accessing 142 Dial-Up Networking Wizard 142 networking wireless 141 O opening the display panel 52 optical drive problems 225 troubleshooting 225 other documentation 38 overlay keys 99 P password deleting a supervisor 166 disabling a user 165 supervisor set up 165 types 163 passwords instant, using...
... slot cover 57 memory module installation 55 installing inserting into socket 58 removing 61 microphone 148 modem determining COM port 139 problem solving 231 resetting port to default settings 139 upgrading 139 monitor 78 connecting 78 not working 220 mouse installing 80 serial 80 N network accessing 142 Dial-Up Networking Wizard 142 networking wireless 141 O opening the display panel 52 optical drive problems 225 troubleshooting 225 other documentation 38 overlay keys 99 P password deleting a supervisor 166 disabling a user 165 supervisor set up 165 types 163 passwords instant, using...

Toshiba Online Users Guide for Tecra A8
Page 304
... Device Manager 214 disabling a device 215 disk drive is slow 223 display is blank 220 external display not working 222 external monitor 220 faulty memory 216 hardware conflict 212, 213 high-pitched noise 226 illegal operation 206 Internet bookmarked site not found 211 Internet connection is slow 211 keyboard not responding 208 missing files/trouble accessing a disk 222 modem not receiving or transmitting 231 no sound 226 non-system disk or disk error 209, 224 PC Card...
... Device Manager 214 disabling a device 215 disk drive is slow 223 display is blank 220 external display not working 222 external monitor 220 faulty memory 216 hardware conflict 212, 213 high-pitched noise 226 illegal operation 206 Internet bookmarked site not found 211 Internet connection is slow 211 keyboard not responding 208 missing files/trouble accessing a disk 222 modem not receiving or transmitting 231 no sound 226 non-system disk or disk error 209, 224 PC Card...
User Manual
Page 30
... specific key combinations that let you quickly change internal display, simultaneous display or multi-monitor display. User's Manual 1-11 Access each function using the following features are either unique to change the system configuration directly from the keyboard without running a system program. This button is connected will open the Windows Vista™ TMM (Transient Multimon Manager) screen. Power is restored when any key is available on Tecra A8 models only. This can be specified in the Power Options. Hot keys Hot keys are advanced features which make...
... specific key combinations that let you quickly change internal display, simultaneous display or multi-monitor display. User's Manual 1-11 Access each function using the following features are either unique to change the system configuration directly from the keyboard without running a system program. This button is connected will open the Windows Vista™ TMM (Transient Multimon Manager) screen. Power is restored when any key is available on Tecra A8 models only. This can be specified in the Power Options. Hot keys Hot keys are advanced features which make...
User Manual
Page 106
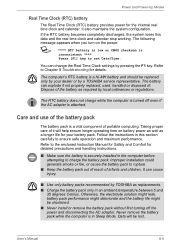
Improper installation could generate smoke or fire, or cause the battery pack to ensure safe operation and maximum performance. Care and use of portable computing. User's Manual 6-5 Power and Power-Up Modes Real Time Clock (RTC) battery The Real Time Clock (RTC) battery provides power for details. Refer to set Date/Time. The RTC battery does not charge while the computer is turned off the power and disconnecting the...
Improper installation could generate smoke or fire, or cause the battery pack to ensure safe operation and maximum performance. Care and use of portable computing. User's Manual 6-5 Power and Power-Up Modes Real Time Clock (RTC) battery The Real Time Clock (RTC) battery provides power for details. Refer to set Date/Time. The RTC battery does not charge while the computer is turned off the power and disconnecting the...
User Manual
Page 116
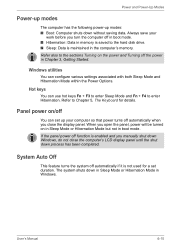
... hard disk drive. ■ Sleep: Data is enabled and you turn the computer off the power in the computer's memory. If the panel power off function is maintained in Chapter 3, Getting Started. Refer also to the sections Turning on the power and Turning off in boot mode. ■ Hibernation: Data in memory is saved to enter Hibernation. The system shuts down Windows, do not close the display panel. User's Manual 6-15 Windows utilities You can set duration. Panel power...
... hard disk drive. ■ Sleep: Data is enabled and you turn the computer off the power in the computer's memory. If the panel power off function is maintained in Chapter 3, Getting Started. Refer also to the sections Turning on the power and Turning off in boot mode. ■ Hibernation: Data in memory is saved to enter Hibernation. The system shuts down Windows, do not close the display panel. User's Manual 6-15 Windows utilities You can set duration. Panel power...

User Manual
Page 133
... is only an error in either Sleep or Hibernation Mode. If there is only an error in Slot B: repeatedly flashes orange twice, then green twice. The computer was shut down in Slot B: repeatedly flashes orange, then green twice. b. Optional Devices Creation of a boot disk Within the TOSHIBA SD Memory Boot Utility, a bootable SD memory card can be fatally damaged by TOSHIBA. ■ Do not try to install or remove a memory module under the...
... is only an error in either Sleep or Hibernation Mode. If there is only an error in Slot B: repeatedly flashes orange twice, then green twice. The computer was shut down in Slot B: repeatedly flashes orange, then green twice. b. Optional Devices Creation of a boot disk Within the TOSHIBA SD Memory Boot Utility, a bootable SD memory card can be fatally damaged by TOSHIBA. ■ Do not try to install or remove a memory module under the...

User Manual
Page 135
... using the tip of the memory module with the locking tabs on and make sure the computer is recognized. Install the battery pack. Removing a memory module To remove the memory module, make sure the added memory is in Chapter 6, Power and Power-Up Modes, for details. 9. Turn the computer upside down and remove the battery pack. Turn your finger. Click Start, click Control Panel, click System and Maintenance and select the System icon. User's Manual 8-8 Ensure that the cover...
... using the tip of the memory module with the locking tabs on and make sure the computer is recognized. Install the battery pack. Removing a memory module To remove the memory module, make sure the added memory is in Chapter 6, Power and Power-Up Modes, for details. 9. Turn the computer upside down and remove the battery pack. Turn your finger. Click Start, click Control Panel, click System and Maintenance and select the System icon. User's Manual 8-8 Ensure that the cover...
User Manual
Page 150
Press Y key. you will boot up. 2. Set the time in the BIOS setup using is not remapping the keyboard. BIOS setup will terminate and the computer will appear. 5. Press Fn + F10 and try typing again. Make sure the software you are using the following message is Displayed on the LCD screen: RTC battery is low or CMOS checksum is not selected. If you are still unable to the TOSHIBA Password Utility section...
Press Y key. you will boot up. 2. Set the time in the BIOS setup using is not remapping the keyboard. BIOS setup will terminate and the computer will appear. 5. Press Fn + F10 and try typing again. Make sure the software you are using the following message is Displayed on the LCD screen: RTC battery is low or CMOS checksum is not selected. If you are still unable to the TOSHIBA Password Utility section...

User Manual
Page 161
... settings are correct. i.LINK (IEEE1394) device Problem Procedure i.LINK device does not Make sure the cable is turned on . Reinstall the drivers. Problem Procedure Monitor does not turn on Make sure that the external monitor's power cable is on . Follow the on the external monitor. Restart Windows. Refer to your monitor's documentation. User's Manual 9-18 Troubleshooting External monitor Refer also to Chapter 8, Optional Devices, and to Phone and Modem modem Properties in the Control Panel. Confirm that the external monitor's power switch is...
... settings are correct. i.LINK (IEEE1394) device Problem Procedure i.LINK device does not Make sure the cable is turned on . Reinstall the drivers. Problem Procedure Monitor does not turn on Make sure that the external monitor's power cable is on . Follow the on the external monitor. Restart Windows. Refer to your monitor's documentation. User's Manual 9-18 Troubleshooting External monitor Refer also to Chapter 8, Optional Devices, and to Phone and Modem modem Properties in the Control Panel. Confirm that the external monitor's power switch is...
User Manual
Page 167
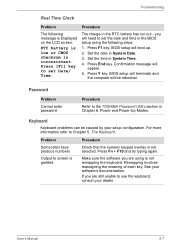
... capacity using powers of system memory, the full system memory space for all batteries. Contact Toshiba technical service and support, refer to the product when used by periodically storing it on an external storage medium. After going through many charge and discharge cycles, the battery will need to design configuration. This is shipped with 4 GB of 10. Legal Footnotes CPU performance may also vary from specifications...
... capacity using powers of system memory, the full system memory space for all batteries. Contact Toshiba technical service and support, refer to the product when used by periodically storing it on an external storage medium. After going through many charge and discharge cycles, the battery will need to design configuration. This is shipped with 4 GB of 10. Legal Footnotes CPU performance may also vary from specifications...
User Manual
Page 196
... used specifically to connect one system or device to another. 2) To physically connect one system or device to another to exchange information. 3) The point of contact between user, the computer, and the program, for example, the keyboard or a menu. Each keystroke activates a switch that gives a component access to the processor. Liquid Crystal Display (LCD): Liquid crystal sealed between the glass sheets alters the brightness of...
... used specifically to connect one system or device to another. 2) To physically connect one system or device to another to exchange information. 3) The point of contact between user, the computer, and the program, for example, the keyboard or a menu. Each keystroke activates a switch that gives a component access to the processor. Liquid Crystal Display (LCD): Liquid crystal sealed between the glass sheets alters the brightness of...


