

Owners Manual
Page 2
... overheating and avoid possible damage to cause an electric shock. The exclamation mark in the triangle tells you install the TV on the screen. If the cabinet is probably non-standard and must be strong enough to the TV. The lightning symbol in the triangle tells you...If you that the cable ground shall be flat and steady. Turn the TV off to extremely high temperatures or humidity, and temperatures of the screen will evaporate. • Avoid displaying stationary images on your dealer. • If the room temperature suddenly rises, condensation may occur on the ...
... overheating and avoid possible damage to cause an electric shock. The exclamation mark in the triangle tells you install the TV on the screen. If the cabinet is probably non-standard and must be strong enough to the TV. The lightning symbol in the triangle tells you...If you that the cable ground shall be flat and steady. Turn the TV off to extremely high temperatures or humidity, and temperatures of the screen will evaporate. • Avoid displaying stationary images on your dealer. • If the room temperature suddenly rises, condensation may occur on the ...
Owners Manual
Page 3
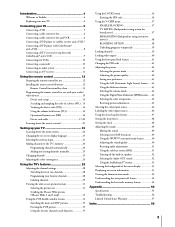
Introduction 4 Welcome to Toshiba 4 Exploring your new TV 4 Connecting your TV 5 Connecting a VCR 5 Connecting a cable converter...settings 28 Switching between two channels 28 Programming your favorite channels 28 Labeling channels 29 Viewing the wide-screen picture formats 31 Selecting the picture size 31 Scrolling the Theater Wide picture (Theater Wide 2 and ... 52 Using the StableSoundTM feature 53 Selecting the background of the menu display 53 Displaying on-screen information 53 Viewing the demonstration mode 54 Understanding the auto power off feature 54 Understanding the ...
Introduction 4 Welcome to Toshiba 4 Exploring your new TV 4 Connecting your TV 5 Connecting a VCR 5 Connecting a cable converter...settings 28 Switching between two channels 28 Programming your favorite channels 28 Labeling channels 29 Viewing the wide-screen picture formats 31 Selecting the picture size 31 Scrolling the Theater Wide picture (Theater Wide 2 and ... 52 Using the StableSoundTM feature 53 Selecting the background of the menu display 53 Displaying on-screen information 53 Viewing the demonstration mode 54 Understanding the auto power off feature 54 Understanding the ...
Owners Manual
Page 4
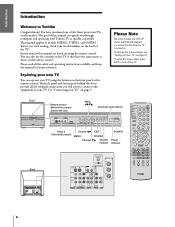
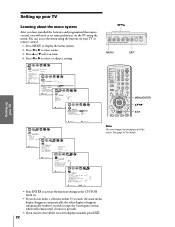
... menu, either press EXIT or turn off the TV. Front Remote sensor (Behind the screen) Behind the door VIDEO-3 IN S-VIDEO VIDEO AUDIO L/MONO R Menu x •zy...IN IN AUDIO OUT AUDIO PR R COLOR STREAM HD 2 IN ANT-2 Setting up and operating your Toshiba TV as quickly as those on the remote control. You can operate your TV" on page 5.... TVs on the market. Before you will need to connect other equipment to Toshiba Congratulations! See "Connecting your TV using the remote control. You have the same...appears on-screen the first time the TV is to models 50HX81, 57HX81, and...
... menu, either press EXIT or turn off the TV. Front Remote sensor (Behind the screen) Behind the door VIDEO-3 IN S-VIDEO VIDEO AUDIO L/MONO R Menu x •zy...IN IN AUDIO OUT AUDIO PR R COLOR STREAM HD 2 IN ANT-2 Setting up and operating your Toshiba TV as quickly as those on the remote control. You can operate your TV" on page 5.... TVs on the market. Before you will need to connect other equipment to Toshiba Congratulations! See "Connecting your TV using the remote control. You have the same...appears on-screen the first time the TV is to models 50HX81, 57HX81, and...
Owners Manual
Page 13
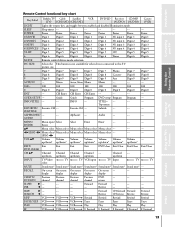
...0 Digit 0 Digit 0 Digit 0 Digit 0 Digit 0 Digit 0 ENT --- INFO/TITLE --- --- TITLE= --- --- --- Channel --- --- RECALL On-screen On-screen On-screen On-screen On-screen --- --- --- Reverse CH reverse Reverse Reverse REW VCR VCR VCR Rewind Rewind Rewind Rewind Rewind PAUSE/STEP VCR VCR VCR Pause Pause Pause Pause... DVD --- --- --- Introduction Connecting your TV Using the Remote Control Setting up your TV Remote Control functional key chart Key Label Toshiba TV Cable Satellite (TV) (CBL/SAT) (CBL/SAT) VCR DVD/LD Receiver CD/MD Cassete (AUDIO) (AUDIO) (VCR...
...0 Digit 0 Digit 0 Digit 0 Digit 0 Digit 0 Digit 0 ENT --- INFO/TITLE --- --- TITLE= --- --- --- Channel --- --- RECALL On-screen On-screen On-screen On-screen On-screen --- --- --- Reverse CH reverse Reverse Reverse REW VCR VCR VCR Rewind Rewind Rewind Rewind Rewind PAUSE/STEP VCR VCR VCR Pause Pause Pause Pause... DVD --- --- --- Introduction Connecting your TV Using the Remote Control Setting up your TV Remote Control functional key chart Key Label Toshiba TV Cable Satellite (TV) (CBL/SAT) (CBL/SAT) VCR DVD/LD Receiver CD/MD Cassete (AUDIO) (AUDIO) (VCR...
Owners Manual
Page 21
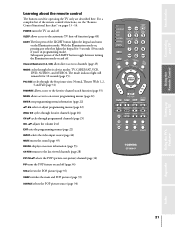
... the keypad for operating the TV only are described here. Subsequent presses of the remote control's functions, see the "Remote Control functional key chart" on -screen programming menus (page 22) ENTER sets programming menu information (page 22) yz x • select or adjust programming menus (page 22) (FAV) x • cycles through favorite... level EXIT exits the programming menus (page 22) INPUT selects the video input source (page 46) MUTE mutes the sound (page 49) RECALL displays on-screen information (page 53) CH RTN returns to on pages 13 -14.
... the keypad for operating the TV only are described here. Subsequent presses of the remote control's functions, see the "Remote Control functional key chart" on -screen programming menus (page 22) ENTER sets programming menu information (page 22) yz x • select or adjust programming menus (page 22) (FAV) x • cycles through favorite... level EXIT exits the programming menus (page 22) INPUT selects the video input source (page 46) MUTE mutes the sound (page 49) RECALL displays on-screen information (page 53) CH RTN returns to on pages 13 -14.
Owners Manual
Page 22
... After you have installed the batteries and programmed the remote control, you will need to set some preferences on the TV using the buttons on -screen displays instantly, press EXIT. 22 Appendix Index
... After you have installed the batteries and programmed the remote control, you will need to set some preferences on the TV using the buttons on -screen displays instantly, press EXIT. 22 Appendix Index

Owners Manual
Page 23
...different languages (English, French and Spanish) for the on the antenna terminal you wish to highlight either ANT 1 or ANT 2, depending on -screen display of adjustment menus and messages. The current signal source displays in purple. 2. Introduction Connecting your TV Using the Remote Control Setting up your... desired language. Press y or z to two different antenna input sources (ANT 1 or ANT 2). Press x or • to highlight your TV Changing the on-screen display language You can connect to highlight LANGUAGE. 1 2 3 4 5 6 7 8 9 10 11 12 13 14 15 16 17 18 19 20 21 22 23...
...different languages (English, French and Spanish) for the on the antenna terminal you wish to highlight either ANT 1 or ANT 2, depending on -screen display of adjustment menus and messages. The current signal source displays in purple. 2. Introduction Connecting your TV Using the Remote Control Setting up your... desired language. Press y or z to two different antenna input sources (ANT 1 or ANT 2). Press x or • to highlight your TV Changing the on-screen display language You can connect to highlight LANGUAGE. 1 2 3 4 5 6 7 8 9 10 11 12 13 14 15 16 17 18 19 20 21 22 23...
Owners Manual
Page 25
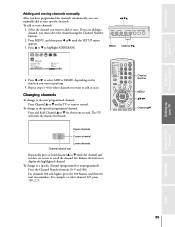
... example, to a specific channel (programmed or unprogrammed): Press the Channel Number buttons (0-9 and 100). To change to the next programmed channel: Press Channel y or z on -screen to perform. 5.
... example, to a specific channel (programmed or unprogrammed): Press the Channel Number buttons (0-9 and 100). To change to the next programmed channel: Press Channel y or z on -screen to perform. 5.
Owners Manual
Page 26
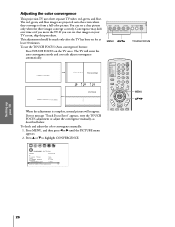
If you move the TV. To check and adjust the color convergence manually: 1. The red, green, and blue images are projected onto the screen where they converge to highlight CONVERGENCE. 1 2 3 4 5 6 7 8 9 10 11 12 13 14 15 16 17 18 19 20 21 22 23 24 25 26 27 28 ... the TV's Features Appendix Index 26 The TV will reappear. Convergence may drift over time or if you can see clear images on your TV screen, skip this procedure. Press y or z to form a full-color picture.
If you move the TV. To check and adjust the color convergence manually: 1. The red, green, and blue images are projected onto the screen where they converge to highlight CONVERGENCE. 1 2 3 4 5 6 7 8 9 10 11 12 13 14 15 16 17 18 19 20 21 22 23 24 25 26 27 28 ... the TV's Features Appendix Index 26 The TV will reappear. Convergence may drift over time or if you can see clear images on your TV screen, skip this procedure. Press y or z to form a full-color picture.
Owners Manual
Page 28
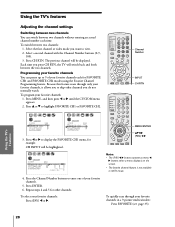
... CH RTN MENU/ENTER yzx • (FAV) x • Notes: • The (FAV) x • buttons operate as menu x • buttons when a menu display is on the screen. • The favorite channel feature is not available in a 9-picture multi-window: Press FAVORITE (see page 35). Select the first channel or video mode you...
... CH RTN MENU/ENTER yzx • (FAV) x • Notes: • The (FAV) x • buttons operate as menu x • buttons when a menu display is on the screen. • The favorite channel feature is not available in a 9-picture multi-window: Press FAVORITE (see page 35). Select the first channel or video mode you...
Owners Manual
Page 29
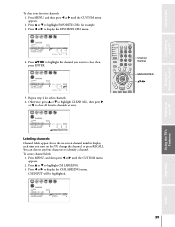
... create channel labels: 1. Press MENU, and then press x or • until the CUSTOM menu appears. 2. Press yzx • to highlight the channel you turn on -screen channel number display each time you want to identify a channel. You can choose any four characters to clear, then press ENTER. 1 2 3 4 5 6 7 8 9 10 11 12 13...
... create channel labels: 1. Press MENU, and then press x or • until the CUSTOM menu appears. 2. Press yzx • to highlight the channel you turn on -screen channel number display each time you want to identify a channel. You can choose any four characters to clear, then press ENTER. 1 2 3 4 5 6 7 8 9 10 11 12 13...

Owners Manual
Page 31
... hidden edges, either Nomal, Theater Wide 1, Theater Wide 2, Theater Wide 3, or Full picture size, as "letter box" format, with bars at right). Wide-screen picture on a conventional TV screen (also known as described below. 1 2 3 4 5 6 7 8 9 10 11 12 13 14 15 16 17 18 19 20 21 22 23 24 25 26 27... 18 19 20 21 22 23 24 25 26 27 28 29 30 31 32 33 34 35 While the above menu is on the screen, you select Theater Wide 2 or 3 for conventional size programs, the top and bottom edges of the picture (see note at the left and right. PIC...
... hidden edges, either Nomal, Theater Wide 1, Theater Wide 2, Theater Wide 3, or Full picture size, as "letter box" format, with bars at right). Wide-screen picture on a conventional TV screen (also known as described below. 1 2 3 4 5 6 7 8 9 10 11 12 13 14 15 16 17 18 19 20 21 22 23 24 25 26 27... 18 19 20 21 22 23 24 25 26 27 28 29 30 31 32 33 34 35 While the above menu is on the screen, you select Theater Wide 2 or 3 for conventional size programs, the top and bottom edges of the picture (see note at the left and right. PIC...
Owners Manual
Page 32
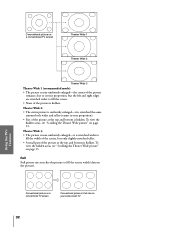
...• Part of the picture is hidden. To view the hidden areas, see "Scrolling the Theater Wide picture" on page 33. Setting up your wide-screen TV 32 Theater Wide 2: • The entire picture is uniformly enlarged-it is hidden. Full Full picture size stretches the picture to fill the width... of the screen, but the left and right edges are stretched wider to fill the screen. • None of the picture at the top and bottom is stretched wider to fill the...
...• Part of the picture is hidden. To view the hidden areas, see "Scrolling the Theater Wide picture" on page 33. Setting up your wide-screen TV 32 Theater Wide 2: • The entire picture is uniformly enlarged-it is hidden. Full Full picture size stretches the picture to fill the width... of the screen, but the left and right edges are stretched wider to fill the screen. • None of the picture at the top and bottom is stretched wider to fill the...
Owners Manual
Page 34
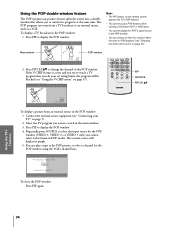
... the POP window: 1. Introduction Connecting your TV Using the Remote Control Using the POP double-window feature The POP (picture-out-picture) feature splits the screen into a double window that exceeds your TV Using the TV's Features Appendix Index 34 Note: • The PIP buttons on the remote control operate the...
... the POP window: 1. Introduction Connecting your TV Using the Remote Control Using the POP double-window feature The POP (picture-out-picture) feature splits the screen into a double window that exceeds your TV Using the TV's Features Appendix Index 34 Note: • The PIP buttons on the remote control operate the...
Owners Manual
Page 47
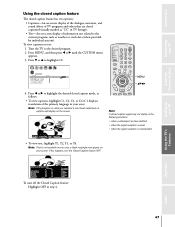
...captioned (usually marked as "CC" in step 4. Note: If text is not available in your area, a black rectangle may not display in your screen. Press z or y to the desired program. 2. Setting up your TV Using the Remote Control Using the closed caption feature The closed caption feature... provided by individual stations). If this happens, turn off the Closed Caption feature: Highlight OFF in TV listings). • Text-An on-screen display of TV programs and videos that are closed captioned, no captions will display on your area). Introduction Connecting your TV Using the TV's...
...captioned (usually marked as "CC" in step 4. Note: If text is not available in your area, a black rectangle may not display in your screen. Press z or y to the desired program. 2. Setting up your TV Using the Remote Control Using the closed caption feature The closed caption feature... provided by individual stations). If this happens, turn off the Closed Caption feature: Highlight OFF in TV listings). • Text-An on-screen display of TV programs and videos that are closed captioned, no captions will display on your area). Introduction Connecting your TV Using the TV's...
Owners Manual
Page 48
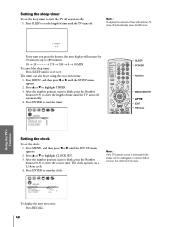
... time display will increase by 10 minutes, up your TV Using the Remote Control Setting the sleep timer To set using the on-screen menu: 1. The clock operates on -screen: Press RECALL. The timer can also be reset. Press ENTER to 180 minutes. 10 → 20 170 → 180 → 0 → 10...
... time display will increase by 10 minutes, up your TV Using the Remote Control Setting the sleep timer To set using the on-screen menu: 1. The clock operates on -screen: Press RECALL. The timer can also be reset. Press ENTER to 180 minutes. 10 → 20 170 → 180 → 0 → 10...

Owners Manual
Page 49
... Control Adjusting the sound Muting the sound Press MUTE to highlight MTS. 3. While the sound is in STEREO mode so you have SAP on the screen but not hear any sound. Press MENU, and then press x or • until the AUDIO menu appears. 2. For example, a station might broadcast ... a second audio program. The MTS feature is not available when the TV is off the sound. Press y or z to temporarily turn off , the screen will hear the station's second audio program (if available) from the speakers, while viewing the original program's picture (see the current program on , you...
... Control Adjusting the sound Muting the sound Press MUTE to highlight MTS. 3. While the sound is in STEREO mode so you have SAP on the screen but not hear any sound. Press MENU, and then press x or • until the AUDIO menu appears. 2. For example, a station might broadcast ... a second audio program. The MTS feature is not available when the TV is off the sound. Press y or z to temporarily turn off , the screen will hear the station's second audio program (if available) from the speakers, while viewing the original program's picture (see the current program on , you...
Owners Manual
Page 53
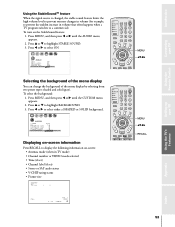
... 20 21 22 23 24 25 26 27 28 29 30 31 32 33 34 35 Displaying on-screen information Press RECALL to a commercial). Press y or z to highlight STABLE SOUND. 3. To turn on -screen: • Antenna mode (when in volume that often happens when a TV program switches to display the following information...
... 20 21 22 23 24 25 26 27 28 29 30 31 32 33 34 35 Displaying on-screen information Press RECALL to a commercial). Press y or z to highlight STABLE SOUND. 3. To turn on -screen: • Antenna mode (when in volume that often happens when a TV program switches to display the following information...
Owners Manual
Page 56
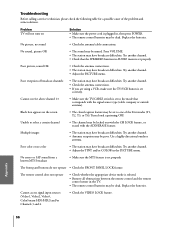
... the TV/VCR button is set correctly. Try another channel. • Adjust the PICTURE menu. Replace the batteries. Problem TV will not turn on the screen • The closed captioning OFF. Poor reception of the problem and some solutions. Turn closed caption feature may have broadcast difficulties. Use a highly directional outdoor...
... the TV/VCR button is set correctly. Try another channel. • Adjust the PICTURE menu. Replace the batteries. Problem TV will not turn on the screen • The closed captioning OFF. Poor reception of the problem and some solutions. Turn closed caption feature may have broadcast difficulties. Use a highly directional outdoor...


