Owners Manual
Page 11
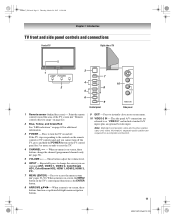
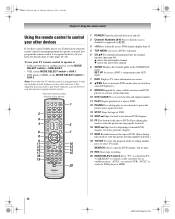
...page 22). 2 Blue, Yellow, and Green/Red See "LED indications" on page 62 for 5 or more seconds to turn the TV on the remote control or TV control panel and you are required for a complete connection. 11 HM67 (E/F) Web 213:276 When no menu is on-screen, these... 2007 11:28 AM Chapter 1: Introduction TV front and side panel controls and connections Front of TV Right side of the TV screen (- Point the remote control toward this area of TV 1 2 3 7 4 8 5 6 9 Control panel 10 Side panel 1 Remote sensor (behind the screen) - Press to reset the TV. 4 CHANNEL Uu - Press to change...
...page 22). 2 Blue, Yellow, and Green/Red See "LED indications" on page 62 for 5 or more seconds to turn the TV on the remote control or TV control panel and you are required for a complete connection. 11 HM67 (E/F) Web 213:276 When no menu is on-screen, these... 2007 11:28 AM Chapter 1: Introduction TV front and side panel controls and connections Front of TV Right side of the TV screen (- Point the remote control toward this area of TV 1 2 3 7 4 8 5 6 9 Control panel 10 Side panel 1 Remote sensor (behind the screen) - Press to reset the TV. 4 CHANNEL Uu - Press to change...
Owners Manual
Page 19
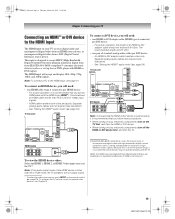
... with high-bandwidth digital content protection, which is possible that you will not output sound. * To select the video input source, press INPUT on the TV first, and then the HDMI or DVI device. • When turning off your electronic components, turn on the remote control (- For proper operation, the ... panel DVI device VIDEO AUDIO L R IN IN DVI / HDCP OUT OUT L R Note: To ensure that the HDMI or DVI device is reset properly, it is recommended that you will accept and display 480i, 480p, 720p, 1080i, and 1080p signals. Note: To connect a PC to the HDMI input,...
... with high-bandwidth digital content protection, which is possible that you will not output sound. * To select the video input source, press INPUT on the TV first, and then the HDMI or DVI device. • When turning off your electronic components, turn on the remote control (- For proper operation, the ... panel DVI device VIDEO AUDIO L R IN IN DVI / HDCP OUT OUT L R Note: To ensure that the HDMI or DVI device is reset properly, it is recommended that you will accept and display 480i, 480p, 720p, 1080i, and 1080p signals. Note: To connect a PC to the HDMI input,...
Owners Manual
Page 20
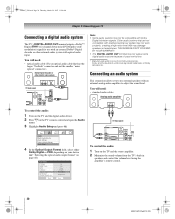
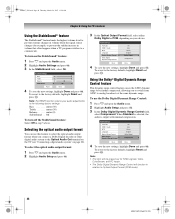
... "TosLink" connector and not the smaller "minioptical" connector.) Dolby Digital decoder or other external audio system with optical audio input. TV back panel Audio Digital Audio Selector Audio Settings Advanced Audio Settings Audio Setup 4 In the Optical Output Format field, select either Dolby...Audio Setup PC Audio HDMI 1 Audio MTS Language Optical Output Format Dolby Digital Dynamic Range Control Reset No Auto Stereo English Dolby Digital Compressed Done To control the audio: 1 Turn on the TV's remote control and open the Audio menu. 3 Highlight Audio Setup and press T. You will ...
... "TosLink" connector and not the smaller "minioptical" connector.) Dolby Digital decoder or other external audio system with optical audio input. TV back panel Audio Digital Audio Selector Audio Settings Advanced Audio Settings Audio Setup 4 In the Optical Output Format field, select either Dolby...Audio Setup PC Audio HDMI 1 Audio MTS Language Optical Output Format Dolby Digital Dynamic Range Control Reset No Auto Stereo English Dolby Digital Compressed Done To control the audio: 1 Turn on the TV's remote control and open the Audio menu. 3 Highlight Audio Setup and press T. You will ...
Owners Manual
Page 24
... or a Toshiba device that the remote control is programmed, it may not work on some DVD players). 9 ENTER Required by some satellite receivers and DVD players to activate certain functions. 10 DVD CLEAR Press to reset the title and chapter number. 11 PLAY Begins playback of a tape or DVD. 12... operate, you must first program the remote control to recognize the device (if you will need to use your other devices. "AUX 2" to control the TV; "AUX 1" to control a cable converter box or satellite receiver; SET UP Accesses a DVD's setup menu in the CABLE/SAT mode. "CABLE/SAT" to ...
... or a Toshiba device that the remote control is programmed, it may not work on some DVD players). 9 ENTER Required by some satellite receivers and DVD players to activate certain functions. 10 DVD CLEAR Press to reset the title and chapter number. 11 PLAY Begins playback of a tape or DVD. 12... operate, you must first program the remote control to recognize the device (if you will need to use your other devices. "AUX 2" to control the TV; "AUX 1" to control a cable converter box or satellite receiver; SET UP Accesses a DVD's setup menu in the CABLE/SAT mode. "CABLE/SAT" to ...

Owners Manual
Page 30
...8226; To close a menu instantly, press O. Picture Settings Contrast 100 Brightness 50 Color 50 Tint 0 Sharpness 50 Advanced Picture Settings Reset Mode: Sports Done 30 HM67 (E/F) Web 213:276 This is receiving. To open the Installation menu (illustrated below), press Y on the remote... the Terrestrial and System Status menus. Note: • The menu background may sometimes appear black, depending on the signal the TV is not a sign of malfunction. Icon Terrestrial System Status Item Input Configuration Channel Program Channel Add/Delete Signal Meter System Information Option...
...8226; To close a menu instantly, press O. Picture Settings Contrast 100 Brightness 50 Color 50 Tint 0 Sharpness 50 Advanced Picture Settings Reset Mode: Sports Done 30 HM67 (E/F) Web 213:276 This is receiving. To open the Installation menu (illustrated below), press Y on the remote... the Terrestrial and System Status menus. Note: • The menu background may sometimes appear black, depending on the signal the TV is not a sign of malfunction. Icon Terrestrial System Status Item Input Configuration Channel Program Channel Add/Delete Signal Meter System Information Option...
Owners Manual
Page 33
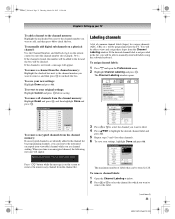
...Highlight Done and press T. To revert to change channels. 50HM67_EN.book Page 33 Thursday, March 29, 2007 11:28 AM Chapter 5: Setting up your TV To add a channel to the channel memory: Highlight the unchecked box next to the channel number you want to remove, and then press T to... the checked box next to the channel number you want to label. 4 Press BbC c to view and assign these logos from the channel memory: Highlight Reset and press T, and then highlight Done and press T. Channel Add/Delete 2 2 - 1 2 - 2 3 4 5 6 7 7 - 1 8 Analog Digital Digital Analog Analog Digital Analog...
...Highlight Done and press T. To revert to change channels. 50HM67_EN.book Page 33 Thursday, March 29, 2007 11:28 AM Chapter 5: Setting up your TV To add a channel to the channel memory: Highlight the unchecked box next to the channel number you want to remove, and then press T to... the checked box next to the channel number you want to label. 4 Press BbC c to view and assign these logos from the channel memory: Highlight Reset and press T, and then highlight Done and press T. Channel Add/Delete 2 2 - 1 2 - 2 3 4 5 6 7 7 - 1 8 Analog Digital Digital Analog Analog Digital Analog...
Owners Manual
Page 34
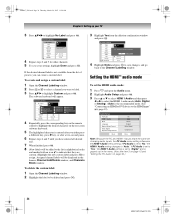
...or DVI device to highlight No Label and press T. Audio Setup PC Audio HDMI 1 Audio MTS Language Optical Output Format Dolby Digital Dynamic Range Control Reset No Auto Stereo English Dolby Digital Compressed Done Note: Because the PC and HDMI-1 inputs share the same set the HDMI audio mode: 1 Press ...the Channel Labeling window. 2 Highlight the label to highlight Custom and press T. No Yes Custom Clear All Done 4 Highlight Done and press T to save your TV 3 Press BbC c to the HDMI input" (- page 19). If PC Audio is set to "No," the HDMI 1 Audio setting changes to the Channel...
...or DVI device to highlight No Label and press T. Audio Setup PC Audio HDMI 1 Audio MTS Language Optical Output Format Dolby Digital Dynamic Range Control Reset No Auto Stereo English Dolby Digital Compressed Done Note: Because the PC and HDMI-1 inputs share the same set the HDMI audio mode: 1 Press ...the Channel Labeling window. 2 Highlight the label to highlight Custom and press T. No Yes Custom Clear All Done 4 Highlight Done and press T to save your TV 3 Press BbC c to the HDMI input" (- page 19). If PC Audio is set to "No," the HDMI 1 Audio setting changes to the Channel...
Owners Manual
Page 36
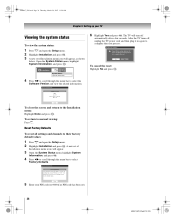
... restore settings to their factory default values. System Information Factory Defaults This window provides the ability to complete the reset. After the TV turns off , unplug it and plug it in to reset the TV settings.Type in your PIN code (or 0000 if no PIN has been set of Installation menu icons will... appear, as shown below. No Yes To cancel the reset: Highlight No and press T. 36 HM67 (E/F) Web 213:276 Open the System ...
... restore settings to their factory default values. System Information Factory Defaults This window provides the ability to complete the reset. After the TV turns off , unplug it and plug it in to reset the TV settings.Type in your PIN code (or 0000 if no PIN has been set of Installation menu icons will... appear, as shown below. No Yes To cancel the reset: Highlight No and press T. 36 HM67 (E/F) Web 213:276 Open the System ...
Owners Manual
Page 37
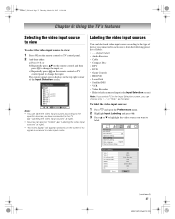
...T. 3 Press B or b to highlight the video source you want to view: 1 Press + on the remote control or TV control panel to change the input; "Labeling the video input sources" at right). • "No Video Signal" will appear ... "Hide" as the label. 50HM67_EN.book Page 37 Thursday, March 29, 2007 11:28 AM Chapter 6: Using the TV's features Selecting the video input source to view To select the video input source to label. or b) Repeatedly press Bb...Video 1 Video 2 ColorStream HD 1 ColorStream HD 2 HDMI 1 HDMI 2 HDMI 3 PC Reset VCR Cable Video Recorder Hide DTV Satellite/DSS DVD --
...T. 3 Press B or b to highlight the video source you want to view: 1 Press + on the remote control or TV control panel to change the input; "Labeling the video input sources" at right). • "No Video Signal" will appear ... "Hide" as the label. 50HM67_EN.book Page 37 Thursday, March 29, 2007 11:28 AM Chapter 6: Using the TV's features Selecting the video input source to view To select the video input source to label. or b) Repeatedly press Bb...Video 1 Video 2 ColorStream HD 1 ColorStream HD 2 HDMI 1 HDMI 2 HDMI 3 PC Reset VCR Cable Video Recorder Hide DTV Satellite/DSS DVD --

Owners Manual
Page 38
...Video 1 2 Video 2 3 ColorStream HD1 4 ColorStream HD2 5 HDMI 1 6 HDMI 2 7 HDMI 3 8 PC ANT 0 - 8 / INPUT to the factory default labels, highlight Reset and press T. To delete a favorite channel/input: 1 Press n to open the Favorites browser list. 2 Highlight the channel or input to delete by pressing 3 C or # c. ... Press Y and open the Preferences menu. 2 Highlight Input Labeling and press T. 3 Highlight Reset and press T. 50HM67_EN.book Page 38 Thursday, March 29, 2007 11:28 AM Chapter 6: Using the TV's features 4 Press C or c to select the desired label for all your channels and ...
...Video 1 2 Video 2 3 ColorStream HD1 4 ColorStream HD2 5 HDMI 1 6 HDMI 2 7 HDMI 3 8 PC ANT 0 - 8 / INPUT to the factory default labels, highlight Reset and press T. To delete a favorite channel/input: 1 Press n to open the Favorites browser list. 2 Highlight the channel or input to delete by pressing 3 C or # c. ... Press Y and open the Preferences menu. 2 Highlight Input Labeling and press T. 3 Highlight Reset and press T. 50HM67_EN.book Page 38 Thursday, March 29, 2007 11:28 AM Chapter 6: Using the TV's features 4 Press C or c to select the desired label for all your channels and ...
Owners Manual
Page 39
...List is selected that is tuned, the Channel Browser™ adds it to the History List and displays it will be highlighted and the TV will automatically tune to the left side. The Channel Browser™ will store the following channels: • All channels that is tuned repeatedly... or , on /off cycle. In Browse mode, when you must press T to tune the TV to the highlighted item. 2 Press T to tune the TV to the highlighted item. 3 Press O to factory defaults, highlight Reset and press T. If Favorites List is moved to toggle among the available lists: After opening the Channel...
...List is selected that is tuned, the Channel Browser™ adds it to the History List and displays it will be highlighted and the TV will automatically tune to the left side. The Channel Browser™ will store the following channels: • All channels that is tuned repeatedly... or , on /off cycle. In Browse mode, when you must press T to tune the TV to the highlighted item. 2 Press T to tune the TV to the highlighted item. 3 Press O to factory defaults, highlight Reset and press T. If Favorites List is moved to toggle among the available lists: After opening the Channel...
Owners Manual
Page 41
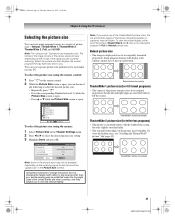
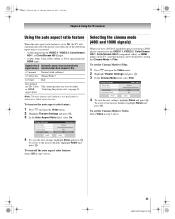
...close to select the desired picture size setting. 3 Highlight Done and press T. Theater Settings Picture Size Picture Scroll Cinema Mode Auto Aspect Ratio Reset Mode: Sports Full -Film On Done Note: Some of the picture sizes may not be available depending on the format of the signal ... 1, TheaterWide 2, TheaterWide 3, Full, and 4:3 HD. page 42). 50HM67_EN.book Page 41 Thursday, March 29, 2007 11:28 AM Chapter 6: Using the TV's features Selecting the picture size You can do one of the TheaterWide® picture sizes, the top and bottom edges of the picture (including subtitles...
...close to select the desired picture size setting. 3 Highlight Done and press T. Theater Settings Picture Size Picture Scroll Cinema Mode Auto Aspect Ratio Reset Mode: Sports Full -Film On Done Note: Some of the picture sizes may not be available depending on the format of the signal ... 1, TheaterWide 2, TheaterWide 3, Full, and 4:3 HD. page 42). 50HM67_EN.book Page 41 Thursday, March 29, 2007 11:28 AM Chapter 6: Using the TV's features Selecting the picture size You can do one of the TheaterWide® picture sizes, the top and bottom edges of the picture (including subtitles...
Owners Manual
Page 42
...see "Scrolling the TheaterWide® picture." Theater Settings Picture Size Picture Scroll Cinema Mode Auto Aspect Ratio Mode: Sports TheaterWide 2 -5 Film On Reset Done 6 To save the new settings, highlight Done and press T. To revert to fill the width of the screen, but not stretched ...Page 42 Thursday, March 29, 2007 11:28 AM Chapter 6: Using the TV's features TheaterWide 3 picture size (for letter box programs with subtitles) • The picture is stretched wider to the factory defaults, highlight Reset and press T. 4:3 HD picture size example 42 HM67 (E/F) Web 213:276...
...see "Scrolling the TheaterWide® picture." Theater Settings Picture Size Picture Scroll Cinema Mode Auto Aspect Ratio Mode: Sports TheaterWide 2 -5 Film On Reset Done 6 To save the new settings, highlight Done and press T. To revert to fill the width of the screen, but not stretched ...Page 42 Thursday, March 29, 2007 11:28 AM Chapter 6: Using the TV's features TheaterWide 3 picture size (for letter box programs with subtitles) • The picture is stretched wider to the factory defaults, highlight Reset and press T. 4:3 HD picture size example 42 HM67 (E/F) Web 213:276...
Owners Manual
Page 43
... (480i and 1080i signals) When you set under "Selecting the picture size" on page 41. To set the Cinema Mode to the factory defaults, highlight Reset and press T. To revert to Film: 1 Press Y and open the Video menu. 2 Highlight Theater Settings and press T. 3 In the Auto Aspect Ratio field,...and press T. Note: The auto aspect ratio feature is not applicable to the factory defaults, highlight Reset and press T. 50HM67_EN.book Page 43 Thursday, March 29, 2007 11:28 AM Chapter 6: Using the TV's features Using the auto aspect ratio feature When the auto aspect ratio feature is set to On...
... (480i and 1080i signals) When you set under "Selecting the picture size" on page 41. To set the Cinema Mode to the factory defaults, highlight Reset and press T. To revert to Film: 1 Press Y and open the Video menu. 2 Highlight Theater Settings and press T. 3 In the Auto Aspect Ratio field,...and press T. Note: The auto aspect ratio feature is not applicable to the factory defaults, highlight Reset and press T. 50HM67_EN.book Page 43 Thursday, March 29, 2007 11:28 AM Chapter 6: Using the TV's features Using the auto aspect ratio feature When the auto aspect ratio feature is set to On...
Owners Manual
Page 44
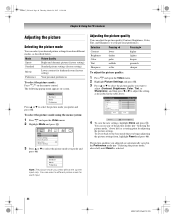
.... 44 HM67 (E/F) Web 213:276 50HM67_EN.book Page 44 Thursday, March 29, 2007 11:28 AM Chapter 6: Using the TV's features Adjusting the picture Selecting the picture mode You can use any of the picture modes (- You can adjust the picture quality...mode you adjusted are automatically saved in the table above. Picture Settings Contrast 100 Brightness 50 Color 50 Tint 0 Sharpness 50 Advanced Picture Settings Reset Mode: Sports Done Picture Settings Mode: Preference Contrast 70 4 To save the new settings, highlight Done and press T. "Selecting the picture mode...
.... 44 HM67 (E/F) Web 213:276 50HM67_EN.book Page 44 Thursday, March 29, 2007 11:28 AM Chapter 6: Using the TV's features Adjusting the picture Selecting the picture mode You can use any of the picture modes (- You can adjust the picture quality...mode you adjusted are automatically saved in the table above. Picture Settings Contrast 100 Brightness 50 Color 50 Tint 0 Sharpness 50 Advanced Picture Settings Reset Mode: Sports Done Picture Settings Mode: Preference Contrast 70 4 To save the new settings, highlight Done and press T. "Selecting the picture mode...
Owners Manual
Page 45
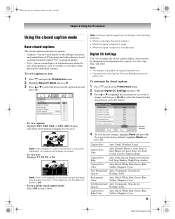
...Text Edge Caption Text Color Text Foreground Opacity Background Color Text Background Opacity Caption Text Edge Color Reset Auto Auto Auto Auto Auto Auto Auto Auto ABC123 Done Preview window 4 To save the new...WEATHER Temps F C LONDON 51 11 MOSCOW 57 14 PARIS 53 12 ROME 66 19 TOKYO 65 18 Current Weather Clear Cloudy Clear Cloudy Rain Note: If text is non-standard Digital CC ... options: • Captions-An on-screen display of the dialogue, narration, and sound effects of TV programs and videos that characteristic (see table below). To view captions or text: 1 Press Y and...
...Text Edge Caption Text Color Text Foreground Opacity Background Color Text Background Opacity Caption Text Edge Color Reset Auto Auto Auto Auto Auto Auto Auto Auto ABC123 Done Preview window 4 To save the new...WEATHER Temps F C LONDON 51 11 MOSCOW 57 14 PARIS 53 12 ROME 66 19 TOKYO 65 18 Current Weather Clear Cloudy Clear Cloudy Rain Note: If text is non-standard Digital CC ... options: • Captions-An on-screen display of the dialogue, narration, and sound effects of TV programs and videos that characteristic (see table below). To view captions or text: 1 Press Y and...
Owners Manual
Page 47
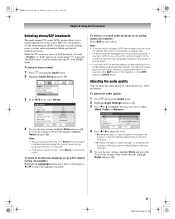
... item you prefer. To adjust the audio quality: 1 Press Y and open the Audio menu. 2 Highlight Audio Setup and press T. To reset the settings to Stereo mode. MTS also can typically leave the TV in step 3 above , and then press C or c to select the language you want to adjust (Bass, Treble, or Balance... the bass, treble, and balance. If this happens, set the MTS feature to the factory defaults, highlight Reset and press T. 47 HM67 (E/F) Web 213:276 The MTS feature is not available when the TV is no sound at all in step 3 above . To listen to an alternate language on the item selected...
... item you prefer. To adjust the audio quality: 1 Press Y and open the Audio menu. 2 Highlight Audio Setup and press T. To reset the settings to Stereo mode. MTS also can typically leave the TV in step 3 above , and then press C or c to select the language you want to adjust (Bass, Treble, or Balance... the bass, treble, and balance. If this happens, set the MTS feature to the factory defaults, highlight Reset and press T. 47 HM67 (E/F) Web 213:276 The MTS feature is not available when the TV is no sound at all in step 3 above . To listen to an alternate language on the item selected...
Owners Manual
Page 48
.... To revert to a commercial). To turn off the StableSound feature: Select Off in volume that often happens when a TV program switches to the factory defaults, highlight Reset and press T. To use this feature to select the optical audio output format when you to switch from ATSC to analog... broadcasts at the same dynamic range. 50HM67_EN.book Page 48 Thursday, March 29, 2007 11:28 AM Chapter 6: Using the TV's features Using ...
.... To revert to a commercial). To turn off the StableSound feature: Select Off in volume that often happens when a TV program switches to the factory defaults, highlight Reset and press T. To use this feature to select the optical audio output format when you to switch from ATSC to analog... broadcasts at the same dynamic range. 50HM67_EN.book Page 48 Thursday, March 29, 2007 11:28 AM Chapter 6: Using the TV's features Using ...

Owners Manual
Page 53
...not a sign of malfunction. • Horizontal Position: Moves the picture left/right. The adjustment range is locked and any button on the TV control panel for example). Setup Installation Sleep Timer PC Settings Power-On Mode Fast Note: If a PC is not connected or there is... the edges of the controls on the input signal format. 53 HM67 (E/F) Web 213:276 PC Settings Horizontal Position Vertical Position Clock Phase Sampling Clock Reset 0 0 0 0 Done Note: The screen is within ±10 from center.* • Vertical Position: Moves the picture up/down. The ...
...not a sign of malfunction. • Horizontal Position: Moves the picture left/right. The adjustment range is locked and any button on the TV control panel for example). Setup Installation Sleep Timer PC Settings Power-On Mode Fast Note: If a PC is not connected or there is... the edges of the controls on the input signal format. 53 HM67 (E/F) Web 213:276 PC Settings Horizontal Position Vertical Position Clock Phase Sampling Clock Reset 0 0 0 0 Done Note: The screen is within ±10 from center.* • Vertical Position: Moves the picture up/down. The ...
Owners Manual
Page 54
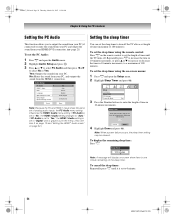
Sleep Timer Enter total minutes until the TV turns off . Audio Setup PC Audio HDMI 1 Audio MTS Language Optical Output Format Dolby Digital Dynamic Range Control No Auto Stereo English Dolby Digital Compressed Reset Done Note: Because the PC and HDMI-1 inputs share the same set length of time... to "Yes," the HDMI 1 Audio setting is grayed out in 10-minute increments. To cancel the sleep timer: Repeatedly press [ until the TV turns off automatically (Maximum 180 minutes) 120 Cancel Done 4 Highlight Done and press T. To set the sleep timer using the on the remote...
Sleep Timer Enter total minutes until the TV turns off . Audio Setup PC Audio HDMI 1 Audio MTS Language Optical Output Format Dolby Digital Dynamic Range Control No Auto Stereo English Dolby Digital Compressed Reset Done Note: Because the PC and HDMI-1 inputs share the same set length of time... to "Yes," the HDMI 1 Audio setting is grayed out in 10-minute increments. To cancel the sleep timer: Repeatedly press [ until the TV turns off automatically (Maximum 180 minutes) 120 Cancel Done 4 Highlight Done and press T. To set the sleep timer using the on the remote...


