Printable Spec Sheet
Page 1
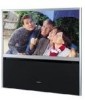
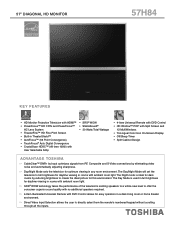
... viewing in any room environment. 57" DIAGONAL HD MONITOR 57H84 KEY FEATURES • HD Monitor Projection Television with HDMI™ •...; PowerFocus™ HD CRTs and PowerFocus™ HC Lens System • TheaterFine™ HD Fine Pitch Screen • Built-in TheaterShield™ • AutoFocus™ (56 Point Convergence) • TouchFocus® Auto Digital...8226; Off/Sleep Timer • Split Cabinet Design ADVANTAGE TOSHIBA >> CableClear™ DNR+ by Input optimizes signals from ...
... viewing in any room environment. 57" DIAGONAL HD MONITOR 57H84 KEY FEATURES • HD Monitor Projection Television with HDMI™ •...; PowerFocus™ HD CRTs and PowerFocus™ HC Lens System • TheaterFine™ HD Fine Pitch Screen • Built-in TheaterShield™ • AutoFocus™ (56 Point Convergence) • TouchFocus® Auto Digital...8226; Off/Sleep Timer • Split Cabinet Design ADVANTAGE TOSHIBA >> CableClear™ DNR+ by Input optimizes signals from ...
Printable Spec Sheet
Page 2
...Toshiba America Consumer Products. TALEN, PixelPure, HD Window, CrystalScan HDSC, CableClear, TheaterFine, TheaterShield, DFine, PowerFocus, and AutoFocus are trademarks of the U.S. 57H84 S P E C I F I C AT I O N S VIDEO Screen Size 57" Diagonal CRTs PowerFocus HD Lens System TouchFocus® auto digital... X 2-Level Mute X SurfLock™ X Inputs: RF Inputs 2 Rear A/V Input 2 Rear S-Video Input 2 ColorStream® HD Component Video Inputs (Y, Pb, Pr) 2 Front Panel A/V Inputs A/V/S HDMI™ Digital Input X Outputs: Video Output X Audio Outputs F + V Lifting...
...Toshiba America Consumer Products. TALEN, PixelPure, HD Window, CrystalScan HDSC, CableClear, TheaterFine, TheaterShield, DFine, PowerFocus, and AutoFocus are trademarks of the U.S. 57H84 S P E C I F I C AT I O N S VIDEO Screen Size 57" Diagonal CRTs PowerFocus HD Lens System TouchFocus® auto digital... X 2-Level Mute X SurfLock™ X Inputs: RF Inputs 2 Rear A/V Input 2 Rear S-Video Input 2 ColorStream® HD Component Video Inputs (Y, Pb, Pr) 2 Front Panel A/V Inputs A/V/S HDMI™ Digital Input X Outputs: Video Output X Audio Outputs F + V Lifting...
Owner's Manual - English
Page 13
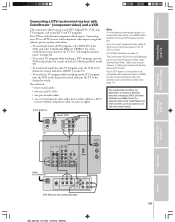
...and watch DTV (digital TV), VCR, and TV programs, and record DTV and TV programs. Your TV has ColorStream (component video) inputs. The ColorStream HD1/HD2 and HDMI jacks can greatly enhance picture quality and realism. - Connecting your TV to record, and select VIDEO 1 on the TV. - see ...DTV receiver/set-top box with ColorStream® (component video) and a VCR This connection allows you to TV CH 3 CH 4 TV VIDEO IN OUT L R AUDIO Setting up your TV Using the TV's Features Appendix Index From DTV Antenna Satelite IN Y PB PR S-VIDEO COMPONENT VIDEO VIDEO OUT AUDIO OUT...
...and watch DTV (digital TV), VCR, and TV programs, and record DTV and TV programs. Your TV has ColorStream (component video) inputs. The ColorStream HD1/HD2 and HDMI jacks can greatly enhance picture quality and realism. - Connecting your TV to record, and select VIDEO 1 on the TV. - see ...DTV receiver/set-top box with ColorStream® (component video) and a VCR This connection allows you to TV CH 3 CH 4 TV VIDEO IN OUT L R AUDIO Setting up your TV Using the TV's Features Appendix Index From DTV Antenna Satelite IN Y PB PR S-VIDEO COMPONENT VIDEO VIDEO OUT AUDIO OUT...
Owner's Manual - English
Page 15
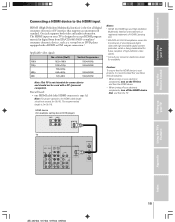
...supports an uncompressed standard. The HDMI input on the TV first, and then the HDMI device. • When turning off your electronic components, turn on your TV is designed to accept HDMI program material in digital form from EIA/CEA-861/861B-compliant2 consumer electronic ... not intended for availability. Introduction Connecting your TV Using the Remote Control Connecting a HDMI device to the HDMI input HDMI1 (High Definition Multimedia Interface) is the first all digital consumer electronics A/V interface that you follow these procedures: • When turning on your electronic...
...supports an uncompressed standard. The HDMI input on the TV first, and then the HDMI device. • When turning off your electronic components, turn on your TV is designed to accept HDMI program material in digital form from EIA/CEA-861/861B-compliant2 consumer electronic ... not intended for availability. Introduction Connecting your TV Using the Remote Control Connecting a HDMI device to the HDMI input HDMI1 (High Definition Multimedia Interface) is the first all digital consumer electronics A/V interface that you follow these procedures: • When turning on your electronic...
Owner's Manual - English
Page 16
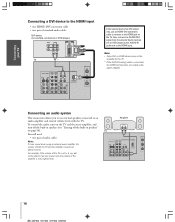
..., and turn off the built-in speakers (see "Turning off the built-in speakers" on the TV. For example, if the volume of the TV is connected, the HDMI terminal does not output audio signals (digital). Note: • Some DVI or HDMI devices may not be available for example, set-top box... or DVD player) VIDEO AUDIO LR IN DVI OUT OUT TV * If the external device has DVI output only, use external speakers connected to the...
..., and turn off the built-in speakers (see "Turning off the built-in speakers" on the TV. For example, if the volume of the TV is connected, the HDMI terminal does not output audio signals (digital). Note: • Some DVI or HDMI devices may not be available for example, set-top box... or DVD player) VIDEO AUDIO LR IN DVI OUT OUT TV * If the external device has DVI output only, use external speakers connected to the...
Owner's Manual - English
Page 18
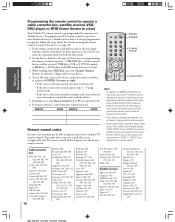
... In some keys are not operational, repeat the device code setup using the remote control to enter the 3-digit code for a DVD player or HTIB [home theater in a box) Your Toshiba TV remote control is listed, try each one separately until you will need to the other device may not be... remote control. • Every time you change the batteries, you find the code for your VCR brand, set the Device Switch back to TV to operate most Toshiba devices. For future reference, write down RECALL, press the Channel Number buttons to operate the device, see page 20. 1. Setting up your ...
... In some keys are not operational, repeat the device code setup using the remote control to enter the 3-digit code for a DVD player or HTIB [home theater in a box) Your Toshiba TV remote control is listed, try each one separately until you will need to the other device may not be... remote control. • Every time you change the batteries, you find the code for your VCR brand, set the Device Switch back to TV to operate most Toshiba devices. For future reference, write down RECALL, press the Channel Number buttons to operate the device, see page 20. 1. Setting up your ...
Owner's Manual - English
Page 34
... EX I CTURE SCROLL ON OFF RESET : SELECT ENTER : SET SAVE 3. Press y or z to aspect information indicated in the digital signal of HDMI (not ID-1 signal). Setting up your TV screen for extended periods of 480i or other than HDMI imput source), the picture size is automatically selected (as still PIP... When the AUTO ASPECT feature is set mode If the signal does not include aspect information, the picture size you selected on your TV Using the TV's Features Appendix Index 34 This type of damage is NOT COVERED BY YOUR WARRANTY because it is the result of signal source 4:3...
... EX I CTURE SCROLL ON OFF RESET : SELECT ENTER : SET SAVE 3. Press y or z to aspect information indicated in the digital signal of HDMI (not ID-1 signal). Setting up your TV screen for extended periods of 480i or other than HDMI imput source), the picture size is automatically selected (as still PIP... When the AUTO ASPECT feature is set mode If the signal does not include aspect information, the picture size you selected on your TV Using the TV's Features Appendix Index 34 This type of damage is NOT COVERED BY YOUR WARRANTY because it is the result of signal source 4:3...

Owner's Manual - English
Page 39
... is not supported. The PIN code will be released (Blocking Reset status restored). 2. You can use this TV detects the signals and blocks the programs according to your 4-digit code by pressing the Number buttons (0-9). • When the PIN code is displayed, press RECALL four times ...within five seconds. V-Chip system. Set new 4-digit code, and then press ENTER. To use these functions after entering the correct PIN code. Using the V-CHIP menu Some TV programs and movies include signals that classify the content of the program (violence,...
... is not supported. The PIN code will be released (Blocking Reset status restored). 2. You can use this TV detects the signals and blocks the programs according to your 4-digit code by pressing the Number buttons (0-9). • When the PIN code is displayed, press RECALL four times ...within five seconds. V-Chip system. Set new 4-digit code, and then press ENTER. To use these functions after entering the correct PIN code. Using the V-CHIP menu Some TV programs and movies include signals that classify the content of the program (violence,...
Owner's Manual - English
Page 42
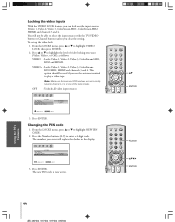
... programs temporarily 1. From the LOCKS menu, press y or z to watch . Introduction Connecting your TV Using the Remote Control Setting up your 4-digit PIN code. If you set, the TV enters program lock mode. If the correct code is entered, the program lock mode is turned on the screen. 3. CH I P CH LOCK V I DEO LOCK...
... programs temporarily 1. From the LOCKS menu, press y or z to watch . Introduction Connecting your TV Using the Remote Control Setting up your 4-digit PIN code. If you set, the TV enters program lock mode. If the correct code is entered, the program lock mode is turned on the screen. 3. CH I P CH LOCK V I DEO LOCK...
Owner's Manual - English
Page 44
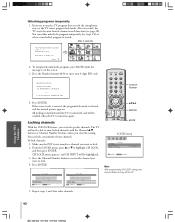
...The numbers you can lock out the input sources (Video 1, Video 2, Video 3, ColorStream HD1, ColorStream HD2, HDMI) and channels 3 and 4. Introduction Connecting your TV Using the Remote Control Setting up the video lock: 1. Press the Number buttons (0-9) to play a video tape. Press y or z to select the input sources ... the video inputs With the VIDEO LOCK feature, you enter will not be used if you use the antenna terminal to enter a 4-digit code. From the LOCKS menu, press y or z to channel 3 or 4 or one of video locking you clear the setting. Press ENTER. LOCKS V - ...
...The numbers you can lock out the input sources (Video 1, Video 2, Video 3, ColorStream HD1, ColorStream HD2, HDMI) and channels 3 and 4. Introduction Connecting your TV Using the Remote Control Setting up the video lock: 1. Press the Number buttons (0-9) to play a video tape. Press y or z to select the input sources ... the video inputs With the VIDEO LOCK feature, you enter will not be used if you use the antenna terminal to enter a 4-digit code. From the LOCKS menu, press y or z to channel 3 or 4 or one of video locking you clear the setting. Press ENTER. LOCKS V - ...
Owner's Manual - English
Page 49
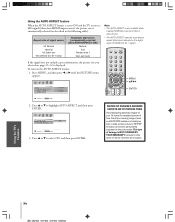
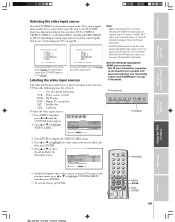
...Color Stream HD2 6 : HDM I 7 : ANT 2 0- 7 : TO SELECT SOURCE SELECT I ON ANT 1 V I DEO 1 V I DEO 2 V I DEO 3 Color Stream HD1 Color Stream HD2 HDM I ANT 2 TV / V I CUSTOM MENU LABEL - - - Press MENU, and then press x or • until the CUSTOM menu appears. 2. See "Connecting a device to the HDMI input" on page 15...or S-video IN connection instead of labels: - - - : Uses the default label name VCR : Video cassette recorder DVD : DVD video DTV : Digital TV set-top box SAT : Satellite box CBL : Cable box To label the video input sources: 1. To exit the menu, press EXIT. You can ...
...Color Stream HD2 6 : HDM I 7 : ANT 2 0- 7 : TO SELECT SOURCE SELECT I ON ANT 1 V I DEO 1 V I DEO 2 V I DEO 3 Color Stream HD1 Color Stream HD2 HDM I ANT 2 TV / V I CUSTOM MENU LABEL - - - Press MENU, and then press x or • until the CUSTOM menu appears. 2. See "Connecting a device to the HDMI input" on page 15...or S-video IN connection instead of labels: - - - : Uses the default label name VCR : Video cassette recorder DVD : DVD video DTV : Digital TV set-top box SAT : Satellite box CBL : Cable box To label the video input sources: 1. To exit the menu, press EXIT. You can ...


