
Owners Manual
Page 1
...contact your TV antenna installer, cable provider, or satellite provider. © 2011 TOSHIBA CORPORATION All Rights Reserved Owner's Record The model number and serial number are on the back and side of steps for setting up your new TV, see page 12. Record these numbers whenever you communicate with... your Toshiba dealer about this TV. Integrated High Definition LCD Television 32TL515U 42TL515U 47TL515U 55TL515U For an overview of your TV.
...contact your TV antenna installer, cable provider, or satellite provider. © 2011 TOSHIBA CORPORATION All Rights Reserved Owner's Record The model number and serial number are on the back and side of steps for setting up your new TV, see page 12. Record these numbers whenever you communicate with... your Toshiba dealer about this TV. Integrated High Definition LCD Television 32TL515U 42TL515U 47TL515U 55TL515U For an overview of your TV.

Owners Manual
Page 2
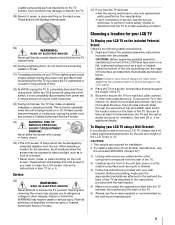
... always supported on the proper stands or installed according to the manufacturer's recommendations. • Flat panel displays that are popular purchases. TOSHIBA Cares! • The consumer electronics industry is not positioned in a sufficiently stable location, it can be potentially hazardous due to falling...weight of this television for wall mounting this apparatus must be securely attached to the floor/wall in accordance with furniture and television sets. • Don't place flat panel displays on furniture that can be heavy. Follow the manufacturer's recommendations for the...
... always supported on the proper stands or installed according to the manufacturer's recommendations. • Flat panel displays that are popular purchases. TOSHIBA Cares! • The consumer electronics industry is not positioned in a sufficiently stable location, it can be potentially hazardous due to falling...weight of this television for wall mounting this apparatus must be securely attached to the floor/wall in accordance with furniture and television sets. • Don't place flat panel displays on furniture that can be heavy. Follow the manufacturer's recommendations for the...
Owners Manual
Page 5
...1) Unplug and remove any kind into the TV cabinet slots. 40) During a lightning storm, do not touch the connecting cables or TV set. 41) For added protection of this WARNING may result in item 37 on the included Pedestal Stand: Observe the following safety precautions: 1) ... mount manufacturer. 5 See item 26, p. 4 for ventilation. If these sounds become frequent or continuous, unplug the power cord and contact a Toshiba Authorized Service Provider. 44) WARNING: RISK OF SERIOUS PERSONAL INJURY OR EQUIPMENT DAMAGE! To Display your LCD TV on p. 4. Opening and removing ...
...1) Unplug and remove any kind into the TV cabinet slots. 40) During a lightning storm, do not touch the connecting cables or TV set. 41) For added protection of this WARNING may result in item 37 on the included Pedestal Stand: Observe the following safety precautions: 1) ... mount manufacturer. 5 See item 26, p. 4 for ventilation. If these sounds become frequent or continuous, unplug the power cord and contact a Toshiba Authorized Service Provider. 44) WARNING: RISK OF SERIOUS PERSONAL INJURY OR EQUIPMENT DAMAGE! To Display your LCD TV on p. 4. Opening and removing ...
Owners Manual
Page 7
... will not occur in relation to the horizontal center of the screen. Federal Communications Commission Statement FCC Compliance Statement Toshiba television models 32TL515U, 42TL515U, 47TL515U, and 55TL515U comply with FCC radiation exposure limits set . If this equipment. FCC Radiation Exposure Statement: This equipment complies with Part 15 of the FCC Rules. Over 47...
... will not occur in relation to the horizontal center of the screen. Federal Communications Commission Statement FCC Compliance Statement Toshiba television models 32TL515U, 42TL515U, 47TL515U, and 55TL515U comply with FCC radiation exposure limits set . If this equipment. FCC Radiation Exposure Statement: This equipment complies with Part 15 of the FCC Rules. Over 47...
Owners Manual
Page 8
... technical limitations of LCD Display technology and are registered U.S. Enabling or changing certain features and functionality (e.g. To return to [Home] mode settings, select [AutoView] picture mode, and set by the technology. therefore, Toshiba is subject to [On] mode. [AutoView] mode is manufactured using an extremely high level of the device. Canada - Operation is...
... technical limitations of LCD Display technology and are registered U.S. Enabling or changing certain features and functionality (e.g. To return to [Home] mode settings, select [AutoView] picture mode, and set by the technology. therefore, Toshiba is subject to [On] mode. [AutoView] mode is manufactured using an extremely high level of the device. Canada - Operation is...
Owners Manual
Page 10
...Channel Return 41 10 Using SurfLock 41 Selecting the video input to view 41 Using closed captions 42 Analog CC mode 42 Digital CC settings 42 Setting the PIN code 43 Entering a new PIN code 43 Changing or deleting your PIN code 43 Forgotten PIN code 43 Using parental controls... by rating (V-Chip 43 Downloading an additional rating system 44 Displaying ratings 45 Unlocking programs 45 Locking specific channels 45 Locking video input 45 Setting a time limit for games 46 Locking the control panel 46 Using HDMI® CEC Control 46 Controlling HDMI® CEC playback devices 47...
...Channel Return 41 10 Using SurfLock 41 Selecting the video input to view 41 Using closed captions 42 Analog CC mode 42 Digital CC settings 42 Setting the PIN code 43 Entering a new PIN code 43 Changing or deleting your PIN code 43 Forgotten PIN code 43 Using parental controls... by rating (V-Chip 43 Downloading an additional rating system 44 Displaying ratings 45 Unlocking programs 45 Locking specific channels 45 Locking video input 45 Setting a time limit for games 46 Locking the control panel 46 Using HDMI® CEC Control 46 Controlling HDMI® CEC playback devices 47...
Owners Manual
Page 11
White Balance 58 Resetting to the factory default 59 Locking the picture settings 59 Adjusting the audio 59 Muting the sound 59 Selecting stereo/SAP broadcasts 59 ...Volume 60 Using advanced sound features 61 Using surround sound 61 Chapter 8: Advanced features 62 Using your home network 62 Setting up the Network 63 Wireless Setup 63 Advanced Network Setup 65 Network Connection Test 66 Using the software keyboard 66 Performing...control codes 90 Limited United States Warranty for LCD Televisions 96 Limited Canadian Warranty for Toshiba Brand Flat Panel Televisions 97 Index 100 11
White Balance 58 Resetting to the factory default 59 Locking the picture settings 59 Adjusting the audio 59 Muting the sound 59 Selecting stereo/SAP broadcasts 59 ...Volume 60 Using advanced sound features 61 Using surround sound 61 Chapter 8: Advanced features 62 Using your home network 62 Setting up the Network 63 Wireless Setup 63 Advanced Network Setup 65 Network Connection Test 66 Using the software keyboard 66 Performing...control codes 90 Limited United States Warranty for LCD Televisions 96 Limited Canadian Warranty for Toshiba Brand Flat Panel Televisions 97 Index 100 11
Owners Manual
Page 12
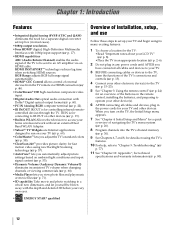
... your TV and begin using its many exciting features. 1 To choose a location for a separate digital converter set-top box (in the power cords for details on using new Backlight Scanning technology (-p. 57). •AutoView® lets you have ... STAR® qualified Overview of the TV's connections and controls (- p. 2-6). 2 Do not plug in any power cords until AFTER you automatically adjust picture settings based on the remote control, installing the batteries, and preparing to an AV amplifier via HDMI connection (p. 46). •ColorStream® HD high-resolution component...
... your TV and begin using its many exciting features. 1 To choose a location for a separate digital converter set-top box (in the power cords for details on using new Backlight Scanning technology (-p. 57). •AutoView® lets you have ... STAR® qualified Overview of the TV's connections and controls (- p. 2-6). 2 Do not plug in any power cords until AFTER you automatically adjust picture settings based on the remote control, installing the batteries, and preparing to an AV amplifier via HDMI connection (p. 46). •ColorStream® HD high-resolution component...
Owners Manual
Page 16
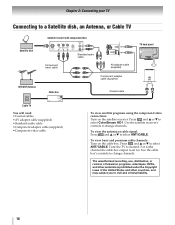
.... 16 Use the satellite receiver's controls to change channels. The unauthorized recording, use, distribution, or revision of television programs, videotapes, DVDs, and other materials is set to). Chapter 2: Connecting your TV Connecting to a Satellite dish, an Antenna, or Cable TV Satellite dish Satellite receiver with component video Y PB PR AUDIO OUT...
.... 16 Use the satellite receiver's controls to change channels. The unauthorized recording, use, distribution, or revision of television programs, videotapes, DVDs, and other materials is set to). Chapter 2: Connecting your TV Connecting to a Satellite dish, an Antenna, or Cable TV Satellite dish Satellite receiver with component video Y PB PR AUDIO OUT...

Owners Manual
Page 17
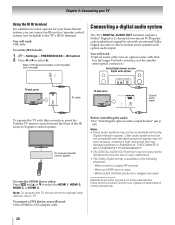
... operation, use an HDMI cable with high-bandwidth digital content protection, which is designed to accept HDCP (HighBandwidth Digital-Content Protection) program material in HDMI Settings (- To view the HDMI device video: Press and B or b to -DVI adapter cable transfers video only. Note: For programming the TV remote control to -DVI...
... operation, use an HDMI cable with high-bandwidth digital content protection, which is designed to accept HDCP (HighBandwidth Digital-Content Protection) program material in HDMI Settings (- To view the HDMI device video: Press and B or b to -DVI adapter cable transfers video only. Note: For programming the TV remote control to -DVI...

Owners Manual
Page 19
... similar cabinet. Note: • To program the remote control to operate the device(s), see "Programming the remote to select Out. p. 17-18) To set the IR OUT mode: 1 > Settings > PREFERENCES > IR Control. 2 Press C or c to operate other devices" (- To connect the IR blaster cable: 1 Locate the infrared sensor on , move the remote...
... similar cabinet. Note: • To program the remote control to operate the device(s), see "Programming the remote to select Out. p. 17-18) To set the IR OUT mode: 1 > Settings > PREFERENCES > IR Control. 2 Press C or c to operate other devices" (- To connect the IR blaster cable: 1 Locate the infrared sensor on , move the remote...
Owners Manual
Page 20
...a high noise level that are registered trademarks of the IR receiver/repeater control system. p. 60). You will need : •IR cable To set the IR IN mode: 1 > Settings > PREFERENCES > IR Control. 2 Press C or c to copy restrictions. • The Dolby Digital format is used . Note: To program...an HDMI input is available in the following situations: - Dolby and the double-D symbol are not compatible with this connection, point the Toshiba TV remote control toward the front of Dolby Laboratories. 20 Older audio systems that may not output some digital audio sources due to ...
...a high noise level that are registered trademarks of the IR receiver/repeater control system. p. 60). You will need : •IR cable To set the IR IN mode: 1 > Settings > PREFERENCES > IR Control. 2 Press C or c to copy restrictions. • The Dolby Digital format is used . Note: To program...an HDMI input is available in the following situations: - Dolby and the double-D symbol are not compatible with this connection, point the Toshiba TV remote control toward the front of Dolby Laboratories. 20 Older audio systems that may not output some digital audio sources due to ...
Owners Manual
Page 22
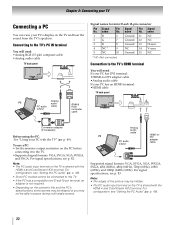
...HDMI 4 and ColorStream HD2 terminal. p. 49). For configuration, see p. 82. p. 49). 22 name Pin Signal No. To use a PC: • Set the monitor output resolution on the PC before connecting it to - Connecting to the TV's PC IN terminal You will need : •Analog RGB (15... Signal names for mini D-sub 15-pin connector Pin Signal No. For signal specifications, see "Setting the PC audio" (- For configuration, see p. 83. name Pin Signal No. For signal specifications, see "Setting the PC Audio" (- PC DVI PC audio output adapter cable Supported signal formats: VGA, SVGA...
...HDMI 4 and ColorStream HD2 terminal. p. 49). For configuration, see p. 82. p. 49). 22 name Pin Signal No. To use a PC: • Set the monitor output resolution on the PC before connecting it to - Connecting to the TV's PC IN terminal You will need : •Analog RGB (15... Signal names for mini D-sub 15-pin connector Pin Signal No. For signal specifications, see "Setting the PC audio" (- For configuration, see p. 83. name Pin Signal No. For signal specifications, see "Setting the PC Audio" (- PC DVI PC audio output adapter cable Supported signal formats: VGA, SVGA...
Owners Manual
Page 25
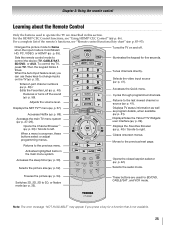
..." (- Enters 2-part channel numbers (- Accesses Netflix (- Selects the video input source (- p. 51). Selects the audio mode. p. 55). Sets the remote control mode to right. Accesses the main TV menu system (- Cycles through programmed channels. Freezes the picture (- p. 39) / ...Scrolls to the previous/next page. When a menu is set, you press a key for a function that is ColorStream HD, PC, VIDEO, or HDMI® (- When the Auto Input feature ...
..." (- Enters 2-part channel numbers (- Accesses Netflix (- Selects the video input source (- p. 51). Selects the audio mode. p. 55). Sets the remote control mode to right. Accesses the main TV menu system (- Cycles through programmed channels. Freezes the picture (- p. 39) / ...Scrolls to the previous/next page. When a menu is set, you press a key for a function that is ColorStream HD, PC, VIDEO, or HDMI® (- When the Auto Input feature ...

Owners Manual
Page 26
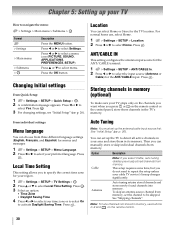
... To select Cable: ANT/CABLE In Please confirm the connection with Tuner Input. Press . To finish Initial Setup, see "Changing Initial settings" (- Please confirm the connection with Tuner Input. OK Note: If you do not want to scan channels, you do not finish ... normal home use. p. 30). • does not work until Menu Language, Time Zone, and Location have been set. 1 Menu Language Quick Setup Menu Language English 2 Time Zone Local Time Setting Time Zone Daylight Saving Time Select a language. Eastern Off Select On or Off. OK 4 Location Location To use...
... To select Cable: ANT/CABLE In Please confirm the connection with Tuner Input. Press . To finish Initial Setup, see "Changing Initial settings" (- Please confirm the connection with Tuner Input. OK Note: If you do not want to scan channels, you do not finish ... normal home use. p. 30). • does not work until Menu Language, Time Zone, and Location have been set. 1 Menu Language Quick Setup Menu Language English 2 Time Zone Local Time Setting Time Zone Daylight Saving Time Select a language. Eastern Off Select On or Off. OK 4 Location Location To use...
Owners Manual
Page 27
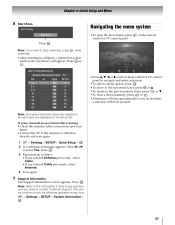
...a menu instantly, press or . •All menus will appear. Auto Tuning (Antenna) Antenna Channels Found: 14 Ch. Press . on the remote Picture Sound Applications Settings Preferences Setup •Press B, b, C, or c on the remote control or TV control panel to contact Customer Support. Type RF Ch. 2 ATV 2 4-1 DTV... Note: If you need to navigate and make a selection within 60 seconds. 27 while •After scanning is any time. > Settings > SETUP > System Information > . Press OK or . OK Navigating the menu system •To open the main menu, press control or ...
...a menu instantly, press or . •All menus will appear. Auto Tuning (Antenna) Antenna Channels Found: 14 Ch. Press . on the remote Picture Sound Applications Settings Preferences Setup •Press B, b, C, or c on the remote control or TV control panel to contact Customer Support. Type RF Ch. 2 ATV 2 4-1 DTV... Note: If you need to navigate and make a selection within 60 seconds. 27 while •After scanning is any time. > Settings > SETUP > System Information > . Press OK or . OK Navigating the menu system •To open the main menu, press control or ...
Owners Manual
Page 28
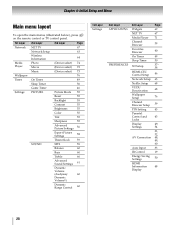
...menus (illustrated below), press on the remote control or TV control panel. 1st Layer 2nd Layer 3rd Layer Page Network Media Player Wallpaper Timer Settings NET TV Network Setup Wireless Information Photo Movie Music On Timer Sleep Timer Game Timer PICTURE SOUND 67 63 64 (Device select) 74 (...Setup HDMI-CEC Control Setup Network Setup Netflix Setup VUDU Deactivation Wallpaper Setup Channel Browser Setup PIN Setting Parental Control and Locks Display Settings AV Connection Auto Input IR Control Energy Saving Settings HDMI Information Display Page 69 67 71 39 40 49 50 37- 38 46 63 68 68...
...menus (illustrated below), press on the remote control or TV control panel. 1st Layer 2nd Layer 3rd Layer Page Network Media Player Wallpaper Timer Settings NET TV Network Setup Wireless Information Photo Movie Music On Timer Sleep Timer Game Timer PICTURE SOUND 67 63 64 (Device select) 74 (...Setup HDMI-CEC Control Setup Network Setup Netflix Setup VUDU Deactivation Wallpaper Setup Channel Browser Setup PIN Setting Parental Control and Locks Display Settings AV Connection Auto Input IR Control Energy Saving Settings HDMI Information Display Page 69 67 71 39 40 49 50 37- 38 46 63 68 68...
Owners Manual
Page 29
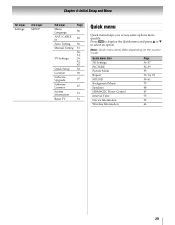
Quick menu Item 3D Settings PICTURE Picture Mode Repeat SOUND Background Music Speakers HDMI-CEC Player Control Interval Time Device Information Wireless Information Page 36-37 52-59 55 73, .... Note: Quick menu items differ depending on the current mode. Chapter 4: Initial Setup and Menu 1st Layer Settings 2nd Layer SETUP 3rd Layer Menu Language ANT/CABLE In Auto Tuning Manual Tuning TV Settings Quick Setup Location Software Upgrade Software Licenses System Information Reset TV Page 30 30 30 31 30, 31...
Quick menu Item 3D Settings PICTURE Picture Mode Repeat SOUND Background Music Speakers HDMI-CEC Player Control Interval Time Device Information Wireless Information Page 36-37 52-59 55 73, .... Note: Quick menu items differ depending on the current mode. Chapter 4: Initial Setup and Menu 1st Layer Settings 2nd Layer SETUP 3rd Layer Menu Language ANT/CABLE In Auto Tuning Manual Tuning TV Settings Quick Setup Location Software Upgrade Software Licenses System Information Reset TV Page 30 30 30 31 30, 31...
Owners Manual
Page 30
... message appears. Press . See "Initial Setup" (- Then you do not need to repeat the setup unless your region. 1 > Settings > SETUP > TV Settings > . This setup requires some time, but you can select Home or Store for the ANT/CABLE input. Antenna Auto tuning retains stored...You can choose from memory. Option Description Cable Note: If you select Cable, auto tuning deletes previously stored channels from memory, set up the antenna/cable input source first. To skip an antenna source channel from memory. See "Skipping channels". Note: To tune...
... message appears. Press . See "Initial Setup" (- Then you do not need to repeat the setup unless your region. 1 > Settings > SETUP > TV Settings > . This setup requires some time, but you can select Home or Store for the ANT/CABLE input. Antenna Auto tuning retains stored...You can choose from memory. Option Description Cable Note: If you select Cable, auto tuning deletes previously stored channels from memory, set up the antenna/cable input source first. To skip an antenna source channel from memory. See "Skipping channels". Note: To tune...

Owners Manual
Page 31
...buttons 0-9 on the remote control. Type ATV DTV Description Analog channel. OK 2 Press B or b to the 8 column. To turn on skip: 1 > Settings > PREFERENCES > AV Connection > . OK 3 Press B or b to select the item you can manually enter channels if the channel number is selected. Press...5-1 DTV 6 ATV 6-1 DTV 8 ATV 9 ATV 10 ATV 11 ATV 12 ATV 3 Move to select Channel Options. The box is known. 1 > Settings > SETUP > Manual Tuning > . on the remote control to be skipped when selecting inputs in the Input selection window. CH Manual Tuning After storing channels ...
...buttons 0-9 on the remote control. Type ATV DTV Description Analog channel. OK 2 Press B or b to the 8 column. To turn on skip: 1 > Settings > PREFERENCES > AV Connection > . OK 3 Press B or b to select the item you can manually enter channels if the channel number is selected. Press...5-1 DTV 6 ATV 6-1 DTV 8 ATV 9 ATV 10 ATV 11 ATV 12 ATV 3 Move to select Channel Options. The box is known. 1 > Settings > SETUP > Manual Tuning > . on the remote control to be skipped when selecting inputs in the Input selection window. CH Manual Tuning After storing channels ...


