User Guide
Page 38
...instruction manuals for those operations. Before controlling the devices: ❖ For an explanation of setup and operations, see "Other HDMI® CEC Control functions" on page 100. See each device's operation manual. NOTE This feature is not liable for compatibility information. However, Toshiba...according to models incorporating Toshiba's HDMI®...connected devices. Connecting an HDMI® audio system If your HDMI® amplifier supports ARC, audio from the TV can be properly synchronized. 38 Connecting Your TV Connecting an HDMI® audio system To connect...
...instruction manuals for those operations. Before controlling the devices: ❖ For an explanation of setup and operations, see "Other HDMI® CEC Control functions" on page 100. See each device's operation manual. NOTE This feature is not liable for compatibility information. However, Toshiba...according to models incorporating Toshiba's HDMI®...connected devices. Connecting an HDMI® audio system If your HDMI® amplifier supports ARC, audio from the TV can be properly synchronized. 38 Connecting Your TV Connecting an HDMI® audio system To connect...
User Guide
Page 41
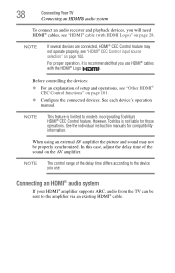
For configuration information, see "Setting the computer audio" on page 103. ❖ Some computer models cannot be connected to the HDMI® terminal on computer hardware and setup. When connecting a computer with a DVI port to this TV. ❖ If the computer has a compatible mini D-sub15-pin terminal, ...the TV is shared with the HDMI 4 and ColorStream® HD2 terminal. Connecting Your TV 41 Connecting a computer NOTE ❖ The PC audio input terminal on the content's title and the computer's specifications, some scenes may be skipped or you may not be necessary, depending ...
For configuration information, see "Setting the computer audio" on page 103. ❖ Some computer models cannot be connected to the HDMI® terminal on computer hardware and setup. When connecting a computer with a DVI port to this TV. ❖ If the computer has a compatible mini D-sub15-pin terminal, ...the TV is shared with the HDMI 4 and ColorStream® HD2 terminal. Connecting Your TV 41 Connecting a computer NOTE ❖ The PC audio input terminal on the content's title and the computer's specifications, some scenes may be skipped or you may not be necessary, depending ...
User Guide
Page 54
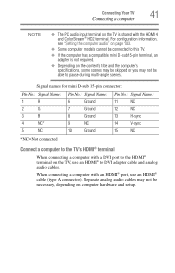
... scanning is complete, the auto tuning results screen (such as the one below) will appear. Press OK or EXIT. Select SETTINGS, SETUP, Quick Setup, and then press OK. Type 2 ATV 3 ATV 4 ATV 5 ATV 6 ATV 7 ATV 8 ATV 9 ATV RF Ch. 2 3 4 5 6 7 8 9 (Sample Illustration) ... Press the MENU button. If some channels are not found after scanning: ❖ Check the antenna/cable connections, and scan again. ❖ Connect the TV to select Yes. Press OK. 3 Repeat setup to Step 6. ❖ If you selected Antenna previously, select Cable. ❖ If you selected Cable previously...
... scanning is complete, the auto tuning results screen (such as the one below) will appear. Press OK or EXIT. Select SETTINGS, SETUP, Quick Setup, and then press OK. Type 2 ATV 3 ATV 4 ATV 5 ATV 6 ATV 7 ATV 8 ATV 9 ATV RF Ch. 2 3 4 5 6 7 8 9 (Sample Illustration) ... Press the MENU button. If some channels are not found after scanning: ❖ Check the antenna/cable connections, and scan again. ❖ Connect the TV to select Yes. Press OK. 3 Repeat setup to Step 6. ❖ If you selected Antenna previously, select Cable. ❖ If you selected Cable previously...

User Guide
Page 64
... menu, Submenu, and then press the OK or EXIT button. Format: MENU SETTINGS Main menu Submenu OK Description: Press the MENU button. Changing initial settings From Quick Setup: 1 Press the MENU button. 2 Select SETTINGS, SETUP, Quick Setup, and then press the OK button. A confirmation message appears. 64 Press the ( / arrow) buttons to select a menu icon (SOUND...
... menu, Submenu, and then press the OK or EXIT button. Format: MENU SETTINGS Main menu Submenu OK Description: Press the MENU button. Changing initial settings From Quick Setup: 1 Press the MENU button. 2 Select SETTINGS, SETUP, Quick Setup, and then press the OK button. A confirmation message appears. 64 Press the ( / arrow) buttons to select a menu icon (SOUND...

User Guide
Page 65
...messages in which you to select Yes. 4 Press the OK button. Select Home for your region. 1 Press the MENU button. 2 Select SETTINGS, SETUP, TV Settings, and then press the OK button. 3 Press the ( / arrow) buttons to select Local Time. 4 Press the OK button. 5 Select ... to specify the correct time zone for normal home use. 1 Press the MENU button. 2 Select SETTINGS, SETUP, and then Store/Home Mode. Local Time This setting allows you reside. 1 Press the MENU button. 2 Select SETTINGS, SETUP, and then Menu Language. 3 Press the ( / arrow) buttons to select your preferred language. ...
...messages in which you to select Yes. 4 Press the OK button. Select Home for your region. 1 Press the MENU button. 2 Select SETTINGS, SETUP, TV Settings, and then press the OK button. 3 Press the ( / arrow) buttons to select Local Time. 4 Press the OK button. 5 Select ... to specify the correct time zone for normal home use. 1 Press the MENU button. 2 Select SETTINGS, SETUP, and then Store/Home Mode. Local Time This setting allows you reside. 1 Press the MENU button. 2 Select SETTINGS, SETUP, and then Menu Language. 3 Press the ( / arrow) buttons to select your preferred language. ...
User Guide
Page 66
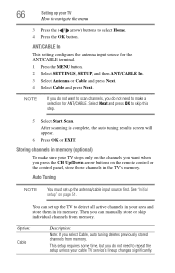
.... 2 Select SETTINGS, SETUP, and then ANT/CABLE In. 3 Select Antenna or Cable and press Next. 4 Select Cable and press Next. You can manually store or skip...setup" on the remote control or the control panel, store those channels in its memory. After scanning is complete, the auto tuning results screen will appear. 6 Press OK or EXIT. NOTE If you do not need to repeat the setup...setting configures the antenna input source for ANT/CABLE. This setup requires some time, but you can set up your cable TV service's lineup changes significantly. Auto Tuning NOTE You must set...
.... 2 Select SETTINGS, SETUP, and then ANT/CABLE In. 3 Select Antenna or Cable and press Next. 4 Select Cable and press Next. You can manually store or skip...setup" on the remote control or the control panel, store those channels in its memory. After scanning is complete, the auto tuning results screen will appear. 6 Press OK or EXIT. NOTE If you do not need to repeat the setup...setting configures the antenna input source for ANT/CABLE. This setup requires some time, but you can set up your cable TV service's lineup changes significantly. Auto Tuning NOTE You must set...

User Guide
Page 67
...channel and remove it from memory, set the channel to begin Manual Tuning. The TV cycles through the channels and stores all active channels in memory, use buttons 0-9 and the DASH button on the remote control. 1 Press the MENU button. 2 Select SETTINGS, SETUP, Auto Tuning, and then press ...the OK button. Manual Tuning After storing channels in memory, you can manually enter channels if the channel number is known. 1 Press the MENU ...
...channel and remove it from memory, set the channel to begin Manual Tuning. The TV cycles through the channels and stores all active channels in memory, use buttons 0-9 and the DASH button on the remote control. 1 Press the MENU button. 2 Select SETTINGS, SETUP, Auto Tuning, and then press ...the OK button. Manual Tuning After storing channels in memory, you can manually enter channels if the channel number is known. 1 Press the MENU ...
User Guide
Page 68
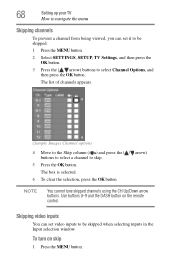
... channels using the CH Up/Down arrow buttons. 68 Setting up your TV How to navigate the menu Skipping channels To prevent a channel from being viewed, you can set it to skip. 5 Press the OK button. To turn on the remote control. Use buttons 0-9 and the DASH button on ...skip 1 Press the MENU button. Skipping video inputs You can set video inputs to be skipped. 1 Press the MENU button. 2 Select SETTINGS, SETUP, TV Settings, and then press the OK button. 3 Press the ( /...
... channels using the CH Up/Down arrow buttons. 68 Setting up your TV How to navigate the menu Skipping channels To prevent a channel from being viewed, you can set it to skip. 5 Press the OK button. To turn on the remote control. Use buttons 0-9 and the DASH button on ...skip 1 Press the MENU button. Skipping video inputs You can set video inputs to be skipped. 1 Press the MENU button. 2 Select SETTINGS, SETUP, TV Settings, and then press the OK button. 3 Press the ( /...
User Guide
Page 69
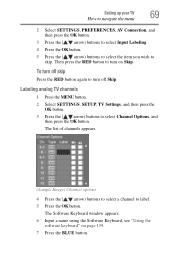
... buttons to select a channel to turn on page 139. 7 Press the BLUE button. Setting up your TV 69 How to navigate the menu 2 Select SETTINGS, PREFERENCES, AV Connection, and then press the OK button. 3 Press the ( / arrow) buttons to select... Input Labeling. 4 Press the OK button. 5 Press the ( / arrow) buttons to select the item you wish to select Channel Options, and then press the OK button. Labeling analog TV channels 1 Press the MENU button. 2 Select SETTINGS, SETUP, TV Settings...
... buttons to select a channel to turn on page 139. 7 Press the BLUE button. Setting up your TV 69 How to navigate the menu 2 Select SETTINGS, PREFERENCES, AV Connection, and then press the OK button. 3 Press the ( / arrow) buttons to select... Input Labeling. 4 Press the OK button. 5 Press the ( / arrow) buttons to select the item you wish to select Channel Options, and then press the OK button. Labeling analog TV channels 1 Press the MENU button. 2 Select SETTINGS, SETUP, TV Settings...

User Guide
Page 82
... displays on the screen when a 3D signal is deleted, 3D Safety Settings are grayed out, and the settings are reset to the factory default. NOTE ❖ The PIN code cannot be set to "0000." 82 Basic features Setting the 3D PIN code NOTE the PIN code cannot be set to "0000." ❖ If PIN is received. 1 Press the MENU...
... displays on the screen when a 3D signal is deleted, 3D Safety Settings are grayed out, and the settings are reset to the factory default. NOTE ❖ The PIN code cannot be set to "0000." 82 Basic features Setting the 3D PIN code NOTE the PIN code cannot be set to "0000." ❖ If PIN is received. 1 Press the MENU...

User Guide
Page 83
... ( / arrow) buttons to select 3D, and then press the OK button. 3 Press the ( / arrow) buttons to select 3D Safety Settings, and then press the OK button. 4 Enter your 4-digit 3D PIN code. 5 Press the ( / arrow) buttons to select 3D Timer Lock. 6 Press the ( / arrow) buttons to select On. Once...( / arrow) buttons to select 3D, and then press the OK button. 3 Press the ( / arrow) buttons to select 3D Safety Settings, and then press the OK button. 4 Enter your 4-digit 3D PIN code. 5 Press the ( / arrow) buttons to select 3D Lock. 6 Press the ( / arrow) buttons to select On. Basic features ...
... ( / arrow) buttons to select 3D, and then press the OK button. 3 Press the ( / arrow) buttons to select 3D Safety Settings, and then press the OK button. 4 Enter your 4-digit 3D PIN code. 5 Press the ( / arrow) buttons to select 3D Timer Lock. 6 Press the ( / arrow) buttons to select On. Once...( / arrow) buttons to select 3D, and then press the OK button. 3 Press the ( / arrow) buttons to select 3D Safety Settings, and then press the OK button. 4 Enter your 4-digit 3D PIN code. 5 Press the ( / arrow) buttons to select 3D Lock. 6 Press the ( / arrow) buttons to select On. Basic features ...

User Guide
Page 87
... sources according to the specific devices you have connected to the TV, see "Labeling video inputs" on page 70. ❖ You can select inputs that are connected to an HDMI® input, the icon appears in the input selector. NOTE If Closed Captions Display is set to Off, Analog CC...; CEC device: 1 Press the ( / arrow) buttons to select On or Off. Analog CC mode The closed caption mode: 1 Press the MENU button. Select SETTINGS, SETUP, TV Settings, and then press the OK button. 2 Press the ( / arrow) buttons to select Closed Captions, and then press the OK button. 3 Press the ( /...
... sources according to the specific devices you have connected to the TV, see "Labeling video inputs" on page 70. ❖ You can select inputs that are connected to an HDMI® input, the icon appears in the input selector. NOTE If Closed Captions Display is set to Off, Analog CC...; CEC device: 1 Press the ( / arrow) buttons to select On or Off. Analog CC mode The closed caption mode: 1 Press the MENU button. Select SETTINGS, SETUP, TV Settings, and then press the OK button. 2 Press the ( / arrow) buttons to select Closed Captions, and then press the OK button. 3 Press the ( /...

User Guide
Page 88
To view captions or text: 1 Press the MENU button. Select SETTINGS, SETUP, TV Settings, and then press the OK button. 2 Press the ( / arrow) buttons to select Closed Captions, and then press the OK button. 3 Press the ( / arrow) buttons to ..., CC2, CC3, or CC4. (Sample Illustration) Captions NOTE If the program or video you have selected is not closed captioned (usually marked "CC" in program guides). To view captions: Press the ( / arrow) buttons to select Analog CC Mode. Displays information not related to the current program, such as weather or stock...
To view captions or text: 1 Press the MENU button. Select SETTINGS, SETUP, TV Settings, and then press the OK button. 2 Press the ( / arrow) buttons to select Closed Captions, and then press the OK button. 3 Press the ( / arrow) buttons to ..., CC2, CC3, or CC4. (Sample Illustration) Captions NOTE If the program or video you have selected is not closed captioned (usually marked "CC" in program guides). To view captions: Press the ( / arrow) buttons to select Analog CC Mode. Displays information not related to the current program, such as weather or stock...
User Guide
Page 90
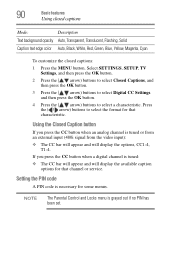
and then press the OK button. 4 Press the ( / arrow) buttons to select the format for that channel or service. Using the Closed Caption button If you press the CC button when a digital channel is necessary for that characteristic. NOTE The Parental Control ...some menus. Setting the PIN code A PIN code is tuned: ❖ The CC bar will appear and will display the options, CC1-4, T1-4. If you press the CC button when an analog channel is grayed out if no PIN has been set. Press the ( / arrow) buttons to select a characteristic. Select SETTINGS, SETUP, TV Settings, and ...
and then press the OK button. 4 Press the ( / arrow) buttons to select the format for that channel or service. Using the Closed Caption button If you press the CC button when a digital channel is necessary for that characteristic. NOTE The Parental Control ...some menus. Setting the PIN code A PIN code is tuned: ❖ The CC bar will appear and will display the options, CC1-4, T1-4. If you press the CC button when an analog channel is grayed out if no PIN has been set. Press the ( / arrow) buttons to select a characteristic. Select SETTINGS, SETUP, TV Settings, and ...

User Guide
Page 95
Follow the instructions to select Channel Options, and then press the OK button. Unlocking programs If you try to tune to a program that is configured as Locked cannot be viewed unless the PIN code is selected. Select SETTINGS, SETUP, TV Settings, and then press the OK button. 2 Press the ...on page 90. 5 The box is entered first, see "Setting the PIN code" on screen. See, "Setting the PIN code" on the remote control. To clear the selection, press the OK button. Basic features 95 Locking specific channels Displaying ratings To display the rating of channels appears. (Sample...
Follow the instructions to select Channel Options, and then press the OK button. Unlocking programs If you try to tune to a program that is configured as Locked cannot be viewed unless the PIN code is selected. Select SETTINGS, SETUP, TV Settings, and then press the OK button. 2 Press the ...on page 90. 5 The box is entered first, see "Setting the PIN code" on screen. See, "Setting the PIN code" on the remote control. To clear the selection, press the OK button. Basic features 95 Locking specific channels Displaying ratings To display the rating of channels appears. (Sample...
User Guide
Page 105
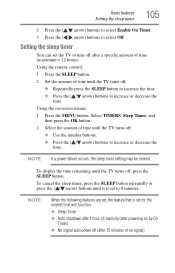
... shutdown after 1 hour of inactivity (after powering on -screen menus: 1 Press the MENU button. Setting the sleep timer You can set to select Off. Using the remote control: 1 Press the SLEEP button. 2 Set the amount of time until the TV turns off after 15 minutes of time until the TV turns... Using the on by On Timer) ❖ No signal auto power off (after a specific amount of time (maximum = 12 hours). To display the time remaining until the TV turns off , press the SLEEP button. Basic features Setting the sleep timer 105 2 Press the ( / arrow) buttons to select Enable On Timer...
... shutdown after 1 hour of inactivity (after powering on -screen menus: 1 Press the MENU button. Setting the sleep timer You can set to select Off. Using the remote control: 1 Press the SLEEP button. 2 Set the amount of time until the TV turns off after 15 minutes of time until the TV turns... Using the on by On Timer) ❖ No signal auto power off (after a specific amount of time (maximum = 12 hours). To display the time remaining until the TV turns off , press the SLEEP button. Basic features Setting the sleep timer 105 2 Press the ( / arrow) buttons to select Enable On Timer...
User Guide
Page 107
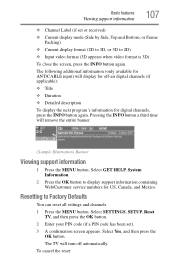
Resetting to display support information containing Web/Customer service numbers for off automatically. To cancel the reset: Basic features Viewing support information 107 ❖ Channel Label (if set ). 3 A confirmation screen appears. Select SETTINGS, SETUP, Reset TV, and then press the OK button. 2 Enter your PIN code (if a PIN code has been set...press the OK button. Select GET HELP, System Information. 2 Press the OK button to Factory Defaults You can reset all settings and channels. 1 Press the MENU button. The TV will turn off -air digital channels (if applicable): &#...
Resetting to display support information containing Web/Customer service numbers for off automatically. To cancel the reset: Basic features Viewing support information 107 ❖ Channel Label (if set ). 3 A confirmation screen appears. Select SETTINGS, SETUP, Reset TV, and then press the OK button. 2 Enter your PIN code (if a PIN code has been set...press the OK button. Select GET HELP, System Information. 2 Press the OK button to Factory Defaults You can reset all settings and channels. 1 Press the MENU button. The TV will turn off -air digital channels (if applicable): &#...
User Guide
Page 176
Chapter 10 Troubleshooting General troubleshooting Before calling a service technician, review this method, unplug the TV from the AC wall outlet and plug it back in . If the problem still exists attempt to controls. TV stops responding to troubleshoot the problem. Before you are experiencing. Black box on the TV control panel for the problem you begin to troubleshoot any problem, first...
Chapter 10 Troubleshooting General troubleshooting Before calling a service technician, review this method, unplug the TV from the AC wall outlet and plug it back in . If the problem still exists attempt to controls. TV stops responding to troubleshoot the problem. Before you are experiencing. Black box on the TV control panel for the problem you begin to troubleshoot any problem, first...
User Guide
Page 182
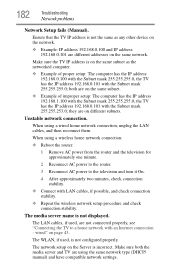
...the TV has the IP address 192.168.0.101 with an Internet connection - Make sure both are using a wired home network connection, unplug the LAN cables, and then reconnect them. 182 Troubleshooting Network problems Network Setup fails (Manual). Unstable network connection. The LAN cables, if used , is not displayed. Ensure.... Make sure the TV IP address is on page 43. When using the same network type (DHCP/ manual) and have compatible network settings. they are not connected properly, see "Connecting the TV to the television and turn it On. 4 After approximately two minutes, check...
...the TV has the IP address 192.168.0.101 with an Internet connection - Make sure both are using a wired home network connection, unplug the LAN cables, and then reconnect them. 182 Troubleshooting Network problems Network Setup fails (Manual). Unstable network connection. The LAN cables, if used , is not displayed. Ensure.... Make sure the TV IP address is on page 43. When using the same network type (DHCP/ manual) and have compatible network settings. they are not connected properly, see "Connecting the TV to the television and turn it On. 4 After approximately two minutes, check...
User Guide
Page 198
... favorites 150 browsing favorites 149 expert picture settings RGB Filter 123 setting 122 Test Pattern 122 White Balance 123 External Control Setup 167 F Factory Defaults reset 107 favorites adding 150 browsing 149 viewing 152...setup 169 maximum volume setup 170 Media Controller setup 169 MediaGuide 153 operating 154 setup 153 MediaShare (Media Player) basic operation 158 playing music files 162 specifications 157 viewing movie files 160 viewing photo files 164 Music access via ePORTAL 157 N network advanced setup 136 connection test 139 DNS setup 137 initial setup 58 setup 131 wireless setup...
... favorites 150 browsing favorites 149 expert picture settings RGB Filter 123 setting 122 Test Pattern 122 White Balance 123 External Control Setup 167 F Factory Defaults reset 107 favorites adding 150 browsing 149 viewing 152...setup 169 maximum volume setup 170 Media Controller setup 169 MediaGuide 153 operating 154 setup 153 MediaShare (Media Player) basic operation 158 playing music files 162 specifications 157 viewing movie files 160 viewing photo files 164 Music access via ePORTAL 157 N network advanced setup 136 connection test 139 DNS setup 137 initial setup 58 setup 131 wireless setup...


