User Guide
Page 17
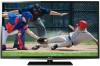
...your TV and begin using its many exciting features. 1 Carefully read the important safety, installation, care, and service information. Keep this manual for future reference. 2 To choose a location for your TV and other immovable ...a location where light does not reflect on page 48 for an overview of navigating the TV's menu system. Then press the POWER button on the TV control panel or remote control to a wall,...cause overheating, which will damage the TV. THIS TYPE OF DAMAGE IS NOT COVERED UNDER THE TOSHIBA WARRANTY. 3 Do not plug in any power cords until after you cannot turn on the ...
...your TV and begin using its many exciting features. 1 Carefully read the important safety, installation, care, and service information. Keep this manual for future reference. 2 To choose a location for your TV and other immovable ...a location where light does not reflect on page 48 for an overview of navigating the TV's menu system. Then press the POWER button on the TV control panel or remote control to a wall,...cause overheating, which will damage the TV. THIS TYPE OF DAMAGE IS NOT COVERED UNDER THE TOSHIBA WARRANTY. 3 Do not plug in any power cords until after you cannot turn on the ...
User Guide
Page 53
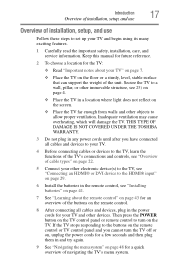
...❖ You must use the Channel Number buttons on page 51. 2 Press the MENU button and open the Setup menu. 3 Highlight Installation, and then press the ENTER button. (Sample Image) Setup menu - Setting up the ANT/CABLE input source before programming channels. This is finished, ...you must set up your Cable TV service lineup changes significantly. however, once channel programming is normal; See "ANT/CABLE IN...
...❖ You must use the Channel Number buttons on page 51. 2 Press the MENU button and open the Setup menu. 3 Highlight Installation, and then press the ENTER button. (Sample Image) Setup menu - Setting up the ANT/CABLE input source before programming channels. This is finished, ...you must set up your Cable TV service lineup changes significantly. however, once channel programming is normal; See "ANT/CABLE IN...

User Guide
Page 83
... to the current Base CC Mode setting. However, once you wish to change, and then press the ( / arrow) buttons to select the desired service. Mode: Description Caption size Auto, Small, Standard, Large Caption text type Auto, Default, Mono (with Serif), Prop. (with Serif), Mono (without...the Preferences menu. 2 Highlight CC Selector, and then press the ENTER button. 3 Press the ( / arrow) buttons to select Closed Caption, and then press the ( / arrow) buttons to select the format for a particular channel. If the selected service is not available, the next best service will ...
... to the current Base CC Mode setting. However, once you wish to change, and then press the ( / arrow) buttons to select the desired service. Mode: Description Caption size Auto, Small, Standard, Large Caption text type Auto, Default, Mono (with Serif), Prop. (with Serif), Mono (without...the Preferences menu. 2 Highlight CC Selector, and then press the ENTER button. 3 Press the ( / arrow) buttons to select Closed Caption, and then press the ( / arrow) buttons to select the format for a particular channel. If the selected service is not available, the next best service will ...

User Guide
Page 85
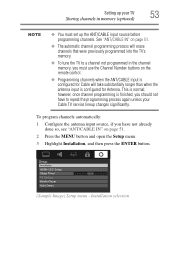
.../SAP broadcasts The multi-channel TV sound (MTS) feature allows you to select the desired service. 4 Press the EXIT button. MTS also can typically leave the TV in stereo sound: 1 Press the MENU button and open the Sound menu. 2 Highlight Audio Setup, and then press the ENTER button. 3 In the MTS field, select... to reduce the noise. Using the TV's features 85 Adjusting the audio 2 Highlight Digital Audio Selector, and then press the ENTER button. (Sample Image) Sound menu -
.../SAP broadcasts The multi-channel TV sound (MTS) feature allows you to select the desired service. 4 Press the EXIT button. MTS also can typically leave the TV in stereo sound: 1 Press the MENU button and open the Sound menu. 2 Highlight Audio Setup, and then press the ENTER button. 3 In the MTS field, select... to reduce the noise. Using the TV's features 85 Adjusting the audio 2 Highlight Digital Audio Selector, and then press the ENTER button. (Sample Image) Sound menu -


