User Guide
Page 2
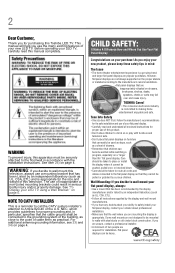
... minimum of two people are required for purchasing this product. • Don't allow children to climb on or play with furniture and television sets. • Don't place flat panel displays on a "larger than life" flat panel display. Follow the manufacturer's recommendations for the safe ... this television. The use a mounting bracket that are popular purchases. For additional antenna grounding information, see 33) and 34) on page 4. TOSHIBA Cares! • The consumer electronics industry is appropriate. See "To Display your new LED TV. CHILD SAFETY: It Makes A Difference How ...
... minimum of two people are required for purchasing this product. • Don't allow children to climb on or play with furniture and television sets. • Don't place flat panel displays on a "larger than life" flat panel display. Follow the manufacturer's recommendations for the safe ... this television. The use a mounting bracket that are popular purchases. For additional antenna grounding information, see 33) and 34) on page 4. TOSHIBA Cares! • The consumer electronics industry is appropriate. See "To Display your new LED TV. CHILD SAFETY: It Makes A Difference How ...
User Guide
Page 7
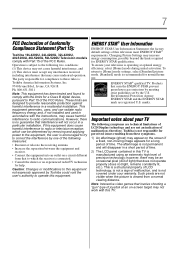
...interference in a residential installation. Products that earn the ENERGY STAR prevent green house gas emissions by meeting strict guidelines set by Toshiba could void the user's authority to which can radiate radio frequency energy and, if not installed and used in ...fixed, non-moving image appears for normal home use. 7 FCC Declaration of Conformity Compliance Statement (Part 15): Toshiba 19L4200U, 24L4200U, 32L4200U, 40L5200U, 46L5200U, 50L5200U Television models comply with this television meet ENERGY STAR® requirements. ENERGY STAR® User Information ENERGY STAR ...
...interference in a residential installation. Products that earn the ENERGY STAR prevent green house gas emissions by meeting strict guidelines set by Toshiba could void the user's authority to which can radiate radio frequency energy and, if not installed and used in ...fixed, non-moving image appears for normal home use. 7 FCC Declaration of Conformity Compliance Statement (Part 15): Toshiba 19L4200U, 24L4200U, 32L4200U, 40L5200U, 46L5200U, 50L5200U Television models comply with this television meet ENERGY STAR® requirements. ENERGY STAR® User Information ENERGY STAR ...
User Guide
Page 10
.../Installation menu layout 48 Navigating the menu system 48 Chapter 5: Setting up your TV 50 Initial Setup 50 Storing channels in memory (optional 52 Auto Tuning 52 Setting channel skip 55 Setting the AV input mode 56 Setting the HDMI® audio mode 56 Viewing the digital signal meter... 57 Setting the time zone 58 Viewing the system status 58 Resetting Factory Defaults 59 Chapter...
.../Installation menu layout 48 Navigating the menu system 48 Chapter 5: Setting up your TV 50 Initial Setup 50 Storing channels in memory (optional 52 Auto Tuning 52 Setting channel skip 55 Setting the AV input mode 56 Setting the HDMI® audio mode 56 Viewing the digital signal meter... 57 Setting the time zone 58 Viewing the system status 58 Resetting Factory Defaults 59 Chapter...
User Guide
Page 11
... 78 Adjusting the picture 79 Selecting the picture mode 79 Adjusting the picture quality 80 Using closed captions 81 Base closed captions 81 Digital CC settings 82 CC Selector 83 Adjusting the audio 84 Muting the sound 84 Using the digital audio selector 84
... 78 Adjusting the picture 79 Selecting the picture mode 79 Adjusting the picture quality 80 Using closed captions 81 Base closed captions 81 Digital CC settings 82 CC Selector 83 Adjusting the audio 84 Muting the sound 84 Using the digital audio selector 84
User Guide
Page 12
... 97 Using the input lock feature 97 Locking channels 98 Using the GameTimer 99 Using the panel lock feature 99 Using the PC settings feature 100 Setting the PC Audio 101 Using the Media Player 102 Auto Start function 103 To open the Media Player 103 Viewing photo files 105 ...Playing music files 106 Viewing photo files and playing music files at the same time 107 Sorting photo or music files 108 Setting the sleep timer 109 Automatic Power Down 110 Chip 90 Downloading an additional rating system .........91 Displaying ratings 95 Blocking TV programs by rating...
... 97 Using the input lock feature 97 Locking channels 98 Using the GameTimer 99 Using the panel lock feature 99 Using the PC settings feature 100 Setting the PC Audio 101 Using the Media Player 102 Auto Start function 103 To open the Media Player 103 Viewing photo files 105 ...Playing music files 106 Viewing photo files and playing music files at the same time 107 Sorting photo or music files 108 Setting the sleep timer 109 Automatic Power Down 110 Chip 90 Downloading an additional rating system .........91 Displaying ratings 95 Blocking TV programs by rating...
User Guide
Page 13
...Using HDMI® CEC 111 HDMI® CEC playback device (DVD player, etc.) control 111 Other HDMI® CEC functions 113 Setting up HDMI® CEC 114 Displaying TV status information 114 Understanding the last mode memory feature ......115 Chapter 7: Using the TV's ...Advanced Features 116 Using the advanced picture settings 116 Dynamic Contrast 116 Static Gamma 117 Color temperature 117 ClearFrame™ (L5200U Series 118 Film Stabilization (L5200U Series 119 CableClear®...
...Using HDMI® CEC 111 HDMI® CEC playback device (DVD player, etc.) control 111 Other HDMI® CEC functions 113 Setting up HDMI® CEC 114 Displaying TV status information 114 Understanding the last mode memory feature ......115 Chapter 7: Using the TV's ...Advanced Features 116 Using the advanced picture settings 116 Dynamic Contrast 116 Static Gamma 117 Color temperature 117 ClearFrame™ (L5200U Series 118 Film Stabilization (L5200U Series 119 CableClear®...
User Guide
Page 16
...Media Player-Allows you to the TV's PC IN terminal" on page 36. ❖ HDMI® CEC-Allows control of your new Toshiba wide screen, integrated HD, LED TV: ❖ Integrated digital tuning (8VSB ATSC and QAM)- 16 Introduction Features Features The following are.... ❖ ClearFrameTM 120 Hz anti-blur feature (for a separate digital converter set-top box (in most cases). ❖ 1366 x 768 output resolution 19L4200U, 32L4200U. ❖ 1920 x 1080 output resolution 24L4200U, 40L5200U, 46L5200U, and 50L5200U. ❖ Three HDMI® (L5200U Series) Two HDMI® (L4200U ...
...Media Player-Allows you to the TV's PC IN terminal" on page 36. ❖ HDMI® CEC-Allows control of your new Toshiba wide screen, integrated HD, LED TV: ❖ Integrated digital tuning (8VSB ATSC and QAM)- 16 Introduction Features Features The following are.... ❖ ClearFrameTM 120 Hz anti-blur feature (for a separate digital converter set-top box (in most cases). ❖ 1366 x 768 output resolution 19L4200U, 32L4200U. ❖ 1920 x 1080 output resolution 24L4200U, 40L5200U, 46L5200U, and 50L5200U. ❖ Three HDMI® (L5200U Series) Two HDMI® (L4200U ...
User Guide
Page 17
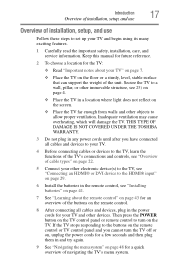
Inadequate ventilation may cause overheating, which will damage the TV. THIS TYPE OF DAMAGE IS NOT COVERED UNDER THE TOSHIBA WARRANTY. 3 Do not plug in any power cords until after you cannot turn on the screen. ❖ Place the TV far enough from walls and ...other objects to allow proper ventilation. Introduction 17 Overview of installation, setup, and use Overview of installation, setup, and use Follow these steps to set up your TV and other devices. Then press the POWER button on the TV control panel or remote control to turn the TV off or...
Inadequate ventilation may cause overheating, which will damage the TV. THIS TYPE OF DAMAGE IS NOT COVERED UNDER THE TOSHIBA WARRANTY. 3 Do not plug in any power cords until after you cannot turn on the screen. ❖ Place the TV far enough from walls and ...other objects to allow proper ventilation. Introduction 17 Overview of installation, setup, and use Overview of installation, setup, and use Follow these steps to set up your TV and other devices. Then press the POWER button on the TV control panel or remote control to turn the TV off or...
User Guide
Page 20
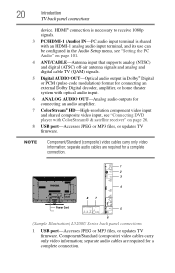
... firmware. separate audio cables are required for connecting an audio amplifier. 7 ColorStream® HD-High-resolution component video input and shared composite video input, see "Setting the PC Audio" on page 101. 4 ANT/CABLE-Antenna input that supports analog (NTSC) and digital (ATSC) off-air antenna signals and analog and digital...
... firmware. separate audio cables are required for connecting an audio amplifier. 7 ColorStream® HD-High-resolution component video input and shared composite video input, see "Setting the PC Audio" on page 101. 4 ANT/CABLE-Antenna input that supports analog (NTSC) and digital (ATSC) off-air antenna signals and analog and digital...
User Guide
Page 21
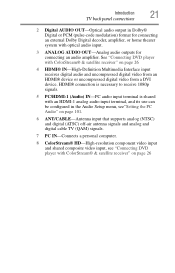
Introduction 21 TV back panel connections 2 Digital AUDIO OUT-Optical audio output in the Audio Setup menu, see"Setting the PC Audio" on page 101. 6 ANT/CABLE-Antenna input that supports analog (NTSC) and digital (ATSC) off-air antenna signals and analog and digital ...
Introduction 21 TV back panel connections 2 Digital AUDIO OUT-Optical audio output in the Audio Setup menu, see"Setting the PC Audio" on page 101. 6 ANT/CABLE-Antenna input that supports analog (NTSC) and digital (ATSC) off-air antenna signals and analog and digital ...

User Guide
Page 23
...yellow for video, red for stereo right audio, and white for a complete connection. An HDMI® cable delivers digital audio and video in sets of component video.) These cables are typically color-coded red, green, and blue. Separate audio cables are not required, see "Connecting an ...(red/white/yellow) (Sample Illustration) Standard AV cables Standard A/V cables (composite video) usually come in sets of three and connects with video devices with component video output. (ColorStream® is Toshiba's brand of three, and connects to the HDMI® input" on your TV) are typically color-...
...yellow for video, red for stereo right audio, and white for a complete connection. An HDMI® cable delivers digital audio and video in sets of component video.) These cables are typically color-coded red, green, and blue. Separate audio cables are not required, see "Connecting an ...(red/white/yellow) (Sample Illustration) Standard AV cables Standard A/V cables (composite video) usually come in sets of three and connects with video devices with component video output. (ColorStream® is Toshiba's brand of three, and connects to the HDMI® input" on your TV) are typically color-...
User Guide
Page 26
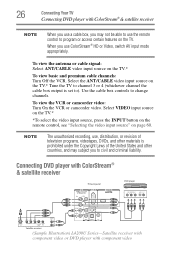
...; & satellite receiver NOTE When you use a cable box, you may subject you use , distribution, or revision of television programs, videotapes, DVDs, and other materials is set to civil and criminal liability. To view the VCR or camcorder video: Turn On the VCR or camcorder video. NOTE The unauthorized recording, use ColorStream...
...; & satellite receiver NOTE When you use a cable box, you may subject you use , distribution, or revision of television programs, videotapes, DVDs, and other materials is set to civil and criminal liability. To view the VCR or camcorder video: Turn On the VCR or camcorder video. NOTE The unauthorized recording, use ColorStream...
User Guide
Page 29
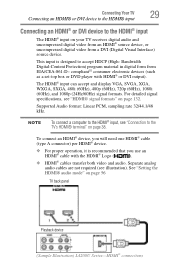
compliant[1] consumer electronic devices (such as a set-top box or DVD player with the HDMI® Logo ( ). ❖ HDMI® cables transfer both video and audio. To connect an HDMI® device, ...; input can accept and display VGA, SVGA, XGA, WXGA, SXGA, 480i (60Hz), 480p (60Hz), 720p (60Hz), 1080i (60Hz), and 1080p (24Hz/60Hz) signal formats. See "Setting the HDMI® audio mode" on page 132. Supported Audio format: Linear PCM, sampling rate 32/44.1/48 kHz. Bandwidth Digital-Content Protection) program material...
compliant[1] consumer electronic devices (such as a set-top box or DVD player with the HDMI® Logo ( ). ❖ HDMI® cables transfer both video and audio. To connect an HDMI® device, ...; input can accept and display VGA, SVGA, XGA, WXGA, SXGA, 480i (60Hz), 480p (60Hz), 720p (60Hz), 1080i (60Hz), and 1080p (24Hz/60Hz) signal formats. See "Setting the HDMI® audio mode" on page 132. Supported Audio format: Linear PCM, sampling rate 32/44.1/48 kHz. Bandwidth Digital-Content Protection) program material...
User Guide
Page 31
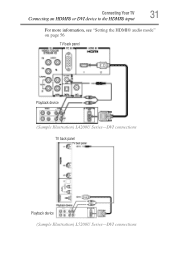
Connecting Your TV 31 Connecting an HDMI® or DVI device to the HDMI® input For more information, see "Setting the HDMI® audio mode" on page 56 TV back panel Playback device (Sample Illustration) L4200U Series-DVI connections TV back panel Playback device (Sample Illustration) L5200U Series-DVI connections
Connecting Your TV 31 Connecting an HDMI® or DVI device to the HDMI® input For more information, see "Setting the HDMI® audio mode" on page 56 TV back panel Playback device (Sample Illustration) L4200U Series-DVI connections TV back panel Playback device (Sample Illustration) L5200U Series-DVI connections

User Guide
Page 33
...feature may not operate properly. ❖ For proper operation, it is limited to the individual instruction manuals for those operations. Refer to models incorporating Toshiba's HDMI® CEC. Before controlling the device(s): ❖ After completing the above connections, configure the HDMI® CEC Setup menu with the ... audio receiver and playback device connections To connect an HDMI® device, you use an HDMI® cable with the desired settings, see "HDMI® CEC input source selection" on page 22). However, Toshiba is not liable for compatibility information.
...feature may not operate properly. ❖ For proper operation, it is limited to the individual instruction manuals for those operations. Refer to models incorporating Toshiba's HDMI® CEC. Before controlling the device(s): ❖ After completing the above connections, configure the HDMI® CEC Setup menu with the ... audio receiver and playback device connections To connect an HDMI® device, you use an HDMI® cable with the desired settings, see "HDMI® CEC input source selection" on page 22). However, Toshiba is not liable for compatibility information.

User Guide
Page 35
... Digital or PCM, depending on your device, see "Audyssey Premium Television™" on page 87. (Sample Image) Audio Setup screen - Done 6 To save the new settings, highlight Done, and then press the ENTER button. THIS DAMAGE IS NOT COVERED BY YOUR WARRANTY. ❖ The DIGITAL AUDIO OUT terminal may damage speakers...
... Digital or PCM, depending on your device, see "Audyssey Premium Television™" on page 87. (Sample Image) Audio Setup screen - Done 6 To save the new settings, highlight Done, and then press the ENTER button. THIS DAMAGE IS NOT COVERED BY YOUR WARRANTY. ❖ The DIGITAL AUDIO OUT terminal may damage speakers...
User Guide
Page 38
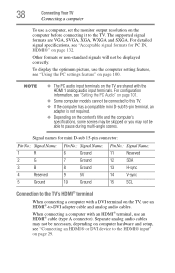
... Signal names for PC IN, HDMI®" on the computer before connecting it to pause during multi-angle scenes. For configuration information, see "Setting the PC Audio" on page 101. ❖ Some computer models cannot be connected to this TV. ❖ If the computer has a ...on the TV, use an HDMI® cable (type A connector). 38 Connecting Your TV Connecting a computer To use the computer setting feature, see "Using the PC settings feature" on page 100. The supported signal formats are shared with the HDMI 1 analog audio input terminals. For detailed signal specifications...
... Signal names for PC IN, HDMI®" on the computer before connecting it to pause during multi-angle scenes. For configuration information, see "Setting the PC Audio" on page 101. ❖ Some computer models cannot be connected to this TV. ❖ If the computer has a ...on the TV, use an HDMI® cable (type A connector). 38 Connecting Your TV Connecting a computer To use the computer setting feature, see "Using the PC settings feature" on page 100. The supported signal formats are shared with the HDMI 1 analog audio input terminals. For detailed signal specifications...

User Guide
Page 44
When the TV is present), see "Setting the sleep timer" on page 70. 44 Using the Remote Control Learning about the remote control 1 The POWER button turns the TV On/Off. CAPTION ...
When the TV is present), see "Setting the sleep timer" on page 70. 44 Using the Remote Control Learning about the remote control 1 The POWER button turns the TV On/Off. CAPTION ...

User Guide
Page 46
Icon Picture Sound Item Mode Picture Settings Noise Reduction Game Mode Theater Settings Digital Audio Selector Audio Settings Audio Setup Option Dynamic/Standard/Movie/PC/Preference Opens the Picture Settings menu Opens the Noise Reduction menu Off/On Opens the Theater Settings menu Launches the temporary Audio Selector Opens the Audio Settings menu Opens the Audio Setup...
Icon Picture Sound Item Mode Picture Settings Noise Reduction Game Mode Theater Settings Digital Audio Selector Audio Settings Audio Setup Option Dynamic/Standard/Movie/PC/Preference Opens the Picture Settings menu Opens the Noise Reduction menu Off/On Opens the Theater Settings menu Launches the temporary Audio Selector Opens the Audio Settings menu Opens the Audio Setup...

User Guide
Page 47
... Rating Blocking Edit Rating Limits Input Lock Panel Lock GameTimer® New PIN Code Installation HDMI® CEC Setup Sleep Timer PC Settings Media Player Option Launches the temporary CC Selector Off/CC1/CC2/CC3/CC4/T1/T2/T3/T4 Opens the Digital CC Setup menu Opens the ... English/Français/Español Opens the Channel Browser Setup menu Opens the HDMI® CEC Player Control menu Opens the Energy Saving Settings menu Off/On (for USA region) Opens the Edit Rating Limits menu (for USA region) Off/Video/Video+ Off/On Off/30 min/60 min...
... Rating Blocking Edit Rating Limits Input Lock Panel Lock GameTimer® New PIN Code Installation HDMI® CEC Setup Sleep Timer PC Settings Media Player Option Launches the temporary CC Selector Off/CC1/CC2/CC3/CC4/T1/T2/T3/T4 Opens the Digital CC Setup menu Opens the ... English/Français/Español Opens the Channel Browser Setup menu Opens the HDMI® CEC Player Control menu Opens the Energy Saving Settings menu Off/On (for USA region) Opens the Edit Rating Limits menu (for USA region) Off/Video/Video+ Off/On Off/30 min/60 min...


