User Manual
Page 5
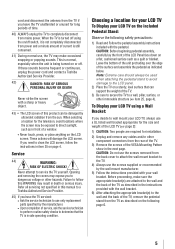
...TV, remove the pedestal stand from mains power. When the TV is in death or serious injury. If these sounds become frequent or continuous, unplug the power cord and contact a Toshiba Authorized Service Provider. 42) DANGER: RISK OF SERIOUS PERSONAL INJURY OR DEATH! Failure to follow the instructions in the... the wall bracket. 6) After attaching the appropriate bracket(s) to the wall and the back of the TV as described in this manual to a Toshiba Authorized Service Provider. 45) If you need to use the screws removed from the sun. This is normal, especially when the unit is being...
...TV, remove the pedestal stand from mains power. When the TV is in death or serious injury. If these sounds become frequent or continuous, unplug the power cord and contact a Toshiba Authorized Service Provider. 42) DANGER: RISK OF SERIOUS PERSONAL INJURY OR DEATH! Failure to follow the instructions in the... the wall bracket. 6) After attaching the appropriate bracket(s) to the wall and the back of the TV as described in this manual to a Toshiba Authorized Service Provider. 45) If you need to use the screws removed from the sun. This is normal, especially when the unit is being...
User Manual
Page 9
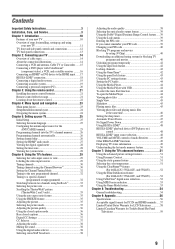
...36 Base closed captions 36 Digital CC Settings 37 CC Selector 37 Adjusting the audio 38 Muting the sound 38 Using the digital audio selector 38 Selecting stereo/SAP broadcasts 38 Adjusting the audio quality 38 ...feature 51 Selecting the color temperature 51 Using the ClearFrame™ feature (For 46SL412U, 55SL412U, and 55S41U 52 Using the Film Stabilization feature (For 46SL412U, 55SL412U, and 55S41U 52 Using CableClear® digital noise reduction 52 Using MPEG... States Warranty for LCD Televisions 58 Limited Canadian Warranty for Toshiba Brand Flat Panel Televisions 59 9
...36 Base closed captions 36 Digital CC Settings 37 CC Selector 37 Adjusting the audio 38 Muting the sound 38 Using the digital audio selector 38 Selecting stereo/SAP broadcasts 38 Adjusting the audio quality 38 ...feature 51 Selecting the color temperature 51 Using the ClearFrame™ feature (For 46SL412U, 55SL412U, and 55S41U 52 Using the Film Stabilization feature (For 46SL412U, 55SL412U, and 55S41U 52 Using CableClear® digital noise reduction 52 Using MPEG... States Warranty for LCD Televisions 58 Limited Canadian Warranty for Toshiba Brand Flat Panel Televisions 59 9
User Manual
Page 19
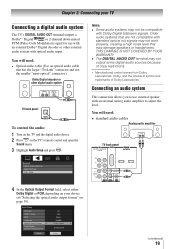
... audio amplifier to adjust the level. Chapter 2: Connecting your device ("Selecting the optical audio output format" on the TV's remote control and open the Sound menu. 3無 Highlight Audio Setup and press . You will need : • Optical audio cable (Use an optical audio cable that has the larger "TosLink" connector...
... audio amplifier to adjust the level. Chapter 2: Connecting your device ("Selecting the optical audio output format" on the TV's remote control and open the Sound menu. 3無 Highlight Audio Setup and press . You will need : • Optical audio cable (Use an optical audio cable that has the larger "TosLink" connector...
User Manual
Page 20
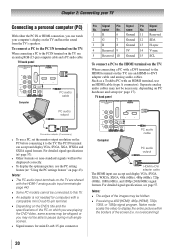
...correctly. • To display the optimum picture, use the PC setting feature ( "Using the PC settings feature" on the TV and hear the sound from the TV's speakers. For detailed signal specifications ( page 57). • Other formats or non-standard signals will not be hidden. ••... 14 V-sync 5 Reserved 10 Ground 15 SCL To connect a PC to -DVI adapter cable and analog audio cables. name Pin Signal No. Such as a Toshiba PC with a DVI terminal to the TV. TV back panel Conversion adapter (if necessary) • To use a PC, set the monitor output resolution on ...
...correctly. • To display the optimum picture, use the PC setting feature ( "Using the PC settings feature" on the TV and hear the sound from the TV's speakers. For detailed signal specifications ( page 57). • Other formats or non-standard signals will not be hidden. ••... 14 V-sync 5 Reserved 10 Ground 15 SCL To connect a PC to -DVI adapter cable and analog audio cables. name Pin Signal No. Such as a Toshiba PC with a DVI terminal to the TV. TV back panel Conversion adapter (if necessary) • To use a PC, set the monitor output resolution on ...

User Manual
Page 22
...). 11無 C.CAPTION accesses the closed caption ( pages 36-37). 12無 MUTE reduces or turns off . The button is on and off the sound ( page 38). 13無 VOL + - press again to restart. 27無 SKIP Skips back to beginning of a tape or DVD. 23無 SKIP ... channels when no menu is used for operating the TV are described here. Note: The error message "NOT AVAILABLE" may appear if you to control Toshiba REGZA-LINK compatible devices via HDMI connection ( Page 48, REGZA-LINK playback device control). 21無 STOP Stops the tape or DVD. 22&#...
...). 11無 C.CAPTION accesses the closed caption ( pages 36-37). 12無 MUTE reduces or turns off . The button is on and off the sound ( page 38). 13無 VOL + - press again to restart. 27無 SKIP Skips back to beginning of a tape or DVD. 23無 SKIP ... channels when no menu is used for operating the TV are described here. Note: The error message "NOT AVAILABLE" may appear if you to control Toshiba REGZA-LINK compatible devices via HDMI connection ( Page 48, REGZA-LINK playback device control). 21無 STOP Stops the tape or DVD. 22&#...
User Manual
Page 23
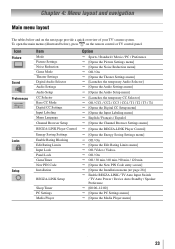
Icon Picture Sound Preferences Locks Setup Item Mode Picture Settings Noise Reduction Game Mode Theater Settings Digital Audio Selector Audio Settings Audio Setup CC Selector Base CC Mode ...
Icon Picture Sound Preferences Locks Setup Item Mode Picture Settings Noise Reduction Game Mode Theater Settings Digital Audio Selector Audio Settings Audio Setup CC Selector Base CC Mode ...
User Manual
Page 27
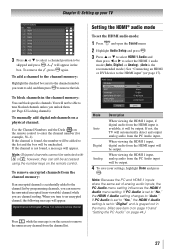
... an encrypted channel, the following message will appear. Setting the HDMI® audio mode To set the HDMI audio mode: 1無 Press and open the Sound menu. 2無 Highlight Audio Setup and press . 3無 Press p or q to select HDMI 1 Audio and then press t or u to select the HDMI 1 audio mode (Auto...
... an encrypted channel, the following message will appear. Setting the HDMI® audio mode To set the HDMI audio mode: 1無 Press and open the Sound menu. 2無 Highlight Audio Setup and press . 3無 Press p or q to select HDMI 1 Audio and then press t or u to select the HDMI 1 audio mode (Auto...

User Manual
Page 36
... the closed caption mode Base closed captions The closed caption mode has two options: • Captions-An on-screen display of the dialogue, narration, and sound effects of TV programs and videos that you prefer and press . ** DynaLight This function automatically strengthens the black coloring of dark areas in the video...
... the closed caption mode Base closed captions The closed caption mode has two options: • Captions-An on-screen display of the dialogue, narration, and sound effects of TV programs and videos that you prefer and press . ** DynaLight This function automatically strengthens the black coloring of dark areas in the video...

User Manual
Page 38
...stronger or increases the balance in the right channel (depending on closed caption feature, use the digital audio selector: 1無 Press and open the Sound menu. 2無 Highlight Audio Setup and press . 3無 In the MTS field, select Stereo. 4無 To save the new settings, ... screen but hear the other audio information (when provided by individual stations). Chapter 6: Using the TV's features Adjusting the audio Muting the sound Press on an ATSC digital station (if available): Highlight the Language field in Step 3 above . Each time you are watching is Closed...
...stronger or increases the balance in the right channel (depending on closed caption feature, use the digital audio selector: 1無 Press and open the Sound menu. 2無 Highlight Audio Setup and press . 3無 In the MTS field, select Stereo. 4無 To save the new settings, ... screen but hear the other audio information (when provided by individual stations). Chapter 6: Using the TV's features Adjusting the audio Muting the sound Press on an ATSC digital station (if available): Highlight the Language field in Step 3 above . Each time you are watching is Closed...
User Manual
Page 39
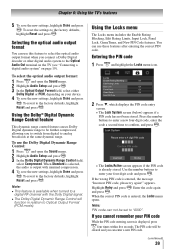
...code will function in relation to Optical Output Format (PCM mode). To select the optical audio output format: 1無 Press and open the Sound menu. 2無 Highlight Audio Setup and press . 3無 In the Dolby Digital Dynamic Range Control field, select Compressed. To use these ... Digital Dynamic Range Control will be further compressed, allowing you can use the Dolby Digital Dynamic Range Control: 1無 Press and open the Sound menu. 2無 Highlight Audio Setup and press . 3無 In the Optical Output Format field, select either Dolby Digital or PCM, depending...
...code will function in relation to Optical Output Format (PCM mode). To select the optical audio output format: 1無 Press and open the Sound menu. 2無 Highlight Audio Setup and press . 3無 In the Dolby Digital Dynamic Range Control field, select Compressed. To use these ... Digital Dynamic Range Control will be further compressed, allowing you can use the Dolby Digital Dynamic Range Control: 1無 Press and open the Sound menu. 2無 Highlight Audio Setup and press . 3無 In the Optical Output Format field, select either Dolby Digital or PCM, depending...
User Manual
Page 44
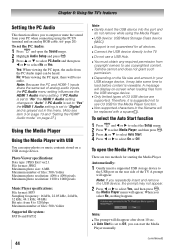
... the Media Player manually. (continued) 44 Note: Because the PC and HDMI-1 inputs share the same set to select No or Yes. To open the Sound menu. 2無 Highlight Audio Setup and press . 3無 Press or to select PC Audio and then press or to...input, the audio from 8 to 320 kbps Maximum number of analog audio inputs, the PC Audio menu setting influences the HDMI 1 Audio menu setting. Toshiba cannot and does not grant such permission. ••Depending on the rear side of files: 500 / folder Maximum photo resolution: 4096 x 4096 pixels...
... the Media Player manually. (continued) 44 Note: Because the PC and HDMI-1 inputs share the same set to select No or Yes. To open the Sound menu. 2無 Highlight Audio Setup and press . 3無 Press or to select PC Audio and then press or to...input, the audio from 8 to 320 kbps Maximum number of analog audio inputs, the PC Audio menu setting influences the HDMI 1 Audio menu setting. Toshiba cannot and does not grant such permission. ••Depending on the rear side of files: 500 / folder Maximum photo resolution: 4096 x 4096 pixels...
User Manual
Page 46
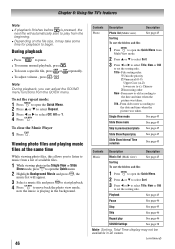
... the picture was taken. Viewing photo files and playing music files at the same time While viewing photo files, this allows you can adjust the SOUND menu functions from the QUICK menu. Note: During playback, you to listen to music from Multi View mode. 2無 Press or to select... mode See page 45 Slide Show mode See page 45 Skip to previous/next photo See page 45 Slide Show Repeat play See page 46 SOUND Settings See page 38 Note: Sorting, Total Time display may take some time for playback to set the sorting rule. Playback See page 45 Pause...
... the picture was taken. Viewing photo files and playing music files at the same time While viewing photo files, this allows you can adjust the SOUND menu functions from the QUICK menu. Note: During playback, you to listen to music from Multi View mode. 2無 Press or to select... mode See page 45 Slide Show mode See page 45 Skip to previous/next photo See page 45 Slide Show Repeat play See page 46 SOUND Settings See page 38 Note: Sorting, Total Time display may take some time for playback to set the sorting rule. Playback See page 45 Pause...
User Manual
Page 49
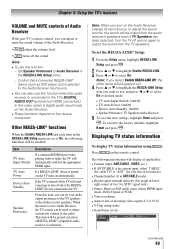
...If a REGZA-LINK® device is turned off and on the Audio Receiver, change its input source, or adjust the sound volume, the sound will be used to output the sound from the audio receiver's speakers even if TV Speakers has been selected. This item will send a message to turn on ... REGZA-LINK. 3無 Press t or u to the factory defaults, highlight Reset and press . To set your TV's remote control, you turn off the sound. for the Audio Receiver input source. ••You can also use this function: −− Set Speaker Preference to Audio Receiver in the REGZA...
...If a REGZA-LINK® device is turned off and on the Audio Receiver, change its input source, or adjust the sound volume, the sound will be used to output the sound from the audio receiver's speakers even if TV Speakers has been selected. This item will send a message to turn on ... REGZA-LINK. 3無 Press t or u to the factory defaults, highlight Reset and press . To set your TV's remote control, you turn off the sound. for the Audio Receiver input source. ••You can also use this function: −− Set Speaker Preference to Audio Receiver in the REGZA...

User Manual
Page 54
... a digital display, in and try one of sync. Black box on the TV, no color •• The station may help synchronize the sound to inform them of this issue. Other problems •• If your local broadcast, cable, or satellite provider to the picture. -- Video Input... T2, T3, or T4). Poor composite picture •• If the TV is connected to reduce the effect of this phenomenon: -- Picture and sound are out of sync •• As with all products that has a programmable audio delay feature, use the Restore Factory Defaults procedure ( page...
... a digital display, in and try one of sync. Black box on the TV, no color •• The station may help synchronize the sound to inform them of this issue. Other problems •• If your local broadcast, cable, or satellite provider to the picture. -- Video Input... T2, T3, or T4). Poor composite picture •• If the TV is connected to reduce the effect of this phenomenon: -- Picture and sound are out of sync •• As with all products that has a programmable audio delay feature, use the Restore Factory Defaults procedure ( page...
User Manual
Page 55
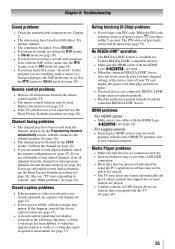
... from the channel memory by the LOCK feature. Try another channel. •• The sound may have changed settings of USB storage device are formats that seems "incorrect" for Toshiba REGZA-LINK® compatible devices. •• Make sure the HDMI cables with the HDMI... that correspond with the latest HDMI TV products, due to use the Reset Factory Defaults procedure ( page 28). Chapter 8: Troubleshooting Sound problems •• Check the antenna/cable connections ( Chapter 2). •• The station may not operate properly. ••...
... from the channel memory by the LOCK feature. Try another channel. •• The sound may have changed settings of USB storage device are formats that seems "incorrect" for Toshiba REGZA-LINK® compatible devices. •• Make sure the HDMI cables with the HDMI... that correspond with the latest HDMI TV products, due to use the Reset Factory Defaults procedure ( page 28). Chapter 8: Troubleshooting Sound problems •• Check the antenna/cable connections ( Chapter 2). •• The station may not operate properly. ••...
Brochure
Page 2
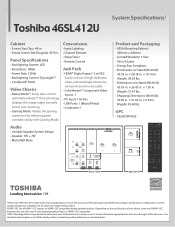
...pushed, pulled over -scanning. • Gaming Mode: Initiate the gaming experience by reducing game controller delay with Native Mode™! Toshiba 46SL412U System Specifications1 Cabinet • Screen Size Class: 46 in. • Actual Screen Size Diagonal: 45.9 in . This technology displays... if your display/peripheral device is HDMI®-CEC compatible. 3VESA® Mounting Pattern If you decide to high-definition video, and amazingly immersive surround sound in one cable. • ColorStream™ Component Video Inputs: 1 • PC Input: 1 Hi-Res • USB Ports: 1 (Music/Photo...
...pushed, pulled over -scanning. • Gaming Mode: Initiate the gaming experience by reducing game controller delay with Native Mode™! Toshiba 46SL412U System Specifications1 Cabinet • Screen Size Class: 46 in. • Actual Screen Size Diagonal: 45.9 in . This technology displays... if your display/peripheral device is HDMI®-CEC compatible. 3VESA® Mounting Pattern If you decide to high-definition video, and amazingly immersive surround sound in one cable. • ColorStream™ Component Video Inputs: 1 • PC Input: 1 Hi-Res • USB Ports: 1 (Music/Photo...


