User Manual
Page 9
...Setting the sleep timer 43 Setting Automatic Power Down 43 Setting No Signal Power Down 43 Displaying TV status information 44 Viewing support information 44 Resetting to Factory Defaults 44 Power failure 44 Chapter 7: Picture and sound controls 45 Selecting the picture size 45 Scrolling the picture 47 Using ...feature 50 MPEG NR 50 DNR 50 Auto Brightness Sensor 50 Backlight Adjustment Pro 50 ColorMaster 51 Base Color Adjustment 51 Color temperature 51 Resetting to the factory default 51 Setting the Expert Picture Settings 51 Test Pattern 51 RGB Filter 51 White Balance 51...
...Setting the sleep timer 43 Setting Automatic Power Down 43 Setting No Signal Power Down 43 Displaying TV status information 44 Viewing support information 44 Resetting to Factory Defaults 44 Power failure 44 Chapter 7: Picture and sound controls 45 Selecting the picture size 45 Scrolling the picture 47 Using ...feature 50 MPEG NR 50 DNR 50 Auto Brightness Sensor 50 Backlight Adjustment Pro 50 ColorMaster 51 Base Color Adjustment 51 Color temperature 51 Resetting to the factory default 51 Setting the Expert Picture Settings 51 Test Pattern 51 RGB Filter 51 White Balance 51...
User Manual
Page 10
... remote to operate other devices . . . 79 Device code setup 79 Searching for a device code 80 Locking the volume keys 80 Clearing the remote's programming 80 Resetting to the factory default 80 Operating the TV with combination buttons 81 Remote control codes 82 Limited United States Warranty for LCD Televisions 88 Limited...
... remote to operate other devices . . . 79 Device code setup 79 Searching for a device code 80 Locking the volume keys 80 Clearing the remote's programming 80 Resetting to the factory default 80 Operating the TV with combination buttons 81 Remote control codes 82 Limited United States Warranty for LCD Televisions 88 Limited...
User Manual
Page 16
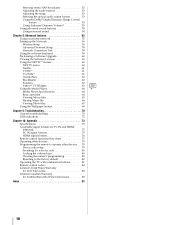
... signal format, you will need a High Speed HDMI cable. Because this is an evolving technology, it is possible that the HDMI or DVI device is reset properly: • When turning on electronic components, turn off electronic components, turn on your TV receives digital audio and uncompressed digital video from an HDMI...
... signal format, you will need a High Speed HDMI cable. Because this is an evolving technology, it is possible that the HDMI or DVI device is reset properly: • When turning on electronic components, turn off electronic components, turn on your TV receives digital audio and uncompressed digital video from an HDMI...
User Manual
Page 24
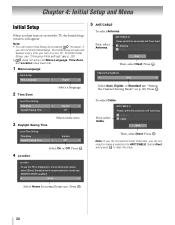
... a language. OK Note: If you do not want to skip this step. Chapter 4: Initial Setup and Menu Initial Setup When you first turn on or reset the TV, the Initial Setup window will appear every time you turn on p. 32).
... a language. OK Note: If you do not want to skip this step. Chapter 4: Initial Setup and Menu Initial Setup When you first turn on or reset the TV, the Initial Setup window will appear every time you turn on p. 32).

User Manual
Page 26
... Sleep Timer Game Timer PICTURE SOUND 60 56 57 (Device select) 67 (Device select) 65 (Device select) 66 69 42 43 39 Picture Mode 48 Reset 48 Backlight 48 Contrast 48 Brightness 48 Color 48 Tint 48 Sharpness 48 Advanced Picture Settings 49 Expert Picture Settings 51 TheaterLock 52 MTS 52...
... Sleep Timer Game Timer PICTURE SOUND 60 56 57 (Device select) 67 (Device select) 65 (Device select) 66 69 42 43 39 Picture Mode 48 Reset 48 Backlight 48 Contrast 48 Brightness 48 Color 48 Tint 48 Sharpness 48 Advanced Picture Settings 49 Expert Picture Settings 51 TheaterLock 52 MTS 52...
User Manual
Page 27
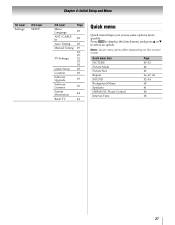
... 2nd Layer SETUP 3rd Layer Menu Language ANT/CABLE In Auto Tuning Manual Tuning TV Settings Quick Setup Location Software Upgrade Software Licenses System Information Reset TV Page 28 28 28 29 28, 29, 32, 35, 38 28 28 60 60 44 44 Quick menu Quick menu helps you access some...
... 2nd Layer SETUP 3rd Layer Menu Language ANT/CABLE In Auto Tuning Manual Tuning TV Settings Quick Setup Location Software Upgrade Software Licenses System Information Reset TV Page 28 28 28 29 28, 29, 32, 35, 38 28 28 60 60 44 44 Quick menu Quick menu helps you access some...

User Manual
Page 31
..., HDMI 1, HDMI 2, HDMI 3, HDMI 4, PC (ColorStream HD2) Note: The TV mode select button will be restricted to the ANT/CABLE input. OK 31 To reset Auto Input: Select Reset. To set . 4 Press C or c to set Auto Input: 1 > Settings > PREFERENCES > Auto Input > . After setting an input for a specific MODE SELECT button, the TV...
..., HDMI 1, HDMI 2, HDMI 3, HDMI 4, PC (ColorStream HD2) Note: The TV mode select button will be restricted to the ANT/CABLE input. OK 31 To reset Auto Input: Select Reset. To set . 4 Press C or c to set Auto Input: 1 > Settings > PREFERENCES > Auto Input > . After setting an input for a specific MODE SELECT button, the TV...

User Manual
Page 32
Digital channels have priority when manually entering a channel number using the 0-9 buttons on the remote control. (For example, to factory defaults, highlight Reset and press . Tuning in to enter the major channel number. OK Use the 0-9 buttons on the remote control to the next programmed channel Press CH ...
Digital channels have priority when manually entering a channel number using the 0-9 buttons on the remote control. (For example, to factory defaults, highlight Reset and press . Tuning in to enter the major channel number. OK Use the 0-9 buttons on the remote control to the next programmed channel Press CH ...
User Manual
Page 36
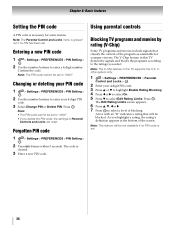
... ratings you select. Note: This feature will be not available if no PIN has been set to select a level of Parental Controls and Locks are reset. Press . OK 2 Press Q 4 times within 5 seconds. Using parental controls Blocking TV programs and movies by rating (V-Chip) Some TV programs and movies include signals that...
... ratings you select. Note: This feature will be not available if no PIN has been set to select a level of Parental Controls and Locks are reset. Press . OK 2 Press Q 4 times within 5 seconds. Using parental controls Blocking TV programs and movies by rating (V-Chip) Some TV programs and movies include signals that...
User Manual
Page 42
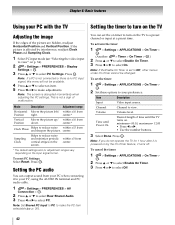
... and minimize periodic vertical stripes on the TV to select PC Settings. If the picture is disrupted momentarily when adjusting the PC settings. To reset PC Settings: Select Reset. OK 2 Press B or b to select Rear Shared Audio. 3 Press C or c to view. Note: If the Enable On Timer is powered on . This is...
... and minimize periodic vertical stripes on the TV to select PC Settings. If the picture is disrupted momentarily when adjusting the PC settings. To reset PC Settings: Select Reset. OK 2 Press B or b to select Rear Shared Audio. 3 Press C or c to view. Note: If the Enable On Timer is powered on . This is...
User Manual
Page 44
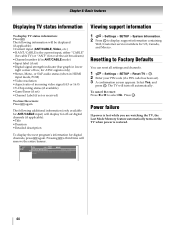
... Web/Customer service numbers for digital channels, press Q again. Select Yes, and press OK . To cancel the reset: Press C or c to Factory Defaults You can reset all settings and channels. 1 > Settings > SETUP > Reset TV > . Press . Resetting to select No. Chapter 6: Basic features Displaying TV status information To display TV status information: Press Q. OK 2 Enter...
... Web/Customer service numbers for digital channels, press Q again. Select Yes, and press OK . To cancel the reset: Press C or c to Factory Defaults You can reset all settings and channels. 1 > Settings > SETUP > Reset TV > . Press . Resetting to select No. Chapter 6: Basic features Displaying TV status information To display TV status information: Press Q. OK 2 Enter...
User Manual
Page 48
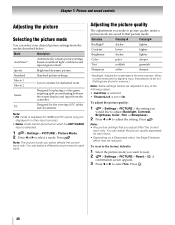
...and sound controls Adjusting the picture Selecting the picture mode You can select your desired picture settings from the controller. To reset to the factory defaults: 1 Select the picture mode you would like to adjust (Backlight, Contrast, Brightness, Color, Tint, or... Sharpness). 2 Press C or c to reset. 2 > Settings > PICTURE > Reset > OK . Note: • Any picture settings that picture mode. OK 48 Mode Description AutoView® Automatically adjusts picture settings based...
...and sound controls Adjusting the picture Selecting the picture mode You can select your desired picture settings from the controller. To reset to the factory defaults: 1 Select the picture mode you would like to adjust (Backlight, Contrast, Brightness, Color, Tint, or... Sharpness). 2 Press C or c to reset. 2 > Settings > PICTURE > Reset > OK . Note: • Any picture settings that picture mode. OK 48 Mode Description AutoView® Automatically adjusts picture settings based...

User Manual
Page 50
...appears. 4 Press OK to fix the adjustment. Backlight Adjustment Pro Backlight Control Level 37 100 Control Level 0 Ambient Light Cancel Reset 5 Press OK to display the adjustment window. OK 3 Press B or b to highlight MPEG NR. 4 Press C or c to the factory defaults, select... Reset on the screen. Press . To reset the adjustments of a weak signal to select Auto Brightness Sensor Settings. OK 2 Press B or b to 100. The adjustment range is ...
...appears. 4 Press OK to fix the adjustment. Backlight Adjustment Pro Backlight Control Level 37 100 Control Level 0 Ambient Light Cancel Reset 5 Press OK to display the adjustment window. OK 3 Press B or b to highlight MPEG NR. 4 Press C or c to the factory defaults, select... Reset on the screen. Press . To reset the adjustments of a weak signal to select Auto Brightness Sensor Settings. OK 2 Press B or b to 100. The adjustment range is ...
User Manual
Page 51
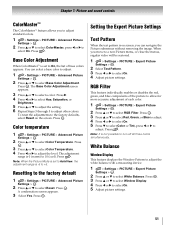
... to adjust the setting. 6 Repeat Steps 3 through 5 to select Color Temperature. OK 2 Press B or b to adjust other colors. Press . Resetting to adjust the white balance with a measuring device. 1 > Settings > PICTURE > Expert Picture Settings > . Press . When you to turn off... Advanced Picture Settings > . OK 2 Press B or b to select a color. The Base Color Adjustment screen appears. 3 Press B or b to select Reset. OK 2 Select Test Pattern. 3 Press C or c to select On. The adjustment range is not possible to adjust standard colors. 1 > Settings > PICTURE...
... to adjust the setting. 6 Repeat Steps 3 through 5 to select Color Temperature. OK 2 Press B or b to adjust other colors. Press . Resetting to adjust the white balance with a measuring device. 1 > Settings > PICTURE > Expert Picture Settings > . Press . When you to turn off... Advanced Picture Settings > . OK 2 Press B or b to select a color. The Base Color Adjustment screen appears. 3 Press B or b to select Reset. OK 2 Select Test Pattern. 3 Press C or c to select On. The adjustment range is not possible to adjust standard colors. 1 > Settings > PICTURE...
User Manual
Page 52
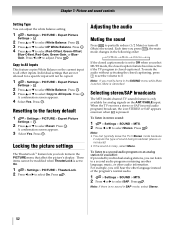
...to All Inputs This feature copies White Balance on the current input to Off when you select MUTE mode, the closed -captioned. Press . OK Resetting to adjust. Press . Each time you press , the mute mode changes in Stereo mode because it outputs the type of the program's normal...If the closed captioning, press VOL to set the volume to select On. To listen to select SAP. Press . Press . OK 2 Press B or b to select Reset. OK 2 Press B or b to select White Balance. Press . Note: If you can adjust the white balance setting. 1 > Settings > PICTURE > Expert Picture ...
...to All Inputs This feature copies White Balance on the current input to Off when you select MUTE mode, the closed -captioned. Press . OK Resetting to adjust. Press . Each time you press , the mute mode changes in Stereo mode because it outputs the type of the program's normal...If the closed captioning, press VOL to set the volume to select On. To listen to select SAP. Press . Press . OK 2 Press B or b to select Reset. OK 2 Press B or b to select White Balance. Press . Note: If you can adjust the white balance setting. 1 > Settings > PICTURE > Expert Picture ...

User Manual
Page 58
... this TV is On, you input an incompatible number and press OK , the field number will be a private address. Your internet service provider should be reset to the previous value. 7 Press B or b to highlight Secondary DNS Address, and edit in the same way as IP Address. Press . Press . Note:... as Primary DNS Address. Press . OK 3 Press B or b to select IP Address Setup. Press . OK Note: • IP address field numbers must be reset to the previous value. 7 Press B or b to highlight Subnet Mask, and edit in the DNS Setup menu. If you can view the fixed MAC address...
... this TV is On, you input an incompatible number and press OK , the field number will be a private address. Your internet service provider should be reset to the previous value. 7 Press B or b to highlight Secondary DNS Address, and edit in the same way as IP Address. Press . Press . Note:... as Primary DNS Address. Press . OK 3 Press B or b to select IP Address Setup. Press . OK Note: • IP address field numbers must be reset to the previous value. 7 Press B or b to highlight Subnet Mask, and edit in the DNS Setup menu. If you can view the fixed MAC address...
User Manual
Page 70
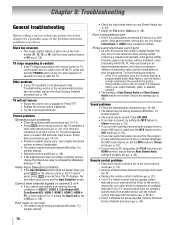
... video processing or different compression rates used by broadcasters in this Troubleshooting section or the recommended solution has not worked, perform the Reset Factory Defaults procedure (- Refer to the owner's manual for your TV remote control does not operate a specific feature on the TV... setting is properly set to the correct device mode (- p. 34). p. 52). • If you are watching (such as expected, perform the Reset Factory Defaults procedure (- p. 48). • If the Edge Booster does not achieve a sharper picture, change the Sharpness value to Stereo mode (- ...
... video processing or different compression rates used by broadcasters in this Troubleshooting section or the recommended solution has not worked, perform the Reset Factory Defaults procedure (- Refer to the owner's manual for your TV remote control does not operate a specific feature on the TV... setting is properly set to the correct device mode (- p. 34). p. 52). • If you are watching (such as expected, perform the Reset Factory Defaults procedure (- p. 48). • If the Edge Booster does not achieve a sharper picture, change the Sharpness value to Stereo mode (- ...
User Manual
Page 71
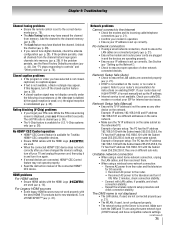
...28). p. 44). Closed caption problems • If the program or video you have changed the device's settings, turn off your router's documentation for Toshiba HDMI® CEC compatible devices. • Ensure HDMI cables with the Subnet mask 255.255.253.0; p. 35). • A closed -caption feature ...• Reconnect AC power to the router. • Reconnect AC power to controls" and "Other problems" (- If the problem persists, use the Reset Factory Defaults procedure (- If this happens, turn it ON. p. 14). p. 21). • Confirm your modem's operation. • Ensure your ...
...28). p. 44). Closed caption problems • If the program or video you have changed the device's settings, turn off your router's documentation for Toshiba HDMI® CEC compatible devices. • Ensure HDMI cables with the Subnet mask 255.255.253.0; p. 35). • A closed -caption feature ...• Reconnect AC power to the router. • Reconnect AC power to controls" and "Other problems" (- If the problem persists, use the Reset Factory Defaults procedure (- If this happens, turn it ON. p. 14). p. 21). • Confirm your modem's operation. • Ensure your ...
User Manual
Page 80
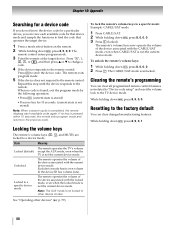
...to other devices" (- The CABLE/SAT mode is unlocked. While holding down Q, press 8, 9, 0, 0. To lock the remote's volume keys to the TV device mode. Resetting to the factory default You can clear all programmed remote control features not related to "Device code setup" and... reset the volume lock to a specific mode: Example: CABLE/SAT mode 1 Press CABLE/SAT. 2 While holding down Q, press 8, 0, 0, 0. 3 Press VOL (locked). While holding down Q, press 8, 9, 0, 1....
...to other devices" (- The CABLE/SAT mode is unlocked. While holding down Q, press 8, 9, 0, 0. To lock the remote's volume keys to the TV device mode. Resetting to the factory default You can clear all programmed remote control features not related to "Device code setup" and... reset the volume lock to a specific mode: Example: CABLE/SAT mode 1 Press CABLE/SAT. 2 While holding down Q, press 8, 0, 0, 0. 3 Press VOL (locked). While holding down Q, press 8, 9, 0, 1....

User Manual
Page 92
... quality 48 Picture size 45 PIN code 36 R Remote control Battery installation 22 Buttons 23 Device code table 82 Functional key chart 77 Programming 79 Reset TV 44 RGB Filter 51 RGB Range 41 S SAP 52 Shared inputs 30 Sleep Timer 43 Software keyboard 59 Static Gamma 49 Stereo sound 52...
... quality 48 Picture size 45 PIN code 36 R Remote control Battery installation 22 Buttons 23 Device code table 82 Functional key chart 77 Programming 79 Reset TV 44 RGB Filter 51 RGB Range 41 S SAP 52 Shared inputs 30 Sleep Timer 43 Software keyboard 59 Static Gamma 49 Stereo sound 52...


