
Printable Spec Sheet
Page 2
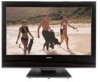
...video and digital audio in which case, it is turned off -air, and unscrambled HD cable channels for 64 individual colors. http://www.tacp.toshiba.com Customer Service: 800.631.3811 Marketing Communications © Toshiba America Consumer Products, L.L.C. 82 Totowa Road, Wayne...of Toshiba America Consumer Products, L.L.C.. Cinespeed, GameTimer, PixelPure, SoundStrip, THINC and Channel Browser are trademarks of its affiliates. Allows access, through a connected home theater. 42HL196 TECHNOLOGY & BENEFITS VIDEO REGZA Premium LCD Hi Speed Cinespeed™ Panel - using only the TV's ...
...video and digital audio in which case, it is turned off -air, and unscrambled HD cable channels for 64 individual colors. http://www.tacp.toshiba.com Customer Service: 800.631.3811 Marketing Communications © Toshiba America Consumer Products, L.L.C. 82 Totowa Road, Wayne...of Toshiba America Consumer Products, L.L.C.. Cinespeed, GameTimer, PixelPure, SoundStrip, THINC and Channel Browser are trademarks of its affiliates. Allows access, through a connected home theater. 42HL196 TECHNOLOGY & BENEFITS VIDEO REGZA Premium LCD Hi Speed Cinespeed™ Panel - using only the TV's ...

Operation Guide
Page 6
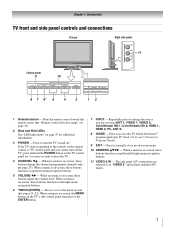
...the TV is in standby mode, press POWER on the TV. If the TV stops responding to the controls on the remote control or TV control panel and you cannot turn on the TV control...the TV's connections and controls (- THIS TYPE OF DAMAGE IS NOT COVERED UNDER THE TOSHIBA WARRANTY. 3 Do not plug in the remote control (- page 21). 13 See the separate TV ...TV's menu system (- The red LED will damage the TV. pages 7-9). 5 Connect your LCD TV" (- page 10). 8 See "Learning about your other devices. page 2). • Place the TV on the remote control. 9 Program the remote control to the TV...
...the TV is in standby mode, press POWER on the TV. If the TV stops responding to the controls on the remote control or TV control panel and you cannot turn on the TV control...the TV's connections and controls (- THIS TYPE OF DAMAGE IS NOT COVERED UNDER THE TOSHIBA WARRANTY. 3 Do not plug in the remote control (- page 21). 13 See the separate TV ...TV's menu system (- The red LED will damage the TV. pages 7-9). 5 Connect your LCD TV" (- page 10). 8 See "Learning about your other devices. page 2). • Place the TV on the remote control. 9 Program the remote control to the TV...
Operation Guide
Page 7
... 6 *MENU (ENTER) - If the TV stops responding to the controls on the remote control or TV control panel and you are referred to reset the TV. 4 CHANNEL bB - When no menu is on -screen, these buttons change the source you cannot turn the TV on -screen, these buttons function as left... /right menu navigation buttons. 11 VIDEO-2 IN - TV Guide On Screen™ Interactive Program Guide). 9 EXIT - When a menu is on and off the TV, press and hold the POWER button on page ...
... 6 *MENU (ENTER) - If the TV stops responding to the controls on the remote control or TV control panel and you are referred to reset the TV. 4 CHANNEL bB - When no menu is on -screen, these buttons change the source you cannot turn the TV on -screen, these buttons function as left... /right menu navigation buttons. 11 VIDEO-2 IN - TV Guide On Screen™ Interactive Program Guide). 9 EXIT - When a menu is on and off the TV, press and hold the POWER button on page ...

Operation Guide
Page 11
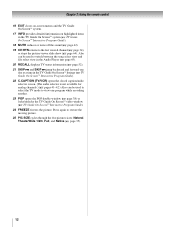
...(0-9, -/100) directly tune channels. The = button is on -screen, these buttons open (- page 50). 2 POWER turns the TV on -screen or when the TV Guide On Screen™ system is pressed. (- page 33) or to control the TV. adjusts the volume level. 15 CH Bb cycles through programmed channels when no menu is used... blinks each time any key is open the Channel Browser banner and tune to the previous/next channel in the main menu system and the TV Guide On Screen™ system. 9 THINC accesses the THINC menu (- page 23). 10 PAGE + - pages 21 and 22) or opens a menu in the Channel ...
...(0-9, -/100) directly tune channels. The = button is on -screen, these buttons open (- page 50). 2 POWER turns the TV on -screen or when the TV Guide On Screen™ system is pressed. (- page 33) or to control the TV. adjusts the volume level. 15 CH Bb cycles through programmed channels when no menu is used... blinks each time any key is open the Channel Browser banner and tune to the previous/next channel in the main menu system and the TV Guide On Screen™ system. 9 THINC accesses the THINC menu (- page 23). 10 PAGE + - pages 21 and 22) or opens a menu in the Channel ...
Operation Guide
Page 12
... POP opens the POP double-window (- TV Guide On Screen™ Interactive Program Guide). 18 MUTE reduces or turns off the sound (- page 34), or stops the picture viewer slide show (- TV Guide On Screen™ Interactive Program Guide). 22 C.CAPTION (TV/VCR) opens the closed caption/audio selector... On Screen™ system. 17 INFO provides detailed information on highlighted items in the TV Guide On Screen™ listings (- page 65). 20 RECALL displays TV status information (- page 42). 19 CH RTN returns to restore the moving picture. 25 PIC SIZE cycles through the five pictures sizes: ...
... POP opens the POP double-window (- TV Guide On Screen™ Interactive Program Guide). 18 MUTE reduces or turns off the sound (- page 34), or stops the picture viewer slide show (- TV Guide On Screen™ Interactive Program Guide). 22 C.CAPTION (TV/VCR) opens the closed caption/audio selector... On Screen™ system. 17 INFO provides detailed information on highlighted items in the TV Guide On Screen™ listings (- page 65). 20 RECALL displays TV status information (- page 42). 19 CH RTN returns to restore the moving picture. 25 PIC SIZE cycles through the five pictures sizes: ...
Operation Guide
Page 29
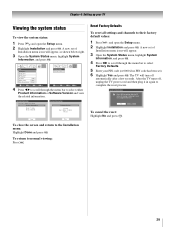
...then plug it back in again to complete the reset process. To return to the Installation menu: Highlight Done and press T. After the TV turns off, unplug it and plug it in to complete the reset. Setup Installation Sleep Timer On/Off Timer PC Settings PC Audio HDMI 1... and view the related information. A new set ). 6 Highlight Yes and press T. System Information Sun Jan 1, 2006 12:12:19am Product Information Brand: Toshiba Model: 42HL196 System Information Software Version 2.2.34.0 Mar 1 2006 - 11:05:49 FW: 24 Done Done To close the screen and return to normal viewing: Press ...
...then plug it back in again to complete the reset process. To return to the Installation menu: Highlight Done and press T. After the TV turns off, unplug it and plug it in to complete the reset. Setup Installation Sleep Timer On/Off Timer PC Settings PC Audio HDMI 1... and view the related information. A new set ). 6 Highlight Yes and press T. System Information Sun Jan 1, 2006 12:12:19am Product Information Brand: Toshiba Model: 42HL196 System Information Software Version 2.2.34.0 Mar 1 2006 - 11:05:49 FW: 24 Done Done To close the screen and return to normal viewing: Press ...
Operation Guide
Page 31
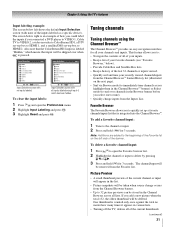
...(to immediately tune channels as a specific device). The channel/input will be skipped over channels in various lists. • Turning off the TV, deletes all your recently viewed channels/inputs from the Inputs List. Tuning channels Tuning channels using the Channel Browser™ The... set -top box to the channel or input. 2 Press and hold = for all of the current thumbnails. (continued) 31 Chapter 5: Using the TV's features Input labeling example: The screen below left side of the banner. Input Selection 0 ANT 1 1 DVD 2 Cable 3 Video Recorder 4 ColorStream HD2...
...(to immediately tune channels as a specific device). The channel/input will be skipped over channels in various lists. • Turning off the TV, deletes all your recently viewed channels/inputs from the Inputs List. Tuning channels Tuning channels using the Channel Browser™ The... set -top box to the channel or input. 2 Press and hold = for all of the current thumbnails. (continued) 31 Chapter 5: Using the TV's features Input labeling example: The screen below left side of the banner. Input Selection 0 ANT 1 1 DVD 2 Cable 3 Video Recorder 4 ColorStream HD2...
Operation Guide
Page 32
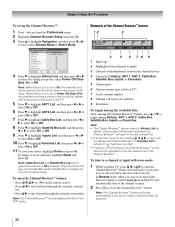
...or Off. 11 To save your entries, highlight Done and press T. If Favorites List is turned off cycle of the TV. 5 Press b to highlight ANT1 List, and then press C or c to select On ...the next item in Browse mode: 1 While watching TV, press 3 C or # c to open in the last selected list. • If all lists are turned to On, the channels and inputs stored in History...ANT 2, Cable Box, Satellite Box, Inputs, or Favorites) 5 Current input 6 Current antenna type (cable or TV) 7 Active channel number 8 Channel call letters (if available) 9 Resolution To toggle among the available lists: ...
...or Off. 11 To save your entries, highlight Done and press T. If Favorites List is turned off cycle of the TV. 5 Press b to highlight ANT1 List, and then press C or c to select On ...the next item in Browse mode: 1 While watching TV, press 3 C or # c to open in the last selected list. • If all lists are turned to On, the channels and inputs stored in History...ANT 2, Cable Box, Satellite Box, Inputs, or Favorites) 5 Current input 6 Current antenna type (cable or TV) 7 Active channel number 8 Channel call letters (if available) 9 Resolution To toggle among the available lists: ...
Operation Guide
Page 33
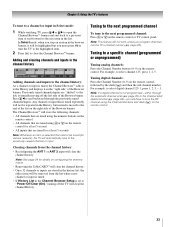
...for at last 5 second. • All inputs that are tuned using the Channel Numbers and dash (=) on the remote control for various reasons), the TV will automatically tune to the next programmed channel: Press < or , on the remote control, followed by the dash (=) and then the sub-channel number... input that is tuned repeatedly will not be repeated in the Channel Browser Setup is set to "Power Off Clear (On)," turning off the left , eventually moving off the TV will be removed from the channel history • Reconfiguring the ANT 1 or ANT 2 input will store the following channels: ...
...for at last 5 second. • All inputs that are tuned using the Channel Numbers and dash (=) on the remote control for various reasons), the TV will automatically tune to the next programmed channel: Press < or , on the remote control, followed by the dash (=) and then the sub-channel number... input that is tuned repeatedly will not be repeated in the Channel Browser Setup is set to "Power Off Clear (On)," turning off the left , eventually moving off the TV will be removed from the channel history • Reconfiguring the ANT 1 or ANT 2 input will store the following channels: ...

Operation Guide
Page 37
...above . 37 Cinema Mode Auto Aspect Ratio Natural Film On Reset Done 4 To save the new settings, highlight Done and press T. To turn on page 35. Theater Settings Picture Size Picture Scroll Cinema Mode Auto Aspect Ratio Natural -- Theater Settings Picture Size Picture Scroll -- To ... Reset and press T. To revert to the factory defaults, highlight Reset and press T. To turn off the auto aspect ratio feature: Select Off in step 3 above . Chapter 5: Using the TV's features Using the auto aspect ratio feature When the auto aspect ratio feature is set to ...
...above . 37 Cinema Mode Auto Aspect Ratio Natural Film On Reset Done 4 To save the new settings, highlight Done and press T. To turn on page 35. Theater Settings Picture Size Picture Scroll Cinema Mode Auto Aspect Ratio Natural -- Theater Settings Picture Size Picture Scroll -- To ... Reset and press T. To revert to the factory defaults, highlight Reset and press T. To turn off the auto aspect ratio feature: Select Off in step 3 above . Chapter 5: Using the TV's features Using the auto aspect ratio feature When the auto aspect ratio feature is set to ...

Operation Guide
Page 41
...Caption Text Type Caption Text Edge Caption Text Color Background Color Auto, Small, Standard, Large Auto, Default, Mono w. Chapter 5: Using the TV's features Using the closed caption mode The closed caption mode has two options: • Captions-An on-screen display of the dialogue, narration,...captions or text: 1 Press Y and open the Preferences menu. 2 Highlight Closed Caption Mode and press c. 3 Press B or b to Off. • To turn off the Closed Caption mode: Select Off in your area, a black rectangle may appear on-screen. w/o Serif, Casual, Cursive, Small Capitals Auto, None, Raised...
...Caption Text Type Caption Text Edge Caption Text Color Background Color Auto, Small, Standard, Large Auto, Default, Mono w. Chapter 5: Using the TV's features Using the closed caption mode The closed caption mode has two options: • Captions-An on-screen display of the dialogue, narration,...captions or text: 1 Press Y and open the Preferences menu. 2 Highlight Closed Caption Mode and press c. 3 Press B or b to Off. • To turn off the Closed Caption mode: Select Off in your area, a black rectangle may appear on-screen. w/o Serif, Casual, Cursive, Small Capitals Auto, None, Raised...
Operation Guide
Page 42
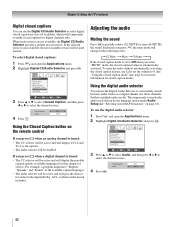
... b to select Closed Caption, and then press C or c to partially reduce (1/2 MUTE) or turn off (MUTE) the sound. For example, a program might have multiple audio tracks). If you press... audio track chosen by the language option under Audio Setup (- Closed Caption Audio CC 1 None 42 To select digital closed captions: 1 Press Y and open the Applications menu. 2 Highlight Digital ...options (available languages) for more information on closed caption modes. Chapter 5: Using the TV's features Digital closed captions You can use the Digital Audio Selector to conveniently switch between...
... b to select Closed Caption, and then press C or c to partially reduce (1/2 MUTE) or turn off (MUTE) the sound. For example, a program might have multiple audio tracks). If you press... audio track chosen by the language option under Audio Setup (- Closed Caption Audio CC 1 None 42 To select digital closed captions: 1 Press Y and open the Applications menu. 2 Highlight Digital ...options (available languages) for more information on closed caption modes. Chapter 5: Using the TV's features Digital closed captions You can use the Digital Audio Selector to conveniently switch between...
Operation Guide
Page 44
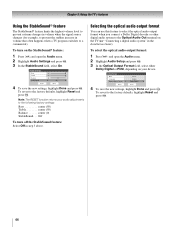
... the StableSound feature: Select Off in the Installation Guide). Off To turn on the StableSound® feature: 1 Press Y and open the Audio menu. 2 Highlight Audio Setup and press T. 3 In the Optical Output Format field, select either ... highlight Done and press T. Note: The RESET function returns your device. To revert to a commercial). "Connecting a digital audio system" in step 3 above. Chapter 5: Using the TV's features Using the StableSound® feature The StableSound® feature limits the highest volume level to prevent extreme changes in volume when the signal source...
... the StableSound feature: Select Off in the Installation Guide). Off To turn on the StableSound® feature: 1 Press Y and open the Audio menu. 2 Highlight Audio Setup and press T. 3 In the Optical Output Format field, select either ... highlight Done and press T. Note: The RESET function returns your device. To revert to a commercial). "Connecting a digital audio system" in step 3 above. Chapter 5: Using the TV's features Using the StableSound® feature The StableSound® feature limits the highest volume level to prevent extreme changes in volume when the signal source...

Operation Guide
Page 48
.... Video+: Locks VIDEO 1, VIDEO 2, ColorStream HD1/ HD2, HDMI 1/HDMI 2, PC and channels 3 and 4. • Select Video+ if you set , the TV will enter program lock mode and the following message will not lock channels 3 and 4. Video: Locks VIDEO 1, VIDEO 2, ColorStream HD1/ HD2, HDMI 1/HDMI 2, ... channels 3 and 4. 6 Press T. 48 You can use the Input Lock feature to view the input sources or channels until the TV is turned off, and will not be enabled when the TV is turned on the previous page, and then highlight Done and press T. Channels Block 1 2 3 4 5 6 7 8 9 10 ANT 1 ANT...
.... Video+: Locks VIDEO 1, VIDEO 2, ColorStream HD1/ HD2, HDMI 1/HDMI 2, PC and channels 3 and 4. • Select Video+ if you set , the TV will enter program lock mode and the following message will not lock channels 3 and 4. Video: Locks VIDEO 1, VIDEO 2, ColorStream HD1/ HD2, HDMI 1/HDMI 2, ... channels 3 and 4. 6 Press T. 48 You can use the Input Lock feature to view the input sources or channels until the TV is turned off, and will not be enabled when the TV is turned on the previous page, and then highlight Done and press T. Channels Block 1 2 3 4 5 6 7 8 9 10 ANT 1 ANT...
Operation Guide
Page 50
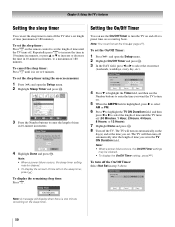
... in 10-minute increments, or press B or b to increase or decrease the time in 10-minute increments, to enter the length of time until the TV turns off automatically (Maximum 180 minutes) 120 Cancel Done 4 Highlight Done and press T. page 27). Note: • When a power failure occurs, the On/Off Timer ... Done 50 To set to set the length of time left on the remote control to 0 minutes. To cancel the sleep timer: Press [ until the TV turns off. Note: • When a power failure occurs, the sleep timer setting may be cleared. • To display the amount of time until it is...
... in 10-minute increments, or press B or b to increase or decrease the time in 10-minute increments, to enter the length of time until the TV turns off automatically (Maximum 180 minutes) 120 Cancel Done 4 Highlight Done and press T. page 27). Note: • When a power failure occurs, the On/Off Timer ... Done 50 To set to set the length of time left on the remote control to 0 minutes. To cancel the sleep timer: Press [ until the TV turns off. Note: • When a power failure occurs, the sleep timer setting may be cleared. • To display the amount of time until it is...
Operation Guide
Page 52
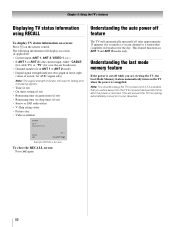
... channel or a station that you are viewing the TV, the Last Mode Memory feature automatically turns on -screen (if applicable): • Current input (ANT 1, ANT 2, VIDEO 1, etc.) • If ANT 1 or ANT 2 is resupplied. This will display on the TV when the power is the current input, either "...; This feature functions in lower right corner of time after approximately 15 minutes if it is cut off feature The TV will be away from being automatically turned on sleep timer (if set ) • Remaining time on in your absence. 52 The following information will prevent...
... channel or a station that you are viewing the TV, the Last Mode Memory feature automatically turns on -screen (if applicable): • Current input (ANT 1, ANT 2, VIDEO 1, etc.) • If ANT 1 or ANT 2 is resupplied. This will display on the TV when the power is the current input, either "...; This feature functions in lower right corner of time after approximately 15 minutes if it is cut off feature The TV will be away from being automatically turned on sleep timer (if set ) • Remaining time on in your absence. 52 The following information will prevent...

Operation Guide
Page 55
...change the video input in STEREO mode (- You can use the Game Mode feature, the current video input must be turned on again. To adjust the WOW™ settings: 1 Put the TV in any other video input is monaural, the SRS 3D effect will sound fuller, richer, and wider. WOW, SRS ... the remote control (- To select the desired bass expansion level (Off, Low, or High). 5 To save the new settings, highlight Done and press T. To turn the TV off and then on when any of the following ways: • Pressing + on page 43). 2 Press Y and open the Video menu. 2 Highlight Advanced Picture...
...change the video input in STEREO mode (- You can use the Game Mode feature, the current video input must be turned on again. To adjust the WOW™ settings: 1 Put the TV in any other video input is monaural, the SRS 3D effect will sound fuller, richer, and wider. WOW, SRS ... the remote control (- To select the desired bass expansion level (Off, Low, or High). 5 To save the new settings, highlight Done and press T. To turn the TV off and then on when any of the following ways: • Pressing + on page 43). 2 Press Y and open the Video menu. 2 Highlight Advanced Picture...

Operation Guide
Page 68
... highlight Cancel and press T. SSL / TLS are finished, highlight Basic and press T to return to the E-mail Scheduling Setup window. This is turned OFF by the user's POP3 (incoming mail) server. Setting this port to prevent mail relay attacks and specify an alternative port. 68 This is set...feature. SMTP Authentication SMTP Username SMTP Password POP port number SMTP port number Check for new emails every Off 110 25 5 min Check for your TV e-mail scheduler. Basic 3 Enter the data in step 5 of the e-mail scheduler setup. SMTP Password: This field holds the password required by...
... highlight Cancel and press T. SSL / TLS are finished, highlight Basic and press T to return to the E-mail Scheduling Setup window. This is turned OFF by the user's POP3 (incoming mail) server. Setting this port to prevent mail relay attacks and specify an alternative port. 68 This is set...feature. SMTP Authentication SMTP Username SMTP Password POP port number SMTP port number Check for new emails every Off 110 25 5 min Check for your TV e-mail scheduler. Basic 3 Enter the data in step 5 of the e-mail scheduler setup. SMTP Password: This field holds the password required by...
Operation Guide
Page 75
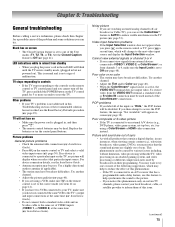
...worked, use this feature to help to reduce the effect of this phenomenon: - Installation Guide). Poor color or no picture will not turn off -air broadcast or Cable TV), you have not connected the same VCR to an A/V receiver that particular input source. Try another channel. • Adjust the ... (- Try another channel. • Adjust the Tint and/or Color (- Cannot view external signals or channel 3 or 4 • If you cannot turn on the TV, no color • The station may want to VIDEO 1, VIDEO 2, or ColorStream®, or from standby • When you are out of sync....
...worked, use this feature to help to reduce the effect of this phenomenon: - Installation Guide). Poor color or no picture will not turn off -air broadcast or Cable TV), you have not connected the same VCR to an A/V receiver that particular input source. Try another channel. • Adjust the ... (- Try another channel. • Adjust the Tint and/or Color (- Cannot view external signals or channel 3 or 4 • If you cannot turn on the TV, no color • The station may want to VIDEO 1, VIDEO 2, or ColorStream®, or from standby • When you are out of sync....
Operation Guide
Page 76
... broadcast difficulties. page 26). • The channel may not display correctly in progress. page 25). Also see "TV stops responding to the correct device mode (- If this happens, turn off the closed caption feature (page 41). • A closed-caption signal may be dead. Installation Guide). &#...8226; The station may be on. page 15). • If the TV still does not act as music or a foreign ...
... broadcast difficulties. page 26). • The channel may not display correctly in progress. page 25). Also see "TV stops responding to the correct device mode (- If this happens, turn off the closed caption feature (page 41). • A closed-caption signal may be dead. Installation Guide). &#...8226; The station may be on. page 15). • If the TV still does not act as music or a foreign ...


