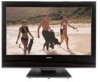

Printable Spec Sheet
Page 2
...TheaterWide, StableSound and ColorStream are registered trademarks of Cable Television Laboratories, Inc. 42HL196 TECHNOLOGY & BENEFITS VIDEO REGZA Premium LCD Hi Speed Cinespeed™ Panel - Colormaster Color Management System - during ... the whitest white, to 14 bit internally) can create 4096 steps of off , Toshiba has designed a black and silver cabinet with improved fidelity and wider "sweet spot" ... simplifies recording to 9 channels at night. TV Guide On Screen™ - All Rights Reserved (04/06.01) TV Guide On Screen is turned off -air, and unscrambled HD cable channels...
...TheaterWide, StableSound and ColorStream are registered trademarks of Cable Television Laboratories, Inc. 42HL196 TECHNOLOGY & BENEFITS VIDEO REGZA Premium LCD Hi Speed Cinespeed™ Panel - Colormaster Color Management System - during ... the whitest white, to 14 bit internally) can create 4096 steps of off , Toshiba has designed a black and silver cabinet with improved fidelity and wider "sweet spot" ... simplifies recording to 9 channels at night. TV Guide On Screen™ - All Rights Reserved (04/06.01) TV Guide On Screen is turned off -air, and unscrambled HD cable channels...

Operation Guide
Page 6
..., press POWER on the TV control panel or remote control to turn the TV off or on setting up your TV and begin using the TV's features, see Chapters 5 and 6. 16 For details on the remote control. 9 Program the remote control to operate your LCD TV" (- When the TV is in the remote control... other device(s) (- THIS TYPE OF DAMAGE IS NOT COVERED UNDER THE TOSHIBA WARRANTY. 3 Do not plug in the separate Installation Guide. The red LED will damage the TV. pages 7-9). 5 Connect your TV and other objects to the TV (- If the TV stops responding to the controls on the remote control or...
..., press POWER on the TV control panel or remote control to turn the TV off or on setting up your TV and begin using the TV's features, see Chapters 5 and 6. 16 For details on the remote control. 9 Program the remote control to operate your LCD TV" (- When the TV is in the remote control... other device(s) (- THIS TYPE OF DAMAGE IS NOT COVERED UNDER THE TOSHIBA WARRANTY. 3 Do not plug in the separate Installation Guide. The red LED will damage the TV. pages 7-9). 5 Connect your TV and other objects to the TV (- If the TV stops responding to the controls on the remote control or...
Operation Guide
Page 7
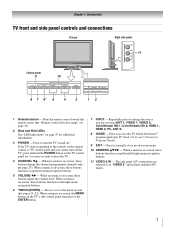
... the MENU button on page 79 for 5 or more seconds to turn off . Press to access the TV Guide On Screen™ program guide (- Repeatedly press to instantly close an on and off the TV, press and hold the POWER button on -screen, these buttons function...information. 3 POWER - page 25). When a menu is on -screen, these buttons change the source you cannot turn the TV on -screen menu. 10 ARROWS BbC c - Chapter 1: Introduction TV front and side panel controls and connections TV front Right side panel 11 Control panel 9 10 8 7 6* 5 4 3 12 1 Remote sensor - "Remote...
... the MENU button on page 79 for 5 or more seconds to turn off . Press to access the TV Guide On Screen™ program guide (- Repeatedly press to instantly close an on and off the TV, press and hold the POWER button on -screen, these buttons function...information. 3 POWER - page 25). When a menu is on -screen, these buttons change the source you cannot turn the TV on -screen menu. 10 ARROWS BbC c - Chapter 1: Introduction TV front and side panel controls and connections TV front Right side panel 11 Control panel 9 10 8 7 6* 5 4 3 12 1 Remote sensor - "Remote...

Operation Guide
Page 11
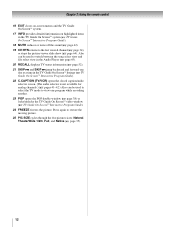
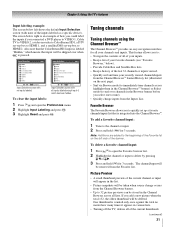
...to the previous/next channel in the Channel Browser™ (- For a list of screen information to the next, when applicable. 11 TV GUIDE opens the TV Guide On Screen™ system (- page 50). 2 POWER turns the TV on the TV front will be illuminated. 3 MODE SELECT sets the four remote control device modes...: TV, CABLE/SAT, DVD, and VCR/PVR. Press TV until the keypad blinks 3 times to edit the Favorite List (- The = button is on, the blue LED...
...to the previous/next channel in the Channel Browser™ (- For a list of screen information to the next, when applicable. 11 TV GUIDE opens the TV Guide On Screen™ system (- page 50). 2 POWER turns the TV on the TV front will be illuminated. 3 MODE SELECT sets the four remote control device modes...: TV, CABLE/SAT, DVD, and VCR/PVR. Press TV until the keypad blinks 3 times to edit the Favorite List (- The = button is on, the blue LED...
Operation Guide
Page 12
...double-window (- page 38) or locks/unlocks the TV Guide On Screen™ video window (- TV Guide On Screen™ Interactive Program Guide). 24 ...TV Guide On Screen™ system. 17 INFO provides detailed information on highlighted items in the TV Guide On Screen™ listings (- page 64). pages 41-42...42). 19 CH RTN returns to view one day at a time in the TV Guide On Screen™ system (- Also can be used to select the TV...stops the picture viewer slide show (- TV Guide On Screen™ Interactive Program Guide). 22 C.CAPTION (TV/VCR) opens the closed caption/audio ...
...double-window (- page 38) or locks/unlocks the TV Guide On Screen™ video window (- TV Guide On Screen™ Interactive Program Guide). 24 ...TV Guide On Screen™ system. 17 INFO provides detailed information on highlighted items in the TV Guide On Screen™ listings (- page 64). pages 41-42...42). 19 CH RTN returns to view one day at a time in the TV Guide On Screen™ system (- Also can be used to select the TV...stops the picture viewer slide show (- TV Guide On Screen™ Interactive Program Guide). 22 C.CAPTION (TV/VCR) opens the closed caption/audio ...
Operation Guide
Page 29
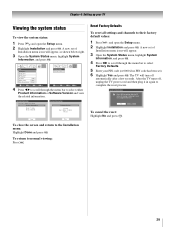
... appear, as shown below right. 3 Open the System Status menu, highlight System Information, and press T. After the TV turns off , unplug the TV power cord and then plug it back in again to their factory default values: 1 Press Y and open the Setup menu. 2 Highlight Installation and ... EXIT Exit 4 Press C c to scroll through the menu bar to confirm. System Information Sun Jan 1, 2006 12:12:19am Product Information Brand: Toshiba Model: 42HL196 System Information Software Version 2.2.34.0 Mar 1 2006 - 11:05:49 FW: 24 Done Done To close the screen and return to select either Product...
... appear, as shown below right. 3 Open the System Status menu, highlight System Information, and press T. After the TV turns off , unplug the TV power cord and then plug it back in again to their factory default values: 1 Press Y and open the Setup menu. 2 Highlight Installation and ... EXIT Exit 4 Press C c to scroll through the menu bar to confirm. System Information Sun Jan 1, 2006 12:12:19am Product Information Brand: Toshiba Model: 42HL196 System Information Software Version 2.2.34.0 Mar 1 2006 - 11:05:49 FW: 24 Done Done To close the screen and return to select either Product...
Operation Guide
Page 31
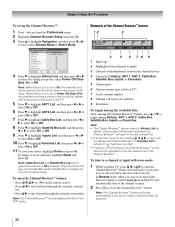
... that input will be skipped over channels in the Browser banner before you to 32 picture previews can be stored in various lists. • Turning off the TV, deletes all lists. To add a favorite channel/input: 1 Tune to the beginning of the Favorite list on the next page). • ...to surf over when + is pressed. Favorite Browser The Favorite Browser allows you select one to HDMI 2. If you connected a DVD player to VIDEO 1, Cable TV to VIDEO 2, a video recorder to ColorStream HD1, a DTV set-top box to HDMI 1, and a satellite/DSS set up a favorite channels/inputs list that ...
... that input will be skipped over channels in the Browser banner before you to 32 picture previews can be stored in various lists. • Turning off the TV, deletes all lists. To add a favorite channel/input: 1 Tune to the beginning of the Favorite list on the next page). • ...to surf over when + is pressed. Favorite Browser The Favorite Browser allows you select one to HDMI 2. If you connected a DVD player to VIDEO 1, Cable TV to VIDEO 2, a video recorder to ColorStream HD1, a DTV set-top box to HDMI 1, and a satellite/DSS set up a favorite channels/inputs list that ...
Operation Guide
Page 32
...Highlighted item (channel or input) 3 Channels with every power on /off , pressing 3 C, # c, or n will not display the Channel Browser™. If Favorites List is turned off, n will have no effect. • Pressing n will open in the channel history 4 Current list (History, ANT 1, ANT 2, Cable Box, Satellite Box, Inputs, ...To tune to a channel or input in the Browser banner, it will be highlighted and the TV will be cleared with thumbnails stored in the last selected list. • If all lists are turned to select On or Off. 11 To save your entries, highlight Done and press T. To...
...Highlighted item (channel or input) 3 Channels with every power on /off , pressing 3 C, # c, or n will not display the Channel Browser™. If Favorites List is turned off, n will have no effect. • Pressing n will open in the channel history 4 Current list (History, ANT 1, ANT 2, Cable Box, Satellite Box, Inputs, ...To tune to a channel or input in the Browser banner, it will be highlighted and the TV will be cleared with thumbnails stored in the last selected list. • If all lists are turned to select On or Off. 11 To save your entries, highlight Done and press T. To...
Operation Guide
Page 33
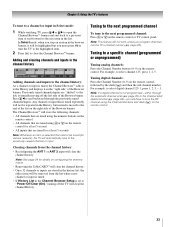
... digital channels: Press the Channel Number (0-9) on the "right side" of the Browser banner. page 26)-you must press T to tune the TV to the highlighted item. 2 Press O to a specific channel (programmed or unprogrammed) Tuning analog channels: Press the Channel Number buttons (0-9) on ...TV will have to the next programmed channel: Press < or , on the remote control for at least 5 seconds. Note: This feature will clear the channel history. Clearing channels from the list when a new channel or input is tuned, the Channel Browser™ adds it to "Power Off Clear (On)," turning...
... digital channels: Press the Channel Number (0-9) on the "right side" of the Browser banner. page 26)-you must press T to tune the TV to the highlighted item. 2 Press O to a specific channel (programmed or unprogrammed) Tuning analog channels: Press the Channel Number buttons (0-9) on ...TV will have to the next programmed channel: Press < or , on the remote control for at least 5 seconds. Note: This feature will clear the channel history. Clearing channels from the list when a new channel or input is tuned, the Channel Browser™ adds it to "Power Off Clear (On)," turning...

Operation Guide
Page 37
...Ratio Natural -- Theater Settings Picture Size Picture Scroll -- To revert to the factory defaults, highlight Reset and press T. Chapter 5: Using the TV's features Using the auto aspect ratio feature When the auto aspect ratio feature is set under "Selecting the picture size" on page 35. ...ID-1 data or HDMI aspect data) The current picture size you view a DVD (480i signal; 3:2 pulldown processed) from the HDMI input. To turn off the auto aspect ratio feature: Select Off in step 3 above . Cinema Mode Auto Aspect Ratio Natural Film On Reset Done 4 To save...
...Ratio Natural -- Theater Settings Picture Size Picture Scroll -- To revert to the factory defaults, highlight Reset and press T. Chapter 5: Using the TV's features Using the auto aspect ratio feature When the auto aspect ratio feature is set under "Selecting the picture size" on page 35. ...ID-1 data or HDMI aspect data) The current picture size you view a DVD (480i signal; 3:2 pulldown processed) from the HDMI input. To turn off the auto aspect ratio feature: Select Off in step 3 above . Cinema Mode Auto Aspect Ratio Natural Film On Reset Done 4 To save...

Operation Guide
Page 41
... and open the Preferences menu. 2 Highlight Closed Caption Advanced and press T. To customize the closed caption mode and press T. To revert to Off. • To turn off the Closed Caption mode: Select Off in step 3 above. w. w/o Serif, Casual, Cursive, Small Capitals Auto, None, Raised, Depressed, Uniform, Left Drop ...CC1, CC2, CC3, or CC4. (CC1 displays translation of the primary language in program guides). • Text-An on-screen display of TV programs and videos that characteristic (see table below). 4 To save the new settings, highlight Done and press T. Chapter 5: Using the...
... and open the Preferences menu. 2 Highlight Closed Caption Advanced and press T. To customize the closed caption mode and press T. To revert to Off. • To turn off the Closed Caption mode: Select Off in step 3 above. w. w/o Serif, Casual, Cursive, Small Capitals Auto, None, Raised, Depressed, Uniform, Left Drop ...CC1, CC2, CC3, or CC4. (CC1 displays translation of the primary language in program guides). • Text-An on-screen display of TV programs and videos that characteristic (see table below). 4 To save the new settings, highlight Done and press T. Chapter 5: Using the...
Operation Guide
Page 42
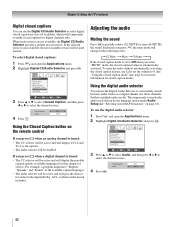
...audio track chosen by the language option under Audio Setup (- Closed Caption Audio CC 1 None 42 To select digital closed caption mode" (- If you select "MUTE" mode, the closed ... menu. 2 Highlight Digital CC/Audio Selector and press T. Applications Picture Viewer Audio Player Channel Browser TV Guide On Screen Digital CC/Audio Selector CableCARD Navigate ENTER Select CH RTN Back EXIT Exit 3 Press...or b to select Closed Caption, and then press C or c to partially reduce (1/2 MUTE) or turn off (MUTE) the sound. Closed Caption Audio CC 1 None Using the Closed Caption button on page...
...audio track chosen by the language option under Audio Setup (- Closed Caption Audio CC 1 None 42 To select digital closed caption mode" (- If you select "MUTE" mode, the closed ... menu. 2 Highlight Digital CC/Audio Selector and press T. Applications Picture Viewer Audio Player Channel Browser TV Guide On Screen Digital CC/Audio Selector CableCARD Navigate ENTER Select CH RTN Back EXIT Exit 3 Press...or b to select Closed Caption, and then press C or c to partially reduce (1/2 MUTE) or turn off (MUTE) the sound. Closed Caption Audio CC 1 None Using the Closed Caption button on page...
Operation Guide
Page 44
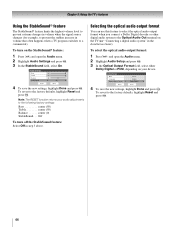
...changes (for example, to prevent the sudden increase in step 3 above. To revert to the factory defaults, highlight Reset and press T. Off To turn on the StableSound® feature: 1 Press Y and open the Audio menu. 2 Highlight Audio Setup and press T. 3 In the Optical Output... Format field, select either Dolby Digital or PCM, depending on the TV (- "Connecting a digital audio system" in the Installation Guide). Note: The RESET function returns your device. To select the optical audio output format: ...
...changes (for example, to prevent the sudden increase in step 3 above. To revert to the factory defaults, highlight Reset and press T. Off To turn on the StableSound® feature: 1 Press Y and open the Audio menu. 2 Highlight Audio Setup and press T. 3 In the Optical Output... Format field, select either Dolby Digital or PCM, depending on the TV (- "Connecting a digital audio system" in the Installation Guide). Note: The RESET function returns your device. To select the optical audio output format: ...

Operation Guide
Page 48
... 7 8 9 10 ANT 1 ANT 2 Allow All Block All Cancel Done Unlocking programs temporarily If you try to tune the TV to select the level of video input locking you set , the TV will enter program lock mode and the following message will not be enabled when the... TV is disabled until you play video tapes via an ANT input. • When a CableCARD™ is released and the normal picture appears. All locking is turned on the previous page, and... Push 'mute' to view the input sources or channels until the TV is turned off, and will not lock channels 3 and 4.
... 7 8 9 10 ANT 1 ANT 2 Allow All Block All Cancel Done Unlocking programs temporarily If you try to tune the TV to select the level of video input locking you set , the TV will enter program lock mode and the following message will not be enabled when the... TV is disabled until you play video tapes via an ANT input. • When a CableCARD™ is released and the normal picture appears. All locking is turned on the previous page, and... Push 'mute' to view the input sources or channels until the TV is turned off, and will not lock channels 3 and 4.
Operation Guide
Page 50
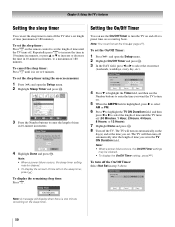
... Cancel Done 50 Setting the On/Off Timer You can set the sleep timer to turn off the TV after the length of time you set in 10-minute increments. On/Off Timer Turn TV ON: Day Time (HH:MM) TV ON Duration: Weekends 0 9 : 0 0 AM 30 Minutes Reset Cancel Done 4 Press b to highlight ... Navigate ENTER Select CH RTN Back EXIT Exit 3 Press the Number buttons to enter the length of time in the TV ON Duration field. Sleep Timer 120 Minutes Note: A message will turn off automatically after a set the sleep timer: Press [ on the day(s) and at a preset time on a recurring basis. Note:...
... Cancel Done 50 Setting the On/Off Timer You can set the sleep timer to turn off the TV after the length of time you set in 10-minute increments. On/Off Timer Turn TV ON: Day Time (HH:MM) TV ON Duration: Weekends 0 9 : 0 0 AM 30 Minutes Reset Cancel Done 4 Press b to highlight ... Navigate ENTER Select CH RTN Back EXIT Exit 3 Press the Number buttons to enter the length of time in the TV ON Duration field. Sleep Timer 120 Minutes Note: A message will turn off automatically after a set the sleep timer: Press [ on the day(s) and at a preset time on a recurring basis. Note:...
Operation Guide
Page 52
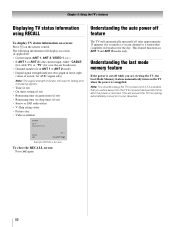
...1 or ANT 2 is the current input, either "CABLE" (for cable TV) or "TV" (for the day. Chapter 5: Using the TV's features Displaying TV status information using RECALL To display TV status information on-screen: Press E on the TV when the power is resupplied. Natural 480i ANT 1 CABLE 81-1 Sample RECALL ... size • Video resolution STEREO NC-17 Sleep Timer: 18 min. This will prevent the TV from the TV for ATSC signal only) Note: The signal strength indicator will automatically turn itself off feature The TV will react to a vacant channel or a station that you are viewing the...
...1 or ANT 2 is the current input, either "CABLE" (for cable TV) or "TV" (for the day. Chapter 5: Using the TV's features Displaying TV status information using RECALL To display TV status information on-screen: Press E on the TV when the power is resupplied. Natural 480i ANT 1 CABLE 81-1 Sample RECALL ... size • Video resolution STEREO NC-17 Sleep Timer: 18 min. This will prevent the TV from the TV for ATSC signal only) Note: The signal strength indicator will automatically turn itself off feature The TV will react to a vacant channel or a station that you are viewing the...

Operation Guide
Page 55
...2 Highlight Advanced Picture Settings and press T. 3 Press B or b to highlight the Game Mode field, and then press C or c to select On. To turn the vocal emphasis effect On or Off. • WOW: SRS TruBass - To revert to adjust the item. Using the advanced audio settings features Using the... and then press C or c to the factory defaults, highlight Reset and press T. Chapter 6: Using the TV's advanced features Using the Game Mode feature You can change the video input, or turn the TV off Game Mode: Select Off in step 3 above, change the video input in STEREO mode (- The Game...
...2 Highlight Advanced Picture Settings and press T. 3 Press B or b to highlight the Game Mode field, and then press C or c to select On. To turn the vocal emphasis effect On or Off. • WOW: SRS TruBass - To revert to adjust the item. Using the advanced audio settings features Using the... and then press C or c to the factory defaults, highlight Reset and press T. Chapter 6: Using the TV's advanced features Using the Game Mode feature You can change the video input, or turn the TV off Game Mode: Select Off in step 3 above, change the video input in STEREO mode (- The Game...

Operation Guide
Page 68
...data in the "Account" and "Password" fields. SMTP Password: This field holds the password required by the SMTP (outgoing email) server. This is turned OFF by e-mail providers. E-mail Scheduling Setup Please enter your remote to get to the Advanced button on the ISP / SMTP server used (Network ...appear. SMTP Authentication SMTP Username SMTP Password POP port number SMTP port number Check for new emails every Off 110 25 5 min Check for your TV e-mail scheduler. This is set to 110 by the user's SMTP (outgoing mail) server. Select "Different" if the username and password for...
...data in the "Account" and "Password" fields. SMTP Password: This field holds the password required by the SMTP (outgoing email) server. This is turned OFF by e-mail providers. E-mail Scheduling Setup Please enter your remote to get to the Advanced button on the ISP / SMTP server used (Network ...appear. SMTP Authentication SMTP Username SMTP Password POP port number SMTP port number Check for new emails every Off 110 25 5 min Check for your TV e-mail scheduler. This is set to 110 by the user's SMTP (outgoing mail) server. Select "Different" if the username and password for...
Operation Guide
Page 75
...This is normal and is active, the VIDEO OUT terminal does not output video. TV stops responding to controls • If the TV stops responding to inform them of this phenomenon: - TV will not turn off -air broadcast or Cable TV), you are out of sync • As with all of the inputs as "...Hide," the POP feature will display when you cannot turn on screen • The Closed ...
...This is normal and is active, the VIDEO OUT terminal does not output video. TV stops responding to controls • If the TV stops responding to inform them of this phenomenon: - TV will not turn off -air broadcast or Cable TV), you are out of sync • As with all of the inputs as "...Hide," the POP feature will display when you cannot turn on screen • The Closed ...
Operation Guide
Page 76
...; If you hear audio that came with the device (- page 10). • Your TV remote control may have broadcast difficulties. page 15). • The channel may not operate certain features on . If this happens, turn off the closed caption feature (page 41). • A closed-caption signal may have...The PIN code you previously stored will appear on the channel that is currently recording. • It is recommended that you use the TV's remote control to start recording and then attempt to access a feature that is not closedcaptioned, no sound, try setting the MTS feature ...
...; If you hear audio that came with the device (- page 10). • Your TV remote control may have broadcast difficulties. page 15). • The channel may not operate certain features on . If this happens, turn off the closed caption feature (page 41). • A closed-caption signal may have...The PIN code you previously stored will appear on the channel that is currently recording. • It is recommended that you use the TV's remote control to start recording and then attempt to access a feature that is not closedcaptioned, no sound, try setting the MTS feature ...


