
Printable Spec Sheet
Page 1
42HL196 42" (measured diagonally) Integrated REGZA 1080p LCD TV KEY FEATURES VIDEO New Cinespeed™ Panel with Response Time of the picture to light, with traditional scan methods. PixelPure™ Hi-Bit Digital Video ... Tuner Dual HDMI™ Digital Inputs PC Input (15 Pin, D-Sub) 4-Item Glow Universal Remote1 Improved Channel Browser™ TV Guide On Screen™ IMAGE NOT AVAILABLE ADVANTAGE TOSHIBA Cinespeed™ panel LCD sets provide the lightning fast (8 ms or less) response time required by the most demanding home theater enthusiasts. Eliminating the overscan...
42HL196 42" (measured diagonally) Integrated REGZA 1080p LCD TV KEY FEATURES VIDEO New Cinespeed™ Panel with Response Time of the picture to light, with traditional scan methods. PixelPure™ Hi-Bit Digital Video ... Tuner Dual HDMI™ Digital Inputs PC Input (15 Pin, D-Sub) 4-Item Glow Universal Remote1 Improved Channel Browser™ TV Guide On Screen™ IMAGE NOT AVAILABLE ADVANTAGE TOSHIBA Cinespeed™ panel LCD sets provide the lightning fast (8 ms or less) response time required by the most demanding home theater enthusiasts. Eliminating the overscan...

Printable Spec Sheet
Page 2
... Licensing L.L.C.. using only the TV's remote control, even through an existing home network, to maximize the sound of off , Toshiba has designed a black and silver cabinet with CableCARD™ - Product design and specification subject to set is maximized to allow everyone ...5.1 - CableCARD is a trademark of Cable Television Laboratories, Inc. LCDs include new panels that offer response times that you the response for the listener. 42HL196 TECHNOLOGY & BENEFITS VIDEO REGZA Premium LCD Hi Speed Cinespeed™ Panel - Off axis viewing is turned ...
... Licensing L.L.C.. using only the TV's remote control, even through an existing home network, to maximize the sound of off , Toshiba has designed a black and silver cabinet with CableCARD™ - Product design and specification subject to set is maximized to allow everyone ...5.1 - CableCARD is a trademark of Cable Television Laboratories, Inc. LCDs include new panels that offer response times that you the response for the listener. 42HL196 TECHNOLOGY & BENEFITS VIDEO REGZA Premium LCD Hi Speed Cinespeed™ Panel - Off axis viewing is turned ...
Operation Guide
Page 1
...Toshiba dealer about this product, carefully read the Important Safety, Installation, Care, and Service information in the spaces below. Model number: Serial number: YC/M VX1A00010400 Note: To display a High Definition picture, the TV... must be receiving a High Definition signal (such as an over-the-air High Definition TV broadcast, a High...LCD Television HIGH-DEFINITION TELEVISION 42HL196 IMPORTANT NOTE Before connecting, operating, or adjusting this TV. For details, please contact your TV antenna installer, cable provider, or satellite provider. © 2006 TOSHIBA...
...Toshiba dealer about this product, carefully read the Important Safety, Installation, Care, and Service information in the spaces below. Model number: Serial number: YC/M VX1A00010400 Note: To display a High Definition picture, the TV... must be receiving a High Definition signal (such as an over-the-air High Definition TV broadcast, a High...LCD Television HIGH-DEFINITION TELEVISION 42HL196 IMPORTANT NOTE Before connecting, operating, or adjusting this TV. For details, please contact your TV antenna installer, cable provider, or satellite provider. © 2006 TOSHIBA...

Operation Guide
Page 3
... (Part 15 2 Important notes about your LCD TV 2 Trademark Information 2 Chapter 1: Introduction 5 Welcome to Toshiba 5 Features of your new TV 5 Overview of steps for installing, setting up, and using your new TV 6 TV front and side panel controls and connections 7 TV back panel connections 8 Chapter 2: Using the... mode 41 Closed Caption Advanced 41 Digital closed captions 42 Using the Closed Caption button on the remote control 42 Adjusting the audio 42 Muting the sound 42 Using the digital audio selector 42 Selecting stereo/SAP broadcasts 43 Adjusting the audio quality 43...
... (Part 15 2 Important notes about your LCD TV 2 Trademark Information 2 Chapter 1: Introduction 5 Welcome to Toshiba 5 Features of your new TV 5 Overview of steps for installing, setting up, and using your new TV 6 TV front and side panel controls and connections 7 TV back panel connections 8 Chapter 2: Using the... mode 41 Closed Caption Advanced 41 Digital closed captions 42 Using the Closed Caption button on the remote control 42 Adjusting the audio 42 Muting the sound 42 Using the digital audio selector 42 Selecting stereo/SAP broadcasts 43 Adjusting the audio quality 43...

Operation Guide
Page 4
...G. Using e-mail scheduling 72 E-mail parameters 72 Sending a request e-mail to your PC 58 Compatible operating systems 58 Setting up file sharing on the TV 62 Media specifications 62 Using the Picture Viewer 63 Using the Audio Player 65 F. Chapter 7: Using the THINC™ ... Receiving an e-mail from the TV 74 Modifying an existing recording or reminder 74 Chapter 8: Troubleshooting 75 General troubleshooting 75 Home network troubleshooting 77 LED indications 79 Chapter 9: Appendix 80 Specifications 80 Limited United States Warranty for LCD Televisions 26" and Larger 81 ...
...G. Using e-mail scheduling 72 E-mail parameters 72 Sending a request e-mail to your PC 58 Compatible operating systems 58 Setting up file sharing on the TV 62 Media specifications 62 Using the Picture Viewer 63 Using the Audio Player 65 F. Chapter 7: Using the THINC™ ... Receiving an e-mail from the TV 74 Modifying an existing recording or reminder 74 Chapter 8: Troubleshooting 75 General troubleshooting 75 Home network troubleshooting 77 LED indications 79 Chapter 9: Appendix 80 Specifications 80 Limited United States Warranty for LCD Televisions 26" and Larger 81 ...

Operation Guide
Page 5
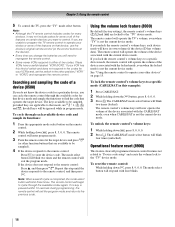
...) computer terminal (- For more information, call your new Toshiba widescreen, integrated HD, LCD TV: • Integrated digital tuning (8VSB ATSC and QAM) eliminates the need for viewing encrypted digital Cable TV programs (- Features of your TV. Chapter 7 and Installation Guide). 5 This digital television ...(- Installation Guide). • Ethernet (RJ-45) (THINC™) port for connecting the TV to a home network to get the most innovative LCD TVs on your TV. Please use of a set-top box. Certain advanced and interactive digital cable services (such as video-on-demand, a...
...) computer terminal (- For more information, call your new Toshiba widescreen, integrated HD, LCD TV: • Integrated digital tuning (8VSB ATSC and QAM) eliminates the need for viewing encrypted digital Cable TV programs (- Features of your TV. Chapter 7 and Installation Guide). 5 This digital television ...(- Installation Guide). • Ethernet (RJ-45) (THINC™) port for connecting the TV to a home network to get the most innovative LCD TVs on your TV. Please use of a set-top box. Certain advanced and interactive digital cable services (such as video-on-demand, a...

Operation Guide
Page 6
...TV on the TV. THIS TYPE OF DAMAGE IS NOT COVERED UNDER THE TOSHIBA WARRANTY. 3 Do not plug in any power cords until the TV goes into the TV's channel memory (- The red LED will damage the TV. When the TV is in standby mode, press POWER on the TV...TV far enough from your LCD TV" (- Keep this manual for future reference. 2 Observe the following when choosing a location for the TV: • Read the separate Installation Guide. • Read the separate TV... of steps for installing, setting up, and using your new TV Follow these steps to set up and using the TV Guide On Screen™ system...
...TV on the TV. THIS TYPE OF DAMAGE IS NOT COVERED UNDER THE TOSHIBA WARRANTY. 3 Do not plug in any power cords until the TV goes into the TV's channel memory (- The red LED will damage the TV. When the TV is in standby mode, press POWER on the TV...TV far enough from your LCD TV" (- Keep this manual for future reference. 2 Observe the following when choosing a location for the TV: • Read the separate Installation Guide. • Read the separate TV... of steps for installing, setting up, and using your new TV Follow these steps to set up and using the TV Guide On Screen™ system...
Operation Guide
Page 8
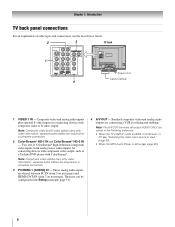
... 51). 4 A/V OUT - Note: The A/V OUT terminals will output AUDIO ONLY (no video) in the Setup menu (- Two sets of cable types and connections, see the Installation Guide. 2 3 TV back 1 4 Power cord Cable Clamper 1 VIDEO 1 IN - "Selecting the video input source to view," page 30). •... for connecting devices with ColorStream®. separate audio cables are required for connecting devices with component video output, such as a Toshiba DVD player with composite video or S-video output. Composite video and analog audio inputs plus optional S-video inputs for editing and...
... 51). 4 A/V OUT - Note: The A/V OUT terminals will output AUDIO ONLY (no video) in the Setup menu (- Two sets of cable types and connections, see the Installation Guide. 2 3 TV back 1 4 Power cord Cable Clamper 1 VIDEO 1 IN - "Selecting the video input source to view," page 30). •... for connecting devices with ColorStream®. separate audio cables are required for connecting devices with component video output, such as a Toshiba DVD player with composite video or S-video output. Composite video and analog audio inputs plus optional S-video inputs for editing and...

Operation Guide
Page 11
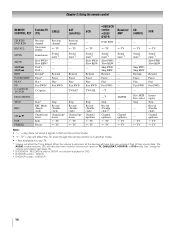
... open , moves from one set of the remote control's functions, see the separate TV Guide On Screen™ Interactive Program Guide. 1 3 2 4 5 6 7 8 9 10 11 12 13 14 15 17 16 18 19 20 21 22 23 24 25 1 SLEEP accesses the sleep timer (- When the TV is used for a function ...; system, see the remote control functional key chart (- The = button is on, the blue LED indicator on the TV front will be illuminated. 3 MODE SELECT sets the four remote control device modes: TV, CABLE/SAT, DVD, and VCR/PVR. page 31). 5 INPUT selects the video input source (- pages 13-14)....
... open , moves from one set of the remote control's functions, see the separate TV Guide On Screen™ Interactive Program Guide. 1 3 2 4 5 6 7 8 9 10 11 12 13 14 15 17 16 18 19 20 21 22 23 24 25 1 SLEEP accesses the sleep timer (- When the TV is used for a function ...; system, see the remote control functional key chart (- The = button is on, the blue LED indicator on the TV front will be illuminated. 3 MODE SELECT sets the four remote control device modes: TV, CABLE/SAT, DVD, and VCR/PVR. page 31). 5 INPUT selects the video input source (- pages 13-14)....

Operation Guide
Page 13
... 5 Digit 6 Digit 7 Digit 8 Digit 9 Digit 0 +100 s TV s TV --- --- Input s TV Menu s TV s TV Menu Setup --- --- DVD clear --- --- --- Chapter 2: Using the remote control Remote Control functional key chart REMOTE CONTROL KEY Toshiba TV (TV) CABLE SAT (satellite) MODE SELECT SLEEP POWER 1 2 3 4 5 6 7 8 9 0 100/-/+10 INPUT PIC SIZE MENU FAV BROWSER/ SET UP THINC/ TOP MENU TV GUIDE INFO ENTER B b C3 #c EXIT/ DVD...
... 5 Digit 6 Digit 7 Digit 8 Digit 9 Digit 0 +100 s TV s TV --- --- Input s TV Menu s TV s TV Menu Setup --- --- DVD clear --- --- --- Chapter 2: Using the remote control Remote Control functional key chart REMOTE CONTROL KEY Toshiba TV (TV) CABLE SAT (satellite) MODE SELECT SLEEP POWER 1 2 3 4 5 6 7 8 9 0 100/-/+10 INPUT PIC SIZE MENU FAV BROWSER/ SET UP THINC/ TOP MENU TV GUIDE INFO ENTER B b C3 #c EXIT/ DVD...
Operation Guide
Page 14
... have their own volume if their own volume if volume lock is picked for DVD-R, no function is set on TV, CABLE/SAT, VCR/PVR, or DVD mode. Stop Record (Double click) Channel up /down s TV s TV AM/FM --- --- Skip FWD Skip REW Rewind Pause Play Fast FWD --- page 16). *2 DVD/DVD-R : ...RECORD is only for DVD. *3 DVD/VCR combo : TV/VCR *4 DVD/VCR combo : DVD/VCR 14 Chapter 2: Using the remote control REMOTE CONTROL KEY Toshiba TV (TV) CABLE CH RTN/ DVD RTN RECALL MUTE SLOW SKIP z SKIP Z REW PAUSE/STEP PLAY FF C.CAPTION...
... have their own volume if their own volume if volume lock is picked for DVD-R, no function is set on TV, CABLE/SAT, VCR/PVR, or DVD mode. Stop Record (Double click) Channel up /down s TV s TV AM/FM --- --- Skip FWD Skip REW Rewind Pause Play Fast FWD --- page 16). *2 DVD/DVD-R : ...RECORD is only for DVD. *3 DVD/VCR combo : TV/VCR *4 DVD/VCR combo : DVD/VCR 14 Chapter 2: Using the remote control REMOTE CONTROL KEY Toshiba TV (TV) CABLE CH RTN/ DVD RTN RECALL MUTE SLOW SKIP z SKIP Z REW PAUSE/STEP PLAY FF C.CAPTION...
Operation Guide
Page 16
... the target device. If your VCR has this kind of two codes. Chapter 2: Using the remote control 5 To control the TV, press the "TV" mode select button. Note: • Although the TV remote control includes codes for many devices, it may not include codes for some or all of a device (8500) If you... codes for that mode, are applicable to the other position ("VCR1" or "VCR2") and reprogram the remote control. If you are unable to program the TV remote control to operate your VCR brand, set the switch to that device mode and sample the functions to control.
... the target device. If your VCR has this kind of two codes. Chapter 2: Using the remote control 5 To control the TV, press the "TV" mode select button. Note: • Although the TV remote control includes codes for many devices, it may not include codes for some or all of a device (8500) If you... codes for that mode, are applicable to the other position ("VCR1" or "VCR2") and reprogram the remote control. If you are unable to program the TV remote control to operate your VCR brand, set the switch to that device mode and sample the functions to control.
Operation Guide
Page 21
...Preferences Locks Setup Item Picture Viewer Audio Player Channel Browser™ TV Guide On Screen™ Digital CC/Audio Selector CableCARD™ Picture Settings Advanced Picture Settings Theater Settings Audio Settings Advanced Audio Settings Audio Setup Closed Caption Mode Closed Caption Advanced Input Labeling Menu Language... PIN Code entry screen] S [Opens the Installation menu (- S Dynamic list of your TV's menu system. page 22)] S [Opens the Sleep Timer menu] S [Opens the On/Off Timer menu] S [Opens the PC Settings menu] S No/Yes S Auto / Digital / Analog S 2 Sec/5 Sec/10 Sec...
...Preferences Locks Setup Item Picture Viewer Audio Player Channel Browser™ TV Guide On Screen™ Digital CC/Audio Selector CableCARD™ Picture Settings Advanced Picture Settings Theater Settings Audio Settings Advanced Audio Settings Audio Setup Closed Caption Mode Closed Caption Advanced Input Labeling Menu Language... PIN Code entry screen] S [Opens the Installation menu (- S Dynamic list of your TV's menu system. page 22)] S [Opens the Sleep Timer menu] S [Opens the On/Off Timer menu] S [Opens the PC Settings menu] S No/Yes S Auto / Digital / Analog S 2 Sec/5 Sec/10 Sec...

Operation Guide
Page 23
...the menu system You can only view the THINC menu by pressing C on the signal the TV is receiving. THINC Applications Picture Viewer Audio Player Channel Browser Favorites Browser TV Guide On Screen * Toshiba Home Interactive Network Connection. This is not a sign of the main menu system. Note:... Press Y to open the menu system. • When a menu is open, use the buttons on the remote control or TV control panel to access and navigate your menu settings or select a highlighted item. (A highlighted menu item appears in a different color in the menu.) • All menus close ...
...the menu system You can only view the THINC menu by pressing C on the signal the TV is receiving. THINC Applications Picture Viewer Audio Player Channel Browser Favorites Browser TV Guide On Screen * Toshiba Home Interactive Network Connection. This is not a sign of the main menu system. Note:... Press Y to open the menu system. • When a menu is open, use the buttons on the remote control or TV control panel to access and navigate your menu settings or select a highlighted item. (A highlighted menu item appears in a different color in the menu.) • All menus close ...
Operation Guide
Page 24
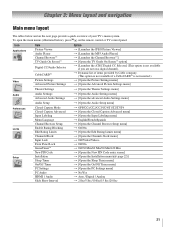
...the ANT 2 input, skip this menu. Chapter 4: Setting up your TV Selecting the menu language You can choose from three different languages (English, French, and Spanish) for the on the TV. Setup Installation Sleep Timer On/Off Timer PC Settings PC Audio HDMI 1 Audio Slide Show Interval No ...Auto 2 Sec Navigate ENTER Select CH RTN Back EXIT Exit 3 (A new set of Installation menu icons will automatically display "Cable Box." ...
...the ANT 2 input, skip this menu. Chapter 4: Setting up your TV Selecting the menu language You can choose from three different languages (English, French, and Spanish) for the on the TV. Setup Installation Sleep Timer On/Off Timer PC Settings PC Audio HDMI 1 Audio Slide Show Interval No ...Auto 2 Sec Navigate ENTER Select CH RTN Back EXIT Exit 3 (A new set of Installation menu icons will automatically display "Cable Box." ...

Operation Guide
Page 25
... programming, either press O or highlight Abort in its memory. Chapter 4: Setting up your TV Programming channels into the TV's channel memory When you press < or , on the remote control or TV control panel, your TV will stop only on which antenna input you want to program channels for,... and open the Setup menu. 3 Highlight Installation and press T. page 24). • If the Antenna 1 input signal type is set to program channels into the TV's memory. • If the Antenna 1 input signal type is configured for details on CableCARD™. To remove an antenna source channel...
... programming, either press O or highlight Abort in its memory. Chapter 4: Setting up your TV Programming channels into the TV's channel memory When you press < or , on the remote control or TV control panel, your TV will stop only on which antenna input you want to program channels for,... and open the Setup menu. 3 Highlight Installation and press T. page 24). • If the Antenna 1 input signal type is set to program channels into the TV's memory. • If the Antenna 1 input signal type is configured for details on CableCARD™. To remove an antenna source channel...

Operation Guide
Page 26
...you want to remove, and then press T to uncheck the box. If the channel is found , a message will be added to your new settings: Highlight Done and press T. To revert to the list and the box will appear. To delete/add channels on the remote control to enter the...the current antenna input only. To remove a channel from the channel memory: Highlight Reset and press T, and then highlight Done and press T. Chapter 4: Setting up your TV Manually adding and deleting channels in the channel memory: 1 Press Y and open the Setup menu. 2 Highlight Installation and press T. 3 (A new...
...you want to remove, and then press T to uncheck the box. If the channel is found , a message will be added to your new settings: Highlight Done and press T. To revert to the list and the box will appear. To delete/add channels on the remote control to enter the...the current antenna input only. To remove a channel from the channel memory: Highlight Reset and press T, and then highlight Done and press T. Chapter 4: Setting up your TV Manually adding and deleting channels in the channel memory: 1 Press Y and open the Setup menu. 2 Highlight Installation and press T. 3 (A new...
Operation Guide
Page 27
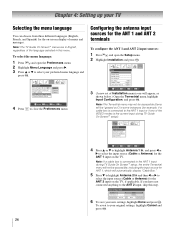
... step. Time And Date Date (MM/DD/YY) 0 6/3 0/0 5 Time (HH:MM) 1 1 : 1 1 AM In the event that your TV Setting the time and date Note: If you already set up the time, the Time and Date setting screen will appear and you will need to "Digital" and is restored. • If you highlight Manual (above... And Date Start Setup Navigate ENTER Select CH RTN Back EXIT Exit If you have not set up the TV Guide On Screen™ system, the time and date were set automatically and you have not set up the TV Guide On Screen™ system, or if you can provide accurate time and date information...
... step. Time And Date Date (MM/DD/YY) 0 6/3 0/0 5 Time (HH:MM) 1 1 : 1 1 AM In the event that your TV Setting the time and date Note: If you already set up the time, the Time and Date setting screen will appear and you will need to "Digital" and is restored. • If you highlight Manual (above... And Date Start Setup Navigate ENTER Select CH RTN Back EXIT Exit If you have not set up the TV Guide On Screen™ system, the time and date were set automatically and you have not set up the TV Guide On Screen™ system, or if you can provide accurate time and date information...
Operation Guide
Page 28
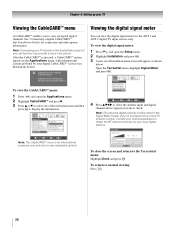
...return to obtain the RF channel numbers for informational purposes only and has no user-adjustable options. Note: Connecting your TV directly to the Audio/Video output of your set of the side menu items and then press T to Antenna 1. CableCard services will appear, as shown below ).... menu, with cable signal connected to display the information. Open the Terrestrial menu, highlight Signal Meter, and press T. Chapter 4: Setting up your TV Viewing the CableCARD™ menu A CableCARD™ enables you want to the Terrestrial menu: Highlight Done and press T.
...return to obtain the RF channel numbers for informational purposes only and has no user-adjustable options. Note: Connecting your TV directly to the Audio/Video output of your set of the side menu items and then press T to Antenna 1. CableCard services will appear, as shown below ).... menu, with cable signal connected to display the information. Open the Terrestrial menu, highlight Signal Meter, and press T. Chapter 4: Setting up your TV Viewing the CableCARD™ menu A CableCARD™ enables you want to the Terrestrial menu: Highlight Done and press T.
Operation Guide
Page 29
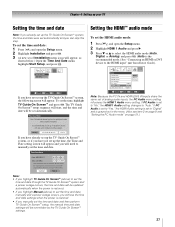
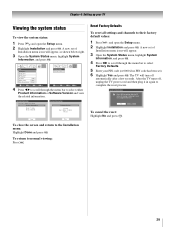
...Press YES to the Installation menu: Highlight Done and press T. System Information Sun Jan 1, 2006 12:12:19am Product Information Brand: Toshiba Model: 42HL196 System Information Software Version 2.2.34.0 Mar 1 2006 - 11:05:49 FW: 24 Done Done To close the screen and return ...to confirm. After the TV turns off automatically after a few seconds. A new set of Installation menu icons will appear. 3 Open the System Status menu, highlight System ...
...Press YES to the Installation menu: Highlight Done and press T. System Information Sun Jan 1, 2006 12:12:19am Product Information Brand: Toshiba Model: 42HL196 System Information Software Version 2.2.34.0 Mar 1 2006 - 11:05:49 FW: 24 Done Done To close the screen and return ...to confirm. After the TV turns off automatically after a few seconds. A new set of Installation menu icons will appear. 3 Open the System Status menu, highlight System ...


