
Operation Guide
Page 3
... LCD TV 2 Trademark Information 2 Chapter 1: Introduction 5 Welcome to Toshiba 5 Features of your new TV 5 Overview of steps for installing, setting up, and using your new TV 6 TV front and side panel controls and connections 7 TV ... device (8500). . . 16 Using the volume lock feature (8000 16 Operational feature reset (8900 16 Multi-brand remote control device codes 17 Chapter 3: Menu layout and navigation... closed captions 42 Using the Closed Caption button on the remote control 42 Adjusting the audio 42 Muting the sound 42 Using the digital audio selector 42 Selecting stereo/SAP...
... LCD TV 2 Trademark Information 2 Chapter 1: Introduction 5 Welcome to Toshiba 5 Features of your new TV 5 Overview of steps for installing, setting up, and using your new TV 6 TV front and side panel controls and connections 7 TV ... device (8500). . . 16 Using the volume lock feature (8000 16 Operational feature reset (8900 16 Multi-brand remote control device codes 17 Chapter 3: Menu layout and navigation... closed captions 42 Using the Closed Caption button on the remote control 42 Adjusting the audio 42 Muting the sound 42 Using the digital audio selector 42 Selecting stereo/SAP...

Operation Guide
Page 4
... on a PC with Microsoft® Windows® XP Service Pack 1 or Service Pack 2 . . 58 Setting up the network address 57 Resetting the network address 58 C. Chapter 7: Using the THINC™ home network feature 56 A. Viewing/playing shared files on a PC with Microsoft®...Receiving an e-mail from the TV 74 Modifying an existing recording or reminder 74 Chapter 8: Troubleshooting 75 General troubleshooting 75 Home network troubleshooting 77 LED indications 79 Chapter 9: Appendix 80 Specifications 80 Limited United States Warranty for LCD Televisions 26" and Larger 81 ...
... on a PC with Microsoft® Windows® XP Service Pack 1 or Service Pack 2 . . 58 Setting up the network address 57 Resetting the network address 58 C. Chapter 7: Using the THINC™ home network feature 56 A. Viewing/playing shared files on a PC with Microsoft®...Receiving an e-mail from the TV 74 Modifying an existing recording or reminder 74 Chapter 8: Troubleshooting 75 General troubleshooting 75 Home network troubleshooting 77 LED indications 79 Chapter 9: Appendix 80 Specifications 80 Limited United States Warranty for LCD Televisions 26" and Larger 81 ...

Operation Guide
Page 6
...TV Guide On Screen™ features (applies to reset the TV. 12 See "Menu layout and navigation" for your TV and other device(s) (- Installation Guide). 7 Install the batteries in your new TV! 6 Secure the TV...TV goes into the TV's channel memory (- THIS TYPE OF DAMAGE IS NOT COVERED UNDER THE TOSHIBA WARRANTY. 3 Do not plug in the power cords for a quick overview of the TV...setting up, and using your LCD TV" (- Chapter 1: Introduction Overview of steps for the TV: • Read the separate Installation Guide. • Read the separate TV Guide On Screen™ ...
...TV Guide On Screen™ features (applies to reset the TV. 12 See "Menu layout and navigation" for your TV and other device(s) (- Installation Guide). 7 Install the batteries in your new TV! 6 Secure the TV...TV goes into the TV's channel memory (- THIS TYPE OF DAMAGE IS NOT COVERED UNDER THE TOSHIBA WARRANTY. 3 Do not plug in the power cords for a quick overview of the TV...setting up, and using your LCD TV" (- Chapter 1: Introduction Overview of steps for the TV: • Read the separate Installation Guide. • Read the separate TV Guide On Screen™ ...
Operation Guide
Page 7
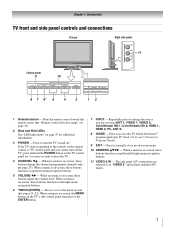
...-2, HDMI 1, HDMI 2, PC, ANT 2). 8 GUIDE - If the TV stops responding to turn the TV on and off the TV, press and hold the POWER button on the remote control or TV control panel and you are referred to reset the TV. 4 CHANNEL bB - Press to the controls on the TV control panel for additional information. 3 POWER - When...
...-2, HDMI 1, HDMI 2, PC, ANT 2). 8 GUIDE - If the TV stops responding to turn the TV on and off the TV, press and hold the POWER button on the remote control or TV control panel and you are referred to reset the TV. 4 CHANNEL bB - Press to the controls on the TV control panel for additional information. 3 POWER - When...
Operation Guide
Page 16
... respond to the codes for that device mode and sample the functions to find the code that operates the target device. Note: • Although the TV remote control includes codes for many devices, it may not include codes for some of a device (8500) If you do not know the device code... position ("VCR1" or "VCR2") and reprogram the remote control. Searching and sampling the code of the features on that mode, are unable to program the TV remote control to either of the features on the device). • Every time you change the batteries you are p, 1, z, If you will need to reprogram...
... respond to the codes for that device mode and sample the functions to find the code that operates the target device. Note: • Although the TV remote control includes codes for many devices, it may not include codes for some of a device (8500) If you do not know the device code... position ("VCR1" or "VCR2") and reprogram the remote control. Searching and sampling the code of the features on that mode, are unable to program the TV remote control to either of the features on the device). • Every time you change the batteries you are p, 1, z, If you will need to reprogram...

Operation Guide
Page 26
... 4 5 6 7 7 - 1 8 Analog Digital Digital Analog Analog Digital Analog Analog Digital Analog ANT 1 ANT 2 Reset Cancel Done Note: This action applies to uncheck the box. Chapter 4: Setting up your TV Manually adding and deleting channels in the channel memory: 1 Press Y and open the Setup menu. 2 Highlight Installation and..., a message will appear. To save your original settings: Highlight Cancel and press T before saving. To remove a channel from the channel memory: Highlight Reset and press T, and then highlight Done and press T. Channel Add/Delete 2 2 - 1 2 - 2 3 4 5 6 7 7 - 1 8 Analog ...
... 4 5 6 7 7 - 1 8 Analog Digital Digital Analog Analog Digital Analog Analog Digital Analog ANT 1 ANT 2 Reset Cancel Done Note: This action applies to uncheck the box. Chapter 4: Setting up your TV Manually adding and deleting channels in the channel memory: 1 Press Y and open the Setup menu. 2 Highlight Installation and..., a message will appear. To save your original settings: Highlight Cancel and press T before saving. To remove a channel from the channel memory: Highlight Reset and press T, and then highlight Done and press T. Channel Add/Delete 2 2 - 1 2 - 2 3 4 5 6 7 7 - 1 8 Analog ...
Operation Guide
Page 29
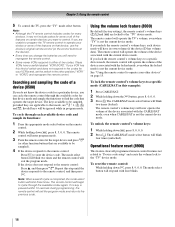
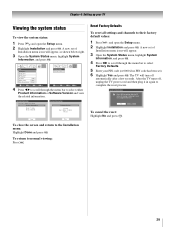
...Information Brand: Toshiba Model: 42HL196 System Information Software Version 2.2.34.0 Mar 1 2006 - 11:05:49 FW: 24 Done Done To close the screen and return to select either Product Information or Software Version and view the related information. Reset Factory Defaults To reset all settings...to scroll through the menu bar to their factory default values: 1 Press Y and open the Setup menu. 2 Highlight Installation and press T. The TV will appear, as shown below right. 3 Open the System Status menu, highlight System Information, and press T. Chapter 4: Setting up your PIN code...
...Information Brand: Toshiba Model: 42HL196 System Information Software Version 2.2.34.0 Mar 1 2006 - 11:05:49 FW: 24 Done Done To close the screen and return to select either Product Information or Software Version and view the related information. Reset Factory Defaults To reset all settings...to scroll through the menu bar to their factory default values: 1 Press Y and open the Setup menu. 2 Highlight Installation and press T. The TV will appear, as shown below right. 3 Open the System Status menu, highlight System Information, and press T. Chapter 4: Setting up your PIN code...

Operation Guide
Page 30
...HD 1 ColorStream HD 2 HDMI 1 HDMI 2 PC ANT 2 DVD Cable Video Recorder Hide DTV Satellite/DSS --- Reset Done 4 Press C or c to the factory default labels, highlight Reset and press T. 30 Input Selection 0 ANT 1 1 Video 1 2 Video 2 3 ColorStream HD1 4 ColorStream ...HD2 5 HDMI 1 6 HDMI 2 7 PC 8 ANT 2 ANT 1 0 - 8 / INPUT to Select b) Repeatedly press Bb on the remote control (or CHANNEL Bb on the control panel) to change the input; or c) Repeatedly press + on the remote control or TV...
...HD 1 ColorStream HD 2 HDMI 1 HDMI 2 PC ANT 2 DVD Cable Video Recorder Hide DTV Satellite/DSS --- Reset Done 4 Press C or c to the factory default labels, highlight Reset and press T. 30 Input Selection 0 ANT 1 1 Video 1 2 Video 2 3 ColorStream HD1 4 ColorStream ...HD2 5 HDMI 1 6 HDMI 2 7 PC 8 ANT 2 ANT 1 0 - 8 / INPUT to Select b) Repeatedly press Bb on the remote control (or CHANNEL Bb on the control panel) to change the input; or c) Repeatedly press + on the remote control or TV...
Operation Guide
Page 31
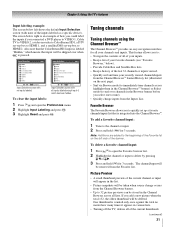
...a favorite channels/inputs list that the ColorStream HD2 input is labeled "Hidden," which has been hidden. One thumbnail is pressed. Chapter 5: Using the TV's features Input labeling example: The screen below left side of the banner. Input Selection 0 ANT 1 1 DVD 2 Cable 3 Video Recorder 4 ...To delete a favorite channel/input: 1 Press n to open the Preferences menu. 2 Highlight Input Labeling and press T. 3 Highlight Reset and press T. Favorite Browser The Favorite Browser allows you select one to Select Input Selection screen with all your recently viewed channels/inputs ...
...a favorite channels/inputs list that the ColorStream HD2 input is labeled "Hidden," which has been hidden. One thumbnail is pressed. Chapter 5: Using the TV's features Input labeling example: The screen below left side of the banner. Input Selection 0 ANT 1 1 DVD 2 Cable 3 Video Recorder 4 ...To delete a favorite channel/input: 1 Press n to open the Preferences menu. 2 Highlight Input Labeling and press T. 3 Highlight Reset and press T. Favorite Browser The Favorite Browser allows you select one to Select Input Selection screen with all your recently viewed channels/inputs ...
Operation Guide
Page 32
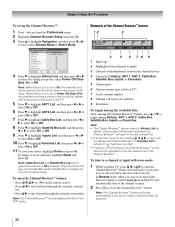
... List ANT2 List Cable Box List Satellite Box List Inputs List Favorites List Select Mode Power Off Clear (On) On On Off On On On Reset Done 4 Press b to highlight History List, and then press C or c to Power Off Clear (On), the channels and inputs stored in the list....automatically if you stop on the remote control. • Press 3 C to surf backward through the currently selected list. • Press # c to factory defaults, highlight Reset and press T. Chapter 5: Using the TV's features To set up the Channel Browser™ on /off cycle. When History List is configured from the...
... List ANT2 List Cable Box List Satellite Box List Inputs List Favorites List Select Mode Power Off Clear (On) On On Off On On On Reset Done 4 Press b to highlight History List, and then press C or c to Power Off Clear (On), the channels and inputs stored in the list....automatically if you stop on the remote control. • Press 3 C to surf backward through the currently selected list. • Press # c to factory defaults, highlight Reset and press T. Chapter 5: Using the TV's features To set up the Channel Browser™ on /off cycle. When History List is configured from the...

Operation Guide
Page 35
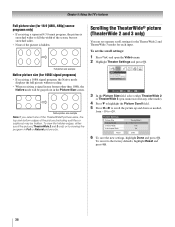
...sizes-Natural, TheaterWide 1, TheaterWide 2, TheaterWide 3, Full, and Native. Theater Settings Picture Size Picture Scroll Cinema Mode Auto Aspect Ratio Reset Natural -- Your picture size preferences can be "grayed out" in the Picture Size screen). • You also can view ...formats in the Theater Settings menu. A B C D E F G A B C D E F G TheaterWide 3 picture size example (continued) 35 Chapter 5: Using the TV's features Selecting the picture size You can select the picture size using the menu system. To view the hidden areas, see "Scrolling the TheaterWide®...
...sizes-Natural, TheaterWide 1, TheaterWide 2, TheaterWide 3, Full, and Native. Theater Settings Picture Size Picture Scroll Cinema Mode Auto Aspect Ratio Reset Natural -- Your picture size preferences can be "grayed out" in the Picture Size screen). • You also can view ...formats in the Theater Settings menu. A B C D E F G A B C D E F G TheaterWide 3 picture size example (continued) 35 Chapter 5: Using the TV's features Selecting the picture size You can select the picture size using the menu system. To view the hidden areas, see "Scrolling the TheaterWide®...
Operation Guide
Page 36
...set the scroll settings: 1 Press Y and open the Video menu. 2 Highlight Theater Settings and press T. To revert to the factory defaults, highlight Reset and press T. 36 Full picture size example Native picture size (for 1080i signal programs) • If receiving a 1080i signal program, the Native mode..., select either scroll the picture (TheaterWide 2 and 3 only) or try viewing the program in Full or Natural picture size. Chapter 5: Using the TV's features Full picture size (for 16:9 [480i, 480p] source programs only) • If receiving a squeezed 4:3 format program, the picture is ...
...set the scroll settings: 1 Press Y and open the Video menu. 2 Highlight Theater Settings and press T. To revert to the factory defaults, highlight Reset and press T. 36 Full picture size example Native picture size (for 1080i signal programs) • If receiving a 1080i signal program, the Native mode..., select either scroll the picture (TheaterWide 2 and 3 only) or try viewing the program in Full or Natural picture size. Chapter 5: Using the TV's features Full picture size (for 16:9 [480i, 480p] source programs only) • If receiving a squeezed 4:3 format program, the picture is ...

Operation Guide
Page 37
... Note: The auto aspect ratio feature is not applicable to the factory defaults, highlight Reset and press T. Cinema Mode Auto Aspect Ratio Natural Film On Reset Done 4 To save the new settings, highlight Done and press T. To turn on...Reset and press T. Aspect ratio of the following input sources is received: • A 480i signal from the VIDEO 1, VIDEO 2, ColorStream HD-1, or ColorStream HD-2 input. • A 1080i, 480i, 480p, or 720p signal from a DVD player connected to the VIDEO 1, VIDEO 2, ColorStream HD-1/ColorStream HD-2 (component video), or HDMI inputs on the TV...
... Note: The auto aspect ratio feature is not applicable to the factory defaults, highlight Reset and press T. Cinema Mode Auto Aspect Ratio Natural Film On Reset Done 4 To save the new settings, highlight Done and press T. To turn on...Reset and press T. Aspect ratio of the following input sources is received: • A 480i signal from the VIDEO 1, VIDEO 2, ColorStream HD-1, or ColorStream HD-2 input. • A 1080i, 480i, 480p, or 720p signal from a DVD player connected to the VIDEO 1, VIDEO 2, ColorStream HD-1/ColorStream HD-2 (component video), or HDMI inputs on the TV...

Operation Guide
Page 40
...for example, increase the contrast or change the color temperature), the picture mode automatically changes to the factory defaults, highlight Reset and press T. Selection Pressing C Pressing c contrast lower higher back light darker lighter brightness darker lighter color paler deeper...Highlight Picture Settings, and press T. 3 Press B or b to select the picture quality you prefer. Chapter 5: Using the TV's features Adjusting the picture Selecting the picture mode You can select your personal preferences. Picture Settings Mode Contrast Back Light Brightness Color ...
...for example, increase the contrast or change the color temperature), the picture mode automatically changes to the factory defaults, highlight Reset and press T. Selection Pressing C Pressing c contrast lower higher back light darker lighter brightness darker lighter color paler deeper...Highlight Picture Settings, and press T. 3 Press B or b to select the picture quality you prefer. Chapter 5: Using the TV's features Adjusting the picture Selecting the picture mode You can select your personal preferences. Picture Settings Mode Contrast Back Light Brightness Color ...

Operation Guide
Page 41
... Serif, Prop. Closed Caption Advanced Caption Size Caption Text Type Caption Text Edge Caption Text Color Background Color Auto Auto Auto Auto Auto Reset Done 3 Press B or b to highlight the characteristic you selected is not closed caption display characteristics by individual stations). Caption Size Caption...usually marked "CC" in step 3 above. w. To revert to the current program, such as the same color. Chapter 5: Using the TV's features Using the closed caption mode The closed caption mode has two options: • Captions-An on-screen display of the dialogue, narration...
... Serif, Prop. Closed Caption Advanced Caption Size Caption Text Type Caption Text Edge Caption Text Color Background Color Auto Auto Auto Auto Auto Reset Done 3 Press B or b to highlight the characteristic you selected is not closed caption display characteristics by individual stations). Caption Size Caption...usually marked "CC" in step 3 above. w. To revert to the current program, such as the same color. Chapter 5: Using the TV's features Using the closed caption mode The closed caption mode has two options: • Captions-An on-screen display of the dialogue, narration...
Operation Guide
Page 43
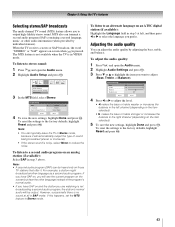
... ATSC digital station (if available): Highlight the Language field in VIDEO mode. To reset the settings to Stereo mode. For example, a station might broadcast another language as a second audio program. When the TV receives a stereo or SAP broadcast, the word "STEREO" or "SAP" appears on...the audio quality by individual stations). Audio Settings Bass Treble Balance StableSound Reset 100 100 0 Off Done 4 Press C or c to reduce the noise. Chapter 5: Using the TV's features Selecting stereo/SAP broadcasts The multi-channel TV sound (MTS) feature allows you to stereo sound: 1 Press Y ...
... ATSC digital station (if available): Highlight the Language field in VIDEO mode. To reset the settings to Stereo mode. For example, a station might broadcast another language as a second audio program. When the TV receives a stereo or SAP broadcast, the word "STEREO" or "SAP" appears on...the audio quality by individual stations). Audio Settings Bass Treble Balance StableSound Reset 100 100 0 Off Done 4 Press C or c to reduce the noise. Chapter 5: Using the TV's features Selecting stereo/SAP broadcasts The multi-channel TV sound (MTS) feature allows you to stereo sound: 1 Press Y ...
Operation Guide
Page 44
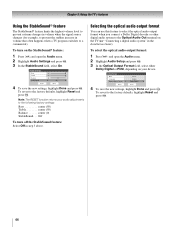
... the Optical Output Format field, select either Dolby Digital or PCM, depending on the TV (- Audio Settings Bass Treble Balance StableSound 100 100 0 On Reset Done 4 To save the new settings, highlight Done and press T. Chapter 5: Using the TV's features Using the StableSound® feature The StableSound® feature limits the highest volume...
... the Optical Output Format field, select either Dolby Digital or PCM, depending on the TV (- Audio Settings Bass Treble Balance StableSound 100 100 0 On Reset Done 4 To save the new settings, highlight Done and press T. Chapter 5: Using the TV's features Using the StableSound® feature The StableSound® feature limits the highest volume...
Operation Guide
Page 50
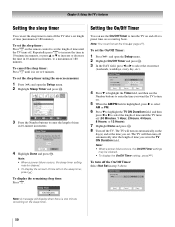
... set the sleep timer to turn off the On/Off Timer: Select Not Set in step 3 above. To display the remaining sleep time: Press [. The TV will turn on automatically on the day(s) and at a preset time on a recurring basis. To set the sleep timer: Press [ on -screen menus: 1 Press... the sleep timer, press E. Note: You must first set the time (- On/Off Timer Turn TV ON: Day Time (HH:MM) TV ON Duration: Weekends 0 9 : 0 0 AM 30 Minutes Reset Cancel Done 4 Press b to highlight the Time field, and then use the On/Off Timer to increase or decrease the time in ...
... set the sleep timer to turn off the On/Off Timer: Select Not Set in step 3 above. To display the remaining sleep time: Press [. The TV will turn on automatically on the day(s) and at a preset time on a recurring basis. To set the sleep timer: Press [ on -screen menus: 1 Press... the sleep timer, press E. Note: You must first set the time (- On/Off Timer Turn TV ON: Day Time (HH:MM) TV ON Duration: Weekends 0 9 : 0 0 AM 30 Minutes Reset Cancel Done 4 Press b to highlight the Time field, and then use the On/Off Timer to increase or decrease the time in ...
Operation Guide
Page 51
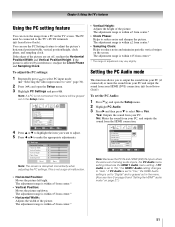
...Audio setting is set the PC Audio: 1 Press Y and open the Setup menu. 3 Highlight PC Settings and press T. Chapter 5: Using the TV's features Using the PC setting feature You can use the PC Settings feature to adjust the picture's horizontal position/width, vertical position/height, clock ... to reduce noise and minimize periodic vertical stripes on the screen. PC Settings Horizontal Position Horizontal Width Vertical Position Vertical Height Clock Phase Sampling Clock Reset 0 0 0 0 0 0 Done Note: The screen is within ±5 from a PC on page 27.) 51 The PC must be grayed out in ...
...Audio setting is set the PC Audio: 1 Press Y and open the Setup menu. 3 Highlight PC Settings and press T. Chapter 5: Using the TV's features Using the PC setting feature You can use the PC Settings feature to adjust the picture's horizontal position/width, vertical position/height, clock ... to reduce noise and minimize periodic vertical stripes on the screen. PC Settings Horizontal Position Horizontal Width Vertical Position Vertical Height Clock Phase Sampling Clock Reset 0 0 0 0 0 0 Done Note: The screen is within ±5 from a PC on page 27.) 51 The PC must be grayed out in ...

Operation Guide
Page 53
... are Off, Low, Middle, High, and Auto. Auto will display the text "DNR." To revert to the factory defaults, highlight Reset and press T. Using CableClear® digital noise reduction The CableClear® digital noise reduction feature allows you select the Movie picture mode...current input is ColorStream HD1, ColorStream HD2, or HDMI, the menu will react proportionally to the strength of your TV picture. Chapter 6: Using the TV's advanced features Using the advanced picture settings features Using dynamic contrast When dynamic contrast is set the dynamic contrast to...
... are Off, Low, Middle, High, and Auto. Auto will display the text "DNR." To revert to the factory defaults, highlight Reset and press T. Using CableClear® digital noise reduction The CableClear® digital noise reduction feature allows you select the Movie picture mode...current input is ColorStream HD1, ColorStream HD2, or HDMI, the menu will react proportionally to the strength of your TV picture. Chapter 6: Using the TV's advanced features Using the advanced picture settings features Using dynamic contrast When dynamic contrast is set the dynamic contrast to...


