

Owners Manual
Page 5
...safety checks to a wall, pillar, surface, or other hazards. Never attempt to clean the LCD screen, follow this manual to a Toshiba Authorized Service Provider. 44) If you need to service the TV yourself. For disposal or recycling information, contact your LCD TV on ... on a flat, cushioned surface such as indicated below. Before proceeding, make occasional snapping or popping sounds. If these sounds become frequent or continuous, unplug the power cord and contact a Toshiba Authorized Service Provider. 41) DANGER: RISK OF SERIOUS PERSONAL INJURY OR DEATH! If you have the...
...safety checks to a wall, pillar, surface, or other hazards. Never attempt to clean the LCD screen, follow this manual to a Toshiba Authorized Service Provider. 44) If you need to service the TV yourself. For disposal or recycling information, contact your LCD TV on ... on a flat, cushioned surface such as indicated below. Before proceeding, make occasional snapping or popping sounds. If these sounds become frequent or continuous, unplug the power cord and contact a Toshiba Authorized Service Provider. 41) DANGER: RISK OF SERIOUS PERSONAL INJURY OR DEATH! If you have the...
Owners Manual
Page 8
... quality 35 Using the closed caption mode 35 Base closed captions 35 Digital CC Settings 36 CC Selector 36 8 Adjusting the audio 37 Muting the sound 37 Using the digital audio selector 37 Selecting stereo/SAP broadcasts 37 Adjusting the audio quality 37 Selecting the digital audio output format 38 Using... 53 Specifications 53 Acceptable signal formats for PC IN and HDMI terminals 54 Limited United States Warranty for LCD Televisions....... 55 Limited Canadian Warranty for Toshiba Brand Flat Panel Televisions 56
... quality 35 Using the closed caption mode 35 Base closed captions 35 Digital CC Settings 36 CC Selector 36 8 Adjusting the audio 37 Muting the sound 37 Using the digital audio selector 37 Selecting stereo/SAP broadcasts 37 Adjusting the audio quality 37 Selecting the digital audio output format 38 Using... 53 Specifications 53 Acceptable signal formats for PC IN and HDMI terminals 54 Limited United States Warranty for LCD Televisions....... 55 Limited Canadian Warranty for Toshiba Brand Flat Panel Televisions 56
Owners Manual
Page 18
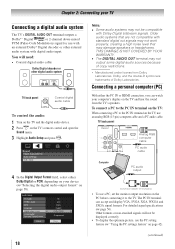
... VGA, SVGA, XGA, WXGA and SXGA signal formats. The PC IN terminal can watch your computer's display on the TV and hear the sound from Dolby Laboratories. For detailed signal specifications ( page 56). Chapter 2: Connecting your TV Connecting a digital audio system The TV's DIGITAL ...control the audio: 1無 Turn on the TV and the digital audio device. 2無 Press on the TV's remote control and open the Sound menu. 3無 Highlight Audio Setup and press . Older audio systems that may not output some digital audio sources because of Dolby Laboratories. Note:...
... VGA, SVGA, XGA, WXGA and SXGA signal formats. The PC IN terminal can watch your computer's display on the TV and hear the sound from Dolby Laboratories. For detailed signal specifications ( page 56). Chapter 2: Connecting your TV Connecting a digital audio system The TV's DIGITAL ...control the audio: 1無 Turn on the TV and the digital audio device. 2無 Press on the TV's remote control and open the Sound menu. 3無 Highlight Audio Setup and press . Older audio systems that may not output some digital audio sources because of Dolby Laboratories. Note:...
Owners Manual
Page 21
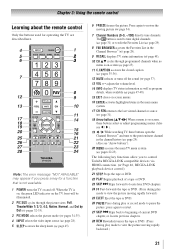
... picture moving picture ( page 34). 7無 Channel Numbers (0-9, -/100) directly tune channels. Note: The error message "NOT AVAILABLE" may appear if you to control Toshiba REGZA-LINK compatible devices via HDMI connection. ( Page 46, REGZA-LINK playback device control) 21無 STOP Stops the tape or DVD. 22無... or record mode to restore the moving rapidly backward.) 21 When the TV is not available. 1無 POWER turns the TV on and off the sound ( page 37). 13無 VOL + -
... picture moving picture ( page 34). 7無 Channel Numbers (0-9, -/100) directly tune channels. Note: The error message "NOT AVAILABLE" may appear if you to control Toshiba REGZA-LINK compatible devices via HDMI connection. ( Page 46, REGZA-LINK playback device control) 21無 STOP Stops the tape or DVD. 22無... or record mode to restore the moving rapidly backward.) 21 When the TV is not available. 1無 POWER turns the TV on and off the sound ( page 37). 13無 VOL + -
Owners Manual
Page 22
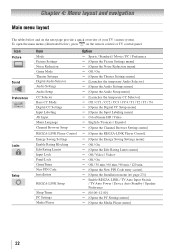
... a quick overview of your TV's menu system. To open the main menus (illustrated below and on the remote control or TV control panel. Icon Picture Sound Preferences Locks Setup Item Mode Picture Settings Noise Reduction Game Mode Theater Settings Digital Audio Selector Audio Settings Audio Setup CC Selector Base CC Mode...
... a quick overview of your TV's menu system. To open the main menus (illustrated below and on the remote control or TV control panel. Icon Picture Sound Preferences Locks Setup Item Mode Picture Settings Noise Reduction Game Mode Theater Settings Digital Audio Selector Audio Settings Audio Setup CC Selector Base CC Mode...
Owners Manual
Page 26
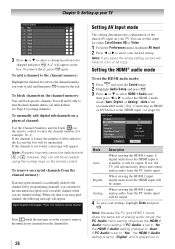
... message is found , a message will not be unchecked. Setting the HDMI® audio mode To set the HDMI audio mode: 1無 Press and open the Sound menu. 2無 Highlight Audio Setup and press . 3無 Press p or q to select HDMI 1 Audio and then press t or u to select the HDMI 1 audio mode (Auto...
... message is found , a message will not be unchecked. Setting the HDMI® audio mode To set the HDMI audio mode: 1無 Press and open the Sound menu. 2無 Highlight Audio Setup and press . 3無 Press p or q to select HDMI 1 Audio and then press t or u to select the HDMI 1 audio mode (Auto...
Owners Manual
Page 35
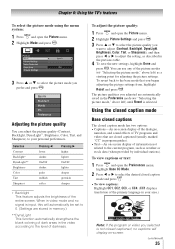
... the closed caption mode Base closed captions The closed caption mode has two options: • Captions-An on-screen display of the dialogue, narration, and sound effects of TV programs and videos that you prefer and press . Selection Contrast Backlight* DynaLight** Brightness Color Tint Sharpness Pressing t lower darker On/Off darker...
... the closed caption mode Base closed captions The closed caption mode has two options: • Captions-An on-screen display of the dialogue, narration, and sound effects of TV programs and videos that you prefer and press . Selection Contrast Backlight* DynaLight** Brightness Color Tint Sharpness Pressing t lower darker On/Off darker...

Owners Manual
Page 37
... reset the settings to the factory defaults, highlight Reset and press . Chapter 6: Using the TV's features Adjusting the audio Muting the sound Press on the remote control to Off when you select "MUTE" mode, the closed caption feature is automatically activated if the TV program...service. 4無 Press . This temporarily overrides the audio track chosen by individual stations). To adjust the audio quality: 1無 Press and open the Sound menu. 2無 Highlight Digital Audio Selector and press . 3無 Press p or q to select Audio, and then press t or u to ...
... reset the settings to the factory defaults, highlight Reset and press . Chapter 6: Using the TV's features Adjusting the audio Muting the sound Press on the remote control to Off when you select "MUTE" mode, the closed caption feature is automatically activated if the TV program...service. 4無 Press . This temporarily overrides the audio track chosen by individual stations). To adjust the audio quality: 1無 Press and open the Sound menu. 2無 Highlight Digital Audio Selector and press . 3無 Press p or q to select Audio, and then press t or u to ...
Owners Manual
Page 38
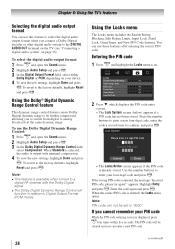
... to be set to the factory defaults, highlight Reset and press . To select the digital audio output format: 1無 Press and open the Sound menu. 2無 Highlight Audio Setup and press . 3無 In the Dolby Digital Dynamic Range Control field, select Compressed. Using the Dolby®... mode). Enter the code again and press . Note: PIN code can use the Dolby Digital Dynamic Range Control: 1無 Press and open the Sound menu. 2無 Highlight Audio Setup and press . 3無 In the Digital Output Format field, select either Dolby Digital or PCM, depending on ...
... to be set to the factory defaults, highlight Reset and press . To select the digital audio output format: 1無 Press and open the Sound menu. 2無 Highlight Audio Setup and press . 3無 In the Dolby Digital Dynamic Range Control field, select Compressed. Using the Dolby®... mode). Enter the code again and press . Note: PIN code can use the Dolby Digital Dynamic Range Control: 1無 Press and open the Sound menu. 2無 Highlight Audio Setup and press . 3無 In the Digital Output Format field, select either Dolby Digital or PCM, depending on ...

Owners Manual
Page 43
...viewing the PC input, there will be heard. Toshiba cannot and does not grant such permission. • Depending on a USB storage device. Note: Because the PC and HDMI-1 inputs share the same set the PC Audio: 1無 Press and open the Sound menu. 2無 Highlight Audio Setup and press .... photo size: 6 MB Maximum number of files: 500 / folder Maximum photo resolution: 1366 x 768 pixels (32DT2U1 / 32DT2UL1) 1920 x 1080 pixels (40FT2U1) Supported file system: FAT16 and FAT32 Note: • Gently insert the USB device into the port and do not to select On or Off. (continued...
...viewing the PC input, there will be heard. Toshiba cannot and does not grant such permission. • Depending on a USB storage device. Note: Because the PC and HDMI-1 inputs share the same set the PC Audio: 1無 Press and open the Sound menu. 2無 Highlight Audio Setup and press .... photo size: 6 MB Maximum number of files: 500 / folder Maximum photo resolution: 1366 x 768 pixels (32DT2U1 / 32DT2UL1) 1920 x 1080 pixels (40FT2U1) Supported file system: FAT16 and FAT32 Note: • Gently insert the USB device into the port and do not to select On or Off. (continued...
Owners Manual
Page 47
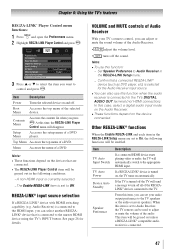
... REGZA-LINK Setup menu. − Confirm that is connected. 47 Contents Menu Accesses the contents list when you can adjust or mute the sound volume of the Audio Receiver. • adjust the volume level. • turns off all of the audio. From this time, the ... Device Auto Standby Speaker Preference Description If a connected HDMI device starts playing video or audio, the TV will send a message to turn off the sound. Chapter 6: Using the TV's features REGZA-LINK® Player Control menu functions: 1無 Press and open the Preferences menu. 2無 Highlight...
... REGZA-LINK Setup menu. − Confirm that is connected. 47 Contents Menu Accesses the contents list when you can adjust or mute the sound volume of the Audio Receiver. • adjust the volume level. • turns off all of the audio. From this time, the ... Device Auto Standby Speaker Preference Description If a connected HDMI device starts playing video or audio, the TV will send a message to turn off the sound. Chapter 6: Using the TV's features REGZA-LINK® Player Control menu functions: 1無 Press and open the Preferences menu. 2無 Highlight...
Owners Manual
Page 48
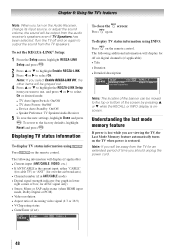
...turns on the TV when power is the current input, either "CABLE" (for cable TV) or "ANT" (for off and on again to output the sound from the TV speakers. Turn the TV off air digital channels (if applicable): • Title • Duration • Detailed description Note: The location of... . Understanding the last mode memory feature If power is lost while you turn on the Audio Receiver, change its input source, or adjust the sound volume, the sound will display for over-the-air broadcasts). • Channel number (if in ANT/CABLE mode) • Digital signal strength indicator (bar graph ...
...turns on the TV when power is the current input, either "CABLE" (for cable TV) or "ANT" (for off and on again to output the sound from the TV speakers. Turn the TV off air digital channels (if applicable): • Title • Duration • Detailed description Note: The location of... . Understanding the last mode memory feature If power is lost while you turn on the Audio Receiver, change its input source, or adjust the sound volume, the sound will display for over-the-air broadcasts). • Channel number (if in ANT/CABLE mode) • Digital signal strength indicator (bar graph ...
Owners Manual
Page 51
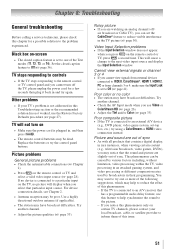
... a ColorStream or HDMI video connection instead. Cannot view external signals or channel 3 or 4 • If you may help synchronize the sound to the remote control or TV control panel and you cannot turn on certain TV channels, please contact your TV's problem is not addressed...8226; Check the AV Input mode when you are slightly out of sync • As with all products that particular input source. Picture and sound are out of sync. Chapter 8: Troubleshooting General troubleshooting Before calling a service technician, please check this phenomenon only on • Make sure the...
... a ColorStream or HDMI video connection instead. Cannot view external signals or channel 3 or 4 • If you may help synchronize the sound to the remote control or TV control panel and you cannot turn on certain TV channels, please contact your TV's problem is not addressed...8226; Check the AV Input mode when you are slightly out of sync • As with all products that particular input source. Picture and sound are out of sync. Chapter 8: Troubleshooting General troubleshooting Before calling a service technician, please check this phenomenon only on • Make sure the...
Owners Manual
Page 52
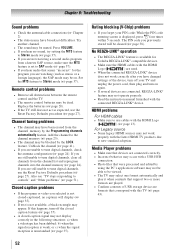
...If you are connected, REGZA-LINK® feature may select one format automatically and play it when contents that seems "incorrect" for Toshiba REGZA-LINK® compatible devices. • Make sure the HDMI cables with the latest HDMI TV products due to tune digital ... reception is nonstandard ( page 35). or c) when the signal reception is weak; If this TV ( page 43). 52 Chapter 8: Troubleshooting Sound problems • Check the antenna/cable connections ( Chapter 2). • The station may not display correctly in the following situations: a) when a ...
...If you are connected, REGZA-LINK® feature may select one format automatically and play it when contents that seems "incorrect" for Toshiba REGZA-LINK® compatible devices. • Make sure the HDMI cables with the latest HDMI TV products due to tune digital ... reception is nonstandard ( page 35). or c) when the signal reception is weak; If this TV ( page 43). 52 Chapter 8: Troubleshooting Sound problems • Check the antenna/cable connections ( Chapter 2). • The station may not display correctly in the following situations: a) when a ...


