Owners Manual
Page 2
..., they are improperly secured or inappropriately situated on your TV (and other electronic components). Toshiba Cares! a Share our safety message about television safety. and (2) analog and/or digital...child may reach for proper use the many exciting features of your home. Before operating your LCD monitor, please read and understand the other than one TV. The use a UL-approved ...accordance with furniture and TVs. The lightning flash with your TV (such as a VCR, remote control, or toy) that children can become excited while watching a program and can potentially push ...
..., they are improperly secured or inappropriately situated on your TV (and other electronic components). Toshiba Cares! a Share our safety message about television safety. and (2) analog and/or digital...child may reach for proper use the many exciting features of your home. Before operating your LCD monitor, please read and understand the other than one TV. The use a UL-approved ...accordance with furniture and TVs. The lightning flash with your TV (such as a VCR, remote control, or toy) that children can become excited while watching a program and can potentially push ...
Owners Manual
Page 5
...Part 15): The Toshiba 26HLC56, 32HLC56, and 37HLC56 LCD Color Monitors comply with Part 15 of the most innovative LCD monitors on the... will disappear in a short period of time. 2) The LCD panel contained in a particular installation. Write these rules is not ...remote control. Please read all the safety and operating instructions carefully, and keep the manual for your monitor. This manual applies to the equipment, the user is viewed from that may not cause harmful interference, and (2) this manual are on the back of the following symptoms are technical limitations of LCD Display...
...Part 15): The Toshiba 26HLC56, 32HLC56, and 37HLC56 LCD Color Monitors comply with Part 15 of the most innovative LCD monitors on the... will disappear in a short period of time. 2) The LCD panel contained in a particular installation. Write these rules is not ...remote control. Please read all the safety and operating instructions carefully, and keep the manual for your monitor. This manual applies to the equipment, the user is viewed from that may not cause harmful interference, and (2) this manual are on the back of the following symptoms are technical limitations of LCD Display...
Owners Manual
Page 6
... 7 Front and side panel controls and connections 8 Back panel connections 9 Chapter 2: Connecting...remote control 16 Preparing the remote control for use 16 Installing the remote control batteries 16 Remote control effective range 16 Learning about the remote control 17 Using the remote control to operate your other devices . . . . 18 Remote Control functional key chart 19 Programming the remote control to operate your other devices 20 Remote control...mode side panels 28 Selecting...caption mode 32 Closed Caption Reception Adjustment 32 Adjusting the ...On timer 39 Displaying the monitor's...
... 7 Front and side panel controls and connections 8 Back panel connections 9 Chapter 2: Connecting...remote control 16 Preparing the remote control for use 16 Installing the remote control batteries 16 Remote control effective range 16 Learning about the remote control 17 Using the remote control to operate your other devices . . . . 18 Remote Control functional key chart 19 Programming the remote control to operate your other devices 20 Remote control...mode side panels 28 Selecting...caption mode 32 Closed Caption Reception Adjustment 32 Adjusting the ...On timer 39 Displaying the monitor's...
Owners Manual
Page 7
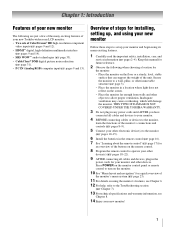
...8226; Place the monitor far enough from walls and other immovable structure (- Press POWER on the monitor control panel or remote control to turn on the remote control. 8 Program the remote control to operate your other device(s) (- pages 10-15). 6 Install the batteries in the power cords for... component video inputs (- page 16). 7 See "Learning about the remote control" (- Overview of steps for the monitor: • Place the monitor on using its many exciting features of your new Toshiba widescreen LCD monitor: • Two sets of the unit. Inadequate ventilation may ...
...8226; Place the monitor far enough from walls and other immovable structure (- Press POWER on the monitor control panel or remote control to turn on the remote control. 8 Program the remote control to operate your other device(s) (- pages 10-15). 6 Install the batteries in the power cords for... component video inputs (- page 16). 7 See "Learning about the remote control" (- Overview of steps for the monitor: • Place the monitor on using its many exciting features of your new Toshiba widescreen LCD monitor: • Two sets of the unit. Inadequate ventilation may ...
Owners Manual
Page 8
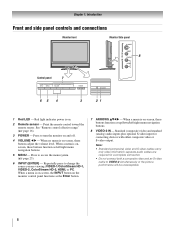
.... Note: • Standard (composite) video and S-video cables carry only video information; Chapter 1: Introduction Front and side panel controls and connections Monitor front Monitor Side panel 8 Control panel 7 65 4 3 21 1 Red LED - Point the remote control toward the remote sensor. See "Remote control effective range" (- When a menu is onscreen, these buttons function as the Enter button. 7 ARROWS BbC c - When no...
.... Note: • Standard (composite) video and S-video cables carry only video information; Chapter 1: Introduction Front and side panel controls and connections Monitor front Monitor Side panel 8 Control panel 7 65 4 3 21 1 Red LED - Point the remote control toward the remote sensor. See "Remote control effective range" (- When a menu is onscreen, these buttons function as the Enter button. 7 ARROWS BbC c - When no...
Owners Manual
Page 11
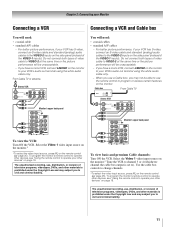
...connect L/MONO on the monitor. To program the monitor's remote control to operate other devices, see "Using the remote control to operate your VCR has S-video, connect an S-video cable and standard (analog) audio cables to the VIDEO-2 inputs on the side panel (instead of video cable to TV VIDEO AUDIO L ...R IN OUT L R Monitor's upper back panel To view the VCR: Turn ON the VCR. When you use the remote control to program or access certain features on the monitor to ...
...connect L/MONO on the monitor. To program the monitor's remote control to operate other devices, see "Using the remote control to operate your VCR has S-video, connect an S-video cable and standard (analog) audio cables to the VIDEO-2 inputs on the side panel (instead of video cable to TV VIDEO AUDIO L ...R IN OUT L R Monitor's upper back panel To view the VCR: Turn ON the VCR. When you use the remote control to program or access certain features on the monitor to ...
Owners Manual
Page 12
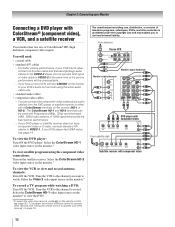
... cables (plus audio cables) from ANT CH 3 CH 4 OUT to TV AUDIO L R IN IN OUT L R Monitor's upper back panel Monitor's right side panel Y PB PR DVD player with component video AUDIO OUT L S-VIDEO COMPONENT VIDEO VIDEO R OUT OUT From satellite dish Y PB PR AUDIO OUT...types of ColorStream terminals on the monitor (HD-1 or HD-2). Chapter 2: Connecting your DVD player has HDMI video, see "Using the remote control to operate your VCR's audio out terminal using the component video connections: Turn on the satellite receiver. Select the ColorStream HD-2 video input...
... cables (plus audio cables) from ANT CH 3 CH 4 OUT to TV AUDIO L R IN IN OUT L R Monitor's upper back panel Monitor's right side panel Y PB PR DVD player with component video AUDIO OUT L S-VIDEO COMPONENT VIDEO VIDEO R OUT OUT From satellite dish Y PB PR AUDIO OUT...types of ColorStream terminals on the monitor (HD-1 or HD-2). Chapter 2: Connecting your DVD player has HDMI video, see "Using the remote control to operate your VCR's audio out terminal using the component video connections: Turn on the satellite receiver. Select the ColorStream HD-2 video input...
Owners Manual
Page 13
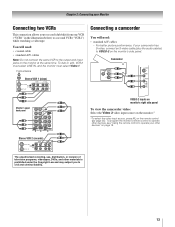
For better picture performance, if your other devices" on the monitor's side panel. Camcorder VIDEO AUDIO OUT L R Monitor's upper back panel VIDEO-2 inputs on monitor's right side panel To view the camcorder video: Select the Video 2 video input source on the monitor.* *To select ... L R IN OUT L R Connecting a camcorder You will need : • standard A/V cables - To program the monitor's remote control to operate other devices, see "Using the remote control to operate your camcorder has S-video, connect an S-video cable (plus the audio cables) to VIDEO-2 on page 18. You ...
For better picture performance, if your other devices" on the monitor's side panel. Camcorder VIDEO AUDIO OUT L R Monitor's upper back panel VIDEO-2 inputs on monitor's right side panel To view the camcorder video: Select the Video 2 video input source on the monitor.* *To select ... L R IN OUT L R Connecting a camcorder You will need : • standard A/V cables - To program the monitor's remote control to operate other devices, see "Using the remote control to operate your camcorder has S-video, connect an S-video cable (plus the audio cables) to VIDEO-2 on page 18. You ...

Owners Manual
Page 16
...: Never throw batteries into the battery compartment. Installing the remote control batteries 1 Remove the battery cover from the remote control if they are dead or if the remote control is not preprogrammed to operate most Toshiba devices (- This will operate the other devices such as cable...box), even if they are different brands. If you have a Toshiba device: Your monitor's remote control is no obstruction between the remote control and the monitor. If you have a non-Toshiba device or a Toshiba device that the remote control is not to match the + and - Squeeze tab and lift ...
...: Never throw batteries into the battery compartment. Installing the remote control batteries 1 Remove the battery cover from the remote control if they are dead or if the remote control is not preprogrammed to operate most Toshiba devices (- This will operate the other devices such as cable...box), even if they are different brands. If you have a Toshiba device: Your monitor's remote control is no obstruction between the remote control and the monitor. If you have a non-Toshiba device or a Toshiba device that the remote control is not to match the + and - Squeeze tab and lift ...
Owners Manual
Page 17
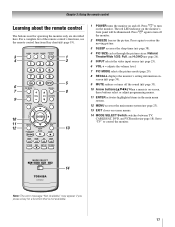
...remote control Learning about the remote control The buttons used for a function that is on and off the monitor. 2 FREEZE freezes the picture. Press p to turn on the monitor. Press p again to turn off . page 26). 5 INPUT selects the video input source (- page 23). 13 EXIT closes on the monitor's front panel...page 29). 8 RECALL displays the monitor's setting information onscreen (- page 25). 6 VOL + - page 33). 10 Arrow buttons (BbC c) When a menu is not available. 17 For a complete list of the remote control's functions, see the remote control functional key chart (-...
...remote control Learning about the remote control The buttons used for a function that is on and off the monitor. 2 FREEZE freezes the picture. Press p to turn on the monitor. Press p again to turn off . page 26). 5 INPUT selects the video input source (- page 23). 13 EXIT closes on the monitor's front panel...page 29). 8 RECALL displays the monitor's setting information onscreen (- page 25). 6 VOL + - page 33). 10 Arrow buttons (BbC c) When a menu is not available. 17 For a complete list of the remote control's functions, see the remote control functional key chart (-...
Owners Manual
Page 18
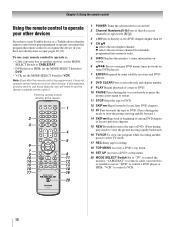
... DVD. • VCR, set the MODE SELECT Switch to VCR. If this happens and you wish to use those features, you have a non-Toshiba device or a Toshiba device that the remote control is programmed, it may not work on and off. 2 Channel Numbers (0-9) Press to directly access channels (as opposed to < ,). 3 +10 Press to... higher than 10. 4 CH Bb B selects the next higher channel; pages 20-22). b selects the next lower channel (for channels programmed into memory only). 5 INFO Displays the monitor's status information onscreen. 6 BbC c Press to control a VCR. 18
... DVD. • VCR, set the MODE SELECT Switch to VCR. If this happens and you wish to use those features, you have a non-Toshiba device or a Toshiba device that the remote control is programmed, it may not work on and off. 2 Channel Numbers (0-9) Press to directly access channels (as opposed to < ,). 3 +10 Press to... higher than 10. 4 CH Bb B selects the next higher channel; pages 20-22). b selects the next lower channel (for channels programmed into memory only). 5 INFO Displays the monitor's status information onscreen. 6 BbC c Press to control a VCR. 18
Owners Manual
Page 19
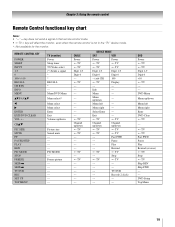
... click) --- --- --- --- Info --- Chapter 3: Using the remote control Remote Control functional key chart Note key does not send a signal in that remote control mode. • sTV = key will affect the monitor, even when the remote control is not in the "TV" device mode. *: Not available for...0 - (sub CH) s TV 100 Display --- --- Menu up /down --- Exit s TV --s TV Channel up/down s TV s TV Channel up /down s TV s TV --- Menu left Menu right Enter DVD Clear s TV --- Menu right --- Select Enter --- Fast FWD --- REMOTE CONTROL KEY POWER SLEEP INPUT 1-9 0 100/-/+10...
... click) --- --- --- --- Info --- Chapter 3: Using the remote control Remote Control functional key chart Note key does not send a signal in that remote control mode. • sTV = key will affect the monitor, even when the remote control is not in the "TV" device mode. *: Not available for...0 - (sub CH) s TV 100 Display --- --- Menu up /down --- Exit s TV --s TV Channel up/down s TV s TV Channel up /down s TV s TV --- Menu left Menu right Enter DVD Clear s TV --- Menu right --- Select Enter --- Fast FWD --- REMOTE CONTROL KEY POWER SLEEP INPUT 1-9 0 100/-/+10...
Owners Manual
Page 20
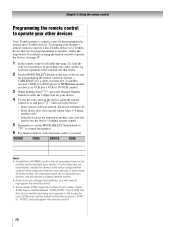
...remote control Programming the remote control to operate your monitor's remote control to operate a non-Toshiba device (or a Toshiba device that it , and press p. (Also see page 18. 1 In the remote control code table (- To program your other codes are programming the remote control to the codes for your device). For details on the remote control... the device will turn off. • If the device does not respond, repeat steps 1-4 using the remote control to operate most Toshiba devices. CABLE/SAT (for a cable converter box or satellite receiver), DVD (for a DVD player or ...
...remote control Programming the remote control to operate your monitor's remote control to operate a non-Toshiba device (or a Toshiba device that it , and press p. (Also see page 18. 1 In the remote control code table (- To program your other codes are programming the remote control to the codes for your device). For details on the remote control... the device will turn off. • If the device does not respond, repeat steps 1-4 using the remote control to operate most Toshiba devices. CABLE/SAT (for a cable converter box or satellite receiver), DVD (for a DVD player or ...
Owners Manual
Page 21
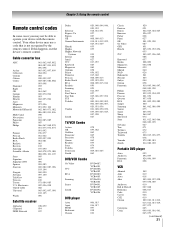
...Magnavox Memorex Mintek NAD Nakamichi Norcent Onkyo Oritron Panasonic Philips Pioneer Proscan Qwestar RCA Sampo Samsung Sansui Sanyo Sharp Sherwood Sony Sylvania Teac Technics Techwood Toshiba Yamaha Zenith 020 021 022, 023, 024, 025 026, 027 028 027 001, 029, 030 087 031 005, 032, 033,... 073 005 009, 010, 016, 061, 065, 079 (continued) 21 S. If this happens, use a code that is not recognized by the remote control. Cable converter box ABC Archer Cableview Century Citizen Contec Diamond Eagle GE Gemini Hamlin Hitachi Jasco Magnavox Memorex Motorola/GI/Jerrold Multi Canal Novavision Panasonic...
...Magnavox Memorex Mintek NAD Nakamichi Norcent Onkyo Oritron Panasonic Philips Pioneer Proscan Qwestar RCA Sampo Samsung Sansui Sanyo Sharp Sherwood Sony Sylvania Teac Technics Techwood Toshiba Yamaha Zenith 020 021 022, 023, 024, 025 026, 027 028 027 001, 029, 030 087 031 005, 032, 033,... 073 005 009, 010, 016, 061, 065, 079 (continued) 21 S. If this happens, use a code that is not recognized by the remote control. Cable converter box ABC Archer Cableview Century Citizen Contec Diamond Eagle GE Gemini Hamlin Hitachi Jasco Magnavox Memorex Motorola/GI/Jerrold Multi Canal Novavision Panasonic...
Owners Manual
Page 22
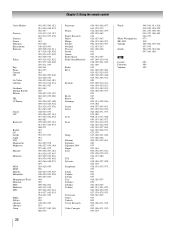
Chapter 3: Using the remote control Curtis Mathes Daewoo Daytron Denon Dimensia Electrohome Emerson Fisher Fuji Funai Garrard GE Go Video Goldstar Gradiente Harman Kardon Hitachi JBL JC Penney Jensen JVC ... RCA Realistic Ricoh Runco Samsung Sansui Sanyo Scott Sears Sharp Shintom Signature Signature 2000 Singer Sony STS Sylvania Symphonic Tandy Tashiko Tatung Teac Technics Teknika Toshiba Totevision Unitec Unitech Vector Research Video Concepts 036, 045, 046, 057, 061, 072, 079 012, 024, 025, 035, 042, 053, 063 014 026, 027, 063...
Chapter 3: Using the remote control Curtis Mathes Daewoo Daytron Denon Dimensia Electrohome Emerson Fisher Fuji Funai Garrard GE Go Video Goldstar Gradiente Harman Kardon Hitachi JBL JC Penney Jensen JVC ... RCA Realistic Ricoh Runco Samsung Sansui Sanyo Scott Sears Sharp Shintom Signature Signature 2000 Singer Sony STS Sylvania Symphonic Tandy Tashiko Tatung Teac Technics Teknika Toshiba Totevision Unitec Unitech Vector Research Video Concepts 036, 045, 046, 057, 061, 072, 079 012, 024, 025, 035, 042, 053, 063 014 026, 027, 063...
Owners Manual
Page 23
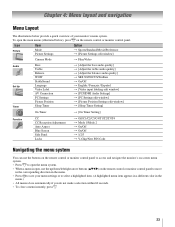
...Mode 2 S On/Off S On/Off S 1/2/3 S V-Chip/New PIN Code Navigating the menu system You can use the buttons on the remote control or monitor control panel to access and navigate the monitor's on-screen menu system. • Press Y to open the menu system. • When a menu is ...To open , use the up/down/left/right arrow buttons (BbC c) on the remote control or monitor control panel. Chapter 4: Menu layout and navigation Menu Layout The illustrations below ), press Y on the remote control or monitor control panel to move in the corresponding direction in the menu.) • All menus close ...
...Mode 2 S On/Off S On/Off S 1/2/3 S V-Chip/New PIN Code Navigating the menu system You can use the buttons on the remote control or monitor control panel to access and navigate the monitor's on-screen menu system. • Press Y to open the menu system. • When a menu is ...To open , use the up/down/left/right arrow buttons (BbC c) on the remote control or monitor control panel. Chapter 4: Menu layout and navigation Menu Layout The illustrations below ), press Y on the remote control or monitor control panel to move in the corresponding direction in the menu.) • All menus close ...
Owners Manual
Page 25
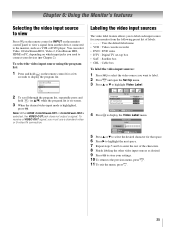
... to select the desired character for your settings. 10 To return to display the Video Label menu. ColorStreamHD2 Video 2 Video 1 PC HDMI 2 To scroll through the program list, repeatedly press and hold + on the remote control for a few seconds to connect your devices (- Set Up Language Video... is highlighted, press T. Chapter 6: Using the Monitor's features Selecting the video input source to view Press + on the remote control or INPUT on the monitor control panel to view a signal from the following preset list of labels Uses the default label name • VCR : Video cassette ...
... to select the desired character for your settings. 10 To return to display the Video Label menu. ColorStreamHD2 Video 2 Video 1 PC HDMI 2 To scroll through the program list, repeatedly press and hold + on the remote control for a few seconds to connect your devices (- Set Up Language Video... is highlighted, press T. Chapter 6: Using the Monitor's features Selecting the video input source to view Press + on the remote control or INPUT on the monitor control panel to view a signal from the following preset list of labels Uses the default label name • VCR : Video cassette ...

Owners Manual
Page 26
...Repeatedly press I on the next page. TheaterWide 2 picture size (for 4:3 format programs) • The center of the picture sizes) will display with subtitles) • The picture is displayed close to you are hidden. Full picture size example TheaterWide 1 picture size example 26 Select the picture size that...but the left and right edges are stretched wider to select the desired picture size, as described below and on the remote control to fill the screen. • The top and bottom edges of picture sizes-Natural, TheaterWide 1, TheaterWide 2, TheaterWide 3, Full, and 4:3 ...
...Repeatedly press I on the next page. TheaterWide 2 picture size (for 4:3 format programs) • The center of the picture sizes) will display with subtitles) • The picture is displayed close to you are hidden. Full picture size example TheaterWide 1 picture size example 26 Select the picture size that...but the left and right edges are stretched wider to select the desired picture size, as described below and on the remote control to fill the screen. • The top and bottom edges of picture sizes-Natural, TheaterWide 1, TheaterWide 2, TheaterWide 3, Full, and 4:3 ...

Owners Manual
Page 29
... (480i signals only) When you view a DVD (480i signal; 3:2 pulldown processed) from four different modes, as described below. The following popup menu appears on the remote control. You can be obtained by setting the Cinema Mode to Film. Picture Mode Picture Settings Cinema Mode Sports ENTER Video MENU Back EXIT Watch TV...
... (480i signals only) When you view a DVD (480i signal; 3:2 pulldown processed) from four different modes, as described below. The following popup menu appears on the remote control. You can be obtained by setting the Cinema Mode to Film. Picture Mode Picture Settings Cinema Mode Sports ENTER Video MENU Back EXIT Watch TV...
Owners Manual
Page 38
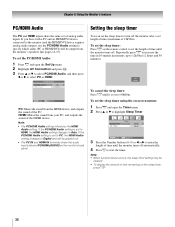
... is set to PC, the HDMI Audio setting changes to Digital and will be cleared. • To display the amount of the HDMI device. To set the sleep timer: Press [ on the monitor's back panel. Sleep Timer On Timer Timer 02:00 00:00 MENU Back EXIT Watch TV 3 Press the Number... or HDMI/DVI) will be grayed out. • The PC IN and HDMI IN terminals share the audio inputs labeled PC/HDMI (AUDIO) on the remote control to set the length of time until the monitor turns off the monitor after a set the sleep timer using the on the sleep timer, press...
... is set to PC, the HDMI Audio setting changes to Digital and will be cleared. • To display the amount of the HDMI device. To set the sleep timer: Press [ on the monitor's back panel. Sleep Timer On Timer Timer 02:00 00:00 MENU Back EXIT Watch TV 3 Press the Number... or HDMI/DVI) will be grayed out. • The PC IN and HDMI IN terminals share the audio inputs labeled PC/HDMI (AUDIO) on the remote control to set the length of time until the monitor turns off the monitor after a set the sleep timer using the on the sleep timer, press...


