
User Manual
Page 1
Introduction OWNER'S MANUAL TOSHIBA LCD COLOR TV E:ENGLISH E F:FRANÇAIS F S:ESPAÑOL S Connecting Your TV Using the Remote Control Setting Up your TV Using the TV's Features Appendix 14DL74 20DL74 © 2004 TOSHIBA CORPORATION All Rights Reserved
Introduction OWNER'S MANUAL TOSHIBA LCD COLOR TV E:ENGLISH E F:FRANÇAIS F S:ESPAÑOL S Connecting Your TV Using the Remote Control Setting Up your TV Using the TV's Features Appendix 14DL74 20DL74 © 2004 TOSHIBA CORPORATION All Rights Reserved

User Manual
Page 2
...important operating and maintenance instructions follow. Before operating the TV, please read and understand the other enclosed instructions for . NO USERSERVICEABLE PARTS INSIDE. CAUTION: To reduce the risk of this Toshiba TV. The Consumer Electronics Association formed the Home Entertainment ...Support Safety Committee, comprised of TV and consumer electronics furniture manufacturers, to advocate children's safety and educate ...
...important operating and maintenance instructions follow. Before operating the TV, please read and understand the other enclosed instructions for . NO USERSERVICEABLE PARTS INSIDE. CAUTION: To reduce the risk of this Toshiba TV. The Consumer Electronics Association formed the Home Entertainment ...Support Safety Committee, comprised of TV and consumer electronics furniture manufacturers, to advocate children's safety and educate ...

User Manual
Page 3
... type plug has two blades and a third grounding prong. or locations with temperatures at or below 41°F (5°C). 18) Always place the TV on the floor or a sturdy, level, stable surface that produce heat. A polarized plug has two blades with the manufacturer's instructions. 8) Do not... install near water. 6) Clean only with the apparatus. Never place the TV: • on or pinched, particularly at plugs, convenience receptacles, and the point where it exits the unit. 11) Only use caution when ...
... type plug has two blades and a third grounding prong. or locations with temperatures at or below 41°F (5°C). 18) Always place the TV on the floor or a sturdy, level, stable surface that produce heat. A polarized plug has two blades with the manufacturer's instructions. 8) Do not... install near water. 6) Clean only with the apparatus. Never place the TV: • on or pinched, particularly at plugs, convenience receptacles, and the point where it exits the unit. 11) Only use caution when ...

User Manual
Page 4
...for long periods of time. 33) During normal use, the TV may make sure you are never in a position where your TV, follow these sounds become frequent or continuous, unplug the power cord and contact a Toshiba Authorized Service Center. 34) The screen on this when locating the... dispose of the following during lightning activity: a) an antenna system; Refer all servicing to a Toshiba Authorized Service Center. 37) If you to install any item you leave the TV unattended or unused for example, AM radios and video equipment) under certain installation conditions. Improper disposal...
...for long periods of time. 33) During normal use, the TV may make sure you are never in a position where your TV, follow these sounds become frequent or continuous, unplug the power cord and contact a Toshiba Authorized Service Center. 34) The screen on this when locating the... dispose of the following during lightning activity: a) an antenna system; Refer all servicing to a Toshiba Authorized Service Center. 37) If you to install any item you leave the TV unattended or unused for example, AM radios and video equipment) under certain installation conditions. Improper disposal...

User Manual
Page 5
... Settings 17 Power Connection 10 TV Settings 18 Video/Audio Connections 11 Using the Remote Control 13 Other Function Settings 21 Appendix 23 Operating the Remote Control 13 Troubleshooting 23 Remote Control Battery Installation 13 14/20DL74 LCD TV Specifications 25 Limited United States ...Warranty for LCD TV 26 Limited Canada Warranty for LCD TV ........27 Using the Remote Control Setting Up your...
... Settings 17 Power Connection 10 TV Settings 18 Video/Audio Connections 11 Using the Remote Control 13 Other Function Settings 21 Appendix 23 Operating the Remote Control 13 Troubleshooting 23 Remote Control Battery Installation 13 14/20DL74 LCD TV Specifications 25 Limited United States ...Warranty for LCD TV 26 Limited Canada Warranty for LCD TV ........27 Using the Remote Control Setting Up your...

User Manual
Page 6
Introduction Introduction Accessories AC Adapter TAA-Y58 CAUTION: Please make sure to only use the AC adapter provided with this product to power the TV. Power Cord Remote Control CT-864 6 Batteries x 2 Type AAA for Remote Control Owner's Manual
Introduction Introduction Accessories AC Adapter TAA-Y58 CAUTION: Please make sure to only use the AC adapter provided with this product to power the TV. Power Cord Remote Control CT-864 6 Batteries x 2 Type AAA for Remote Control Owner's Manual

User Manual
Page 7
... to toggle the display information on and off. PICTURE Press to the last channel viewed. Press again to channel positions. POWER turns the TV on and off . VOL +/- MUTE turns the sound on and off . the channel is skipped when channel surfing. Press T to go... of these connectors. AV1/AV2 selects the AV input signal from one of Controls VOLUME -/+ TV/VIDEO E CHANNEL / F POWER BUTTON S Introduction Connecting Your TV Using the Remote Control Setting Up Your TV Headphones Jack Blue LED Indicator (Power On) Red LED Indicator (Stand by) Remote Control Buttons...
... to toggle the display information on and off. PICTURE Press to the last channel viewed. Press again to channel positions. POWER turns the TV on and off . VOL +/- MUTE turns the sound on and off . the channel is skipped when channel surfing. Press T to go... of these connectors. AV1/AV2 selects the AV input signal from one of Controls VOLUME -/+ TV/VIDEO E CHANNEL / F POWER BUTTON S Introduction Connecting Your TV Using the Remote Control Setting Up Your TV Headphones Jack Blue LED Indicator (Power On) Red LED Indicator (Stand by) Remote Control Buttons...

User Manual
Page 8
... coaxial cable into the slots as shown in the direction desired. Connecting Your TV Connecting the Antenna to Your TV Follow these instructions to connect the antenna to remove the cover. Press the rear cover at the arrows (A) and pull the rear cover in the ... (B) as shown (C) and replace the rear cover (D). 8 C D Note: You can adjust the angle of the LCD TV. 1. B A A B 2. Insert the cover notches into the antenna input. Note: The TV antenna coaxial cable is not supplied with your TV. To adjust the angle, press down on the base and tilt the top of the LCD...
... coaxial cable into the slots as shown in the direction desired. Connecting Your TV Connecting the Antenna to Your TV Follow these instructions to connect the antenna to remove the cover. Press the rear cover at the arrows (A) and pull the rear cover in the ... (B) as shown (C) and replace the rear cover (D). 8 C D Note: You can adjust the angle of the LCD TV. 1. B A A B 2. Insert the cover notches into the antenna input. Note: The TV antenna coaxial cable is not supplied with your TV. To adjust the angle, press down on the base and tilt the top of the LCD...

User Manual
Page 9
...8226; VHF/UHF mixed outdoor antenna. • Independent VHF or independent UHF outdoor antenna. Introduction Connecting Your TV E Antenna Installation Using a good quality TV antenna is essential for easy installation. (Cable is not supplied.) Outdoor Antenna Installation If you are installing an...sharing your dealer or qualified service personnel. When poor reception occurs, please consult your TV antenna. (i.e. This can be used with commonly seen F type round head connec- TV ANTENNA TV ANTENNA FLAT CABLE FLAT CABLE ANTENNA MIXER (NOT SUPPLIED) Notes: Follow these tips ...
...8226; VHF/UHF mixed outdoor antenna. • Independent VHF or independent UHF outdoor antenna. Introduction Connecting Your TV E Antenna Installation Using a good quality TV antenna is essential for easy installation. (Cable is not supplied.) Outdoor Antenna Installation If you are installing an...sharing your dealer or qualified service personnel. When poor reception occurs, please consult your TV antenna. (i.e. This can be used with commonly seen F type round head connec- TV ANTENNA TV ANTENNA FLAT CABLE FLAT CABLE ANTENNA MIXER (NOT SUPPLIED) Notes: Follow these tips ...

User Manual
Page 10
... Connection Follow these instructions to connect your TV to prevent accidents from happening. Power cord (supplied) AC adapter (supplied) CAUTION: Keep children away from the package. 3. Remove the AC adapter from electrical outlets ... the following illustration. 4. Note: This AC adaptor can only be used for this TV. Replace the rear cover as described in step 3 of "Connecting the Antenna to Your TV" on page 8. 2. Do not use with other end of the LCD TV. Remove the rear cover as described in step 1 of "Connecting the Antenna...
... Connection Follow these instructions to connect your TV to prevent accidents from happening. Power cord (supplied) AC adapter (supplied) CAUTION: Keep children away from the package. 3. Remove the AC adapter from electrical outlets ... the following illustration. 4. Note: This AC adaptor can only be used for this TV. Replace the rear cover as described in step 3 of "Connecting the Antenna to Your TV" on page 8. 2. Do not use with other end of the LCD TV. Remove the rear cover as described in step 1 of "Connecting the Antenna...
User Manual
Page 11
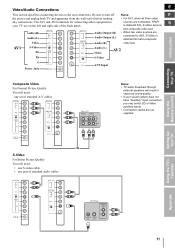
..., YPbPr S is detected first and composite Video Audio (R) video last. Introduction Connecting Your TV E Video/Audio Connections This section describes connecting devices to turn off Notes: F the power and unplug both TV and apparatus from the wall outlet before making • For AV1, when all three video...need : • one S-video cable • one set of standard A/V cables Stereo VCR VIDEO AUDIO LR IN OUT Notes: • TV audio broadcast through external speakers will need : one pair of the back panel. sources are on the left and right side of standard audio ...
..., YPbPr S is detected first and composite Video Audio (R) video last. Introduction Connecting Your TV E Video/Audio Connections This section describes connecting devices to turn off Notes: F the power and unplug both TV and apparatus from the wall outlet before making • For AV1, when all three video...need : • one S-video cable • one set of standard A/V cables Stereo VCR VIDEO AUDIO LR IN OUT Notes: • TV audio broadcast through external speakers will need : one pair of the back panel. sources are on the left and right side of standard audio ...

User Manual
Page 12
Connecting Your TV ColorStream™ (Component Video) For the Best Picture Quality You will need: • one set of component video cables • one pair of standard audio cables Note: The ColorStream terminals can be used with progressive (480p) and interlaced (480i) scan systems. DVD player with component video Y PB PR ¡¿ AUDIO OUT L L R R COMPONENT VIDEO S-VIDEO VIDEO OUT OUT Amplifier To Boost Sound Quality You will need: one pair of standard audio cables Amplifier LINE IN L R 12
Connecting Your TV ColorStream™ (Component Video) For the Best Picture Quality You will need: • one set of component video cables • one pair of standard audio cables Note: The ColorStream terminals can be used with progressive (480p) and interlaced (480i) scan systems. DVD player with component video Y PB PR ¡¿ AUDIO OUT L L R R COMPONENT VIDEO S-VIDEO VIDEO OUT OUT Amplifier To Boost Sound Quality You will need: one pair of standard audio cables Amplifier LINE IN L R 12

User Manual
Page 13
Battery Usage Notes • It is approximately 16 feet at the LCD TV Remote Control Sensor. 2. Introduction Connecting Your TV Using the Remote Control Using the Remote Control Operating the Remote Control 1. The Remote Control range is dangerous to the... both batteries with incorrect polarity. Do not throw batteries into the battery compartment. Setting Up Your TV Using the TV's Features Appendix 13 Avoid placing obstructions between the Remote Control and TV. 30o 30o Remote Control Battery Installation 1. Batteries may cause explosions. 2. Do not puncture or ...
Battery Usage Notes • It is approximately 16 feet at the LCD TV Remote Control Sensor. 2. Introduction Connecting Your TV Using the Remote Control Using the Remote Control Operating the Remote Control 1. The Remote Control range is dangerous to the... both batteries with incorrect polarity. Do not throw batteries into the battery compartment. Setting Up Your TV Using the TV's Features Appendix 13 Avoid placing obstructions between the Remote Control and TV. 30o 30o Remote Control Battery Installation 1. Batteries may cause explosions. 2. Do not puncture or ...

User Manual
Page 14
... Cable selection 100, press 100,0,0; to select the channel you desire. The red (standby) or blue (power on) LED lights up. • When the TV is now ON. Press the power button again. the selected mode appears in standby mode, press the POWER button on the...Channels Use the number buttons on the Top Control Panel; POWER button Red LED Indicator (Standby) Blue LED Indicator (Power On) Changing between TV / AV Settings Press the TV/VIDEO button on the Remote Control to select Press CHS channel selection moves from Press CHS channel selection moves from channel 125, press...
... Cable selection 100, press 100,0,0; to select the channel you desire. The red (standby) or blue (power on) LED lights up. • When the TV is now ON. Press the power button again. the selected mode appears in standby mode, press the POWER button on the...Channels Use the number buttons on the Top Control Panel; POWER button Red LED Indicator (Standby) Blue LED Indicator (Power On) Changing between TV / AV Settings Press the TV/VIDEO button on the Remote Control to select Press CHS channel selection moves from Press CHS channel selection moves from channel 125, press...

User Manual
Page 15
... to select an option in memory to exit. CH S VOL- CH T Other Function Setting VOL + MENU Using the Remote Control Setting Up your TV Using the TV's Features Appendix 15 Press MENU to be recalled. [ 50] [ 100] [ 50] [ 3] [ 0] E F Note: The main menu ...display will auto- Press MENU and press VOL - Press VOL - Introduction Connecting Your TV Using the TV's Features Menu Display The icons on the top line of the screen stand for 7 seconds. [ 0] [ 0] [ 0] Picture Setting [CATV] [ OFF] [ OFF] [ ] Audio ...
... to select an option in memory to exit. CH S VOL- CH T Other Function Setting VOL + MENU Using the Remote Control Setting Up your TV Using the TV's Features Appendix 15 Press MENU to be recalled. [ 50] [ 100] [ 50] [ 3] [ 0] E F Note: The main menu ...display will auto- Press MENU and press VOL - Press VOL - Introduction Connecting Your TV Using the TV's Features Menu Display The icons on the top line of the screen stand for 7 seconds. [ 0] [ 0] [ 0] Picture Setting [CATV] [ OFF] [ OFF] [ ] Audio ...

User Manual
Page 16
You have three selections to choose from : DYNAMIC MILD THEATER USER There are specific to AV1, AV2, and TV modes. Press MENU and press VOL - or + to adjust. 3. BRIGHTNESS [ 50] MENU RETURN Note: All settings except BACKLIGHT are different setting parameters for DYNAMIC, MILD, ... to adjust the selected function. 4. Press VOL - VOL+ BRIGHTNESS darker brighter CONTRAST lower higher COLOR paler deeper SHARPNESS softer sharper TINT reddish greenish Using the TV's Features 16 You have finished adjusting your settings, press MENU to select . 2.
You have three selections to choose from : DYNAMIC MILD THEATER USER There are specific to AV1, AV2, and TV modes. Press MENU and press VOL - or + to adjust. 3. BRIGHTNESS [ 50] MENU RETURN Note: All settings except BACKLIGHT are different setting parameters for DYNAMIC, MILD, ... to adjust the selected function. 4. Press VOL - VOL+ BRIGHTNESS darker brighter CONTRAST lower higher COLOR paler deeper SHARPNESS softer sharper TINT reddish greenish Using the TV's Features 16 You have finished adjusting your settings, press MENU to select . 2.

User Manual
Page 17
... level. 4. or + to select TREBLE or BASS. 3. or + to select . 2. Press VOL - Press MENU and press VOL - or + to set to your TV Using the TV's Features Appendix 17 Press VOL - or + to select . 2. To adjust the setting of the speakers 1. Introduction Connecting Your... TV Using the Remote Control Audio Settings To adjust the balance of TREBLE or BASS 1. or + to exit. Press MENU to adjust the setting. 4. ...
... level. 4. or + to select TREBLE or BASS. 3. or + to select . 2. Press VOL - Press MENU and press VOL - or + to set to your TV Using the TV's Features Appendix 17 Press VOL - or + to select . 2. To adjust the setting of the speakers 1. Introduction Connecting Your... TV Using the Remote Control Audio Settings To adjust the balance of TREBLE or BASS 1. or + to exit. Press MENU to adjust the setting. 4. ...

User Manual
Page 18
... ON) 15 Note: Press CH S button from green/red to delete. Press VOL - or + to start this function. 4. Green (SKIP OFF) 15 Using the TV's Features 18 Press MENU and press VOL - or + to select OFF or ON. Press MENU and press VOL - or + to select . 2. or + to select...to view the programmed AUTO SCAN RED [ SKIP ] GREEN [ON AIR] channels. Deleting / Adding a Channel From your area and store them in the TV's memory. Notes: This delete/add channel action may also directly input the channel number you can automatically detect all active channels in your Remote Control...
... ON) 15 Note: Press CH S button from green/red to delete. Press VOL - or + to start this function. 4. Green (SKIP OFF) 15 Using the TV's Features 18 Press MENU and press VOL - or + to select OFF or ON. Press MENU and press VOL - or + to select . 2. or + to select...to view the programmed AUTO SCAN RED [ SKIP ] GREEN [ON AIR] channels. Deleting / Adding a Channel From your area and store them in the TV's memory. Notes: This delete/add channel action may also directly input the channel number you can automatically detect all active channels in your Remote Control...

User Manual
Page 19
...PARENTS STRONGLY CAUTIONED Some material may not be used for all ages. NO ONE 17 OR UNDER ADMITTED NO ONE UNDER 18 ADMITTED. Since a TV program may be suitable for children under 13. or + to change the CLOSED CAPTION setting. 4. Press VOL - The MPAA rating is equipped ... caption signal to change the MODE setting. 6. Press VOL - RESTRICTED Under 17 requires accompanying parent or guardian. X is independent of the TV programs. Press CLOSED CAPTION to select MODE or DATA or press MENU to exit. TEXT mode displays various types of information over the picture ...
...PARENTS STRONGLY CAUTIONED Some material may not be used for all ages. NO ONE 17 OR UNDER ADMITTED NO ONE UNDER 18 ADMITTED. Since a TV program may be suitable for children under 13. or + to change the CLOSED CAPTION setting. 4. Press VOL - The MPAA rating is equipped ... caption signal to change the MODE setting. 6. Press VOL - RESTRICTED Under 17 requires accompanying parent or guardian. X is independent of the TV programs. Press CLOSED CAPTION to select MODE or DATA or press MENU to exit. TEXT mode displays various types of information over the picture ...

User Manual
Page 20
... and press CH S or T to select . 2. Input desired 4 digit number using the number buttons. 4. or + to select V-CHIP BLOCK. [ ] 2. V-CHIP MPAA TV GUIDEL INES STATUS 5. Press VOL - Press and hold VOLUME + on the upper Control Panel, then press and hold CHANNEL on the... -+RETURN -+RETURN Changing or Clearing the Secret Number 1. NC-17 X 8. The message NEW SECRET NUMBER is 0000) using number buttons. TV RATINGS FV Fantasy Violence TV-Y (All children) Y TV-Y7 (Direct to PG PG-13 BLOCK, PG-13, R, NC-17, and X are R automatically blocked. Input the 4-digit secret number...
... and press CH S or T to select . 2. Input desired 4 digit number using the number buttons. 4. or + to select V-CHIP BLOCK. [ ] 2. V-CHIP MPAA TV GUIDEL INES STATUS 5. Press VOL - Press and hold VOLUME + on the upper Control Panel, then press and hold CHANNEL on the... -+RETURN -+RETURN Changing or Clearing the Secret Number 1. NC-17 X 8. The message NEW SECRET NUMBER is 0000) using number buttons. TV RATINGS FV Fantasy Violence TV-Y (All children) Y TV-Y7 (Direct to PG PG-13 BLOCK, PG-13, R, NC-17, and X are R automatically blocked. Input the 4-digit secret number...


