User Manual
Page 1
Model T609 Nature Sounds Stereo CD Dual Alarm Clock Radio with Digital Tuning For additional information, online registration, and exclusive special offers visit our website: www.timexaudio.com For questions or comments regarding this or other products, please call our toll-free number 1-800-888-4491. Para instruccionese en Espanol, llame al 1-800-888-4491.
Model T609 Nature Sounds Stereo CD Dual Alarm Clock Radio with Digital Tuning For additional information, online registration, and exclusive special offers visit our website: www.timexaudio.com For questions or comments regarding this or other products, please call our toll-free number 1-800-888-4491. Para instruccionese en Espanol, llame al 1-800-888-4491.

User Manual
Page 2
The lightning flash with arrowhead symbol, within the product's enclosure that may be of the cabinet. The symbols above are located at the bottom of sufficient magnitude to constitute a risk electric shock to wide slot. CAUTION: To prevent electric shock, match wide blade of important operating and maintenance (servicing) instructions in the literature accompanying the appliance...
The lightning flash with arrowhead symbol, within the product's enclosure that may be of the cabinet. The symbols above are located at the bottom of sufficient magnitude to constitute a risk electric shock to wide slot. CAUTION: To prevent electric shock, match wide blade of important operating and maintenance (servicing) instructions in the literature accompanying the appliance...
User Manual
Page 3
... ...7 Battery Backup Installation Battery Backup System Maintenance Controls and Indicators ...8 Clock Display ...9 Setting Clock Time ...10 Listening to Compact Discs...10-11 High Speed Musical Search Skip Tracks Repeat Play Random Play Program Play Listening to Radio and Nature Sounds ...12 Antenna Information Sleep to Radio or Nature Sound Turning Off the Alarm Snooze Operation ...15 Dimmer Switch ...15 Stereo Headphone Jack ...15 AUX-in/MP3 input Operation ...15 Troubleshooting ...16-17 Warranty Information ...18 2 Wake to CD or Buzzer Wake to Radio/Nature Sounds Alarm Operation ...13...
... ...7 Battery Backup Installation Battery Backup System Maintenance Controls and Indicators ...8 Clock Display ...9 Setting Clock Time ...10 Listening to Compact Discs...10-11 High Speed Musical Search Skip Tracks Repeat Play Random Play Program Play Listening to Radio and Nature Sounds ...12 Antenna Information Sleep to Radio or Nature Sound Turning Off the Alarm Snooze Operation ...15 Dimmer Switch ...15 Stereo Headphone Jack ...15 AUX-in/MP3 input Operation ...15 Troubleshooting ...16-17 Warranty Information ...18 2 Wake to CD or Buzzer Wake to Radio/Nature Sounds Alarm Operation ...13...
User Manual
Page 4
... in a built-in the instruction and service manual. 1. The unit should still fail to fit, contact your electrician to a power supply only of time. 3 If the plug should be connected to replace your personal safety. Please read all warnings on a bed, sofa, rug, or similar surface that produce heat. 4. Cleaning - Power Sources - Paying particular attention to cords at plugs, convenience receptacles, and...
... in a built-in the instruction and service manual. 1. The unit should still fail to fit, contact your electrician to a power supply only of time. 3 If the plug should be connected to replace your personal safety. Please read all warnings on a bed, sofa, rug, or similar surface that produce heat. 4. Cleaning - Power Sources - Paying particular attention to cords at plugs, convenience receptacles, and...
User Manual
Page 5
... product due to an external antenna. 15. Overloading - The power-supply cord or plug has been damaged. The unit does not appear to rain. The unit has been exposed to operate normally or exhibits a marked change in performance. 14. Antenna - When your unit is left unused for this can result in the user's operating instructions. A Consumer Guide to qualified service personnel. 16. Do not use...
... product due to an external antenna. 15. Overloading - The power-supply cord or plug has been damaged. The unit does not appear to rain. The unit has been exposed to operate normally or exhibits a marked change in performance. 14. Antenna - When your unit is left unused for this can result in the user's operating instructions. A Consumer Guide to qualified service personnel. 16. Do not use...
User Manual
Page 6
... part 15 of possible eye injury. Only a qualified person should , call SDI Technologies Inc., Timex Audio Products Division Customer Service, 1-800-888-4491 for assistance. Consult your system's internal components can try one or more of the FCC rules. A Consumer Guide to Product Safety FCC Information This device complies with the limits for Class B digital device as it is operating...
... part 15 of possible eye injury. Only a qualified person should , call SDI Technologies Inc., Timex Audio Products Division Customer Service, 1-800-888-4491 for assistance. Consult your system's internal components can try one or more of the FCC rules. A Consumer Guide to Product Safety FCC Information This device complies with the limits for Class B digital device as it is operating...
User Manual
Page 7
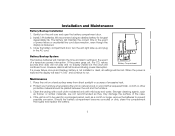
...: Backup battery should be returned for the first time. Place the unit on the back or bottom of excess dust, dirt, heat, water, moisture, vibration, and strong magnetic fields. 5. For backup operation, refer to Product Safety Set Up 1. The clock will start working when the AC cord is a good idea to save all packing materials from source of the cabinet. 6. Remove radio...
...: Backup battery should be returned for the first time. Place the unit on the back or bottom of excess dust, dirt, heat, water, moisture, vibration, and strong magnetic fields. 5. For backup operation, refer to Product Safety Set Up 1. The clock will start working when the AC cord is a good idea to save all packing materials from source of the cabinet. 6. Remove radio...
User Manual
Page 8
... accidental line cord disconnection, even though the display is not installed or dead, all settings will continues to prevent possible corrosion. Stronger cleaning agents, such as thinner or similar materials, are not recommended as a month or longer, remove the batteries to run . If the power goes out, the CD, nature sounds and radio will not play and no display visible but the clock...
... accidental line cord disconnection, even though the display is not installed or dead, all settings will continues to prevent possible corrosion. Stronger cleaning agents, such as thinner or similar materials, are not recommended as a month or longer, remove the batteries to run . If the power goes out, the CD, nature sounds and radio will not play and no display visible but the clock...
User Manual
Page 9
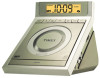
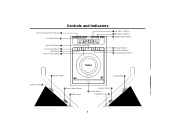
...MODE PROG. µ Program Button ¸ Play Mode Button ¹ Forward/Minute Button Dimmer switch ƿ ƹ Volume Wheel SNOOZE OPEN Tuning Wheel ƾ ƺ Sound Select Switch ƻ MP3 In Jack Function Switch ƽ Ƹ Snooze Button Headphone Jack Ƽ 8 HOUR MIN. Power Off/Alarm Reset Button ᕡ On/ Sleep Button ᕢ Controls and Indicators POWER OFF ALARM RESET ON / SLEEP ALARM 1 ALARM 2 DISPLAY ᕧ Set Alarm 1 Button ᕨ Set Alarm 2 Button ᕩ Toggle Display Button Play/Pause Button ᕣ Clock Adjust Button ᕤ Stop Button...
...MODE PROG. µ Program Button ¸ Play Mode Button ¹ Forward/Minute Button Dimmer switch ƿ ƹ Volume Wheel SNOOZE OPEN Tuning Wheel ƾ ƺ Sound Select Switch ƻ MP3 In Jack Function Switch ƽ Ƹ Snooze Button Headphone Jack Ƽ 8 HOUR MIN. Power Off/Alarm Reset Button ᕡ On/ Sleep Button ᕢ Controls and Indicators POWER OFF ALARM RESET ON / SLEEP ALARM 1 ALARM 2 DISPLAY ᕧ Set Alarm 1 Button ᕨ Set Alarm 2 Button ᕩ Toggle Display Button Play/Pause Button ᕣ Clock Adjust Button ᕤ Stop Button...
User Manual
Page 11
... hold the ¹ Forward/Minute or ᕦ Reverse/Hour Button to search for specific musical passages. Press the ¹ Forward/Minute Button and ᕦ Reverse/Hour Button until the display flashes. 2. Setting The Clock Time 1. Watch the PM Indicator icon at the lower left of the display to Compact Discs 1. Listening to set the correct AM or PM. 3. During play . 4. When you find the passage you wish...
... hold the ¹ Forward/Minute or ᕦ Reverse/Hour Button to search for specific musical passages. Press the ¹ Forward/Minute Button and ᕦ Reverse/Hour Button until the display flashes. 2. Setting The Clock Time 1. Watch the PM Indicator icon at the lower left of the display to Compact Discs 1. Listening to set the correct AM or PM. 3. During play . 4. When you find the passage you wish...

User Manual
Page 12
... display will repeat continuously until the Repeat display disappears. Display will play in random order. The Repeat indicator will stop flashing, indicting Repeat All mode, and the entire disc will repeat continuously until cancelled. • To turn off/cancel Repeat or Repeat All modes, press the ¸ Play Mode Button until cancelled. • Press the ¸ Play Mode Button twice for Repeat mode. The Repeat Indicator located on . You can program up to enter Program Play mode. 2. Notes: • To play...
... display will repeat continuously until the Repeat display disappears. Display will play in random order. The Repeat indicator will stop flashing, indicting Repeat All mode, and the entire disc will repeat continuously until cancelled. • To turn off/cancel Repeat or Repeat All modes, press the ¸ Play Mode Button until cancelled. • Press the ¸ Play Mode Button twice for Repeat mode. The Repeat Indicator located on . You can program up to enter Program Play mode. 2. Notes: • To play...
User Manual
Page 13
... time. Rotate the ƹ Volume Wheel to adjust the volume to Radio/Nature Sounds 1. The AM bar antenna is turning on the display and the Sleep indicator will enter Sleep mode. Note: If you press the ᕢ On/Sleep Button more than 90 minutes, continuously press ᕢ On/Sleep Button until you find the station you find its strongest signal. Sleep to a comfortable level. 5. The sleep timer will change back to Radio and Nature Sounds Antenna...
... time. Rotate the ƹ Volume Wheel to adjust the volume to Radio/Nature Sounds 1. The AM bar antenna is turning on the display and the Sleep indicator will enter Sleep mode. Note: If you press the ᕢ On/Sleep Button more than 90 minutes, continuously press ᕢ On/Sleep Button until you find the station you find its strongest signal. Sleep to a comfortable level. 5. The sleep timer will change back to Radio and Nature Sounds Antenna...
User Manual
Page 14
.../Hour Button to set the correct AM or PM time. 3. Wake to Radio or Nature Sound 1. Press and hold the ᕨ Alarm-2 Button until the display flashes and the Alarm-1 icon appears in the CD player. 5. Note: The CD alarm will have a few seconds to begin setting the alarm before the display reverts to the standard setting. 2. Remember to set the alarm time. Alarm Operation Important! • To wake to the CD Player or Buzzer you have programmed...
.../Hour Button to set the correct AM or PM time. 3. Wake to Radio or Nature Sound 1. Press and hold the ᕨ Alarm-2 Button until the display flashes and the Alarm-1 icon appears in the CD player. 5. Note: The CD alarm will have a few seconds to begin setting the alarm before the display reverts to the standard setting. 2. Remember to set the alarm time. Alarm Operation Important! • To wake to the CD Player or Buzzer you have programmed...

User Manual
Page 15
... your Alarm2 wake up sound settings. The alarm will repeat every 24 hours unless the controls are changed. 14 Alarm Operation 3. Use the ƽ Function Switch, ƾ Tuning Thumbwheel and ƹ Volume Thumbwheel to select your Radio or Nature Sound settings, press the ᕨ Alarm-2 Button or wait a few seconds to return to the Radio section of this manual. 4. To disarm the alarm, press the ᕨ Alarm 2 Button once. This cycle will be automatically reset for...
... your Alarm2 wake up sound settings. The alarm will repeat every 24 hours unless the controls are changed. 14 Alarm Operation 3. Use the ƽ Function Switch, ƾ Tuning Thumbwheel and ƹ Volume Thumbwheel to select your Radio or Nature Sound settings, press the ᕨ Alarm-2 Button or wait a few seconds to return to the Radio section of this manual. 4. To disarm the alarm, press the ᕨ Alarm 2 Button once. This cycle will be automatically reset for...
User Manual
Page 16
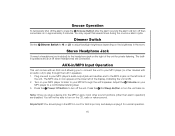
... shut off when headphones are disabled. Plug one -hour alarm cycle. Dimmer Switch Set the ƿ Dimmer Switch to HI or LO to the MP3-in jack on the left of the display, indicating the unit is ON. 2. Important! Adjust the ƹ Volume on your MP3 player to turn off then come back on the brightness in jack, most other sound functions (other than alarm operation) are connected. You may repeat this several times...
... shut off when headphones are disabled. Plug one -hour alarm cycle. Dimmer Switch Set the ƿ Dimmer Switch to HI or LO to the MP3-in jack on the left of the display, indicating the unit is ON. 2. Important! Adjust the ƹ Volume on your MP3 player to turn off then come back on the brightness in jack, most other sound functions (other than alarm operation) are connected. You may repeat this several times...
User Manual
Page 17
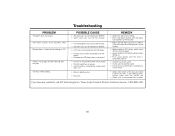
Timex Audio Products Division Customer Service, 1-800-888-4491 16 Troubleshooting PROBLEM The alarm does not sound The alarm sounds at an incorrect time Buzzer alarm is heard when waking to CD There is no display and the CD/radio will not play CD skips while playing POSSIBLE CAUSE • The alarm was not set correctly for AM/PM • Alarm icons are not on the display • The wrong alarm icon was on the...
Timex Audio Products Division Customer Service, 1-800-888-4491 16 Troubleshooting PROBLEM The alarm does not sound The alarm sounds at an incorrect time Buzzer alarm is heard when waking to CD There is no display and the CD/radio will not play CD skips while playing POSSIBLE CAUSE • The alarm was not set correctly for AM/PM • Alarm icons are not on the display • The wrong alarm icon was on the...

User Manual
Page 18
... station • Main volume has been turned all the way down • Headphones are connected to Headphone Jack REMEDY • Try adjusting the direction of the FM wire antenna • Rotate the unit to try and gain better reception • Raise the volume with the volume dial • Disconnect the headphones Unit shuts off unexpectedly Cannot set the clock or alarm time • Unit was in the Sleep Mode instead of Power...
... station • Main volume has been turned all the way down • Headphones are connected to Headphone Jack REMEDY • Try adjusting the direction of the FM wire antenna • Rotate the unit to try and gain better reception • Raise the volume with the volume dial • Disconnect the headphones Unit shuts off unexpectedly Cannot set the clock or alarm time • Unit was in the Sleep Mode instead of Power...
User Manual
Page 19
... prepaid and insured, to the Factory Service Center listed below . Any applicable implied warranties are the most common cause of problems encountered. Limited 90-Day Warranty Information Timex Audio Products, a division of SDI Technologies Inc. (hereafter referred to as exhausted or defective batteries are also limited to 90 days, and SDI Technologies will repair or, at its return to...
... prepaid and insured, to the Factory Service Center listed below . Any applicable implied warranties are the most common cause of problems encountered. Limited 90-Day Warranty Information Timex Audio Products, a division of SDI Technologies Inc. (hereafter referred to as exhausted or defective batteries are also limited to 90 days, and SDI Technologies will repair or, at its return to...


