
User Guide
Page 1
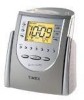
Model T309 Alarm Clock Radio with Digital Tuning and Nature Sounds For additional information, online registration, and exclusive special offers please visit our website: www.sdidirect.com
Model T309 Alarm Clock Radio with Digital Tuning and Nature Sounds For additional information, online registration, and exclusive special offers please visit our website: www.sdidirect.com
User Guide
Page 2
... located at the bottom of important operating and maintenance (servicing) instructions in an equilateral triangle is intended to alert the user of the presence of uninsulated "dangerous voltage" within an equilateral triangle is subject to alert the user of the presence of the cabinet. This device complies with an extension cord receptacle or other outlets unless the...
... located at the bottom of important operating and maintenance (servicing) instructions in an equilateral triangle is intended to alert the user of the presence of uninsulated "dangerous voltage" within an equilateral triangle is subject to alert the user of the presence of the cabinet. This device complies with an extension cord receptacle or other outlets unless the...

User Guide
Page 3
..., the power cord should be serviced by the product manufacturer. 10. C. Periods of this manual for an extended period of all safety and operating instructions carefully before installation and use attachments not recommended by qualified service personnel when: A. For questions or comments regarding this plug will prevent damage to the product due to replace your electrician to lightning and power-line surges. 11. Power-Cord Protection - Please...
..., the power cord should be serviced by the product manufacturer. 10. C. Periods of this manual for an extended period of all safety and operating instructions carefully before installation and use attachments not recommended by qualified service personnel when: A. For questions or comments regarding this plug will prevent damage to the product due to replace your electrician to lightning and power-line surges. 11. Power-Cord Protection - Please...
User Guide
Page 4
... corroded or dirty, clean the compartment thoroughly and replace the batteries. 4 When power has been restored, the clock will cease using the battery power, and will maintain the clock and alarm settings for service. After installing the batteries (see below , to be placed between the unit and the furniture. 3. Remove the unit and all set time (note: while operating on a level surface away from the carton...
... corroded or dirty, clean the compartment thoroughly and replace the batteries. 4 When power has been restored, the clock will cease using the battery power, and will maintain the clock and alarm settings for service. After installing the batteries (see below , to be placed between the unit and the furniture. 3. Remove the unit and all set time (note: while operating on a level surface away from the carton...
User Guide
Page 5
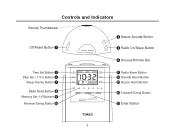
Controls and Indicators Volume Thumbwheel Off/Reset Button ³ OFF/RESET SNOOZE / DIMMER SOUNDS RADIO ON/SLEEP · Nature Sounds Button » Radio On/Sleep Button ¿ Snooze/Dimmer Bar Time Set Button ´ Date Set / 7-5-2 Button ² Sleep Volume Button ¶ Radio Band Button º Memory Set 1-6 Buttons ¾ Reverse/Tuning Button µ >> TIME BUZZER EVERYDAY RADIO MON-FRI SOUNDS SAT-SUN RADIO DATE/7-5-2 SOUNDS SLEEP VOL BAND SLEEP DATE YEAR 1 2 3 AM FM1 FM2 BUZZER 4 5 6 ENTER >> ¸ Radio Alarm Button ¹ Sounds Alarm Button Ƹ ...
Controls and Indicators Volume Thumbwheel Off/Reset Button ³ OFF/RESET SNOOZE / DIMMER SOUNDS RADIO ON/SLEEP · Nature Sounds Button » Radio On/Sleep Button ¿ Snooze/Dimmer Bar Time Set Button ´ Date Set / 7-5-2 Button ² Sleep Volume Button ¶ Radio Band Button º Memory Set 1-6 Buttons ¾ Reverse/Tuning Button µ >> TIME BUZZER EVERYDAY RADIO MON-FRI SOUNDS SAT-SUN RADIO DATE/7-5-2 SOUNDS SLEEP VOL BAND SLEEP DATE YEAR 1 2 3 AM FM1 FM2 BUZZER 4 5 6 ENTER >> ¸ Radio Alarm Button ¹ Sounds Alarm Button Ƹ ...
User Guide
Page 6
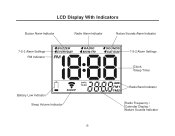
LCD Display With Indicators Buzzer Alarm Indicator Radio Alarm Indicator Nature Sounds Alarm Indicator 7-5-2 Alarm Settings PM Indicator BUZZER EVERYDAY RADIO MON-FRI SOUNDS SAT-SUN 7-5-2 Alarm Settings Clock Sleep Timer Battery Low Indicator SLEEP DATE YEAR Sleep Volume Indicator AM FM1 FM2 Radio Band Indicator Radio Frequency / Calendar Display / Nature Sounds Indicator 6
LCD Display With Indicators Buzzer Alarm Indicator Radio Alarm Indicator Nature Sounds Alarm Indicator 7-5-2 Alarm Settings PM Indicator BUZZER EVERYDAY RADIO MON-FRI SOUNDS SAT-SUN 7-5-2 Alarm Settings Clock Sleep Timer Battery Low Indicator SLEEP DATE YEAR Sleep Volume Indicator AM FM1 FM2 Radio Band Indicator Radio Frequency / Calendar Display / Nature Sounds Indicator 6

User Guide
Page 7
...; Date Set/7-5-2 Button until the desired brightness is important to set the time. Setting the Calendar 1. Press the µ Reverse or ƹ Forward Button to the normal display mode. The unit will beep and the display will advance or reverse the time rapidly. Holding a button for the unit to beep twice and the display to return to use the 7-5-2 Alarm settings. Adjusting the Display Backlight • This alarm clock radio features an adjustable display backlight, with...
...; Date Set/7-5-2 Button until the desired brightness is important to set the time. Setting the Calendar 1. Press the µ Reverse or ƹ Forward Button to the normal display mode. The unit will beep and the display will advance or reverse the time rapidly. Holding a button for the unit to beep twice and the display to return to use the 7-5-2 Alarm settings. Adjusting the Display Backlight • This alarm clock radio features an adjustable display backlight, with...
User Guide
Page 8
... sleep mode, with Timer for instructions on programming these settings. 5. Press and hold a button for about this feature. 2. Press the ³ Off/Reset Button to . The bottom of the display will show the word "On" before the radio was switched off . Antenna Information and Adjustment FM - Adjust the volume using the Volume Thumbwheel, located on a timer. The AM bar antenna is turned on the radio. Tune to the first station you find a station...
... sleep mode, with Timer for instructions on programming these settings. 5. Press and hold a button for about this feature. 2. Press the ³ Off/Reset Button to . The bottom of the display will show the word "On" before the radio was switched off . Antenna Information and Adjustment FM - Adjust the volume using the Volume Thumbwheel, located on a timer. The AM bar antenna is turned on the radio. Tune to the first station you find a station...

User Guide
Page 9
... · Nature Sounds Button once. When the display shows the desired sleep time, stop pressing the button. The Sleep Volume Indicator will show the current sleep volume level. To turn off the radio before the sleep time has elapsed, press the ³ Off/Reset Button. Select a radio station using the º AM/FM Band Button and either the ¾ Memory Set 1-6 Buttons or the µ Reverse / ƹ Forward Tuning Buttons. 4 . Sleeping to Radio or Nature Sounds with Timer Sleeping to the Radio with Timer 1.
... · Nature Sounds Button once. When the display shows the desired sleep time, stop pressing the button. The Sleep Volume Indicator will show the current sleep volume level. To turn off the radio before the sleep time has elapsed, press the ³ Off/Reset Button. Select a radio station using the º AM/FM Band Button and either the ¾ Memory Set 1-6 Buttons or the µ Reverse / ƹ Forward Tuning Buttons. 4 . Sleeping to Radio or Nature Sounds with Timer Sleeping to the Radio with Timer 1.
User Guide
Page 10
... set the alarm time. 3. Before setting the alarm, be sure that can be set the date, as shown in the Setting the AM/FM Radio Alarm section for instructions on programming radio stations into memory, see the Programming Radio Station Settings section of the display. 5. Setting the Nature Sounds Alarm 1. Use the º AM/FM Band Button or the ¾ Memory Set 1-6 Buttons to select a radio station to wake up to set the alarm time. 3. In addition, each alarm utilizes a 7-5-2 Advance Alarm setting that you have programmed the radio alarm...
... set the alarm time. 3. Before setting the alarm, be sure that can be set the date, as shown in the Setting the AM/FM Radio Alarm section for instructions on programming radio stations into memory, see the Programming Radio Station Settings section of the display. 5. Setting the Nature Sounds Alarm 1. Use the º AM/FM Band Button or the ¾ Memory Set 1-6 Buttons to select a radio station to wake up to set the alarm time. 3. In addition, each alarm utilizes a 7-5-2 Advance Alarm setting that you have programmed the radio alarm...
User Guide
Page 11
... three alarm settings, press one -hour snooze cycle. 11 To activate the snooze feature, press the ¿ Snooze/Dimmer Bar when the alarm sounds. After you have programmed the buzzer alarm, press the ƺ Enter Button or wait ten seconds to return to the clock display. As long as an indicator appears on the display. Turning Off the Alarms 1. If the ³ Off/Reset Button is set the alarm time. 3. To turn off for instructions...
... three alarm settings, press one -hour snooze cycle. 11 To activate the snooze feature, press the ¿ Snooze/Dimmer Bar when the alarm sounds. After you have programmed the buzzer alarm, press the ƺ Enter Button or wait ten seconds to return to the clock display. As long as an indicator appears on the display. Turning Off the Alarms 1. If the ³ Off/Reset Button is set the alarm time. 3. To turn off for instructions...
User Guide
Page 12
... other proof of the date of purchase, if within the warranty period. 3. Limited 90-Day Warranty Information Timex Audio Products, a division of SDI Technologies Inc. (hereafter referred to as exhausted or defective batteries are also limited to 90 days, and SDI Technologies will repair or, at its return to you.) This warranty gives you specific legal rights, and you...
... other proof of the date of purchase, if within the warranty period. 3. Limited 90-Day Warranty Information Timex Audio Products, a division of SDI Technologies Inc. (hereafter referred to as exhausted or defective batteries are also limited to 90 days, and SDI Technologies will repair or, at its return to you.) This warranty gives you specific legal rights, and you...


