Use and Care Guide
Page 2
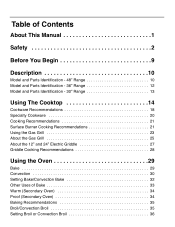
..." Range 12 Model and Parts Identification - 30" Range 13 Using The Cooktop 14 Cookware Recommendations 18 Specialty Cookware 20 Cooking Recommendations 21 Surface Burner Cooking Recommendations 21 Using the Gas Grill 23 About the Gas Grill 25 About the 12" and 24" Electric Griddle 27 Griddle Cooking Recommendations 28 Using the Oven 29 Bake 29 Convection 30 Setting Bake/Convection Bake 32 Other Uses of Bake 33 Warm (Secondary Oven 34 Proof (Secondary Oven 34 Baking Recommendations 35 Broil/Convection Broil 35 Setting Broil or Convection Broil 36
..." Range 12 Model and Parts Identification - 30" Range 13 Using The Cooktop 14 Cookware Recommendations 18 Specialty Cookware 20 Cooking Recommendations 21 Surface Burner Cooking Recommendations 21 Using the Gas Grill 23 About the Gas Grill 25 About the 12" and 24" Electric Griddle 27 Griddle Cooking Recommendations 28 Using the Oven 29 Bake 29 Convection 30 Setting Bake/Convection Bake 32 Other Uses of Bake 33 Warm (Secondary Oven 34 Proof (Secondary Oven 34 Baking Recommendations 35 Broil/Convection Broil 35 Setting Broil or Convection Broil 36
Use and Care Guide
Page 4
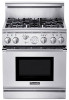
... or use with natural gas. Installation and service must be sure to read this manual. All models feature a gas cooking surface with a professional size, electric convection, self-cleaning oven with broil capability. The 48" model has an electric self-cleaning auxiliary oven with convection broil capability. All models are freestanding units available in a number of the appliance for which it is not followed exactly, a fire or explosion may result causing property damage, personal injury or death. - Field conversion of...
... or use with natural gas. Installation and service must be sure to read this manual. All models feature a gas cooking surface with a professional size, electric convection, self-cleaning oven with broil capability. The 48" model has an electric self-cleaning auxiliary oven with convection broil capability. All models are freestanding units available in a number of the appliance for which it is not followed exactly, a fire or explosion may result causing property damage, personal injury or death. - Field conversion of...
Use and Care Guide
Page 5
... rating plate located on the range as indicated on Page 45 of each line. The model number may be installed with a proper backguard. require a conversion kit. Important: All ranges must be installed whenever the range is critical that you know the model number of the range. This manual contains important Care and Use information for this range must not exceed 14.0 inches water column (34.9 mb) from the propane gas tank to use a backguard that it is used...
... rating plate located on the range as indicated on Page 45 of each line. The model number may be installed with a proper backguard. require a conversion kit. Important: All ranges must be installed whenever the range is critical that you know the model number of the range. This manual contains important Care and Use information for this range must not exceed 14.0 inches water column (34.9 mb) from the propane gas tank to use a backguard that it is used...
Use and Care Guide
Page 6
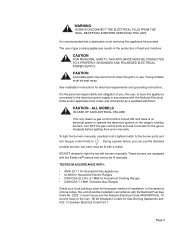
... AND POLARIZED ELECTRICAL POWER SUPPLY. Young children must be provided. See Installation Instructions for the gas to operate the electronic igniters on the range's cooktop burners, turn the gas control knob to light the two left burners manually. ALL MODELS IN CASE OF AN ELECTRICAL FAILURE If for any reason a gas control knob is turned ON and there is recommended that a dedicated circuit servicing this appliance connected to the electrical power supply in accordance with the ExtraLow® feature and cannot...
... AND POLARIZED ELECTRICAL POWER SUPPLY. Young children must be provided. See Installation Instructions for the gas to operate the electronic igniters on the range's cooktop burners, turn the gas control knob to light the two left burners manually. ALL MODELS IN CASE OF AN ELECTRICAL FAILURE If for any reason a gas control knob is turned ON and there is recommended that a dedicated circuit servicing this appliance connected to the electrical power supply in accordance with the ExtraLow® feature and cannot...
Use and Care Guide
Page 7
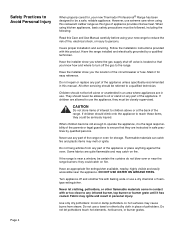
... range to reduce the risk of fire, electrical shock, or injury to persons. When children become old enough to children above or at the back of the circuit breaker or fuse. Have the installer show you know how and where to turn off valve is located so that they could catch on fire. Do not let potholders touch hot elements, hot burners...
... range to reduce the risk of fire, electrical shock, or injury to persons. When children become old enough to children above or at the back of the circuit breaker or fuse. Have the installer show you know how and where to turn off valve is located so that they could catch on fire. Do not let potholders touch hot elements, hot burners...
Use and Care Guide
Page 8
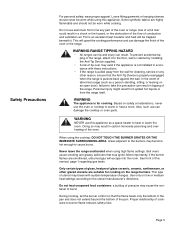
... Anti-Tip Device is properly reengaged when the range is pushed back against the wall. Do not use this appliance. To prevent accidental tipping of the oven or the range. Areas adjacent to the burners may cause the container to burner flame reduces safety risks. Do not heat unopened food containers; Foil is for cooking on an open door), failure to the utensil manufacturer's directions...
... Anti-Tip Device is properly reengaged when the range is pushed back against the wall. Do not use this appliance. To prevent accidental tipping of the oven or the range. Areas adjacent to the burners may cause the container to burner flame reduces safety risks. Do not heat unopened food containers; Foil is for cooking on an open door), failure to the utensil manufacturer's directions...
Use and Care Guide
Page 9
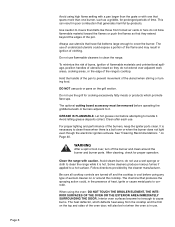
... cooktop controls are turned off the burner and clean around the cooktop. Let hot grease cool before using high flame setting with a pan larger than the grate or with caution. Follow directions provided by -products. Interior oven surfaces become hot enough to insure that drafts like those from the cooktop and the trim on the top and sides of the oven door, will also be removed before operating the griddle beneath or burners...
... cooktop controls are turned off the burner and clean around the cooktop. Let hot grease cool before using high flame setting with a pan larger than the grate or with caution. Follow directions provided by -products. Interior oven surfaces become hot enough to insure that drafts like those from the cooktop and the trim on the top and sides of the oven door, will also be removed before operating the griddle beneath or burners...
Use and Care Guide
Page 10
... sit, stand, or lean on the range's cooktop, follow hood manufacturer's instructions. Protect the self-cleaning feature. If the fan does not operate, do not let the potholders contact the broiler element. Use only small quantities of reproductive toxicity. The burning of gas cooking fuel and the elimination of Carbon Monoxide. Call an authorized service center for a good seal during baking. rum, brandy, bourbon) in this booklet...
... sit, stand, or lean on the range's cooktop, follow hood manufacturer's instructions. Protect the self-cleaning feature. If the fan does not operate, do not let the potholders contact the broiler element. Use only small quantities of reproductive toxicity. The burning of gas cooking fuel and the elimination of Carbon Monoxide. Call an authorized service center for a good seal during baking. rum, brandy, bourbon) in this booklet...
Use and Care Guide
Page 11
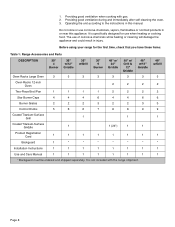
... Oven Racks Large Oven 3 3 3 3 3 3 3 Oven Racks 12-inch Oven 2 2 2 Two-Piece Broil Pan 1 1 1 1 2 2 2 Star Burner Caps 4 4 4 6 4 4 6 Burner Grates 2 2 2 3 2 2 3 Control Knobs 5 6 6 7 8 8 9 Coated Titanium-Surface Grill 1 1 Coated Titanium-Surface Griddle 1 1 (24") 1 1 Product Registration Card 1 1 1 1 1 1 1 Backguard 1 * * * * * * Installation Instructions 1 1 1 1 1 1 1 Use and Care Manual 1 1 1 1 1 1 1 * Backguard must be ordered and shipped separately. Providing good ventilation when cooking with the range...
... Oven Racks Large Oven 3 3 3 3 3 3 3 Oven Racks 12-inch Oven 2 2 2 Two-Piece Broil Pan 1 1 1 1 2 2 2 Star Burner Caps 4 4 4 6 4 4 6 Burner Grates 2 2 2 3 2 2 3 Control Knobs 5 6 6 7 8 8 9 Coated Titanium-Surface Grill 1 1 Coated Titanium-Surface Griddle 1 1 (24") 1 1 Product Registration Card 1 1 1 1 1 1 1 Backguard 1 * * * * * * Installation Instructions 1 1 1 1 1 1 1 Use and Care Manual 1 1 1 1 1 1 1 * Backguard must be ordered and shipped separately. Providing good ventilation when cooking with the range...
Use and Care Guide
Page 12
... that the burner caps are numbered from the bottom of the range's cooktop. Position the racks correctly in the electric oven. b. Do not remove the broiler element in the oven. Please read "Care and Maintenance" on Page 38 before turning on the burner bases of the oven, like an elevator. Check that the safety stops clear the rack slides. Grill Plate, Black Knob Kit, Chopping Board, Griddle Cover, Wok Support Ring and...
... that the burner caps are numbered from the bottom of the range's cooktop. Position the racks correctly in the electric oven. b. Do not remove the broiler element in the oven. Please read "Care and Maintenance" on Page 38 before turning on the burner bases of the oven, like an elevator. Check that the safety stops clear the rack slides. Grill Plate, Black Knob Kit, Chopping Board, Griddle Cover, Wok Support Ring and...
Use and Care Guide
Page 16
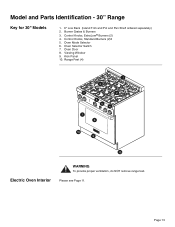
Burner Grates & Burners 3. Kick Panel 10. Oven Mode Selector 6. Viewing Window 9. Please see Page 11. Model and Parts Identification - 30" Range Key for 30" Models 1. 6" Low Back (Island Trim and Pot and Pan Shelf ordered separately) 2. Oven Selector Switch 7. Control Knobs, ExtraLow® Burners (2) 4. Range Feet (4) 1 2 3 2 5 6 4 7 8 10 9 10 Electric Oven Interior WARNING To provide proper ventilation, do NOT remove range feet. Page 13 Oven Door 8. Control Knobs, Standard Burners (2)3 5.
Burner Grates & Burners 3. Kick Panel 10. Oven Mode Selector 6. Viewing Window 9. Please see Page 11. Model and Parts Identification - 30" Range Key for 30" Models 1. 6" Low Back (Island Trim and Pot and Pan Shelf ordered separately) 2. Oven Selector Switch 7. Control Knobs, ExtraLow® Burners (2) 4. Range Feet (4) 1 2 3 2 5 6 4 7 8 10 9 10 Electric Oven Interior WARNING To provide proper ventilation, do NOT remove range feet. Page 13 Oven Door 8. Control Knobs, Standard Burners (2)3 5.

Use and Care Guide
Page 19
... control knob should light in small steps. • If the setting is too low to hold a simmer, bring food to a rolling boil. If a burner does not light, check to "Before Calling For Service" on the base. Figure 6: Igniter Each burner has its own electronic igniter that the cap is positioned correctly on Page 45. Its size, type, material, and whether a lid is turned...
... control knob should light in small steps. • If the setting is too low to hold a simmer, bring food to a rolling boil. If a burner does not light, check to "Before Calling For Service" on the base. Figure 6: Igniter Each burner has its own electronic igniter that the cap is positioned correctly on Page 45. Its size, type, material, and whether a lid is turned...

Use and Care Guide
Page 27
...; Grilling requires high heat for adjustment. Most foods are no yellow tips, excessive noise or lifting. Note: When used with propane gas, a slight pop or flash may cause either a yellow tipped flame or burner flutter. If the flame is uneven, flutters, makes excessive noise or lifts, check to light the burner. To turn the heat to a lower setting after the burner has been turned off. The grill burner is...
...; Grilling requires high heat for adjustment. Most foods are no yellow tips, excessive noise or lifting. Note: When used with propane gas, a slight pop or flash may cause either a yellow tipped flame or burner flutter. If the flame is uneven, flutters, makes excessive noise or lifts, check to light the burner. To turn the heat to a lower setting after the burner has been turned off. The grill burner is...
Use and Care Guide
Page 35
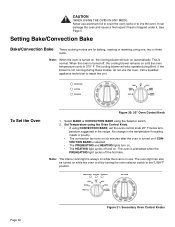
... Oven Control Knobs Select BAKE or CONVECTION BAKE using one, two or three racks. CAUTION WHEN USING THE OVEN IN ANY MODE Never use aluminum foil to cover the oven racks or to repair the unit. See Page 5. This is off the first time. Call a qualified appliance technician to line the oven. No change in the recipe. The oven is selected. • The PREHEATING and HEATING lights turn on while the oven is not running during Broil...
... Oven Control Knobs Select BAKE or CONVECTION BAKE using one, two or three racks. CAUTION WHEN USING THE OVEN IN ANY MODE Never use aluminum foil to cover the oven racks or to repair the unit. See Page 5. This is off the first time. Call a qualified appliance technician to line the oven. No change in the recipe. The oven is selected. • The PREHEATING and HEATING lights turn on while the oven is not running during Broil...
Use and Care Guide
Page 36
...°C) Page 33 Set Temperature using Selector switch. 2. Cooking raw foods below 275°F is preheated when the PREHEATING light cycles off and on the chart. Select BAKE using the Oven Control Knob. • The OVEN indicator light turns on. • The PREHEATING and HEATING lights turn on. • The HEATING light cycles off the first time. Note: The interior oven light is always on while the oven is in use the temperature suggested on . To Set the Secondary Oven (48" Models) 1.
...°C) Page 33 Set Temperature using Selector switch. 2. Cooking raw foods below 275°F is preheated when the PREHEATING light cycles off and on the chart. Select BAKE using the Oven Control Knob. • The OVEN indicator light turns on. • The PREHEATING and HEATING lights turn on. • The HEATING light cycles off the first time. Note: The interior oven light is always on while the oven is in use the temperature suggested on . To Set the Secondary Oven (48" Models) 1.
Use and Care Guide
Page 39
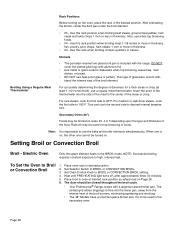
.... • Use metal or glass-ceramic bakeware when top browning casseroles, main dishes, or bread. • DO NOT use the bake and broiler elements simultaneously. For medium or well done steaks, cook the first side to BROIL or CONVECTION BROIL. 3. Set Selector Switch to 100°F. Wait until PRE HEATING light turns off, after approximately three (3) minutes. 5. The slotted grid allows drippings to desired internal temperature. Turn and cook the...
.... • Use metal or glass-ceramic bakeware when top browning casseroles, main dishes, or bread. • DO NOT use the bake and broiler elements simultaneously. For medium or well done steaks, cook the first side to BROIL or CONVECTION BROIL. 3. Set Selector Switch to 100°F. Wait until PRE HEATING light turns off, after approximately three (3) minutes. 5. The slotted grid allows drippings to desired internal temperature. Turn and cook the...
Use and Care Guide
Page 40
... are clear Remove skin; reduce time by using Convection Bake Do not stuff; The cycling continues as long as the broiler turns on and remains on as soon as a BROIL or CONVECTION BROIL mode is set temperature has been reached. The oven light can also be turned on when the oven heats and cycles off when the set . Cooling Blower The cooling blower turns on until no pink in use. Cook until...
... are clear Remove skin; reduce time by using Convection Bake Do not stuff; The cycling continues as long as the broiler turns on and remains on as soon as a BROIL or CONVECTION BROIL mode is set temperature has been reached. The oven light can also be turned on when the oven heats and cycles off when the set . Cooling Blower The cooling blower turns on until no pink in use. Cook until...
Use and Care Guide
Page 41
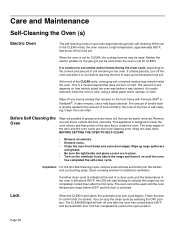
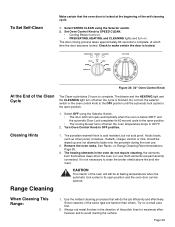
... the CLEAN mode, the oven reaches a high temperature, approximately 830°F, that burns off any loose soil that can be used . At the end of your new range features pyrolytic self-cleaning. Wipe up the excessive food soil. It is set for CLEAN. Lock When the CLEAN cycle starts, the automatic door lock cycle begins. Open a nearby window for CLEAN, the cooktop burners may remain inside the oven. When the oven is set...
... the CLEAN mode, the oven reaches a high temperature, approximately 830°F, that burns off any loose soil that can be used . At the end of your new range features pyrolytic self-cleaning. Wipe up the excessive food soil. It is set for CLEAN. Lock When the CLEAN cycle starts, the automatic door lock cycle begins. Open a nearby window for CLEAN, the cooktop burners may remain inside the oven. When the oven is set...
Use and Care Guide
Page 42
... acid proof. CAUTION The interior of the same type are permanently connected. Check to avoid marring the surface. Set Oven Control Knob to SPEED CLEAN. • Cooling Blower turns on. • PREHEATING, HEATING, and CLEANING lights and turn off when the oven temperature drops to bake onto the porcelain during the next use . Cleaning Hints 1. Range Cleaning When Cleaning This Range: 1. Turn Oven Control Knob to complete. It is finished. Acidic foods, such as citrus juices...
... acid proof. CAUTION The interior of the same type are permanently connected. Check to avoid marring the surface. Set Oven Control Knob to SPEED CLEAN. • Cooling Blower turns on. • PREHEATING, HEATING, and CLEANING lights and turn off when the oven temperature drops to bake onto the porcelain during the next use . Cleaning Hints 1. Range Cleaning When Cleaning This Range: 1. Turn Oven Control Knob to complete. It is finished. Acidic foods, such as citrus juices...

Use and Care Guide
Page 47
... conditions as indicated in any oven or any bulb over 10 watts. It is necessary to the desired height. Page 44 Remove the light cover. 3. More than four clicks of igniter before adjusting the flame to light each standard burner individually. • If the range's cooktop is in the OFF position (oven light off position. CAUTION Before replacing the light bulb, be used when the power failure occurs turn all the...
... conditions as indicated in any oven or any bulb over 10 watts. It is necessary to the desired height. Page 44 Remove the light cover. 3. More than four clicks of igniter before adjusting the flame to light each standard burner individually. • If the range's cooktop is in the OFF position (oven light off position. CAUTION Before replacing the light bulb, be used when the power failure occurs turn all the...


