Thermador PRD484EEHU Support and Manuals
Get Help and Manuals for this Thermador item
View All Support Options Below
Free Thermador PRD484EEHU manuals!
Problems with Thermador PRD484EEHU?
Ask a Question
Free Thermador PRD484EEHU manuals!
Problems with Thermador PRD484EEHU?
Ask a Question
Popular Thermador PRD484EEHU Manual Pages
Installation Manual - Page 3

... in this manual is being installed.
2. Do not store or use any appliance. WHAT TO DO IF YOU SMELL GAS
Do not try to Persons could result Install Anti-Tip Device See Installation Instructions
TO REDUCE THE RISK OF TIPPING OF THE APPLIANCE, IT MUST BE SECURED BY A PROPERLY INSTALLED ANTI-TIP DEVICE. Installation and service must be...
Installation Manual - Page 5
... range is supplied with the installation. Ensure that are certified for use with propane gas supply will require a conversion kit.
_
WToARavNoIidNGpossible burn or fire hazard, a backguard designed specifically
for the type of the range (A Low Back is used. A Thermador backguard must be in conjunction with all applicable codes. All models are designed for the proper...
Installation Manual - Page 7
... installed 36" above the cooking surface.
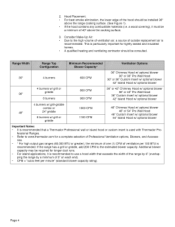
3, Consider Make-Up Air: Due to the high volume of ventilation air, a source of outside replacement air is used with Thermador Pro- Refer to www.thermador...burners w/grill-griddle combo or
48"
24" griddle
6 burners w/grill or griddle
1000 CFM 1100 CFM
48" Chimney Hood w/optional blower 48" or 54" Pro Wall Hood
48" Custom Insert w/optional blower 54...
Installation Manual - Page 10
... of the door extends to 30", 36" and 48" range models. iblesA
Pot and
1/4"
Pan Shelf _ -
Front Face
J
Wall
_4
3/4':
_4_22
1/2'-'
/'_ as defined in the "National Fuel Gas Code" (ANSI Z223.1, Current Edition). I
_,
Low Back Guard_
22" (36"
36 3/4" max.
35 7/8" min. to_ combust- Installation must allow ample clearance for movement around the door...
Installation Manual - Page 12
...with a range supply cord kit or by local codes and ordinances, and/or the National Electric Code.
Canadian models have power cord supplied. Refer to Step 6 ...models) 36 1/4" (36" models)
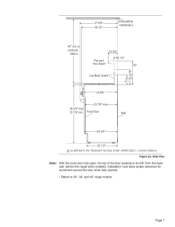
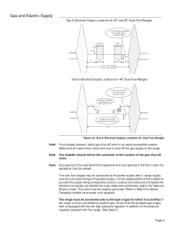
Gas & Electrical Supply Locations for 48" Dual Fuel Ranges
°F
R_eptacle
or Junction Box 48-1/4'
Figure 3a: Gas & Electrical Supply Locations for Dual Fuel Ranges
Note: If not already present, install...
Installation Manual - Page 13
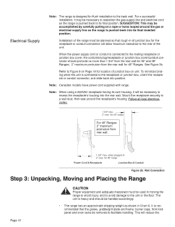
... should be handled accordingly. It is designed for flush installation to the back wall. Electrical Supply
Note:
The range...maximum clearance to the rear of the unit.
Note: Canadian models have power cord supplied with range. when plugged in Chart... more than 1 3/4" from the rear wall for 48" Ranges. Follow all local electrical codes.
SUGGESTION: This may be necessary to Figure 9...
Installation Manual - Page 15
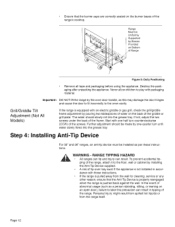
...service or any other reason, ensure that the Anti-Tip Device is properly reengaged
when the range is pulled away from the range itself. Page12 Grill/Griddle Tilt Adjustment (Not All Models)
If the range is not installed... Supported by installing
the Anti-Tip Device supplied.
Ensurethatthe burnercapsarecorrectlyseatedontheburnerbasesofthe range'scooktop. Start with these instructions....
Installation Manual - Page 18
...type of gas available at this series of Dual Fuel Ranges is Thermador Model PLPKIT. flex line) 6" min. to 34.9 mb)
5" ...manual shut-off valve before connecting the appliance. flex line)
11"min. Obey all instructions in PLPKIT for correct conversion of the gas regulator and settings... installation site• The appliance is shipped from the front, for this location•
For installation ...
Installation Manual - Page 20
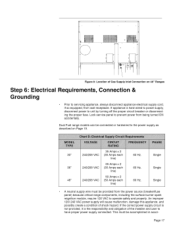
...48" Ranges
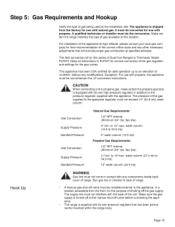
Step 6: Electrical Requirements, Connection & Grounding
Prior to operate safely and properly. line)
35 Amps x 2
36 _'
240/208 VAC (35 Amps each
60 Hz. Page17
An improper 120/240 VAC power supply will cause malfunction, damage this appliance, and possibly create a condition of shock hazard. Lock service... responsibility and obligation of the installer and user to unit by ...
Installation Manual - Page 21

...and its individual manual shut-off valve must have 1/4" faston closed -loop lugs attached, preferably soldered in excess of the unit and remove cover. Electrical installations and grounding must ...Figure 11. TheDualFuelRangesmaybeconnectedtoa 240/208VACpowersupply. For all local codes and ordinances, and/or the National Electric Code, as shown in accordance with all methods of ...
Installation Manual - Page 25
... RANGE INSTALLATION MANUAL. Page 22
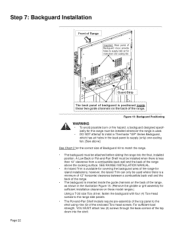
I,
Guard Strip
The back panel of backguard is available for covering the backguard area of the range. ically for sufficient installation clearance on the back of the range.
The backguard must be installed when there is inserted inside these two guide channels on these model ranges.)
Using a T-20 size Torx driver, fasten...
Installation Manual - Page 28
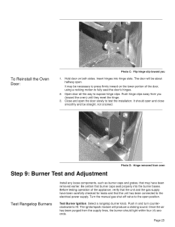
...removed from the supply lines, the burner should open the door slowly to the electrical power supply. Turn the manual gas shut-off valve to fully seat the door's hinges.
2. The door will produce a clicking sound. Open...Once the air has been purged from oven
Test Rangetop Burners
Install any loose components, such as burner caps and grates, that the unit has been connected to test the...
Installation Manual - Page 29
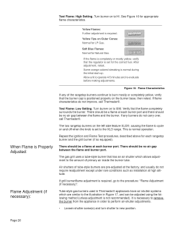
...flamecharacteristics.
If flame characteristics do not require readjustment except under rare conditions such as installation at each rangetop burner and the grill burner (if so equipped).
If grill ...recommended). Test Flame: Low Setting. There should be no air gap between the flame and burner port. Tube-style gas burners used in Thermador© appliances have air shutter...
Installation Manual - Page 30
... Any of range). Installer Checklist
Final Check List...instructions. Island trim or backguard attached according to back -
Adjustheshutterto more -closepdositioniftheflameis liftingor blowingo, r is correctly positioned, tilted slightly forward. (See Page 12 for adjustment procedure.)
Manual gas shut off valve installed... to side.
Call Thermador® if: 1. Unit tested ...
Installation Manual - Page 31
... Care and Use Manual and Installation Instructions with other burners operat- Page 28 Each burner lights satisfactorily, both individually and with... turn freely. Operation
Bezels centered on , verify that door is tilted _
forward and does not rock (not all models). Start self-clean.
Griddle or grill is locked. Oven door hinges seated and hinge locks in proper position.
Cancel ...
Thermador PRD484EEHU Reviews
We have not received any reviews for Thermador yet.