

User Guide
Page 2
... GHz) - The firmware setting is connected. - The following two conditions: (1) This device may cause undesired operation. ElectroMagnetic Compatibility (EMC) standard for radio equipment and services; FCC Caution: Any changes or modifications not expressly approved by the party responsible for wireless telecommunication systems with minimum distance 20cm between the equipment and receiver. - The availability of some specific channels and/or operational...
... GHz) - The firmware setting is connected. - The following two conditions: (1) This device may cause undesired operation. ElectroMagnetic Compatibility (EMC) standard for radio equipment and services; FCC Caution: Any changes or modifications not expressly approved by the party responsible for wireless telecommunication systems with minimum distance 20cm between the equipment and receiver. - The availability of some specific channels and/or operational...

User Guide
Page 4
... UNPACKING AND SETUP 5 Unpacking...5 Setup ...5 HARDWARE INSTALLATION 6 Front Panel ...6 Rear Panel ...7 Side Panel ...8 Hanging Way ...8 Hardware connections ...9 Connecting the WLAN Router...9 Check the installation ...9 PC NETWORK TCP/IP SETTING 10 Windows 95/98/ME ...10 Windows 2000 ...11 Windows XP / Vista / 7...12 CONFIGURATION 13 Login to the WLAN Router through Wireless LAN 13 Login to the WLAN Router ...13 Using the Web Browser ...13 Setup Wizard ...14 Advanced configuration ...23 Main ...23 LAN & DHCP Server...23 WAN ...24 Password...28 Time ...30 Dynamic DNS...31 Wireless...31...
... UNPACKING AND SETUP 5 Unpacking...5 Setup ...5 HARDWARE INSTALLATION 6 Front Panel ...6 Rear Panel ...7 Side Panel ...8 Hanging Way ...8 Hardware connections ...9 Connecting the WLAN Router...9 Check the installation ...9 PC NETWORK TCP/IP SETTING 10 Windows 95/98/ME ...10 Windows 2000 ...11 Windows XP / Vista / 7...12 CONFIGURATION 13 Login to the WLAN Router through Wireless LAN 13 Login to the WLAN Router ...13 Using the Web Browser ...13 Setup Wizard ...14 Advanced configuration ...23 Main ...23 LAN & DHCP Server...23 WAN ...24 Password...28 Time ...30 Dynamic DNS...31 Wireless...31...

User Guide
Page 5
Security ...33 Advanced ...35 Wi‐Fi Protected Setup...36 Status...37 Device Information ...37 Log...38 Log Setting ...39 Statistic...40 Wireless ...41 Routing ...41 Static ...41 Routing Table ...42 Access...44 Filters ...44 Virtual Server ...48 Special AP...49 DMZ...50 Firewall Settings...51 Management...52 Remote Management...52 Tools ...54 Restart...54 Settings ...54 Firmware...55 Ping Test...56 TECHNICAL SPECIFICATIONS 57 LIMITED WARRANTY 58 v
Security ...33 Advanced ...35 Wi‐Fi Protected Setup...36 Status...37 Device Information ...37 Log...38 Log Setting ...39 Statistic...40 Wireless ...41 Routing ...41 Static ...41 Routing Table ...42 Access...44 Filters ...44 Virtual Server ...48 Special AP...49 DMZ...50 Firewall Settings...51 Management...52 Remote Management...52 Tools ...54 Restart...54 Settings ...54 Firmware...55 Ping Test...56 TECHNICAL SPECIFICATIONS 57 LIMITED WARRANTY 58 v
User Guide
Page 6
...;651BR Wireless Home Router. 1 Lists the technical (general, physical and environmental, performance and Routers settings) specifications of the TEW‐651BR Wireless Home Router. Technical Specifications. Purpose This manual discusses how to configure and operate for Internet surfing and office resource sharing, and it is easy to install the IEEE 802.11b/g/n Wireless Home Router. Helps you can connect the TEW‐651BR Wireless Home Router to your xDSL/Cable Modem. Tells how you get started with wireless LAN and Fast Ethernet switch. ABOUT THIS GUIDE...
...;651BR Wireless Home Router. 1 Lists the technical (general, physical and environmental, performance and Routers settings) specifications of the TEW‐651BR Wireless Home Router. Technical Specifications. Purpose This manual discusses how to configure and operate for Internet surfing and office resource sharing, and it is easy to install the IEEE 802.11b/g/n Wireless Home Router. Helps you can connect the TEW‐651BR Wireless Home Router to your xDSL/Cable Modem. Tells how you get started with wireless LAN and Fast Ethernet switch. ABOUT THIS GUIDE...

User Guide
Page 7
... IP addresses and using a shared Internet connection through wireless or wired (WLAN, LAN and WAN‐Internet). The era of the standalone PC is also gaining ground. However, allowing more than two computers to access the Internet at least two computers. All linked computers can solve high network access costs. Networking technology is a need to share one high‐speed broadband connection through an Internet sharing device can make full use of hard...
... IP addresses and using a shared Internet connection through wireless or wired (WLAN, LAN and WAN‐Internet). The era of the standalone PC is also gaining ground. However, allowing more than two computers to access the Internet at least two computers. All linked computers can solve high network access costs. Networking technology is a need to share one high‐speed broadband connection through an Internet sharing device can make full use of hard...
User Guide
Page 8
... popular cable/DSL Internet service providers using Dynamic/Static IP, PPPoE, PPTP and L2TP z High‐speed data rates of up to 150Mbps with IEEE 802.11n* z Wi‐Fi Protected Setup (WPS) connects wireless clients at the push of a button z Supports 64/128‐bit WEP, WPA/WPA2‐RADIUS and WPA‐PSK/WPA2‐PSK z Internet Access Control (MAC Address, Domain and IP Filtering) z Easy remote management via Web browser z Firewall features Network Address Translation (NAT) z Universal Plug and Play (UPnP...
... popular cable/DSL Internet service providers using Dynamic/Static IP, PPPoE, PPTP and L2TP z High‐speed data rates of up to 150Mbps with IEEE 802.11n* z Wi‐Fi Protected Setup (WPS) connects wireless clients at the push of a button z Supports 64/128‐bit WEP, WPA/WPA2‐RADIUS and WPA‐PSK/WPA2‐PSK z Internet Access Control (MAC Address, Domain and IP Filtering) z Easy remote management via Web browser z Firewall features Network Address Translation (NAT) z Universal Plug and Play (UPnP...

User Guide
Page 12
... to reset this device to default settings. 7 Rear Panel The figure below shows the rear panel of the TEW‐651BR Wireless Home Router. Rear Panel Antenna There is an RJ‐45 10/100Mbps Auto‐MDIX port for the WAN that connects to the xDSL/Cable modem for connecting to either 10Mbps or 100Mbps Ethernet connections. It will be a useful tool when the manager forgot the password to login, and needs to restore the device...
... to reset this device to default settings. 7 Rear Panel The figure below shows the rear panel of the TEW‐651BR Wireless Home Router. Rear Panel Antenna There is an RJ‐45 10/100Mbps Auto‐MDIX port for the WAN that connects to the xDSL/Cable modem for connecting to either 10Mbps or 100Mbps Ethernet connections. It will be a useful tool when the manager forgot the password to login, and needs to restore the device...

User Guide
Page 14
... TEW‐651BR Wireless Home Router has four ports, you do not have to buy a switch to the LAN port of the xDSL or Cable modem. 3. When the WAN Port is connected to the Ethernet card on , once the device is connected to the Ethernet port of the WLAN Router. Check the installation The control LEDs of the WLAN Router are clearly visible and the status of the network link can connect up to four computers directly to the broadband modem, the Power...
... TEW‐651BR Wireless Home Router has four ports, you do not have to buy a switch to the LAN port of the xDSL or Cable modem. 3. When the WAN Port is connected to the Ethernet card on , once the device is connected to the Ethernet port of the WLAN Router. Check the installation The control LEDs of the WLAN Router are clearly visible and the status of the network link can connect up to four computers directly to the broadband modem, the Power...
User Guide
Page 18
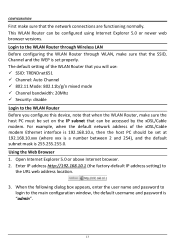
....1 (the factory‐default IP address setting) to the main configuration window, the default username and password is 192.168.10.x, then the host PC should be set properly. For example, when the default network address of the WLAN Router that you will use: 9 SSID: TRENDnet651 9 Channel: Auto Channel 9 802.11 Mode: 802.11b/g/n mixed mode 9 Channel bandwidth: 20Mhz 9 Security: disable Login to the WLAN Router through Wireless LAN Before configuring the WLAN Router through WLAN, make sure that the network connections are functioning normally. Using the Web Browser...
....1 (the factory‐default IP address setting) to the main configuration window, the default username and password is 192.168.10.x, then the host PC should be set properly. For example, when the default network address of the WLAN Router that you will use: 9 SSID: TRENDnet651 9 Channel: Auto Channel 9 802.11 Mode: 802.11b/g/n mixed mode 9 Channel bandwidth: 20Mhz 9 Security: disable Login to the WLAN Router through Wireless LAN Before configuring the WLAN Router through WLAN, make sure that the network connections are functioning normally. Using the Web Browser...
User Guide
Page 28
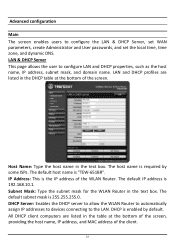
... "TEW‐651BR". LAN and DHCP profiles are listed in the DHCP table at the bottom of the screen, providing the host name, IP address, and MAC address of the screen. The default host name is enabled by some ISPs. The default subnet mask is the IP address of the WLAN Router. Advanced configuration Main The screen enables users to configure the LAN & DHCP Server, set WAN parameters, create Administrator and User passwords, and set the local time, time zone, and dynamic DNS...
... "TEW‐651BR". LAN and DHCP profiles are listed in the DHCP table at the bottom of the screen, providing the host name, IP address, and MAC address of the screen. The default host name is enabled by some ISPs. The default subnet mask is the IP address of the WLAN Router. Advanced configuration Main The screen enables users to configure the LAN & DHCP Server, set WAN parameters, create Administrator and User passwords, and set the local time, time zone, and dynamic DNS...

User Guide
Page 29
... IP address for the WAN, add DNS numbers, and enter the MAC address. End IP: Type an IP address to the WLAN Router. WAN This screen enables users to the WLAN Router. Lease Time: The lease time specifies the amount of the IP range that DHCP will use to assign IP addresses to all LAN devices connected to serve as the start of the network in the text box. This item is optional. Connection Type: Select the connection type, either DHCP client, Fixed IP, PPPoE, PPTP, L2TP...
... IP address for the WAN, add DNS numbers, and enter the MAC address. End IP: Type an IP address to the WLAN Router. WAN This screen enables users to the WLAN Router. Lease Time: The lease time specifies the amount of the IP range that DHCP will use to assign IP addresses to all LAN devices connected to serve as the start of the network in the text box. This item is optional. Connection Type: Select the connection type, either DHCP client, Fixed IP, PPPoE, PPTP, L2TP...

User Guide
Page 41
Client PIN Number: Type Client's PIN number the client uses to configure the Wi‐Fi Protected Setup function. Push Button Configuration: Clicking the Start PBC button will invoke the Push Button Configuration (PBC) method of the WLAN Router. Wi‐Fi Protected Setup This screen enables users to negotiate with the WLAN Router via WPS connection. Push the WPS button on the client side when users want their station to join Router's network. Self‐PIN Number: Display the current PIN number of WPS. WPS: Enable or Disable the WPS (Wi...
Client PIN Number: Type Client's PIN number the client uses to configure the Wi‐Fi Protected Setup function. Push Button Configuration: Clicking the Start PBC button will invoke the Push Button Configuration (PBC) method of the WLAN Router. Wi‐Fi Protected Setup This screen enables users to negotiate with the WLAN Router via WPS connection. Push the WPS button on the client side when users want their station to join Router's network. Self‐PIN Number: Display the current PIN number of WPS. WPS: Enable or Disable the WPS (Wi...

User Guide
Page 50
... access. MAC Address: Type the MAC address of the page. Add: Click to add the user to allow computers with MAC address listed in the MAC Table are listed in the item. Allow: Only allow or deny accessing the internet. Cancel: Click Cancel to remove the user profile. MAC Filters MAC Filter: Enables you have changed any of the fields. The user profiles are denied Internet access. Deny: Computers in the MAC Table. Disable: Disable the MAC filter function. Delete: Select a user...
... access. MAC Address: Type the MAC address of the page. Add: Click to add the user to allow computers with MAC address listed in the MAC Table are listed in the item. Allow: Only allow or deny accessing the internet. Cancel: Click Cancel to remove the user profile. MAC Filters MAC Filter: Enables you have changed any of the fields. The user profiles are denied Internet access. Deny: Computers in the MAC Table. Disable: Disable the MAC filter function. Delete: Select a user...

User Guide
Page 53
... and enter new information. LAN Server: Type the LAN IP address that is being used to provide access to act as a virtual server, remote users requesting Web or FTP services through the WAN are listed in the item. z Cancel: Click the Cancel button to enable or disable the virtual server. Public Port: Type the port number on the LAN that will be assigned to the correct LAN server. Virtual Server This screen enables user to create a virtual server via the protocol and port numbers...
... and enter new information. LAN Server: Type the LAN IP address that is being used to provide access to act as a virtual server, remote users requesting Web or FTP services through the WAN are listed in the item. z Cancel: Click the Cancel button to enable or disable the virtual server. Public Port: Type the port number on the LAN that will be assigned to the correct LAN server. Virtual Server This screen enables user to create a virtual server via the protocol and port numbers...

User Guide
Page 57
... remote management. The WLAN Router is a networking architecture that can be pinged from the list and click "Priority Down" to Ping WAN Port: Type a range of the rule. If user does not want to use the UPnP functionality, select "Disabled" to perform remote management. Using remote management, the WLAN Router can be configured through the WAN via a Web browser. Remote Management This screen enables users to set up HTTP access of a rule, click "Update Priority" to set up the Remote Management feature. HTTP: Enables users to save the changes. New...
... remote management. The WLAN Router is a networking architecture that can be pinged from the list and click "Priority Down" to Ping WAN Port: Type a range of the rule. If user does not want to use the UPnP functionality, select "Disabled" to perform remote management. Using remote management, the WLAN Router can be configured through the WAN via a Web browser. Remote Management This screen enables users to set up HTTP access of a rule, click "Update Priority" to set up the Remote Management feature. HTTP: Enables users to save the changes. New...

User Guide
Page 62
... 802.11n (draft 2.0) technology WAN 1 x 10/100Mbps Auto‐MDIX WAN port (Internet) LAN 4 x 10/100Mbps Auto‐MDIX LAN port WPS Button Enables Wi‐Fi Protected Setup (WPS) function Connection Type Dynamic IP, Static (fixed) IP, PPPoE, PPTP, L2TP Supported Browsers Web Internet Explorer 6.0 or above, Firefox, Safari Internet Access Control MAC Address Filter, Domain/URL Filter, Protocol/IP Filter LED Indicators Power, Status, LAN1 ‐ LAN4, WAN, WLAN Power Supply 5V DC, 1.5A external power adapter Power Consumption 3.2 watts (max) Dimensions (LxWxH) 150 x 110...
... 802.11n (draft 2.0) technology WAN 1 x 10/100Mbps Auto‐MDIX WAN port (Internet) LAN 4 x 10/100Mbps Auto‐MDIX LAN port WPS Button Enables Wi‐Fi Protected Setup (WPS) function Connection Type Dynamic IP, Static (fixed) IP, PPPoE, PPTP, L2TP Supported Browsers Web Internet Explorer 6.0 or above, Firefox, Safari Internet Access Control MAC Address Filter, Domain/URL Filter, Protocol/IP Filter LED Indicators Power, Status, LAN1 ‐ LAN4, WAN, WLAN Power Supply 5V DC, 1.5A external power adapter Power Consumption 3.2 watts (max) Dimensions (LxWxH) 150 x 110...

Quick Installation Guide
Page 6
Click Next. Note: Do not change default settings unless it is admin. 6. Enter a Password, verify the Password and then click Next. Select your ISP. Follow the wizard instructions to complete the configuration. Note: Each Internet Connection type may have different options. 9. Click Next. 4 Click Next. 5. Configure the settings based on information provided by your Time Zone and then click Next. 7. ENGLISH FRANÇAIS DEUTSCH ESPAÑOL 4. By default, the Password is conflicting with your existing hardware. 8.
Click Next. Note: Do not change default settings unless it is admin. 6. Enter a Password, verify the Password and then click Next. Select your ISP. Follow the wizard instructions to complete the configuration. Note: Each Internet Connection type may have different options. 9. Click Next. 4 Click Next. 5. Configure the settings based on information provided by your Time Zone and then click Next. 7. ENGLISH FRANÇAIS DEUTSCH ESPAÑOL 4. By default, the Password is conflicting with your existing hardware. 8.

Quick Installation Guide
Page 7
Open up encryption on the wireless router. 10. Your configuration is recommended that you enable encryption on the wireless router. ENGLISH FRANÇAIS DEUTSCH ESPAÑOL Note: It is now complete For detailed information regarding the TEW-651BR configuration and advanced settings, please refer to User's Guide included on the Utility CD-ROM, or TRENDnet's website at : www.trendnet.com/register Thank you for information on setting up your product...
Open up encryption on the wireless router. 10. Your configuration is recommended that you enable encryption on the wireless router. ENGLISH FRANÇAIS DEUTSCH ESPAÑOL Note: It is now complete For detailed information regarding the TEW-651BR configuration and advanced settings, please refer to User's Guide included on the Utility CD-ROM, or TRENDnet's website at : www.trendnet.com/register Thank you for information on setting up your product...
Quick Installation Guide
Page 8
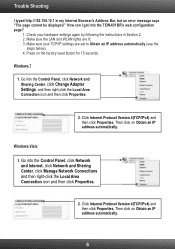
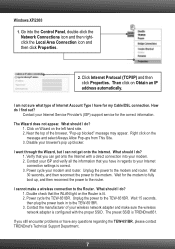
.... Click Internet Protocol Version 4(TCP/IPv4) and then click Properties. Go into the Control Panel, click Network and Sharing Center, click Change Adapter Settings and then right-click the Local Area Connection icon and then click Properties. 2. Press on Obtain an IP address automatically. Windows Vista 1. How can I typed http://192.168.10.1 in Section 2. 2. Trouble Shooting I get into the TEW-651BR's web configuration page? 1. Windows 7 1. Go...
.... Click Internet Protocol Version 4(TCP/IPv4) and then click Properties. Go into the Control Panel, click Network and Sharing Center, click Change Adapter Settings and then right-click the Local Area Connection icon and then click Properties. 2. Press on Obtain an IP address automatically. Windows Vista 1. How can I typed http://192.168.10.1 in Section 2. 2. Trouble Shooting I get into the TEW-651BR's web configuration page? 1. Windows 7 1. Go...
Quick Installation Guide
Page 9
... proper SSID. Unplug the power to the modem. Go into your Internet Service Provider's (ISP) support service for my Cable/DSL connection. How do ? 1. Wait 15 seconds, then plug the power back in regards to your wireless network adapter and make a wireless connection to the TEW-651BR. 3. Contact your modem. 2. Right click on Obtain an IP address automatically. What should I do I have any questions regarding the TEW-651BR, please contact TRENDnet's Technical Support Department...
... proper SSID. Unplug the power to the modem. Go into your Internet Service Provider's (ISP) support service for my Cable/DSL connection. How do ? 1. Wait 15 seconds, then plug the power back in regards to your wireless network adapter and make a wireless connection to the TEW-651BR. 3. Contact your modem. 2. Right click on Obtain an IP address automatically. What should I do I have any questions regarding the TEW-651BR, please contact TRENDnet's Technical Support Department...


