
User Guide
Page 5
...this User's Guide ...1 INTRODUCTION 2 Applications: ...2 Supported Features: ...3 UNPACKING AND SETUP 4 Unpacking ...4 Setup ...4 HARDWARE INSTALLATION 5 Front Panel ...5 Rear Panel ...6 Side Panel...6 Hardware connections ...7 Connecting the WLAN Router...7 Check the installation ...7 PC NETWORK TCP/IP SETTING 8 Windows 95/98/ME...8 Windows 2000 ...9 Windows XP ...10 CONFIGURATION 11 Login to the WLAN Router through Wireless LAN ...11 Login to the WLAN Router...11 Using the Web Browser...11 Setup Wizard...12 Advanced configuration...22 Main ...22 LAN & DHCP Server...22 WAN ...23 Password...
...this User's Guide ...1 INTRODUCTION 2 Applications: ...2 Supported Features: ...3 UNPACKING AND SETUP 4 Unpacking ...4 Setup ...4 HARDWARE INSTALLATION 5 Front Panel ...5 Rear Panel ...6 Side Panel...6 Hardware connections ...7 Connecting the WLAN Router...7 Check the installation ...7 PC NETWORK TCP/IP SETTING 8 Windows 95/98/ME...8 Windows 2000 ...9 Windows XP ...10 CONFIGURATION 11 Login to the WLAN Router through Wireless LAN ...11 Login to the WLAN Router...11 Using the Web Browser...11 Setup Wizard...12 Advanced configuration...22 Main ...22 LAN & DHCP Server...22 WAN ...23 Password...

User Guide
Page 7
... User's Guide Introduction. Technical Specifications. This integrated access device combines Internet gateway functions with web-based configuration. 1 Overview of the IEEE 802.11b/g/n Wireless Home Router. Helps you can connect the IEEE 802.11b/g/n Wireless Home Router to install the router with wireless LAN and Fast Ethernet switch. Lists the technical (general, physical and environmental, performance and Routers settings) specifications of the IEEE 802.11b/g/n Wireless Home Router. Tells how you get started with the basic installation of this guide, the term "the WLAN...
... User's Guide Introduction. Technical Specifications. This integrated access device combines Internet gateway functions with web-based configuration. 1 Overview of the IEEE 802.11b/g/n Wireless Home Router. Helps you can connect the IEEE 802.11b/g/n Wireless Home Router to install the router with wireless LAN and Fast Ethernet switch. Lists the technical (general, physical and environmental, performance and Routers settings) specifications of the IEEE 802.11b/g/n Wireless Home Router. Tells how you get started with the basic installation of this guide, the term "the WLAN...
User Guide
Page 8
... two computers. All linked computers can make full use of hard disk space. Applications: Broadband Internet access: Several computers can be installed and configured right out of IP addresses and using a shared Internet connection through wireless or wired (WLAN, LAN and WAN-Internet). Online gaming: Through the local area network, online gaming and e-commerce services can share one public IP address over such a device. Designed for the business and home, it saves...
... two computers. All linked computers can make full use of hard disk space. Applications: Broadband Internet access: Several computers can be installed and configured right out of IP addresses and using a shared Internet connection through wireless or wired (WLAN, LAN and WAN-Internet). Online gaming: Through the local area network, online gaming and e-commerce services can share one public IP address over such a device. Designed for the business and home, it saves...

User Guide
Page 9
Supported Features: ¾ High speed data transfer rate ¾ NAT for sharing 1 IP address to all LAN/WLAN users. ¾ PPPoE and PPTP protocol for Dial-Up ADSL. ¾ 64/128 bit WEP Encryption ¾ WPA-PSK, WPA2-PSK, WPA, WPA2 security ¾ DHCP Server / Client. ¾ UPnP (Universal Plug and Play). ¾ WPS (Wi-Fi Protected Setup) ¾ Virtual Server mapping. ¾ MAC filtering. ¾ Protocol/IP filtering ¾ Domain/URL filtering ¾ DDNS ¾ Upgradeable firmware for...
Supported Features: ¾ High speed data transfer rate ¾ NAT for sharing 1 IP address to all LAN/WLAN users. ¾ PPPoE and PPTP protocol for Dial-Up ADSL. ¾ 64/128 bit WEP Encryption ¾ WPA-PSK, WPA2-PSK, WPA, WPA2 security ¾ DHCP Server / Client. ¾ UPnP (Universal Plug and Play). ¾ WPS (Wi-Fi Protected Setup) ¾ Virtual Server mapping. ¾ MAC filtering. ¾ Protocol/IP filtering ¾ Domain/URL filtering ¾ DDNS ¾ Upgradeable firmware for...

User Guide
Page 10
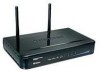
... make sure that can be performed properly using the following methods: ‹ The power outlet should contain the following items: ‹ TEW-632BRP Wireless N Home Router ‹ Easy Go Installation CD ‹ Multi-Language Quick Installation Guide ‹ 2 x 2dBi gain dipole antenna ‹ External power adapter ‹ 1.5m (5ft) Cat.5 Ethernet Cable If any item is found missing or damaged, please contact your wireless network. The box should be . Unpacking Open...
... make sure that can be performed properly using the following methods: ‹ The power outlet should contain the following items: ‹ TEW-632BRP Wireless N Home Router ‹ Easy Go Installation CD ‹ Multi-Language Quick Installation Guide ‹ 2 x 2dBi gain dipole antenna ‹ External power adapter ‹ 1.5m (5ft) Cat.5 Ethernet Cable If any item is found missing or damaged, please contact your wireless network. The box should be . Unpacking Open...

User Guide
Page 12
... the manager forgot the password to login, and needs to restore the device back to execute the Wi-Fi Protected Setup process. WPS (side panel) Push this device to either 10Mbps or 100Mbps Ethernet connections. Rear Panel The figure below shows the side panel of the IEEE 802.11b/g/n Wireless Home Router. LAN (1-4) Four RJ-45 10/100Mbps Auto-MDIX ports for Internet connectivity. POWER Plug the power adapter to this power jack RESET Use a pin-shaped...
... the manager forgot the password to login, and needs to restore the device back to execute the Wi-Fi Protected Setup process. WPS (side panel) Push this device to either 10Mbps or 100Mbps Ethernet connections. Rear Panel The figure below shows the side panel of the IEEE 802.11b/g/n Wireless Home Router. LAN (1-4) Four RJ-45 10/100Mbps Auto-MDIX ports for Internet connectivity. POWER Plug the power adapter to this power jack RESET Use a pin-shaped...

User Guide
Page 13
... and as a switch. the other end of the network cable to the broadband modem, the Power, System, LAN, WLAN and WAN port LEDs of the xDSL or Cable modem. 3. When the LAN Port is connected to the Ethernet port of the WLAN Router will light up indicating a normal status. 2. Check the installation The control LEDs of the WLAN Router are clearly visible and the status of the cable connects to the computer system, the LAN LED will light up. Hardware connections Connecting the WLAN Router 1. Plug in...
... and as a switch. the other end of the network cable to the broadband modem, the Power, System, LAN, WLAN and WAN port LEDs of the xDSL or Cable modem. 3. When the LAN Port is connected to the Ethernet port of the WLAN Router will light up indicating a normal status. 2. Check the installation The control LEDs of the WLAN Router are clearly visible and the status of the cable connects to the computer system, the LAN LED will light up. Hardware connections Connecting the WLAN Router 1. Plug in...
User Guide
Page 17
... when the WLAN Router, make sure that the network connections are functioning normally. Open Internet Explorer 5.0 or above Internet browser. 2. When the following dialog box appears, enter the user name and password to login to the WLAN Router Before you will use: 9 SSID: TRENDnet 9 Channel: 6 9 Security: disable Login to the main configuration window, the default username and password is "admin". 11 CONFIGURATION First make sure that the SSID, Channel and the WEP is 255.255.255.0. The default setting of the xDSL/Cable modem Ethernet interface is 192...
... when the WLAN Router, make sure that the network connections are functioning normally. Open Internet Explorer 5.0 or above Internet browser. 2. When the following dialog box appears, enter the user name and password to login to the WLAN Router Before you will use: 9 SSID: TRENDnet 9 Channel: 6 9 Security: disable Login to the main configuration window, the default username and password is "admin". 11 CONFIGURATION First make sure that the SSID, Channel and the WEP is 255.255.255.0. The default setting of the xDSL/Cable modem Ethernet interface is 192...

User Guide
Page 29
... of the IP range that DHCP will use to assign IP addresses to all LAN devices connected to the WLAN Router. Connection Type: Select the connection type, either DHCP client, Fixed IP, PPPoE, PPTP, L2TP or BigPond Cable from the drop-down list. WAN This screen enables users to the WLAN Router. End IP: Type an IP address to serve as the start of the network in the text box. This item is optional. Start IP: Type an IP address to serve...
... of the IP range that DHCP will use to assign IP addresses to all LAN devices connected to the WLAN Router. Connection Type: Select the connection type, either DHCP client, Fixed IP, PPPoE, PPTP, L2TP or BigPond Cable from the drop-down list. WAN This screen enables users to the WLAN Router. End IP: Type an IP address to serve as the start of the network in the text box. This item is optional. Start IP: Type an IP address to serve...

User Guide
Page 33
... wireless device to configuration the wireless communications parameters for wireless communications. Wireless This section enables users to access the LAN and WAN via the WLAN Router. 802.11 Mode: Select one of the following: zMixed 802.11g and 802.11g - Select if you are using both 802.11b and 802.11n wireless clients. SSID: Type an SSID in order for the wireless device to enable and disable the wireless LAN function, create a SSID, and select the channel for wireless...
... wireless device to configuration the wireless communications parameters for wireless communications. Wireless This section enables users to access the LAN and WAN via the WLAN Router. 802.11 Mode: Select one of the following: zMixed 802.11g and 802.11g - Select if you are using both 802.11b and 802.11n wireless clients. SSID: Type an SSID in order for the wireless device to enable and disable the wireless LAN function, create a SSID, and select the channel for wireless...

User Guide
Page 34
Mode: Select the key type: ASCII or HEX For security purposes, users may want to disable SSID Broadcast to view the WLAN Router's SSID. Security Authentication Type: The authentication type default is enabled, all wireless clients will be able to ensure only authorized clients have the same WEP key.. WEP Encryption WEP: Open System and Shared Key requires the user to set to exchange data with other wireless clients that have access. There are four options: Disabled, WEP, WPA, WPA2 and WPA-Auto. SSID Broadcast: While SSID Broadcast is set a WEP key to open system.
Mode: Select the key type: ASCII or HEX For security purposes, users may want to disable SSID Broadcast to view the WLAN Router's SSID. Security Authentication Type: The authentication type default is enabled, all wireless clients will be able to ensure only authorized clients have the same WEP key.. WEP Encryption WEP: Open System and Shared Key requires the user to set to exchange data with other wireless clients that have access. There are four options: Disabled, WEP, WPA, WPA2 and WPA-Auto. SSID Broadcast: While SSID Broadcast is set a WEP key to open system.

User Guide
Page 37
... enables users to view the status of the WLAN Router LAN, WAN and Wireless connections, and view logs and statistics pertaining to configure the Wi-Fi Protected Setup function. Client PIN Number: Type Client PIN number the client uses to join Router's network. It is only used when users want their station to negotiate with WLAN Router via WPS protocol. Push Button Configuration: Clicking this button will invoke the Push Button Configuration (PBC) method of WLAN Router. User can specify a value between 1 and 255. WPS: Enable or Disable the WPS...
... enables users to view the status of the WLAN Router LAN, WAN and Wireless connections, and view logs and statistics pertaining to configure the Wi-Fi Protected Setup function. Client PIN Number: Type Client PIN number the client uses to join Router's network. It is only used when users want their station to negotiate with WLAN Router via WPS protocol. Push Button Configuration: Clicking this button will invoke the Push Button Configuration (PBC) method of WLAN Router. User can specify a value between 1 and 255. WPS: Enable or Disable the WPS...

User Guide
Page 38
...the MAC address, the Connection status, SSID, Channel and Authentication type. Click "DHCP Renew" to reassign IP addresses to client stations connected to view the WLAN Router's LAN, Wireless and WAN configurations. Device Information This screen enables users to the WAN. Firmware, check this to the WLAN Router LAN interface. After updating the firmware in Tools - WAN: This section displays the WAN interface configuration including the MAC address, Connection status, DHCP client status, IP address, Subnet mask, Default gateway, and DNS. LAN: This section displays the LAN interface...
...the MAC address, the Connection status, SSID, Channel and Authentication type. Click "DHCP Renew" to reassign IP addresses to client stations connected to view the WLAN Router's LAN, Wireless and WAN configurations. Device Information This screen enables users to the WAN. Firmware, check this to the WLAN Router LAN interface. After updating the firmware in Tools - WAN: This section displays the WAN interface configuration including the MAC address, Connection status, DHCP client status, IP address, Subnet mask, Default gateway, and DNS. LAN: This section displays the LAN interface...

User Guide
Page 43
... the page. Network Address: Type the static IP address the network uses to 255.255.255.0. Gateway Address: Type the gateway address of the page and click "Delete" to its destination if the network has a static IP address. Contact the ISP or network administrator for this field is left blank, the network mask defaults to access the Internet. Interface: Select an interface, WAN or LAN, to connect to set parameters by the WLAN Router that the user wants to...
... the page. Network Address: Type the static IP address the network uses to 255.255.255.0. Gateway Address: Type the gateway address of the page and click "Delete" to its destination if the network has a static IP address. Contact the ISP or network administrator for this field is left blank, the network mask defaults to access the Internet. Interface: Select an interface, WAN or LAN, to connect to set parameters by the WLAN Router that the user wants to...

User Guide
Page 47
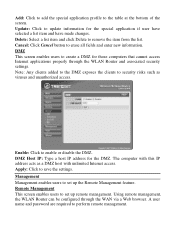
... Internet access. Click the radio button next to Disabled to create a user profile which you have changed any of the list and click Delete to the list at the bottom of the user's network interface. MAC Address: Type the MAC address of the page. (Note: Click anywhere in the MAC Table are listed in the table at the bottom of the page. MAC Table: Use this section to disable the MAC filter. Add: Click to add...
... Internet access. Click the radio button next to Disabled to create a user profile which you have changed any of the list and click Delete to the list at the bottom of the user's network interface. MAC Address: Type the MAC address of the page. (Note: Click anywhere in the MAC Table are listed in the table at the bottom of the page. MAC Table: Use this section to disable the MAC filter. Add: Click to add...

User Guide
Page 50
... the WLAN Router. Update: Click to enable or disable the virtual server. Enable: Click to update information for the virtual server. Public Port: Type the port number on the LAN that will be assigned to the virtual server. Cancel: Click Cancel button to the table at the bottom of the computer on the WAN that will be used to act as a virtual server, remote users requesting Web or FTP services through the WAN are listed in...
... the WLAN Router. Update: Click to enable or disable the virtual server. Enable: Click to update information for the virtual server. Public Port: Type the port number on the LAN that will be assigned to the virtual server. Cancel: Click Cancel button to the table at the bottom of the computer on the WAN that will be used to act as a virtual server, remote users requesting Web or FTP services through the WAN are listed in...
User Guide
Page 52
... IP address acts as viruses and unauthorized access. The computer with unlimited Internet access. Using remote management, the WLAN Router can be configured through the WLAN Router and associated security settings. Delete: Select a list item and click Delete to erase all fields and enter new information. Enable: Click to perform remote management. Remote Management This screen enables users to set up the Remote Management feature. Management Management enables users to set up remote management. DMZ This screen enables users to update information for the DMZ. Update: Click...
... IP address acts as viruses and unauthorized access. The computer with unlimited Internet access. Using remote management, the WLAN Router can be configured through the WLAN Router and associated security settings. Delete: Select a list item and click Delete to erase all fields and enter new information. Enable: Click to perform remote management. Remote Management This screen enables users to set up the Remote Management feature. Management Management enables users to set up remote management. DMZ This screen enables users to update information for the DMZ. Update: Click...

Quick Installation Guide
Page 7
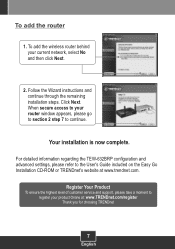
For detailed information regarding the TEW-632BRP configuration and advanced settings, please refer to the User's Guide included on the Easy Go Installation CD-ROM or TRENDnet's website at www.trendnet.com. 5 English Your installation is now complete. Select Exit Router Setup and then click Finish. 12.
For detailed information regarding the TEW-632BRP configuration and advanced settings, please refer to the User's Guide included on the Easy Go Installation CD-ROM or TRENDnet's website at www.trendnet.com. 5 English Your installation is now complete. Select Exit Router Setup and then click Finish. 12.
Quick Installation Guide
Page 9
.... Click Next. When secure access to the User's Guide included on the Easy Go Installation CD-ROM or TRENDnet's website at : www.TRENDnet.com/register Thank you for choosing TRENDnet 7 English To add the wireless router behind your current network, select No and then click Next. 2. Follow the Wizard instructions and continue through the remaining installation steps. For detailed information regarding the TEW-632BRP configuration and advanced settings, please refer to...
.... Click Next. When secure access to the User's Guide included on the Easy Go Installation CD-ROM or TRENDnet's website at : www.TRENDnet.com/register Thank you for choosing TRENDnet 7 English To add the wireless router behind your current network, select No and then click Next. 2. Follow the Wizard instructions and continue through the remaining installation steps. For detailed information regarding the TEW-632BRP configuration and advanced settings, please refer to...

Quick Installation Guide
Page 10
... in working condition. Troubleshooting Q1: I inserted the Easy Go CD-ROM into the TEW-632BRP web configuration page? A1: If the installation menu does not appear automatically, click Start, click Run, and type D:\Autorun.exe where "D" in to your network adapter and Internet connection. Q3: I find out? If the 111 error message appears, you can not make sure the wireless network adapter is the default IP address of the TEW-632BRP Wireless Router. A5: First, make...
... in working condition. Troubleshooting Q1: I inserted the Easy Go CD-ROM into the TEW-632BRP web configuration page? A1: If the installation menu does not appear automatically, click Start, click Run, and type D:\Autorun.exe where "D" in to your network adapter and Internet connection. Q3: I find out? If the 111 error message appears, you can not make sure the wireless network adapter is the default IP address of the TEW-632BRP Wireless Router. A5: First, make...


