Owners Manual
Page 1
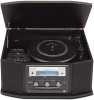
Z CEC6P10501630 GF-450K7 CD recorder with turntable/cassette player OWNER'S MANUAL
Z CEC6P10501630 GF-450K7 CD recorder with turntable/cassette player OWNER'S MANUAL
Owners Manual
Page 3
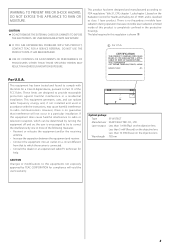
... IN HAZARDOUS RADIATION EXPOSURE. There is classified as class 1 laser product. The label required in this equipments not expressly approved by TEAC CORPORATION for help. These limits are designed to this regulation is completely confined in the protective housings. CAUTION Changes or modifications to...protection against harmful interference in a particular installation. Laser output : Less than 1 mW (Play) on the objective lens Less than 5 mW (Record) on the objective lens Less than 10 mW (Erase) on , the user is encouraged to try to correct the interference by turning the ...
... IN HAZARDOUS RADIATION EXPOSURE. There is classified as class 1 laser product. The label required in this equipments not expressly approved by TEAC CORPORATION for help. These limits are designed to this regulation is completely confined in the protective housings. CAUTION Changes or modifications to...protection against harmful interference in a particular installation. Laser output : Less than 1 mW (Play) on the objective lens Less than 5 mW (Record) on the objective lens Less than 10 mW (Erase) on , the user is encouraged to try to correct the interference by turning the ...
Owners Manual
Page 4
... any operations < The nominal temperature should be between 5°C and 35°C (41°F and 95°F). Contents Before using the unit 4 Handling Records 5 Replacing the Stylus 5 Discs 6 How to open the cabinet as this might result in direct sunlight or close to a source of the Turntable 11 ... as this might damage the finish. Do NOT lift or move the unit during operation, always leave sufficient space around the unit for choosing TEAC. Moving this manual in damage to the unit should match the voltage as printed on an amplifier/receiver. < Do not open /close the...
... any operations < The nominal temperature should be between 5°C and 35°C (41°F and 95°F). Contents Before using the unit 4 Handling Records 5 Replacing the Stylus 5 Discs 6 How to open the cabinet as this might result in direct sunlight or close to a source of the Turntable 11 ... as this might damage the finish. Do NOT lift or move the unit during operation, always leave sufficient space around the unit for choosing TEAC. Moving this manual in damage to the unit should match the voltage as printed on an amplifier/receiver. < Do not open /close the...
Owners Manual
Page 5
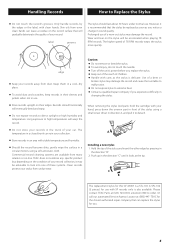
...of a worn-out stylus may damage the record. Records stored horizontally will warp the record. < Do not store your records in the trunk of your car. Long exposure to high temperatures will eventually bend and warp. < Do not expose records to detach. TEAC does not endorse any specific product but, ...Or call our automated Service Agency Locator at (323) 726-0303, extension 840 to Replace the Stylus < Do not touch the record's grooves. Please contact TEAC Parts at : (800) 447- Handling Records How to order. Keep them in a cool, dry place. < To avoid dust and scratches, keep...
...of a worn-out stylus may damage the record. Records stored horizontally will warp the record. < Do not store your records in the trunk of your car. Long exposure to high temperatures will eventually bend and warp. < Do not expose records to detach. TEAC does not endorse any specific product but, ...Or call our automated Service Agency Locator at (323) 726-0303, extension 840 to Replace the Stylus < Do not touch the record's grooves. Please contact TEAC Parts at : (800) 447- Handling Records How to order. Keep them in a cool, dry place. < To avoid dust and scratches, keep...
Owners Manual
Page 6
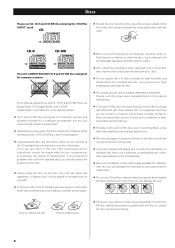
... that could cause the laser pickup to "skip." < Do not expose discs to direct sunlight or high humidity and temperature for computer systems and properly recorded by the edges. < Never use CD, CD-R and CD-RW discs bearing the "DIGITAL AUDIO" mark. Discs Please use such chemicals as to the care... precautions supplied with this unit will warp the disc. < Do not play back correctly in this player. If you use such discs in this unit, TEAC Corporation and its storage case, press down on the disc tray with the label side uppermost. (Compact discs can damage the unit: How to remove...
... that could cause the laser pickup to "skip." < Do not expose discs to direct sunlight or high humidity and temperature for computer systems and properly recorded by the edges. < Never use CD, CD-R and CD-RW discs bearing the "DIGITAL AUDIO" mark. Discs Please use such chemicals as to the care... precautions supplied with this unit will warp the disc. < Do not play back correctly in this player. If you use such discs in this unit, TEAC Corporation and its storage case, press down on the disc tray with the label side uppermost. (Compact discs can damage the unit: How to remove...

Owners Manual
Page 7
... play back the audio until the latch engages. 3. If the latch does not engage, repeat these steps again. Once they have been used for other recordings. CD-R, by the edges to avoid pinching your fingers as it stops. 2. To Open: 1 Lift the turntable cover all the way up until it stops... of contents is space on every audio CD player. Lift the cover all the way up until it closes. Recordable discs In this table of writing this manual, we use the term "recordable" disc to describe a CD-R or CD-RW disc that there is known as a CD-R disc, but the last track...
... play back the audio until the latch engages. 3. If the latch does not engage, repeat these steps again. Once they have been used for other recordings. CD-R, by the edges to avoid pinching your fingers as it stops. 2. To Open: 1 Lift the turntable cover all the way up until it stops... of contents is space on every audio CD player. Lift the cover all the way up until it closes. Recordable discs In this table of writing this manual, we use the term "recordable" disc to describe a CD-R or CD-RW disc that there is known as a CD-R disc, but the last track...
Owners Manual
Page 9
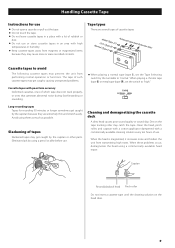
...@) or metal tape (type !%), set the Tape Selecting switch by using them as much as possible. Handling Cassette Tape Instructions for recording 90 minutes or longer sometimes get caught by the capstan or other parts. The tape of such cassette tapes may prevent the unit from.... Avoid using a pencil or alike before use . When these problems occur, demagnetize the head using a commercially available head eraser. Capstan Record/playback head Pinch roller Do not insert a cassette tape until the cleaning solution on the tape tracking roller may get caught, causing unexpected ...
...@) or metal tape (type !%), set the Tape Selecting switch by using them as much as possible. Handling Cassette Tape Instructions for recording 90 minutes or longer sometimes get caught by the capstan or other parts. The tape of such cassette tapes may prevent the unit from.... Avoid using a pencil or alike before use . When these problems occur, demagnetize the head using a commercially available head eraser. Capstan Record/playback head Pinch roller Do not insert a cassette tape until the cleaning solution on the tape tracking roller may get caught, causing unexpected ...

Owners Manual
Page 11
... the cartridge in front and the side to secure the turntable. J Input Selecting switch When PHONO/TAPE is playing, make sure to suspend playing/recording temporarily. Rewind (m) Use this button to stop playing a tape. Pause (J) Use this button to "normal." When playing a chrome tape (type...when shipped from the factory) When you transport the unit, turn the screw counterclockwise to play a tape. Side view of the arrow. When a record or cassette tape is selected by pulling it clockwise with a coin or screwdriver. C cue-lever Use this switch to lift the tone arm. A...
... the cartridge in front and the side to secure the turntable. J Input Selecting switch When PHONO/TAPE is playing, make sure to suspend playing/recording temporarily. Rewind (m) Use this button to stop playing a tape. Pause (J) Use this button to "normal." When playing a chrome tape (type...when shipped from the factory) When you transport the unit, turn the screw counterclockwise to play a tape. Side view of the arrow. When a record or cassette tape is selected by pulling it clockwise with a coin or screwdriver. C cue-lever Use this switch to lift the tone arm. A...
Owners Manual
Page 13
... the volume level to adjust the volume. Hold down these buttons to skip tracks. Press the FM/AM button to listen to stop playback or recording. G Display H TUNED indicator Lights when a station is on or off while the headphones are plugged in. I Speakers (stereo) J CD operation buttons ...In CD mode, use of CD. Press the PHONO/TAPE/AUX button and select AUX to listen to the external source connected to start playback, recording, finalizing and erasing. Press the CD button to erase or unfinalize a CD-RW disc. Then insert the plug from speakers will light. M...
... the volume level to adjust the volume. Hold down these buttons to skip tracks. Press the FM/AM button to listen to stop playback or recording. G Display H TUNED indicator Lights when a station is on or off while the headphones are plugged in. I Speakers (stereo) J CD operation buttons ...In CD mode, use of CD. Press the PHONO/TAPE/AUX button and select AUX to listen to the external source connected to start playback, recording, finalizing and erasing. Press the CD button to erase or unfinalize a CD-RW disc. Then insert the plug from speakers will light. M...
Owners Manual
Page 14
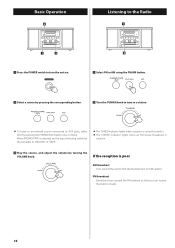
... around the unit to find the best position for AM stations. When PHONO/TAPE is selected, set the Input Selecting switch by the turntable to "RECORD" or "TAPE." < The TUNED indicator lights when a station is correctly tuned in. < The STEREO indicator lights when an FM stereo broadcast is poor AM broadcast...
... around the unit to find the best position for AM stations. When PHONO/TAPE is selected, set the Input Selecting switch by the turntable to "RECORD" or "TAPE." < The TUNED indicator lights when a station is correctly tuned in. < The STEREO indicator lights when an FM stereo broadcast is poor AM broadcast...
Owners Manual
Page 15
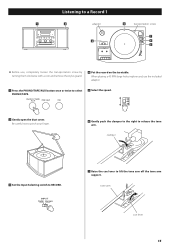
..., completely loosen the transportation screw by turning them clockwise with a coin and remove the stylus guard. 4 Put the record on the turntable. clamper 3 Set the Input Selecting switch to RECORD. 7 Raise the cue lever to select PHONO/TAPE. 5 Select the speed. 2 Gently open the dust cover. ... arm cue lever 15 Listening to release the tone arm. Be careful not to pinch your finger. 6 Gently push the clamper to the right to a Record 1 1 2 adaptor 4 transportation screw 7 3 6 5 < Before use the included adaptor. 1 Press the PHONO/TAPE/AUX button once or twice to lift ...
..., completely loosen the transportation screw by turning them clockwise with a coin and remove the stylus guard. 4 Put the record on the turntable. clamper 3 Set the Input Selecting switch to RECORD. 7 Raise the cue lever to select PHONO/TAPE. 5 Select the speed. 2 Gently open the dust cover. ... arm cue lever 15 Listening to release the tone arm. Be careful not to pinch your finger. 6 Gently push the clamper to the right to a Record 1 1 2 adaptor 4 transportation screw 7 3 6 5 < Before use the included adaptor. 1 Press the PHONO/TAPE/AUX button once or twice to lift ...
Owners Manual
Page 16
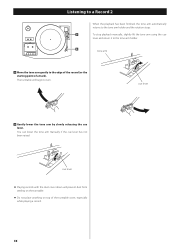
You can lower the tone arm manually if the cue lever has not been raised. Listening to a Record 2 When the playback has been finished, the tone arm automatically returns to the tone arm holder and the rotation stops. 9 To stop playback manually, slightly ... holder. 8 tone arm 8 Move the tone arm gently to turn. cue lever < Playing records with the dust cover down will begin to the edge of the record (or the starting point of the turntable cover, especially while playing a record. 16 The turntable will prevent dust from settling on the turntable. < Do not place...
You can lower the tone arm manually if the cue lever has not been raised. Listening to a Record 2 When the playback has been finished, the tone arm automatically returns to the tone arm holder and the rotation stops. 9 To stop playback manually, slightly ... holder. 8 tone arm 8 Move the tone arm gently to turn. cue lever < Playing records with the dust cover down will begin to the edge of the record (or the starting point of the turntable cover, especially while playing a record. 16 The turntable will prevent dust from settling on the turntable. < Do not place...
Owners Manual
Page 17
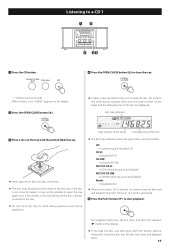
... of the tracks and the total play time of the disc < The disc type indicator shows the type of disc currently loaded. CD: A commercial pre-recorded CD CD-R: A finalized CD-R CD-RW: A finalized CD-RW NO TOC CD-R: A CD-R which has yet to be finalized NO TOC CD-RW: A CD-RW...
... of the tracks and the total play time of the disc < The disc type indicator shows the type of disc currently loaded. CD: A commercial pre-recorded CD CD-R: A finalized CD-R CD-RW: A finalized CD-RW NO TOC CD-R: A CD-R which has yet to be finalized NO TOC CD-RW: A CD-RW...
Owners Manual
Page 18
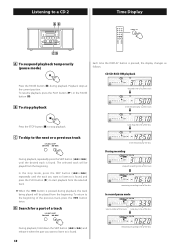
... pressed during playback. C To skip to stop playback elapsed time of current track time remaining for the disc During recording elapsed recording time of the track remaining recording time of the disc In record pause mode total number of the tracks total play time of the disc During playback, hold down the SKIP button... found . Playback stops at the current position. To resume playback, press the PLAY button (y) or the PAUSE button (J). button twice. button is found . 18 remaining recording time of the previous track, press the . B To stop playback.
... pressed during playback. C To skip to stop playback elapsed time of current track time remaining for the disc During recording elapsed recording time of the track remaining recording time of the disc In record pause mode total number of the tracks total play time of the disc During playback, hold down the SKIP button... found . Playback stops at the current position. To resume playback, press the PLAY button (y) or the PAUSE button (J). button twice. button is found . 18 remaining recording time of the previous track, press the . B To stop playback.
Owners Manual
Page 21
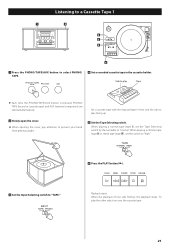
Listening to a Cassette Tape 1 1 2 3 5 4 6 1 Press the PHONO/TAPE/AUX button to select PHONO/ TAPE. 4 Set a recorded cassette tape in front and the side to play facing up. 2 Slowly open the cover. < When opening the cover, pay attention to prevent your hand ...from getting caught. 5 Set the Tape Selecting switch. To play Tape < Each time the PHONO/TAPE/AUX button is pressed, PHONO/ TAPE (record or cassette tape) and AUX (external component) are selected alternatively. Side to play the other side, turn over the cassette tape. 21 Set a cassette tape...
Listening to a Cassette Tape 1 1 2 3 5 4 6 1 Press the PHONO/TAPE/AUX button to select PHONO/ TAPE. 4 Set a recorded cassette tape in front and the side to play facing up. 2 Slowly open the cover. < When opening the cover, pay attention to prevent your hand ...from getting caught. 5 Set the Tape Selecting switch. To play Tape < Each time the PHONO/TAPE/AUX button is pressed, PHONO/ TAPE (record or cassette tape) and AUX (external component) are selected alternatively. Side to play the other side, turn over the cassette tape. 21 Set a cassette tape...
Owners Manual
Page 22
...MD or DAT. This standard has been established to restrict digital-to-digital copying to fastforward or rewind a tape respectively. To stop . digital recording is fast-forwarded or rewound to the end, make sure that you understand the following points: < The unit requires Digital Audio CD-R or ...CD-RW media for a few seconds. Rule 2 When an analog source such as follows: Rule 1 A digital recording is possible from the beginning of a track may differ slightly from it. < You can be erased from the original one. The basic rules governing this...
...MD or DAT. This standard has been established to restrict digital-to-digital copying to fastforward or rewind a tape respectively. To stop . digital recording is fast-forwarded or rewound to the end, make sure that you understand the following points: < The unit requires Digital Audio CD-R or ...CD-RW media for a few seconds. Rule 2 When an analog source such as follows: Rule 1 A digital recording is possible from the beginning of a track may differ slightly from it. < You can be erased from the original one. The basic rules governing this...
Owners Manual
Page 23
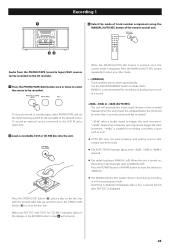
...track increment. "-20db" takes a louder signal to the desired source. MANUAL is recommended for more than 2 seconds, and sound has re-started. To record a record or cassette tape, select PHONO/TAPE and set the Input Selecting switch by the turntable to trigger the track increment. Make sure "NO TOC" and... to select the source to close the disc tray. When the MANUAL/AUTO REC button is pressed once, the current mode is MANUAL (off ). Recording 1 1 3 Select the mode of track number assignment using the MANUAL/AUTO REC button of the remote control unit. 22 Audio from the PHONO/...
...track increment. "-20db" takes a louder signal to the desired source. MANUAL is recommended for more than 2 seconds, and sound has re-started. To record a record or cassette tape, select PHONO/TAPE and set the Input Selecting switch by the turntable to trigger the track increment. Make sure "NO TOC" and... to select the source to close the disc tray. When the MANUAL/AUTO REC button is pressed once, the current mode is MANUAL (off ). Recording 1 1 3 Select the mode of track number assignment using the MANUAL/AUTO REC button of the remote control unit. 22 Audio from the PHONO/...
Owners Manual
Page 24
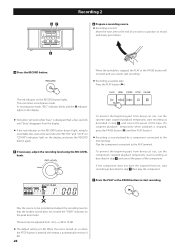
...is turned on the peak level meter. To prevent the beginning part from being cut out, cue the cassette tape, suspend playback temporarily, start recording as described in step 7 , and cancel the pause of the component. To prevent the beginning part from being cut out, cue the component... in step 7 then play the component. 7 Press the PLAY or the PAUSE button to 0 dB. 24 47 Recording 2 6 Prepare a recording source. < Recording a record Move the tone arm to the end of a record or a position to the AUX terminal. Play the source to be adjusted from the display. < If the red...
...is turned on the peak level meter. To prevent the beginning part from being cut out, cue the cassette tape, suspend playback temporarily, start recording as described in step 7 , and cancel the pause of the component. To prevent the beginning part from being cut out, cue the component... in step 7 then play the component. 7 Press the PLAY or the PAUSE button to 0 dB. 24 47 Recording 2 6 Prepare a recording source. < Recording a record Move the tone arm to the end of a record or a position to the AUX terminal. Play the source to be adjusted from the display. < If the red...
Owners Manual
Page 25
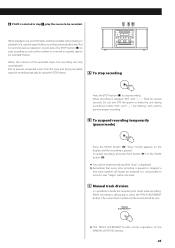
... button (J). But to prevent unwanted noise from the tone arm being recorded, stop recording as soon as the number on the display, and the recording is paused. When recording is possible to divide the recording into tracks while recording. C Manual track division It is stopped, "REC" and "-------" ...always be incremented by using the STOP button. The current track number will stop recording. C AB When playback of a record finishes and the turntable stops rotating or playback of the turntable stops, the recording will be assigned. 8 If AUX is selected in two "stages" within ...
... button (J). But to prevent unwanted noise from the tone arm being recorded, stop recording as soon as the number on the display, and the recording is paused. When recording is possible to divide the recording into tracks while recording. C Manual track division It is stopped, "REC" and "-------" ...always be incremented by using the STOP button. The current track number will stop recording. C AB When playback of a record finishes and the turntable stops rotating or playback of the turntable stops, the recording will be assigned. 8 If AUX is selected in two "stages" within ...
Owners Manual
Page 26
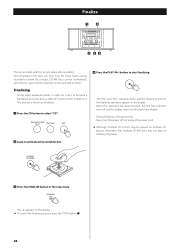
... to select "CD". This process is space, further material can be played on ordinary CD players, remember that finalized CD-RW discs may be recorded on them . When the operation has been finished, the NO TOC indicator turns off nor unplug the power cord. < Although finalized CD-R discs... explained earlier, in order for the finalizing operation appears in the stop mode. Finalize 1 4 3 22 This section deals with the actions taken after recording. Once finalized, CD-R discs are truly final. No more tracks can be "unfinalized", and if there is known as finalizing. 1 Press the CD...
... to select "CD". This process is space, further material can be played on ordinary CD players, remember that finalized CD-RW discs may be recorded on them . When the operation has been finished, the NO TOC indicator turns off nor unplug the power cord. < Although finalized CD-R discs... explained earlier, in order for the finalizing operation appears in the stop mode. Finalize 1 4 3 22 This section deals with the actions taken after recording. Once finalized, CD-R discs are truly final. No more tracks can be "unfinalized", and if there is known as finalizing. 1 Press the CD...

