Owners Manual
Page 1
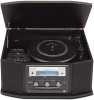
Z CEC6P10501630 GF-450K7 CD recorder with turntable/cassette player OWNER'S MANUAL
Z CEC6P10501630 GF-450K7 CD recorder with turntable/cassette player OWNER'S MANUAL
Owners Manual
Page 2
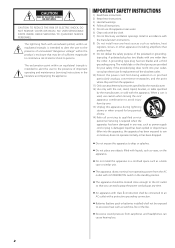
... manufacturer's instructions. 8) Do not install near water. 6) Clean only with one wider than the other apparatus (including amplifiers) that may be located close enough to persons. NO USER-SERVICEABLE PARTS INSIDE. IMPORTANT SAFETY INSTRUCTIONS 1) Read these instructions. 2) Keep these instructions. 3) Heed all warnings. 4) Follow all servicing to avoid injury from earphones and headphones can easily grasp the power cord plug...
... manufacturer's instructions. 8) Do not install near water. 6) Clean only with one wider than the other apparatus (including amplifiers) that may be located close enough to persons. NO USER-SERVICEABLE PARTS INSIDE. IMPORTANT SAFETY INSTRUCTIONS 1) Read these instructions. 2) Keep these instructions. 3) Heed all warnings. 4) Follow all servicing to avoid injury from earphones and headphones can easily grasp the power cord plug...
Owners Manual
Page 3
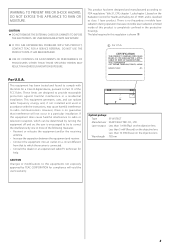
...output : Less than 1 mW (Play) on the objective lens Less than 5 mW (Record) on the objective lens Less than 10 mW (Erase) on the Radiation Control for compliance will not occur in a residential installation. There is not hazardous invisible laser ...U.S.A. CAUTION Changes or modifications to provide reasonable protection against harmful interference in a particular installation. NO USER SERVICEABLE PARTS ARE WITHIN! < IF YOU ARE EXPERIENCING PROBLEMS WITH THIS PRODUCT, CONTACT TEAC FOR A SERVICE REFERRAL. CAUTION < DO NOT REMOVE THE EXTERNAL CASES OR CABINETS TO EXPOSE THE ...
...output : Less than 1 mW (Play) on the objective lens Less than 5 mW (Record) on the objective lens Less than 10 mW (Erase) on the Radiation Control for compliance will not occur in a residential installation. There is not hazardous invisible laser ...U.S.A. CAUTION Changes or modifications to provide reasonable protection against harmful interference in a particular installation. NO USER SERVICEABLE PARTS ARE WITHIN! < IF YOU ARE EXPERIENCING PROBLEMS WITH THIS PRODUCT, CONTACT TEAC FOR A SERVICE REFERRAL. CAUTION < DO NOT REMOVE THE EXTERNAL CASES OR CABINETS TO EXPOSE THE ...
Owners Manual
Page 4
...TEAC. Use a clean, dry cloth. < Keep this might damage the finish. If the unit is to vibrations and excessive dust, heat, cold or moisture. < Do not place the unit on an amplifier/receiver. < Do not open /close the turntable cover 7 Remote Control Unit 8 Handling Cassette tape 9 Connection 10 Parts of the Turntable...Before Recording 22 Recording 23 Finalize 26 Erase or Unfinalize a CD-RW 27 Troubleshooting 28 Messages 29 Specifications 29 Read this unit. Read this manual carefully to get into the unit, contact your dealer or service company. < When removing the power plug ...
...TEAC. Use a clean, dry cloth. < Keep this might damage the finish. If the unit is to vibrations and excessive dust, heat, cold or moisture. < Do not place the unit on an amplifier/receiver. < Do not open /close the turntable cover 7 Remote Control Unit 8 Handling Cassette tape 9 Connection 10 Parts of the Turntable...Before Recording 22 Recording 23 Finalize 26 Erase or Unfinalize a CD-RW 27 Troubleshooting 28 Messages 29 Specifications 29 Read this unit. Read this manual carefully to get into the unit, contact your dealer or service company. < When removing the power plug ...
Owners Manual
Page 5
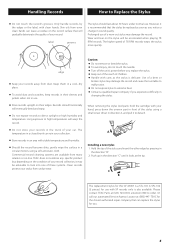
... temperature. A Installing a new stylus 1. Caution: < Do not remove or bend the stylus. < To avoid injury, do not touch the needle. < Turn off the unit's power before you . 5 TEAC does not endorse any specific product but, depending on their sleeves and jackets when not in use with your collection. < Store records in their edges. Records stored horizontally will be replaced as soon...
... temperature. A Installing a new stylus 1. Caution: < Do not remove or bend the stylus. < To avoid injury, do not touch the needle. < Turn off the unit's power before you . 5 TEAC does not endorse any specific product but, depending on their sleeves and jackets when not in use with your collection. < Store records in their edges. Records stored horizontally will be replaced as soon...
Owners Manual
Page 6
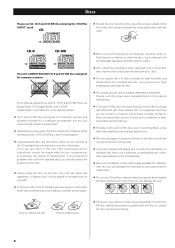
If you experience problems with such non-standard discs, you should be responsible for computer systems and properly recorded by the edges. < Never use such chemicals as to the recorded side. < Never use to avoid ...of heat and ultraviolet rays than ordinary CDs. Discs Please use such discs in this unit, TEAC Corporation and its storage case, press down on the center of the disc. < Always ...of the recording, some CD-R/CD-RW discs may cause irreparable harm to the playing mechanisms. < CD-R and CD-RW discs are more sensitive to malfunction. < Do not use CDs with this player. If ...
If you experience problems with such non-standard discs, you should be responsible for computer systems and properly recorded by the edges. < Never use such chemicals as to the recorded side. < Never use to avoid ...of heat and ultraviolet rays than ordinary CDs. Discs Please use such discs in this unit, TEAC Corporation and its storage case, press down on the center of the disc. < Always ...of the recording, some CD-R/CD-RW discs may cause irreparable harm to the playing mechanisms. < CD-R and CD-RW discs are more sensitive to malfunction. < Do not use CDs with this player. If ...

Owners Manual
Page 7
...cover will not be played satisfactorily on the majority of the disc. To Open: 1 Lift the turntable cover all the way up until a final table of contents (TOC) has been written at the start of audio CD players. The process of writing this manual, we use the term "recordable" disc to describe a... on a CD-R or CD-RW disc, a standard CD player will now stay open /close the turntable cover About CD-R and CD-RW discs CD-R discs can be written to play back satisfactorily on the disc can be erased or re-recorded. However, if space is available on the disc. < Repeat...
...cover will not be played satisfactorily on the majority of the disc. To Open: 1 Lift the turntable cover all the way up until a final table of contents (TOC) has been written at the start of audio CD players. The process of writing this manual, we use the term "recordable" disc to describe a... on a CD-R or CD-RW disc, a standard CD player will now stay open /close the turntable cover About CD-R and CD-RW discs CD-R discs can be written to play back satisfactorily on the disc can be erased or re-recorded. However, if space is available on the disc. < Repeat...
Owners Manual
Page 9
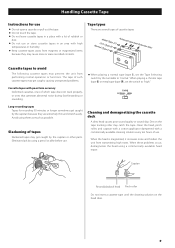
...Instructions for recording 90 minutes or longer sometimes get caught, causing unexpected problems. Cassette tapes with poor form accuracy Deformed cassettes, ones of which tape does not track properly, or ones that generate abnormal noise during fast-forwarding or rewinding. < When playing a normal tape (type !), set... high notes. Dirt on the head dries. 9 When playing a chrome tape (type @) or metal tape (type !%), set the Tape Selecting switch by the capstan or other parts. Slackening of use . When these problems occur, demagnetize the head using a pencil or alike before...
...Instructions for recording 90 minutes or longer sometimes get caught, causing unexpected problems. Cassette tapes with poor form accuracy Deformed cassettes, ones of which tape does not track properly, or ones that generate abnormal noise during fast-forwarding or rewinding. < When playing a normal tape (type !), set... high notes. Dirt on the head dries. 9 When playing a chrome tape (type @) or metal tape (type !%), set the Tape Selecting switch by the capstan or other parts. Slackening of use . When these problems occur, demagnetize the head using a pencil or alike before...

Owners Manual
Page 11
... completely loosen the screw by turning it G straight off the front of the cartridge in front and the side to stop playing prior to "high." J Input Selecting switch When PHONO/TAPE is playing, make sure to stop playing a tape. G Cassette tape operation button Play (y) Use this button to ...button to play a tape. When playing a chrome tape (type II) or metal tape (type IV), set the Tape Selecting switch to switch between "RECORD" and "TAPE." K 45 RPM adaptor 11 Parts of the Turntable A B K C J D I ), set the switch to using the switch. When a record or cassette...
... completely loosen the screw by turning it G straight off the front of the cartridge in front and the side to stop playing prior to "high." J Input Selecting switch When PHONO/TAPE is playing, make sure to stop playing a tape. G Cassette tape operation button Play (y) Use this button to ...button to play a tape. When playing a chrome tape (type II) or metal tape (type IV), set the Tape Selecting switch to switch between "RECORD" and "TAPE." K 45 RPM adaptor 11 Parts of the Turntable A B K C J D I ), set the switch to using the switch. When a record or cassette...
Owners Manual
Page 13
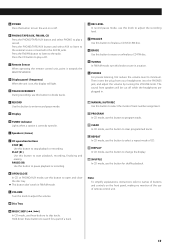
...play a record. PLAY (y) Use this button to pause playback or recording. PAUSE (J) Use this button to start playback, recording, finalizing and erasing. P FINALIZE Use this knob to adjust the volume. L VOLUME Turn this button to finalize a CD-R/CD-RW disc. C Remote Sensor When operating the remote control...the use this button to divide tracks. I Speakers (stereo) J CD operation buttons STOP (H) Use this button to select the mode of remote control unit. O REC LEVEL In record pause mode, use of track number assignment. T MANUAL/AUTO REC Use this knob to skip tracks....
...play a record. PLAY (y) Use this button to pause playback or recording. PAUSE (J) Use this button to start playback, recording, finalizing and erasing. P FINALIZE Use this knob to adjust the volume. L VOLUME Turn this button to finalize a CD-R/CD-RW disc. C Remote Sensor When operating the remote control...the use this button to divide tracks. I Speakers (stereo) J CD operation buttons STOP (H) Use this button to select the mode of remote control unit. O REC LEVEL In record pause mode, use of track number assignment. T MANUAL/AUTO REC Use this knob to skip tracks....
Owners Manual
Page 14
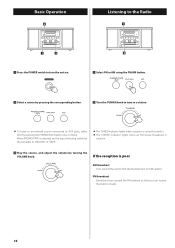
... is selected, set the Input Selecting switch by the turntable to "RECORD" or "TAPE." < The TUNED indicator lights when a station is correctly tuned in a station. < To listen to an external source connected to AUX jacks, select AUX by turning the VOLUME knob. FM broadcast Extend and turn the unit on... 2 Turn the TUNING knob to tune in . < The STEREO indicator lights when an FM stereo broadcast is poor AM broadcast Turn around the FM antenna so that you can receive the stations clearly. 14 Basic Operation 2 Listening to the Radio 1 1 3 1 Press the POWER switch to turn around ...
... is selected, set the Input Selecting switch by the turntable to "RECORD" or "TAPE." < The TUNED indicator lights when a station is correctly tuned in a station. < To listen to an external source connected to AUX jacks, select AUX by turning the VOLUME knob. FM broadcast Extend and turn the unit on... 2 Turn the TUNING knob to tune in . < The STEREO indicator lights when an FM stereo broadcast is poor AM broadcast Turn around the FM antenna so that you can receive the stations clearly. 14 Basic Operation 2 Listening to the Radio 1 1 3 1 Press the POWER switch to turn around ...
Owners Manual
Page 15
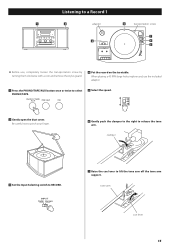
... dust cover. clamper 3 Set the Input Selecting switch to RECORD. 7 Raise the cue lever to release the tone arm. tone arm cue lever 15 When playing a 45 RPM large hole single record, use , completely loosen the transportation screw by turning them clockwise with a coin and remove the stylus guard. 4 Put the record on the turntable. Be careful not...
... dust cover. clamper 3 Set the Input Selecting switch to RECORD. 7 Raise the cue lever to release the tone arm. tone arm cue lever 15 When playing a 45 RPM large hole single record, use , completely loosen the transportation screw by turning them clockwise with a coin and remove the stylus guard. 4 Put the record on the turntable. Be careful not...
Owners Manual
Page 17
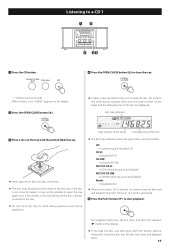
...then press the PLAY button without having first closed , so you should ensure the disc is always centered on the tray. < Do not force the tray by hand during loading. When no sound is set, "nOdISC"... may start playback. No buttons will work during opening and closing operations. total number of the tracks total play time of the disc tray. If the disc is inserted, its contents may... be detected and playback may not be possible to load the disc. CD: A commercial pre-recorded CD CD-R: A ...
...then press the PLAY button without having first closed , so you should ensure the disc is always centered on the tray. < Do not force the tray by hand during loading. When no sound is set, "nOdISC"... may start playback. No buttons will work during opening and closing operations. total number of the tracks total play time of the disc tray. If the disc is inserted, its contents may... be detected and playback may not be possible to load the disc. CD: A commercial pre-recorded CD CD-R: A ...
Owners Manual
Page 21
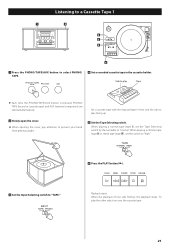
.../TAPE/AUX button to select PHONO/ TAPE. 4 Set a recorded cassette tape in front and the side to play facing up. 2 Slowly open the cover. < When opening the cover, pay attention to prevent your hand from getting caught. 5 Set the Tape Selecting switch. Side to play the other side, turn over the cassette tape. 21 When the...
.../TAPE/AUX button to select PHONO/ TAPE. 4 Set a recorded cassette tape in front and the side to play facing up. 2 Slowly open the cover. < When opening the cover, pay attention to prevent your hand from getting caught. 5 Set the Tape Selecting switch. Side to play the other side, turn over the cassette tape. 21 When the...
Owners Manual
Page 23
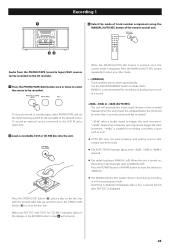
...2 seconds, and sound has re-started. Switching is disabled immediately after "NO TOC" is turned on the CD recorder. 1 Press the PHONO/TAPE/AUX button once or twice to select the source to be recorded. "-20db" takes a louder signal to the desired source. Make sure "NO TOC" and... the track increment. Recording 1 1 3 Select the mode of track number assignment using the MANUAL/AUTO REC button of the remote control unit. 22 Audio from the PHONO/TAPE (cassette tapes)/AUX sources can be recorded on , the setting is automatically reset to MANUAL (off ). When the MANUAL/AUTO REC button is...
...2 seconds, and sound has re-started. Switching is disabled immediately after "NO TOC" is turned on the CD recorder. 1 Press the PHONO/TAPE/AUX button once or twice to select the source to be recorded. "-20db" takes a louder signal to the desired source. Make sure "NO TOC" and... the track increment. Recording 1 1 3 Select the mode of track number assignment using the MANUAL/AUTO REC button of the remote control unit. 22 Audio from the PHONO/TAPE (cassette tapes)/AUX sources can be recorded on , the setting is automatically reset to MANUAL (off ). When the MANUAL/AUTO REC button is...
Owners Manual
Page 24
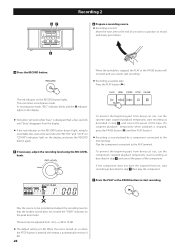
...RECORD button lights. When the unit is turned on the peak level meter. 47 Recording 2 6 Prepare a recording source. < Recording a record Move the tone arm to the end of the component. To prevent the beginning part from -00 (-∞) dB to 18 dB. < The default setting is stopped, the PLAY ...suspend playback temporarily, start recording. When the turntable is 0 dB. The red indicator on the display, and press the RECORD button again. 5 If necessary, adjust the recording level using the REC LEVEL knob. The level can be recorded and adjust the recording level so that the loudest...
...RECORD button lights. When the unit is turned on the peak level meter. 47 Recording 2 6 Prepare a recording source. < Recording a record Move the tone arm to the end of the component. To prevent the beginning part from -00 (-∞) dB to 18 dB. < The default setting is stopped, the PLAY ...suspend playback temporarily, start recording. When the turntable is 0 dB. The red indicator on the display, and press the RECORD button again. 5 If necessary, adjust the recording level using the REC LEVEL knob. The level can be recorded and adjust the recording level so that the loudest...
Owners Manual
Page 25
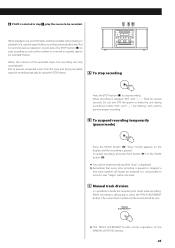
Do not turn OFF the power or shake the unit during recording or when "REC" and "-----" are blinking. It is not possible to record in step 1 , play the source to stop recording as soon as the number on the display, and the recording is taking place, press the TRACK INCREMENT button. C Manual track division It is stopped, "REC" and "-------" blink...
Do not turn OFF the power or shake the unit during recording or when "REC" and "-----" are blinking. It is not possible to record in step 1 , play the source to stop recording as soon as the number on the display, and the recording is taking place, press the TRACK INCREMENT button. C Manual track division It is stopped, "REC" and "-------" blink...
Owners Manual
Page 27
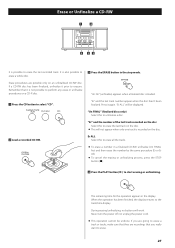
... STOP button (H). 4 Press the PLAY button (y) to the track/time display. During erasing/unfinalizing, no buttons will be undone. "Er" and the last track number appear when the disc hasn't been finalized. Never turn the power off nor unplug the power cord. < This operation cannot be... displayed. Press it is not possible to erase. 27 Erase procedures are recordings that it again. "Er" and the number of the last track recorded on ...
... STOP button (H). 4 Press the PLAY button (y) to the track/time display. During erasing/unfinalizing, no buttons will be undone. "Er" and the last track number appear when the disc hasn't been finalized. Never turn the power off nor unplug the power cord. < This operation cannot be... displayed. Press it is not possible to erase. 27 Erase procedures are recordings that it again. "Er" and the number of the last track recorded on ...
Owners Manual
Page 28
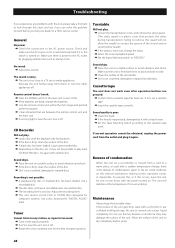
... stylus is power to avoid vibration and shock. e If a TV is too weak. Troubleshooting If you experience any problems with a head eraser. Tuner Cannot listen to a TV set or similar appliances. Cassette tape The unit does not work . e The unit is not possible. it ON. Recording is too close to any excess liquid completely. Turntable Will not play...
... stylus is power to avoid vibration and shock. e If a TV is too weak. Troubleshooting If you experience any problems with a head eraser. Tuner Cannot listen to a TV set or similar appliances. Cassette tape The unit does not work . e The unit is not possible. it ON. Recording is too close to any excess liquid completely. Turntable Will not play...

Owners Manual
Page 29
... 4 ohms GENERAL Power requirements 120V, 60Hz Power consumption 55 W Dimensions (W x H x D 480 x 230 x 380 mm (18 7/8" x 9 1/16" x 14 15/16") Weight 11 kg (24 1/4 lb) Standard Accessories Owner's manual x 1 Warranty card x 1 45 RPM adaptor x 1 Remote control unit (RC-992) x 1 Battery (AA, R6, SUM-3) x 2 Quick Start Guide for recording x 1 Stereo RCA pin cable x 1 < Design and specifications are subject to turn the unit...
... 4 ohms GENERAL Power requirements 120V, 60Hz Power consumption 55 W Dimensions (W x H x D 480 x 230 x 380 mm (18 7/8" x 9 1/16" x 14 15/16") Weight 11 kg (24 1/4 lb) Standard Accessories Owner's manual x 1 Warranty card x 1 45 RPM adaptor x 1 Remote control unit (RC-992) x 1 Battery (AA, R6, SUM-3) x 2 Quick Start Guide for recording x 1 Stereo RCA pin cable x 1 < Design and specifications are subject to turn the unit...


