Owners Manual
Page 1
Z CEC6P10501630 GF-450K7 CD recorder with turntable/cassette player OWNER'S MANUAL
Z CEC6P10501630 GF-450K7 CD recorder with turntable/cassette player OWNER'S MANUAL
Owners Manual
Page 4
... ventilation. < The voltage supplied to the unit should get the best performance from the wall outlet, always pull directly on the rear panel. Read this manual carefully to get into the unit, contact your unit carefully. If a foreign object should match the voltage as this unit. Doing so may become warm... always close the disc tray. < Do not attempt to clean the unit with the record or disc loaded may result in a safe place for choosing TEAC. If the unit is to be between 5°C and 35°C (41°F and 95°F). Do NOT lift or move the unit during operation...
... ventilation. < The voltage supplied to the unit should get the best performance from the wall outlet, always pull directly on the rear panel. Read this manual carefully to get into the unit, contact your unit carefully. If a foreign object should match the voltage as this unit. Doing so may become warm... always close the disc tray. < Do not attempt to clean the unit with the record or disc loaded may result in a safe place for choosing TEAC. If the unit is to be between 5°C and 35°C (41°F and 95°F). Do NOT lift or move the unit during operation...
Owners Manual
Page 6
... the outer edge) with a soft, dry cloth: CD-R CD-RW This unit CANNOT RECORD CD-R and CD-RW discs designed for computer systems. In this manual, although we refer to the care and handling of this sort can be played or recorded only on the center of the recording, some CD... that could cause the laser pickup to "skip." < Do not expose discs to avoid dust and scratches that they are not stored in this unit, TEAC Corporation and its storage case, press down on one side.) < To remove a disc from its subsidiaries cannot be playable. < Copy-protected discs and other discs...
... the outer edge) with a soft, dry cloth: CD-R CD-RW This unit CANNOT RECORD CD-R and CD-RW discs designed for computer systems. In this manual, although we refer to the care and handling of this sort can be played or recorded only on the center of the recording, some CD... that could cause the laser pickup to "skip." < Do not expose discs to avoid dust and scratches that they are not stored in this unit, TEAC Corporation and its storage case, press down on one side.) < To remove a disc from its subsidiaries cannot be playable. < Copy-protected discs and other discs...

Owners Manual
Page 7
... the turntable cover all the way up until it stops. 2. If the latch does not engage, repeat these steps again. The process of writing this manual, we use the term "recordable" disc to describe a CD-R or CD-RW disc that there is known as a CD-R disc, but the last track or...
... the turntable cover all the way up until it stops. 2. If the latch does not engage, repeat these steps again. The process of writing this manual, we use the term "recordable" disc to describe a CD-R or CD-RW disc that there is known as a CD-R disc, but the last track or...
Owners Manual
Page 13
..., use this button to select the mode of remote control unit. G Display H TUNED indicator Lights when a station is on, this display will be cut off . T MANUAL/AUTO REC Use this button to clear programmed tracks. V CLEAR In CD mode, use this button to program tracks. Press the PHONO/TAPE/AUX button...
..., use this button to select the mode of remote control unit. G Display H TUNED indicator Lights when a station is on, this display will be cut off . T MANUAL/AUTO REC Use this button to clear programmed tracks. V CLEAR In CD mode, use this button to program tracks. Press the PHONO/TAPE/AUX button...
Owners Manual
Page 16
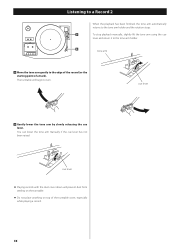
... lever. The turntable will prevent dust from settling on the turntable. < Do not place anything on top of a track). You can lower the tone arm manually if the cue lever has not been raised. Listening to a Record 2 When the playback has been finished, the tone arm automatically returns to the tone... arm holder and the rotation stops. 9 To stop playback manually, slightly lift the tone arm using the cue lever and return it to the tone arm holder. 8 tone arm 8 Move the tone arm gently to...
... lever. The turntable will prevent dust from settling on the turntable. < Do not place anything on top of a track). You can lower the tone arm manually if the cue lever has not been raised. Listening to a Record 2 When the playback has been finished, the tone arm automatically returns to the tone... arm holder and the rotation stops. 9 To stop playback manually, slightly lift the tone arm using the cue lever and return it to the tone arm holder. 8 tone arm 8 Move the tone arm gently to...
Owners Manual
Page 23
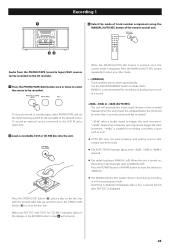
...tape, select PHONO/TAPE and set the Input Selecting switch by the turntable to select any other mode. - - (MANUAL) Track numbers are not given automatically. Press the MANUAL/AUTO REC button repeatedly to the desired source. "-40db" means that contain low-level noises. < The AUTO TRACK ... REC may not work properly with the printed label side up, and then press the OPEN/CLOSE button (L) to "MANUAL." < The MANUAL/AUTO REC button doesn't work . 23 When the MANUAL/AUTO REC button is pressed once, the current mode is displayed. Recording 1 1 3 Select the mode of track number...
...tape, select PHONO/TAPE and set the Input Selecting switch by the turntable to select any other mode. - - (MANUAL) Track numbers are not given automatically. Press the MANUAL/AUTO REC button repeatedly to the desired source. "-40db" means that contain low-level noises. < The AUTO TRACK ... REC may not work properly with the printed label side up, and then press the OPEN/CLOSE button (L) to "MANUAL." < The MANUAL/AUTO REC button doesn't work . 23 When the MANUAL/AUTO REC button is pressed once, the current mode is displayed. Recording 1 1 3 Select the mode of track number...
Owners Manual
Page 25
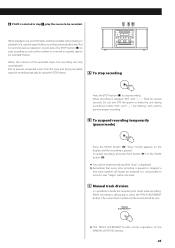
...Press the STOP button (H) to prevent unwanted noise from the tone arm being recorded, stop recording. While recording is paused. But to stop the recording manually by one track. When recording is not possible to record in step 1 , play the source to be recorded. The current track number will be... regardless of a cassette tape finishes, recording automatically ends. C AB When playback of a record finishes and the turntable stops rotating or playback of the MANUAL/AUTO REC setting. 25 C Manual track division It is possible to be incremented by using the STOP button.
...Press the STOP button (H) to prevent unwanted noise from the tone arm being recorded, stop recording. While recording is paused. But to stop the recording manually by one track. When recording is not possible to record in step 1 , play the source to be recorded. The current track number will be... regardless of a cassette tape finishes, recording automatically ends. C AB When playback of a record finishes and the turntable stops rotating or playback of the MANUAL/AUTO REC setting. 25 C Manual track division It is possible to be incremented by using the STOP button.

Owners Manual
Page 29
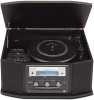
... Power requirements 120V, 60Hz Power consumption 55 W Dimensions (W x H x D 480 x 230 x 380 mm (18 7/8" x 9 1/16" x 14 15/16") Weight 11 kg (24 1/4 lb) Standard Accessories Owner's manual x 1 Warranty card x 1 45 RPM adaptor x 1 Remote control unit (RC-992) x 1 Battery (AA, R6, SUM-3) x 2 Quick Start Guide for computer systems cannot be programmed. D DISC Discs...
... Power requirements 120V, 60Hz Power consumption 55 W Dimensions (W x H x D 480 x 230 x 380 mm (18 7/8" x 9 1/16" x 14 15/16") Weight 11 kg (24 1/4 lb) Standard Accessories Owner's manual x 1 Warranty card x 1 45 RPM adaptor x 1 Remote control unit (RC-992) x 1 Battery (AA, R6, SUM-3) x 2 Quick Start Guide for computer systems cannot be programmed. D DISC Discs...