
Owner's Manual
Page 1
OWNER'S MANUAL VIDEO CASSETTE RECORDER 6480 Sqmphonic =( I DO 0 0 0 0 0 0 O c TABLE OF CONTENTS IMPORTANT SAFEGUARDS 2 PRECAUTIONS 4 FEATURES 5 SUPPLIED ACCESSORIES 5 OPERATING CONTROLS AND FUNCTIONS 6 REMOTE CONTROL OPERATION 8 HOW TO USE THE REMOTE CONTROL 8 INSTALLING THE BATTERIES 9 CABLE CONNECTIONS 10 COMBINATION VHF/UHF ANTENNA, CATV COAXIAL CABLE 10 SEPARATE VHF (75-OHM) / UHF (300-OHM) ANTENNA 11 SEPARATE UHFNHF (300-OHM) ANTENNA 11 AN TERMINALS 12 USING A CATV CONVERTER BOX 13 CONTROLLING VCR INPUT & OUTPUT 13 VIDEO OUTPUT CHANNEL SETTING (BACK ...
OWNER'S MANUAL VIDEO CASSETTE RECORDER 6480 Sqmphonic =( I DO 0 0 0 0 0 0 O c TABLE OF CONTENTS IMPORTANT SAFEGUARDS 2 PRECAUTIONS 4 FEATURES 5 SUPPLIED ACCESSORIES 5 OPERATING CONTROLS AND FUNCTIONS 6 REMOTE CONTROL OPERATION 8 HOW TO USE THE REMOTE CONTROL 8 INSTALLING THE BATTERIES 9 CABLE CONNECTIONS 10 COMBINATION VHF/UHF ANTENNA, CATV COAXIAL CABLE 10 SEPARATE VHF (75-OHM) / UHF (300-OHM) ANTENNA 11 SEPARATE UHFNHF (300-OHM) ANTENNA 11 AN TERMINALS 12 USING A CATV CONVERTER BOX 13 CONTROLLING VCR INPUT & OUTPUT 13 VIDEO OUTPUT CHANNEL SETTING (BACK ...

Owner's Manual
Page 2
.... CAUTION RISK OF ELECTRIC SHOCK DO NOT OPEN CAUTION: TO REDUCE THE RISK OF ELECTRIC SHOCK, DO NOT REMOVE COVER (OR BACK) NO USER SERVICEABLE PARTS INSIDE. Follow Instructions-All operating and use this video product from battery power, or , urces, refer to replace your appliance dealer or local power comp. Water and Moisture-Do not use instructions should be adhered to insert the plug...
.... CAUTION RISK OF ELECTRIC SHOCK DO NOT OPEN CAUTION: TO REDUCE THE RISK OF ELECTRIC SHOCK, DO NOT REMOVE COVER (OR BACK) NO USER SERVICEABLE PARTS INSIDE. Follow Instructions-All operating and use this video product from battery power, or , urces, refer to replace your appliance dealer or local power comp. Water and Moisture-Do not use instructions should be adhered to insert the plug...

Owner's Manual
Page 3
... require extensive work by a qualified technician to restore the video product to keep from the wall outlet and disconnect the antenna or cable system. Power Lines-An outside antenna system, extreme care should be taken to its normal operation. When installing an outside antenna system should be sure the service technician has used replacement parts specified by following conditions: a. Adjust only those controls that...
... require extensive work by a qualified technician to restore the video product to keep from the wall outlet and disconnect the antenna or cable system. Power Lines-An outside antenna system, extreme care should be taken to its normal operation. When installing an outside antenna system should be sure the service technician has used replacement parts specified by following conditions: a. Adjust only those controls that...
Owner's Manual
Page 4
... user could lose the authority to operate this equipment if an unauthorized change or modification is spilled on your VCR, unplug the power cord immediately and take the unit to this book as yours. IMPORTANT COPYRIGHT INFORMATION Unauthorized recording or use the VCR until its installation: • Shield it from direct sunlight and keep it away from Dealer Address Dealer Phone No. Model No. 6480 Serial...
... user could lose the authority to operate this equipment if an unauthorized change or modification is spilled on your VCR, unplug the power cord immediately and take the unit to this book as yours. IMPORTANT COPYRIGHT INFORMATION Unauthorized recording or use the VCR until its installation: • Shield it from direct sunlight and keep it away from Dealer Address Dealer Phone No. Model No. 6480 Serial...
Owner's Manual
Page 5
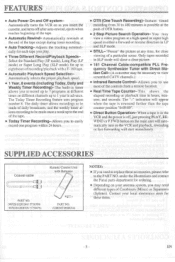
... ACCESSORIES Coaxial cable (QUI Remote Control Unit with Direct Station Call- (A converter may view a video program at the end of the tape except during timer recording. • Auto Tracking-Adjusts the tracking automatically for each tape you play. • Three Different Record/Playback SpeedsSelect the Standard Play (SP mode), Long Play (LP mode) or Super Long Play (SLP mode) for up to eight hours of a particular scene. Allows you need different types of the tape. • Today Timer Recording- Allows you to record...
... ACCESSORIES Coaxial cable (QUI Remote Control Unit with Direct Station Call- (A converter may view a video program at the end of the tape except during timer recording. • Auto Tracking-Adjusts the tracking automatically for each tape you play. • Three Different Record/Playback SpeedsSelect the Standard Play (SP mode), Long Play (LP mode) or Super Long Play (SLP mode) for up to eight hours of a particular scene. Allows you need different types of the tape. • Today Timer Recording- Allows you to record...

Owner's Manual
Page 6
... recording. 8 PAUSE/STILL button- Press to turn VCR on screen) during playback or manual recording. 9 TVNCR button- Press to normal playback speed. 5 F.FWD button- VCR position: to view playback, to monitor video recordings or watch TV or to view one touch recording mode. 7 POWER/TIMER REC button-Press to begin playback of a tape. 3 STOP/EJECT button- TRACKING function- Press • or V to temporarily stop tape motion. Press PLAY button to return VCR to set Today Timer Recording. 15 Digital Display-Displays the clock, timer recording, counter and channel etc. 16 REMOTE SENSOR...
... recording. 8 PAUSE/STILL button- Press to turn VCR on screen) during playback or manual recording. 9 TVNCR button- Press to normal playback speed. 5 F.FWD button- VCR position: to view playback, to monitor video recordings or watch TV or to view one touch recording mode. 7 POWER/TIMER REC button-Press to begin playback of a tape. 3 STOP/EJECT button- TRACKING function- Press • or V to temporarily stop tape motion. Press PLAY button to return VCR to set Today Timer Recording. 15 Digital Display-Displays the clock, timer recording, counter and channel etc. 16 REMOTE SENSOR...
Owner's Manual
Page 8
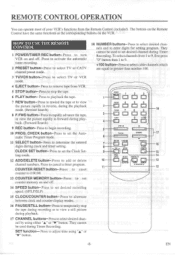
... TV or VCR mode. 4 EJECT button- Press to activate the automatic timer recording. 2 PRESET button- CHECK button-Press to set desired channel during playback. 17 CHANNEL buttons- HOW TO USE THE REMOTE, CONTROL 1 POWER/TIMER REC button- Press to add or delete channel numbers. EN Press to select TV or CATV channel preset mode. 3 TVNCR button- COUNTER RESET button-Press to reset counter to alternate between clock and counter display modes. 16 PAUSE/STILL button- SET function- Press to enter digits for setting program. Press...
... TV or VCR mode. 4 EJECT button- Press to activate the automatic timer recording. 2 PRESET button- CHECK button-Press to set desired channel during playback. 17 CHANNEL buttons- HOW TO USE THE REMOTE, CONTROL 1 POWER/TIMER REC button- Press to add or delete channel numbers. EN Press to select TV or CATV channel preset mode. 3 TVNCR button- COUNTER RESET button-Press to reset counter to alternate between clock and counter display modes. 16 PAUSE/STILL button- SET function- Press to enter digits for setting program. Press...
Owner's Manual
Page 12
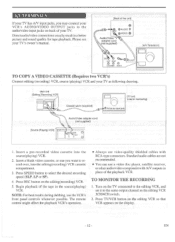
... A VIDEO CASSETTE (Requires two VCR's) Connect editing (recording) VCR, source (playing) VCR and your TV. NOTE: For best results during dubbing, use video-quality shielded cables with A/V outputs in place of the unit] 097 OIDUA® IN Do vIDEO AudioNideo "Y" adapter cord (not supplied) (AN Television] INt 0. Turn on the TV connected to the editing VCR, and set ] (Use for tape playback. EN Direct audio/video connections usually result in a better picture and sound quality for monitoring) Antenna input [a* (Source (Playing) VCRJ AudioNideo adapter cord...
... A VIDEO CASSETTE (Requires two VCR's) Connect editing (recording) VCR, source (playing) VCR and your TV. NOTE: For best results during dubbing, use video-quality shielded cables with A/V outputs in place of the unit] 097 OIDUA® IN Do vIDEO AudioNideo "Y" adapter cord (not supplied) (AN Television] INt 0. Turn on the TV connected to the editing VCR, and set ] (Use for tape playback. EN Direct audio/video connections usually result in a better picture and sound quality for monitoring) Antenna input [a* (Source (Playing) VCRJ AudioNideo adapter cord...

Owner's Manual
Page 13
... (Cable) Input To VCR's ANT.OUT Terminal alu.r TV Antenna Panel CONTROLLING VCR INPUT & OUTPUT VIDE() OUTPUT CHANNEL SETTING (BACK OF' VCR) When the VCR is in the VCR position, your cable service supplies you with a converter box, you cannot preset channels or watch TV programs through the VCR's tuner. Set the 3CH/4CH selector switch to shipment from the VCR. TO RECORD AND VIEW A SCRAMBLED/UNSCRAMBLED CHANNEL. 1. Set the VCR channel selector to the output channel display. This means that "VCR...
... (Cable) Input To VCR's ANT.OUT Terminal alu.r TV Antenna Panel CONTROLLING VCR INPUT & OUTPUT VIDE() OUTPUT CHANNEL SETTING (BACK OF' VCR) When the VCR is in the VCR position, your cable service supplies you with a converter box, you cannot preset channels or watch TV programs through the VCR's tuner. Set the 3CH/4CH selector switch to shipment from the VCR. TO RECORD AND VIEW A SCRAMBLED/UNSCRAMBLED CHANNEL. 1. Set the VCR channel selector to the output channel display. This means that "VCR...
Owner's Manual
Page 18
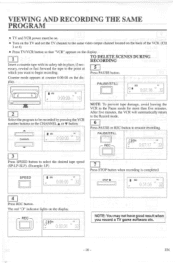
... the program to be on. • Turn on the TV and set the TV channel to the same video output channel located on the back of the VCR. (CH 3 or 4) • Press TV/VCR button so that "VCR" appears on the display. essary, rewind or fast forward the tape to the point at counter 0:00:00 on the display. TO DELETE SCENES DURING 1 RECORDING Insert a cassette tape...
... the program to be on. • Turn on the TV and set the TV channel to the same video output channel located on the back of the VCR. (CH 3 or 4) • Press TV/VCR button so that "VCR" appears on the display. essary, rewind or fast forward the tape to the point at counter 0:00:00 on the display. TO DELETE SCENES DURING 1 RECORDING Insert a cassette tape...
Owner's Manual
Page 19
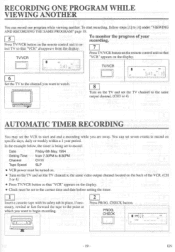
... timer is being set to record: Date Setting Time Channel Tape Speed Friday 6th May, 1994 from 7:30PM to 8:30PM CH16 SLP • VCR power must be set the TV channel to the same video output channel located on the back of your recording, Press TVNCR button on the remote control unit to select TV so that "VCR" disappears from the display. 7 Press TVNCR button on the remote control unit so that "VCR" appears on the display. • Clock must...
... timer is being set to record: Date Setting Time Channel Tape Speed Friday 6th May, 1994 from 7:30PM to 8:30PM CH16 SLP • VCR power must be set the TV channel to the same video output channel located on the back of your recording, Press TVNCR button on the remote control unit to select TV so that "VCR" disappears from the display. 7 Press TVNCR button on the remote control unit so that "VCR" appears on the display. • Clock must...
Owner's Manual
Page 21
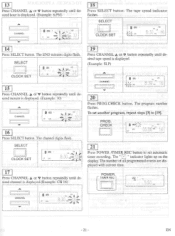
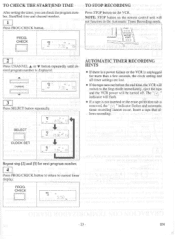
... timer recording. CHECK VCR I gag 8:30:: 16 20 Press PROG.CHECK button. The " indicator lights up on the display. The number of all programmed events are displayed with current time. 13 Press CHANNEL A or V button repeatedly until desired hour is displayed.(Example: CH 16) CHANNEL I 05.06 - 16 21 E " Press POWER !TIMER REC button to set another program, repeat steps [3] to [19]. SELECT 1® %p ZI tea 18 Press SELECT button. The tape speed indicator flashes. POWER r TIMER...
... timer recording. CHECK VCR I gag 8:30:: 16 20 Press PROG.CHECK button. The " indicator lights up on the display. The number of all programmed events are displayed with current time. 13 Press CHANNEL A or V button repeatedly until desired hour is displayed.(Example: CH 16) CHANNEL I 05.06 - 16 21 E " Press POWER !TIMER REC button to set another program, repeat steps [3] to [19]. SELECT 1® %p ZI tea 18 Press SELECT button. The tape speed indicator flashes. POWER r TIMER...
Owner's Manual
Page 23
... mode immediately, eject the tape and the VCR power will be turned off. The " E " indicator will not function in the Automatic Timer Recording mode. _JJ171:32A °°° 2 Press CHANNEL A or V button repeatedly until desired program number is removed, the " E " indicator flashes and automatic timer recording cannot occur. EN Insert a tape that allows recording. PROG. 1CHECK EMEI a sox, AP 7:30 „ 16 TO STOP RECORDING Press STOP button on the remote control unit...
... mode immediately, eject the tape and the VCR power will be turned off. The " E " indicator will not function in the Automatic Timer Recording mode. _JJ171:32A °°° 2 Press CHANNEL A or V button repeatedly until desired program number is removed, the " E " indicator flashes and automatic timer recording cannot occur. EN Insert a tape that allows recording. PROG. 1CHECK EMEI a sox, AP 7:30 „ 16 TO STOP RECORDING Press STOP button on the remote control unit...
Owner's Manual
Page 25
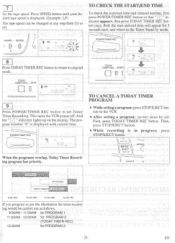
... to set Today Timer Recording. And the " v " indicator lights up on ) First, press TODAY TIMER REC button. for PROGRAM 8 (TODAY TIMER REC) 12:00AM - A 1OOO • STOP SECT OOO EEPAUS C TVNC:R o. This turns the VCR power off. The program number "8" is in progress; Then, press STOP/EJECT button. • While recording is displayed with current time. ing would be changed at any step from [3] to the Timer Stand-by mode. Both...
... to set Today Timer Recording. And the " v " indicator lights up on ) First, press TODAY TIMER REC button. for PROGRAM 8 (TODAY TIMER REC) 12:00AM - A 1OOO • STOP SECT OOO EEPAUS C TVNC:R o. This turns the VCR power off. The program number "8" is in progress; Then, press STOP/EJECT button. • While recording is displayed with current time. ing would be changed at any step from [3] to the Timer Stand-by mode. Both...
Owner's Manual
Page 26
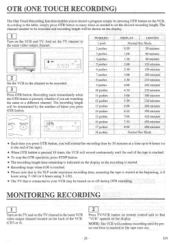
... times, the VCR will record continuously until the preset end time is connected to your VCR may be recorded. 3 Press OTR button. MONITORING RECORDING Turn on the TV and set the desired recording length. The recording length will be shown on the display. 1 Turn on the VCR. T Press TVNCR button on remote control unit so that is reached or the tape runs out. - 26 - NOTE: The VCR will be determined by the number of times...
... times, the VCR will record continuously until the preset end time is connected to your VCR may be recorded. 3 Press OTR button. MONITORING RECORDING Turn on the TV and set the desired recording length. The recording length will be shown on the display. 1 Turn on the VCR. T Press TVNCR button on remote control unit so that is reached or the tape runs out. - 26 - NOTE: The VCR will be determined by the number of times...
Owner's Manual
Page 27
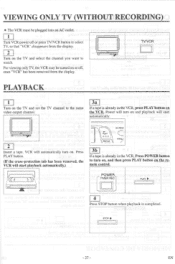
... select the channel you want to select TV, so that "VCR" disappears from the display. ECM POWER, r TIMER REC PLAY 0 4 Press STOP button when playback is already in the VCR, press PLAY button on . Power will turn on and playback will automatically turn on, and then press PLAY button on or off or press TV/VCR button to watch. EN VIEWING ONLY TV (WITHOUT RECORDING) • The VCR must be turned on the remote control.
... select the channel you want to select TV, so that "VCR" disappears from the display. ECM POWER, r TIMER REC PLAY 0 4 Press STOP button when playback is already in the VCR, press PLAY button on . Power will turn on and playback will automatically turn on, and then press PLAY button on or off or press TV/VCR button to watch. EN VIEWING ONLY TV (WITHOUT RECORDING) • The VCR must be turned on the remote control.
Owner's Manual
Page 29
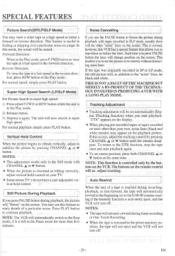
... super high speed: 1) Press either a forward or reverse direction. NOTES: • This adjustment works only in the Still mode with tapes recorded in the Pause mode for more than your TV. • Some newer TV's do not have a user adjustable ver- Tracking Adjustment • Tracking adjustment will change position on the screen. To return to the DTR function, stop the tape once and start playback again. • To set automatically (Digital TRacking...
... super high speed: 1) Press either a forward or reverse direction. NOTES: • This adjustment works only in the Still mode with tapes recorded in the Pause mode for more than your TV. • Some newer TV's do not have a user adjustable ver- Tracking Adjustment • Tracking adjustment will change position on the screen. To return to the DTR function, stop the tape once and start playback again. • To set automatically (Digital TRacking...
Owner's Manual
Page 30
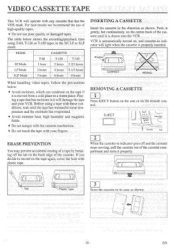
... plastic tape. INSERTING A CASSETTE Insert the cassette in the direction as shown. - 30 - EN Playing a tape that has the VHS mark. For best results we recommend the use of the cassette until the tape has warmed to a warm place. The table below : • Avoid moisture, which can condense on the remote control. VIDEO CASSETTE TAPE This VCR will operate with any cassette that has moisture in it will light...
... plastic tape. INSERTING A CASSETTE Insert the cassette in the direction as shown. - 30 - EN Playing a tape that has the VHS mark. For best results we recommend the use of the cassette until the tape has warmed to a warm place. The table below : • Avoid moisture, which can condense on the remote control. VIDEO CASSETTE TAPE This VCR will operate with any cassette that has moisture in it will light...
Owner's Manual
Page 31
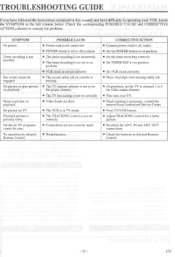
... is not set correctly. • Video heads are dirty. • The VCR is in TV mode. • The TRACKING control is not set correctly. • Connections are not correctly made. • Weak batteries. No picture on cassette is missing. • The TV channel selector is not set to remedy the problem. Noise in Infrared Remote Control. - 31 - No operation by infrared Remote Control. OUT connections. • Check the batteries in picture on playback. Timer recording is...
... is not set correctly. • Video heads are dirty. • The VCR is in TV mode. • The TRACKING control is not set correctly. • Connections are not correctly made. • Weak batteries. No picture on cassette is missing. • The TV channel selector is not set to remedy the problem. Noise in Infrared Remote Control. - 31 - No operation by infrared Remote Control. OUT connections. • Check the batteries in picture on playback. Timer recording is...
Owner's Manual
Page 33
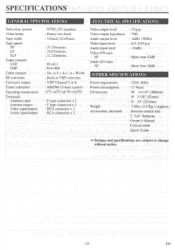
... D 10" (252mm) : 7.01bs. (3.2 Kg.) (Approx.) : Remote control unit 2 "AA" Batteries Owner's Manual Coaxial cable Quick Guide • Designs and specifications are subject to change without notice. - 33 - A-I, A- EN SPECIFICATIONS GENERAL SPECIFICATIONS ELECTRICAL SPECIFICATIONS Television system Video heads Tape width Tape speed SP LP SLP Tuner channel VHF UHF Cable channel RF converter Converter output Timer indication Operating temperature Terminals Antenna input Antenna output Video input/output Audio input/output : NTSC, TV standard : Rotary two-head : 1/2inch (12.65mm) : 33.35mm...
... D 10" (252mm) : 7.01bs. (3.2 Kg.) (Approx.) : Remote control unit 2 "AA" Batteries Owner's Manual Coaxial cable Quick Guide • Designs and specifications are subject to change without notice. - 33 - A-I, A- EN SPECIFICATIONS GENERAL SPECIFICATIONS ELECTRICAL SPECIFICATIONS Television system Video heads Tape width Tape speed SP LP SLP Tuner channel VHF UHF Cable channel RF converter Converter output Timer indication Operating temperature Terminals Antenna input Antenna output Video input/output Audio input/output : NTSC, TV standard : Rotary two-head : 1/2inch (12.65mm) : 33.35mm...


