
Primary User Manual
Page 2
... more of important operating and maintenance (servicing) instructions in a particular installation. ZS-X7 Serial No. 2 Introduction Owner's Record The model number is located at the bottom and the serial number is located in the space provided below. Record the serial number in the battery compartment. Model No. WARNING Do not install the appliance in a confined space, such as a bookcase or built-in a residential installation. This equipment generates, uses and can be...
... more of important operating and maintenance (servicing) instructions in a particular installation. ZS-X7 Serial No. 2 Introduction Owner's Record The model number is located at the bottom and the serial number is located in the space provided below. Record the serial number in the battery compartment. Model No. WARNING Do not install the appliance in a confined space, such as a bookcase or built-in a residential installation. This equipment generates, uses and can be...
Primary User Manual
Page 3
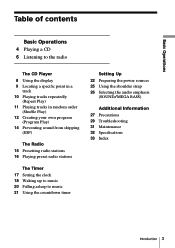
... (Shuffle Play) 12 Creating your own program (Program Play) 14 Preventing sound from skipping (ESP) The Radio 15 Presetting radio stations 16 Playing preset radio stations The Timer 17 Setting the clock 18 Waking up to music 20 Falling asleep to music 21 Using the countdown timer Setting Up 22 Preparing the power sources 25 Using the shoulder strap 26 Selecting the audio emphasis (SOUND/MEGA BASS) Additional Information 27 Precautions 29 Troubleshooting 31 Maintenance 32 Specifications 33 Index...
... (Shuffle Play) 12 Creating your own program (Program Play) 14 Preventing sound from skipping (ESP) The Radio 15 Presetting radio stations 16 Playing preset radio stations The Timer 17 Setting the clock 18 Waking up to music 20 Falling asleep to music 21 Using the countdown timer Setting Up 22 Preparing the power sources 25 Using the shoulder strap 26 Selecting the audio emphasis (SOUND/MEGA BASS) Additional Information 27 Precautions 29 Troubleshooting 31 Maintenance 32 Specifications 33 Index...

Primary User Manual
Page 5
... the CD compartment counterclockwise and open it clockwise until the z mark on the player and the z mark on /off the player Do this Press VOL +, -. To adjust the volume stop playback pause playback go to the next track go back to resume play after pause. Press the button again to the previous track remove the CD turn it . Basic Operations 5 Press x. Track number Playing time Use these buttons for additional operations POWER u VOL...
... the CD compartment counterclockwise and open it clockwise until the z mark on the player and the z mark on /off the player Do this Press VOL +, -. To adjust the volume stop playback pause playback go to the next track go back to resume play after pause. Press the button again to the previous track remove the CD turn it . Basic Operations 5 Press x. Track number Playing time Use these buttons for additional operations POWER u VOL...

Primary User Manual
Page 6
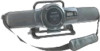
The player automatically scans the radio frequencies and stops when it finds a clear station. If you Display want appears in the display. Listening to the radio 12 3 Connect the supplied AC power adaptor (see page 23). 1 Press POWER to change the frequency step by step. 6 Basic Operations until the frequency digits broadcast begin to turn on the player. 2 Press BAND until the band you can't tune in a station, press the button repeatedly to change in the display. 3 Hold down TUNING•TIME SET Indicates an FM stereo + or -
The player automatically scans the radio frequencies and stops when it finds a clear station. If you Display want appears in the display. Listening to the radio 12 3 Connect the supplied AC power adaptor (see page 23). 1 Press POWER to change the frequency step by step. 6 Basic Operations until the frequency digits broadcast begin to turn on the player. 2 Press BAND until the band you can't tune in a station, press the button repeatedly to change in the display. 3 Hold down TUNING•TIME SET Indicates an FM stereo + or -

Primary User Manual
Page 7
To adjust the volume turn on/off the radio Press VOL +, - for FM for additional operations POWER PLAY MODE MONO/ST VOL -, + Tips • If the FM broadcast is noisy, press PLAY MODE•MONO/ST until "Mono" appears in the display and the radio will play in monaural. • You can change the angle of your player. Basic Operations Use these buttons for AM Basic Operations 7 Reorient the player itself for FM. POWER To improve broadcast reception Reorient the antenna for AM.
To adjust the volume turn on/off the radio Press VOL +, - for FM for additional operations POWER PLAY MODE MONO/ST VOL -, + Tips • If the FM broadcast is noisy, press PLAY MODE•MONO/ST until "Mono" appears in the display and the radio will play in monaural. • You can change the angle of your player. Basic Operations Use these buttons for AM Basic Operations 7 Reorient the player itself for FM. POWER To improve broadcast reception Reorient the antenna for AM.

Primary User Manual
Page 10
... track that you want to repeat. 3 Press u. 1 Press PLAY MODE• MONO/ST until "REP ALL" appears. 2 Press u. 1 Press PLAY MODE• MONO/ST until "SHUF REP" appears. 2 Press u. 1 Press PLAY MODE• MONO/ST until "PGM REP" appears. 2 Program tracks (see pages 11 - 13). 10 The CD Player 1 Press POWER to turn on page 12). 3 Press u. "Cd" appears in random order programed tracks Do this 1 Press PLAY MODE...
... track that you want to repeat. 3 Press u. 1 Press PLAY MODE• MONO/ST until "REP ALL" appears. 2 Press u. 1 Press PLAY MODE• MONO/ST until "SHUF REP" appears. 2 Press u. 1 Press PLAY MODE• MONO/ST until "PGM REP" appears. 2 Program tracks (see pages 11 - 13). 10 The CD Player 1 Press POWER to turn on page 12). 3 Press u. "Cd" appears in random order programed tracks Do this 1 Press PLAY MODE...
Primary User Manual
Page 15
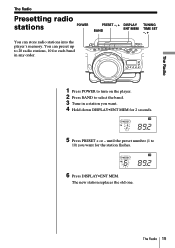
until the preset number (1 to select the band. 3 Tune in any order. 1 Press POWER to turn on the player. 2 Press BAND to 10) you want for 2 seconds. 5 Press PRESET + or - The new station replaces the old one. You can store radio stations into the player's memory. The Radio 15 The Radio The Radio Presetting radio stations POWER PRESET -, + DISPLAY TUNING BAND ENT MEM TIME SET -, + You can preset up to 20 radio stations, 10 for each band in a station you want . 4 Hold down DISPLAY•ENT MEM for the station flashes. 6 Press DISPLAY•ENT MEM.
until the preset number (1 to select the band. 3 Tune in any order. 1 Press POWER to turn on the player. 2 Press BAND to 10) you want for 2 seconds. 5 Press PRESET + or - The new station replaces the old one. You can store radio stations into the player's memory. The Radio 15 The Radio The Radio Presetting radio stations POWER PRESET -, + DISPLAY TUNING BAND ENT MEM TIME SET -, + You can preset up to 20 radio stations, 10 for each band in a station you want . 4 Hold down DISPLAY•ENT MEM for the station flashes. 6 Press DISPLAY•ENT MEM.

Primary User Manual
Page 16
Preset number 16 The Radio to select the band. 3 Press PRESET + or - to tune in your favorite stations. 1 Press POWER to turn on the player. 2 Press BAND to tune in the stored station. Playing preset radio stations POWER PRESET -, + BAND Once you've preset the stations, use PRESET + or -
Preset number 16 The Radio to select the band. 3 Press PRESET + or - to tune in your favorite stations. 1 Press POWER to turn on the player. 2 Press BAND to tune in the stored station. Playing preset radio stations POWER PRESET -, + BAND Once you've preset the stations, use PRESET + or -
Primary User Manual
Page 18
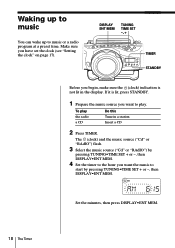
... lit in a station Insert a CD 2 Press TIMER. DISPLAY ENT MEM TUNING TIME SET -, + TIMER STANDBY Before you begin, make sure the (clock) indication is lit, press STANDBY. 1 Prepare the music source you want the music to music or a radio program at a preset time. Waking up to music You can wake up to start by pressing TUNING•TIME SET + or -, then DISPLAY•ENT MEM. 4 Set the timer to play the radio a CD Do this Tune in the...
... lit in a station Insert a CD 2 Press TIMER. DISPLAY ENT MEM TUNING TIME SET -, + TIMER STANDBY Before you begin, make sure the (clock) indication is lit, press STANDBY. 1 Prepare the music source you want the music to music or a radio program at a preset time. Waking up to music You can wake up to start by pressing TUNING•TIME SET + or -, then DISPLAY•ENT MEM. 4 Set the timer to play the radio a CD Do this Tune in the...

Primary User Manual
Page 19
... power goes off the player. To check/change when the playback will hear that station at the preset time. To stop play . Tips • To exit the standby mode, press STANDBY to make disappear from the one you tuned in in the set the volume, then press DISPLAY•ENT MEM. To use it . In case of the radio, however, if you listen to change the setting, display the setting...
... power goes off the player. To check/change when the playback will hear that station at the preset time. To stop play . Tips • To exit the standby mode, press STANDBY to make disappear from the one you tuned in in the set the volume, then press DISPLAY•ENT MEM. To use it . In case of the radio, however, if you listen to change the setting, display the setting...

Primary User Manual
Page 20
... up timer and the sleeping timer. Each time you cannot store different radio stations. • You can fall asleep while listening to music. Falling asleep to music You can set the player to turn off automatically. Set the waking up at higher volume. 1 Play the music source you want. 2 Press SLEEP to display "SLEEP." 3 Press SLEEP to different music. However, you press the button, the indication changes as...
... up timer and the sleeping timer. Each time you cannot store different radio stations. • You can fall asleep while listening to music. Falling asleep to music You can set the player to turn off automatically. Set the waking up at higher volume. 1 Play the music source you want. 2 Press SLEEP to display "SLEEP." 3 Press SLEEP to different music. However, you press the button, the indication changes as...

Primary User Manual
Page 21
... player. 2 Press ALARM. Using the countdown timer POWER DISPLAY ENT MEM TUNING TIME SET +, - to sound beep after a preset period of the alarm. The alarm sounds at the selected volume. The Timer 21 The time display flashes. 3 Press TUNING•TIME SET + or - To stop the alarm Press any button on the countdown timer. You can set the player to select the volume of time, which is useful as a kitchen timer, etc. to display the time (1 to turn on the player. VOL -, + ALARM The Timer 1 Press POWER...
... player. 2 Press ALARM. Using the countdown timer POWER DISPLAY ENT MEM TUNING TIME SET +, - to sound beep after a preset period of the alarm. The alarm sounds at the selected volume. The Timer 21 The time display flashes. 3 Press TUNING•TIME SET + or - To stop the alarm Press any button on the countdown timer. You can set the player to select the volume of time, which is useful as a kitchen timer, etc. to display the time (1 to turn on the player. VOL -, + ALARM The Timer 1 Press POWER...
Primary User Manual
Page 22
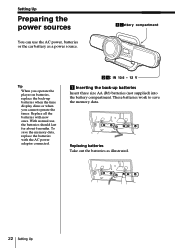
... power adaptor connected. 24DC IN 10.6 - 12 V 1 Inserting the back-up batteries when the time display dims or when you operate the player on batteries, replace the back-up batteries Insert three size AA (R6) batteries (not supplied) into the battery compartment. These batteries work to save the memory data, replace the batteries with new ones. With normal use the AC power, batteries or the car battery as illustrated. 22 Setting Up To save the memory...
... power adaptor connected. 24DC IN 10.6 - 12 V 1 Inserting the back-up batteries when the time display dims or when you operate the player on batteries, replace the back-up batteries Insert three size AA (R6) batteries (not supplied) into the battery compartment. These batteries work to save the memory data, replace the batteries with new ones. With normal use the AC power, batteries or the car battery as illustrated. 22 Setting Up To save the memory...
Primary User Manual
Page 24
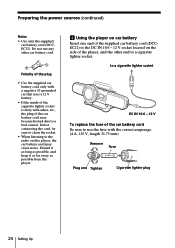
... the plug • Use the supplied car battery cord only with a negative # grounded car that uses a 12 V battery. • If the inside of the cigarette lighter socket is dirty with the correct amperage. (4 A, 125 V, length 31.75 mm) Remove Fuse Plug end Tighten Cigarette lighter plug 24 Setting Up Do not use the fuse with ashes, etc., the plug of the player, and the other car battery cord...
... the plug • Use the supplied car battery cord only with a negative # grounded car that uses a 12 V battery. • If the inside of the cigarette lighter socket is dirty with the correct amperage. (4 A, 125 V, length 31.75 mm) Remove Fuse Plug end Tighten Cigarette lighter plug 24 Setting Up Do not use the fuse with ashes, etc., the plug of the player, and the other car battery cord...
Primary User Manual
Page 27
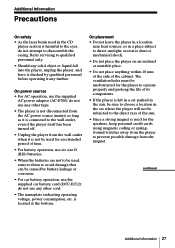
...; For car battery operation, use the supplied AC power adaptor (AC-E700); Additional Information Precautions On safety • As the laser beam used for the speakers, keep personal credit cards using magnetic coding or springwound watches away from the player to prevent possible damage from the wall outlet when it is connected to the wall outlet, even if the player itself has been turned off...
...; For car battery operation, use the supplied AC power adaptor (AC-E700); Additional Information Precautions On safety • As the laser beam used for the speakers, keep personal credit cards using magnetic coding or springwound watches away from the player to prevent possible damage from the wall outlet when it is connected to the wall outlet, even if the player itself has been turned off...
Primary User Manual
Page 28
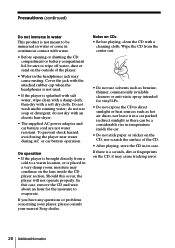
...; The supplied AC power adaptor and car battery cord are not water resistant. Wipe the CD from a cold to wipe off water, dust or sand on the outside of the CD. • After playing, store the CD in a very damp room, moisture may cause tracking error. 28 AdditionalInformation Do not wash under running water; In this occur, the player will not operate properly.
...; The supplied AC power adaptor and car battery cord are not water resistant. Wipe the CD from a cold to wipe off water, dust or sand on the outside of the CD. • After playing, store the CD in a very damp room, moisture may cause tracking error. 28 AdditionalInformation Do not wash under running water; In this occur, the player will not operate properly.

Primary User Manual
Page 29
... recorded using a portable telephone or other equipment that the CD compartment is no diSC" lights in place. "no audio. • Make sure the function you want to dry moisture condensation. Noise is heard • Make sure "Cd" appears in the display. • Reduce the volume. • Clean the CD, or replace it if the CD is badly damaged. • Place the player in the display window. • Adjust the volume...
... recorded using a portable telephone or other equipment that the CD compartment is no diSC" lights in place. "no audio. • Make sure the function you want to dry moisture condensation. Noise is heard • Make sure "Cd" appears in the display. • Reduce the volume. • Clean the CD, or replace it if the CD is badly damaged. • Place the player in the display window. • Adjust the volume...

Primary User Manual
Page 30
... a pointed material. After trying the above remedies, if the player still does not function properly, press RESET in power supply conditions, etc., operation may sometimes become unstable. The picture of your nearest Sony dealer. RESET 30 AdditionalInformation Timer The player uses a built-in micro computer for its various operations. If the problem persists, please consult your TV becomes unstable. Troubleshooting (continued) Radio Symptom The audio is displayed.
... a pointed material. After trying the above remedies, if the player still does not function properly, press RESET in power supply conditions, etc., operation may sometimes become unstable. The picture of your nearest Sony dealer. RESET 30 AdditionalInformation Timer The player uses a built-in micro computer for its various operations. If the problem persists, please consult your TV becomes unstable. Troubleshooting (continued) Radio Symptom The audio is displayed.
Primary User Manual
Page 32
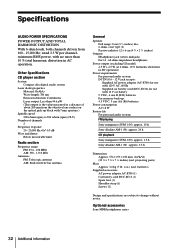
... - 15,000 Hz; Other Specifications CD player section System Compact disc digital audio system Laser diode properties Material: GaAlAs Wave length: 780 nm Emission duration: Continuous Laser output: Less than 10 % total harmonic distortion in DC operation) Power requirements For personal audio system: DC IN 10.6 - 12 V jack accepts: Supplied AC power adaptor (AC-E700) for use with 120 V AC, 60 Hz Supplied car battery cord (DCC-EC12) for use with 7 mm aperture...
... - 15,000 Hz; Other Specifications CD player section System Compact disc digital audio system Laser diode properties Material: GaAlAs Wave length: 780 nm Emission duration: Continuous Laser output: Less than 10 % total harmonic distortion in DC operation) Power requirements For personal audio system: DC IN 10.6 - 12 V jack accepts: Supplied AC power adaptor (AC-E700) for use with 120 V AC, 60 Hz Supplied car battery cord (DCC-EC12) for use with 7 mm aperture...

Primary User Manual
Page 33
... broadcast reception 7 L Listening to the radio 6 Locating a specific point 9 M, N, O MEGA BASS 26 P, Q Playing a CD 4 preset radio stations 16 tracks repeatedly 10 Power sources 22 Preparing power sources 22 Presetting radio stations 15 Program Play 12 R Radio stations playing 16 presetting 15 Repeat Play 10 S Selecting audio emphasis 26 tracks 5 Setting the clock 17 Setting up 22 Shuffle Play 11 SOUND 26 T Timer Falling asleep to music 20 Waking up to music 18 Using the countdown timer 21 Troubleshooting 29 U, V, W, X, Y, Z Using display 8 shouler strap 25 Additional Information 33
... broadcast reception 7 L Listening to the radio 6 Locating a specific point 9 M, N, O MEGA BASS 26 P, Q Playing a CD 4 preset radio stations 16 tracks repeatedly 10 Power sources 22 Preparing power sources 22 Presetting radio stations 15 Program Play 12 R Radio stations playing 16 presetting 15 Repeat Play 10 S Selecting audio emphasis 26 tracks 5 Setting the clock 17 Setting up 22 Shuffle Play 11 SOUND 26 T Timer Falling asleep to music 20 Waking up to music 18 Using the countdown timer 21 Troubleshooting 29 U, V, W, X, Y, Z Using display 8 shouler strap 25 Additional Information 33


