
Primary User Manual
Page 2
... changes or modifications not expressly approved in a residential installation. The player will increase eye hazard. Owner's Record The model number and the serial number are erased, reenter them when you disconnect the AC power cord after charging, be of sufficient magnitude to persons. You cannot use the player again. If the stored data are located at the bottom. This symbol is intended to alert the user...
... changes or modifications not expressly approved in a residential installation. The player will increase eye hazard. Owner's Record The model number and the serial number are erased, reenter them when you disconnect the AC power cord after charging, be of sufficient magnitude to persons. You cannot use the player again. If the stored data are located at the bottom. This symbol is intended to alert the user...
Primary User Manual
Page 3
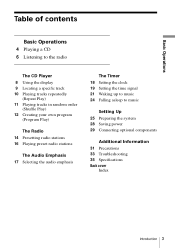
... CD Player 8 Using the display 9 Locating a specific track 10 Playing tracks repeatedly (Repeat Play) 11 Playing tracks in random order (Shuffle Play) 12 Creating your own program (Program Play) The Radio 14 Presetting radio stations 16 Playing preset radio stations The Audio Emphasis 17 Selecting the audio emphasis The Timer 18 Setting the clock 19 Setting the time signal 21 Waking up to music 24 Falling asleep to music Setting Up 25 Preparing the system 28 Saving power 29 Connecting optional components Additional Information 31 Precautions 33 Troubleshooting...
... CD Player 8 Using the display 9 Locating a specific track 10 Playing tracks repeatedly (Repeat Play) 11 Playing tracks in random order (Shuffle Play) 12 Creating your own program (Program Play) The Radio 14 Presetting radio stations 16 Playing preset radio stations The Audio Emphasis 17 Selecting the audio emphasis The Timer 18 Setting the clock 19 Setting the time signal 21 Waking up to music 24 Falling asleep to music Setting Up 25 Preparing the system 28 Saving power 29 Connecting optional components Additional Information 31 Precautions 33 Troubleshooting...
Primary User Manual
Page 4
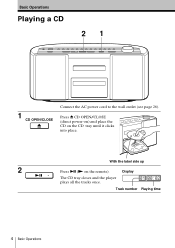
Basic Operations Playing a CD 21 Connect the AC power cord to the wall outlet (see page 26). 1 Press Z CD OPEN/CLOSE (direct power-on) and place the CD on the remote). Display The CD tray closes and the player plays all the tracks once. With the label side up 2 Press u (N on the CD tray until it clicks into place. Track number Playing time 4 Basic Operations
Basic Operations Playing a CD 21 Connect the AC power cord to the wall outlet (see page 26). 1 Press Z CD OPEN/CLOSE (direct power-on) and place the CD on the remote). Display The CD tray closes and the player plays all the tracks once. With the label side up 2 Press u (N on the CD tray until it clicks into place. Track number Playing time 4 Basic Operations
Primary User Manual
Page 5
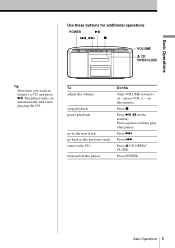
... Operations Use these buttons for additional operations POWER u ., > x VOLUME Z CD OPEN/CLOSE Tip Next time you want to listen to the previous track remove the CD turn on/off the player Do this Turn VOLUME toward + or - (press VOL +, - The player turns on the remote). Basic Operations 5 Press .. Press >. Press POWER. To adjust the volume stop playback pause playback go to the next track go back to a CD, just press u. Press x. Press u (X on automatically and starts playing...
... Operations Use these buttons for additional operations POWER u ., > x VOLUME Z CD OPEN/CLOSE Tip Next time you want to listen to the previous track remove the CD turn on/off the player Do this Turn VOLUME toward + or - (press VOL +, - The player turns on the remote). Basic Operations 5 Press .. Press >. Press POWER. To adjust the volume stop playback pause playback go to the next track go back to a CD, just press u. Press x. Press u (X on automatically and starts playing...
Primary User Manual
Page 6
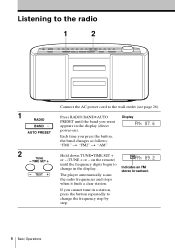
... the button, the band changes as follows: "FM1" t "FM2" t "AM" 2 Hold down TUNE•TIME SET + or - (TUNE + or - Listening to the radio 1 2 Connect the AC power cord to the wall outlet (see page 26). 1 Press RADIO BAND•AUTO Display PRESET until the frequency digits begin to change in the display. on ). The player automatically scans the radio frequencies and stops when it finds a clear station. Indicates an FM stereo...
... the button, the band changes as follows: "FM1" t "FM2" t "AM" 2 Hold down TUNE•TIME SET + or - (TUNE + or - Listening to the radio 1 2 Connect the AC power cord to the wall outlet (see page 26). 1 Press RADIO BAND•AUTO Display PRESET until the frequency digits begin to change in the display. on ). The player automatically scans the radio frequencies and stops when it finds a clear station. Indicates an FM stereo...

Primary User Manual
Page 7
... in the display and the radio will play in monaural. • Next time you want to listen to the radio, just press RADIO BAND• AUTO PRESET. To adjust the volume turn on automatically and starts playing the previous station. If the broadcast is noisy, press PLAY MODE•MONO/ST (MODE on the remote). The player turns on /off the radio Do this Turn VOLUME toward + or - (press VOL +, - Use these buttons for...
... in the display and the radio will play in monaural. • Next time you want to listen to the radio, just press RADIO BAND• AUTO PRESET. To adjust the volume turn on automatically and starts playing the previous station. If the broadcast is noisy, press PLAY MODE•MONO/ST (MODE on the remote). The player turns on /off the radio Do this Turn VOLUME toward + or - (press VOL +, - Use these buttons for...

Primary User Manual
Page 9
... you find a specific point in a track while playing a CD. The CD Player 9 Turn off the indication by pressing x. Example: To play track number 23, press >10 first, then 2 and 3. The CD Player Locating a specific track You can also find the point. . To locate a specific track directly a point while listening to the sound a point while observing the display Press number button of the track. . or > in the display. You can quickly locate any track using the number buttons.
... you find a specific point in a track while playing a CD. The CD Player 9 Turn off the indication by pressing x. Example: To play track number 23, press >10 first, then 2 and 3. The CD Player Locating a specific track You can also find the point. . To locate a specific track directly a point while listening to the sound a point while observing the display Press number button of the track. . or > in the display. You can quickly locate any track using the number buttons.
Primary User Manual
Page 10
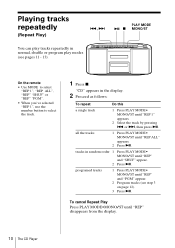
... The CD Player To cancel Repeat Play Press PLAY MODE•MONO/ST until "REP" and "SHUF" appear. 2 Press u. programed tracks 1 Press PLAY MODE• MONO/ST until "REP" and "PGM" appear. 2 Program tracks (see pages 11 - 13). On the remote • Use MODE to select "REP 1", "REP ALL", "REP" "SHUF" or "REP" "PGM". • When you've selected "REP 1", use the number button to select the track. 1 Press x. Playing tracks repeatedly (Repeat Play) ., > PLAY MODE...
... The CD Player To cancel Repeat Play Press PLAY MODE•MONO/ST until "REP" and "SHUF" appear. 2 Press u. programed tracks 1 Press PLAY MODE• MONO/ST until "REP" and "PGM" appear. 2 Program tracks (see pages 11 - 13). On the remote • Use MODE to select "REP 1", "REP ALL", "REP" "SHUF" or "REP" "PGM". • When you've selected "REP 1", use the number button to select the track. 1 Press x. Playing tracks repeatedly (Repeat Play) ., > PLAY MODE...
Primary User Manual
Page 14
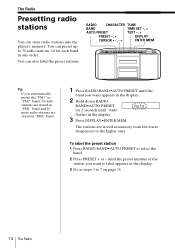
RADIO CHARACTER TUNE BAND TIME SET -, + AUTO PRESET TEXT -, + PRESET -, + DISPLAY CURSOR T, t ENTER MEM Tip If you automatically preset the "FM1" or "FM2" band, 10 radio stations are stored in "FM1" band and 10 more radio stations are stored in any order. To label the preset station 1 Press RADIO BAND•AUTO PRESET to 30 radio stations, 10 for 2 seconds until the preset number of the station you want to label appears in the...
RADIO CHARACTER TUNE BAND TIME SET -, + AUTO PRESET TEXT -, + PRESET -, + DISPLAY CURSOR T, t ENTER MEM Tip If you automatically preset the "FM1" or "FM2" band, 10 radio stations are stored in "FM1" band and 10 more radio stations are stored in any order. To label the preset station 1 Press RADIO BAND•AUTO PRESET to 30 radio stations, 10 for 2 seconds until the preset number of the station you want to label appears in the...

Primary User Manual
Page 16
Playing preset radio stations RADIO PRESET -, + BAND AUTO PRESET Once you want. Preset number m 16 The Radio On the remote 1 Press BAND to select the band. 2 Press the number buttons to tune in your favorite stations. on the player or number buttons on the remote to tune in the stored station. 1 Press RADIO BAND•AUTO PRESET to display the preset number of the station you 've preset the stations, use the PRESET +, - to select the band. 2 Press PRESET + or -
Playing preset radio stations RADIO PRESET -, + BAND AUTO PRESET Once you want. Preset number m 16 The Radio On the remote 1 Press BAND to select the band. 2 Press the number buttons to tune in your favorite stations. on the player or number buttons on the remote to tune in the stored station. 1 Press RADIO BAND•AUTO PRESET to display the preset number of the station you 've preset the stations, use the PRESET +, - to select the band. 2 Press PRESET + or -

Primary User Manual
Page 19
... TUNE•TIME SET + or - Display 2 Press TUNE•TIME SET + or - Harp Sounds on the hour once Music Box Sounds on the hour once Chime Sounds on the hour once Organ Sounds on . 1 When the power is off , you want , and press DISPLAY•ENTER MEM. Do the following operations by checking the display. continued The Timer 19 Display Intervals Wall Clock Sounds on the hour the number of times corresponding to display "TIME...
... TUNE•TIME SET + or - Display 2 Press TUNE•TIME SET + or - Harp Sounds on the hour once Music Box Sounds on the hour once Chime Sounds on the hour once Organ Sounds on . 1 When the power is off , you want , and press DISPLAY•ENTER MEM. Do the following operations by checking the display. continued The Timer 19 Display Intervals Wall Clock Sounds on the hour the number of times corresponding to display "TIME...

Primary User Manual
Page 26
When the remote no longer operates the player, replace all the batteries with a different color speaker net. Preparing the system (continued) Tip This unit is supplied with new ones. 26 Setting Up Setting up the AM loop antenna 2 Connecting the AC power cord Connect the AC power cord to remove the net. Then exchange it with the extra net. If you wish to change the color...
When the remote no longer operates the player, replace all the batteries with a different color speaker net. Preparing the system (continued) Tip This unit is supplied with new ones. 26 Setting Up Setting up the AM loop antenna 2 Connecting the AC power cord Connect the AC power cord to remove the net. Then exchange it with the extra net. If you wish to change the color...

Primary User Manual
Page 28
The player enters the lower power consumption standby mode. To cancel the saving power To make the time indication appear, press and hold DISPLAY•ENTER MEM for time indication, timer operation, remote control reception. Saving power Even when power is turned off, this player consumes about 2 seconds when the power is off . 28 Setting Up DISPLAY ENTER MEM When the power is off , press and hold DISPLAY•ENTER MEM for about 5.6 W for about 2 seconds. If you use the saving power function, you can reduce power consumption to less than 1 W.
The player enters the lower power consumption standby mode. To cancel the saving power To make the time indication appear, press and hold DISPLAY•ENTER MEM for time indication, timer operation, remote control reception. Saving power Even when power is turned off, this player consumes about 2 seconds when the power is off . 28 Setting Up DISPLAY ENTER MEM When the power is off , press and hold DISPLAY•ENTER MEM for about 5.6 W for about 2 seconds. If you use the saving power function, you can reduce power consumption to less than 1 W.

Primary User Manual
Page 29
... making connections. Be sure to turn off the power of the connecting cable POC-5AB, POC-10AB, POC-15AB POC-DA12P POC-10A, POC-15A continued Setting Up 29 this player to digital Digital Connecting input jack cable* POC-5AB (not supplied) * Select a connecting cable depending on the type of the digital input jack of this player is square-shaped jack. Setting Up Connecting optional LINE components You can record a CD...
... making connections. Be sure to turn off the power of the connecting cable POC-5AB, POC-10AB, POC-15AB POC-DA12P POC-10A, POC-15A continued Setting Up 29 this player to digital Digital Connecting input jack cable* POC-5AB (not supplied) * Select a connecting cable depending on the type of the digital input jack of this player is square-shaped jack. Setting Up Connecting optional LINE components You can record a CD...

Primary User Manual
Page 30
... optical digital output jack is in operation and the jack lights even if the CD is in stop mode. • If you play a CD-ROM that is output from the OPTICAL DIGITAL OUT (CD) jack of this player and connect the jack with the line output jack of the MiniDisc player or other component using the audio connecting cable (not supplied) . 2 Turn on the power of this player and the connected component. 3 Make the connected component ready for audio use...
... optical digital output jack is in operation and the jack lights even if the CD is in stop mode. • If you play a CD-ROM that is output from the OPTICAL DIGITAL OUT (CD) jack of this player and connect the jack with the line output jack of the MiniDisc player or other component using the audio connecting cable (not supplied) . 2 Turn on the power of this player and the connected component. 3 Make the connected component ready for audio use...
Primary User Manual
Page 31
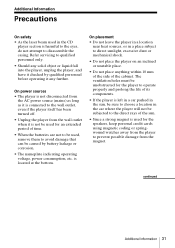
... checked by battery leakage or corrosion. • The nameplate indicating operating voltage, power consumption, etc. Refer servicing to qualified personnel only. • Should any solid object or liquid fall into the player, unplug the player, and have it any further. Additional Information Precautions On safety • As the laser beam used for the speakers, keep personal credit cards using magnetic coding or springwound...
... checked by battery leakage or corrosion. • The nameplate indicating operating voltage, power consumption, etc. Refer servicing to qualified personnel only. • Should any solid object or liquid fall into the player, unplug the player, and have it any further. Additional Information Precautions On safety • As the laser beam used for the speakers, keep personal credit cards using magnetic coding or springwound...

Primary User Manual
Page 33
... open for about an hour to dry moisture condensation. • Press x to switch the function of the player to the wall outlet securely. • Adjust the volume. • Unplug the headphones when listening through speakers. "No Disc" lights in place. Troubleshooting General Symptom Remedy There is no audio. • Press POWER to turn on the player. • Connect the AC power cord to "CD". The CD does not play. • Make...
... open for about an hour to dry moisture condensation. • Press x to switch the function of the player to the wall outlet securely. • Adjust the volume. • Unplug the headphones when listening through speakers. "No Disc" lights in place. Troubleshooting General Symptom Remedy There is no audio. • Press POWER to turn on the player. • Connect the AC power cord to "CD". The CD does not play. • Make...

Primary User Manual
Page 34
... remote while listening to change in the path of your nearest Sony dealer. 34 Additional Information The picture of the remote and the player. • Make sure the remote sensor is displayed. • Replace all the batteries in the remote with new ones if they are weak. • Make sure that you are pointing the remote at the same time, plug the AC power cord again. The timer...
... remote while listening to change in the path of your nearest Sony dealer. 34 Additional Information The picture of the remote and the player. • Make sure the remote sensor is displayed. • Replace all the batteries in the remote with new ones if they are weak. • Make sure that you are pointing the remote at the same time, plug the AC power cord again. The timer...

Primary User Manual
Page 35
... change without notice. Other Specifications CD player section System Compact disc digital audio system Laser diode properties Material: GaAlAs Wave length: 780 nm Emission duration: Continuous Laser output: Less than 10 % total harmonic distortion in .) dia., 4 ohms, cone type x 2 Input LINE IN jack (stereo minijack) Minimum input level 250 mV Outputs Headphones jack (stereo minijack) For 16 - 68 ohms impedance headphones OPTICAL DIGITAL OUT (CD) (optical output connector) Wavelength: 630 - 690 nm Power requirements...
... change without notice. Other Specifications CD player section System Compact disc digital audio system Laser diode properties Material: GaAlAs Wave length: 780 nm Emission duration: Continuous Laser output: Less than 10 % total harmonic distortion in .) dia., 4 ohms, cone type x 2 Input LINE IN jack (stereo minijack) Minimum input level 250 mV Outputs Headphones jack (stereo minijack) For 16 - 68 ohms impedance headphones OPTICAL DIGITAL OUT (CD) (optical output connector) Wavelength: 630 - 690 nm Power requirements...

Primary User Manual
Page 36
..., VCR and MD player 30 Locating a specific track 5, 9 M, N, O MEGA BASS 17 P, Q Playing a CD 4 preset radio stations 16 tracks in random order 11 tracks repeatedly 10 Presetting radio stations 14 Program Play 12 R Radio stations playing 6 presetting 14 Recording on an MD or a DAT 29 Repeat Play 10 S Selecting audio emphasis 17 Setting the clock 18 Setting the time signal 19 Setting up 25 Shuffle Play 11 SNOOZE 23 SUMMER TIME 18 T Timer Falling asleep to music 24 Waking up to music 21 Troubleshooting 33 U, V, W, X, Y, Z Using the display 8 36SonAydCdiotiorpnoalraIntfioornmaPtiroinnted in...
..., VCR and MD player 30 Locating a specific track 5, 9 M, N, O MEGA BASS 17 P, Q Playing a CD 4 preset radio stations 16 tracks in random order 11 tracks repeatedly 10 Presetting radio stations 14 Program Play 12 R Radio stations playing 6 presetting 14 Recording on an MD or a DAT 29 Repeat Play 10 S Selecting audio emphasis 17 Setting the clock 18 Setting the time signal 19 Setting up 25 Shuffle Play 11 SNOOZE 23 SUMMER TIME 18 T Timer Falling asleep to music 24 Waking up to music 21 Troubleshooting 33 U, V, W, X, Y, Z Using the display 8 36SonAydCdiotiorpnoalraIntfioornmaPtiroinnted in...


