User Guide
Page 2
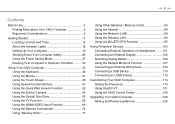
n2 N Contents Before Use 4 Finding More about Your VAIO Computer 5 Ergonomic Considerations 9 Getting Started 11 Locating Controls and Ports 12 About the Indicator Lights 18 Setting Up Your Computer 19 Shutting Down Your Computer Safely 26 Using the Power ...
n2 N Contents Before Use 4 Finding More about Your VAIO Computer 5 Ergonomic Considerations 9 Getting Started 11 Locating Controls and Ports 12 About the Indicator Lights 18 Setting Up Your Computer 19 Shutting Down Your Computer Safely 26 Using the Power ...

User Guide
Page 5
Safety guidelines and owner information. ✍ Before activating the wireless functions such as the wireless LAN and BLUETOOTH technology, read the Safety Information carefully. Before Use > Finding More about Your VAIO Computer n5 N Finding More about Your VAIO Computer This section provides support information about your VAIO computer. 1. An overview of components connection, set-up information, etc. ❑ Recovery, Backup and Troubleshooting Guide ❑ Safety Information - Printed Documentation ❑ Quick Start Guide -
Safety guidelines and owner information. ✍ Before activating the wireless functions such as the wireless LAN and BLUETOOTH technology, read the Safety Information carefully. Before Use > Finding More about Your VAIO Computer n5 N Finding More about Your VAIO Computer This section provides support information about your VAIO computer. 1. An overview of components connection, set-up information, etc. ❑ Recovery, Backup and Troubleshooting Guide ❑ Safety Information - Printed Documentation ❑ Quick Start Guide -

User Guide
Page 6
...Care, system restore, backup and recovery, and contact Sony support. ❑ Program help files - General information of your VAIO computer. To access VAIO User Guide, click Start , All Programs, and VAIO Manual. ❑ Help and Support - Get started with my VAIO Get help menu on your VAIO computer... and wireless setup, security setup, personalizing your computer. You can find the answers you purchased. To access Help and Support: 1 Click Start and Help and Support. 2 Choose from the following categories to access the help files from the help with your VAIO computer with the...
...Care, system restore, backup and recovery, and contact Sony support. ❑ Program help files - General information of your VAIO computer. To access VAIO User Guide, click Start , All Programs, and VAIO Manual. ❑ Help and Support - Get started with my VAIO Get help menu on your VAIO computer... and wireless setup, security setup, personalizing your computer. You can find the answers you purchased. To access Help and Support: 1 Click Start and Help and Support. 2 Choose from the following categories to access the help files from the help with your VAIO computer with the...

User Guide
Page 11
Before starting your computer for example, a printer, an external hard disk drive, a scanner, and so on) at a time, following the manufacturer's instructions. ❑ Locating Controls and Ports (... Safely (page 26) ❑ Using the Power Saving Mode (page 27) ❑ Keeping Your Computer in Optimum Condition (page 30) Getting Started > n 11 N Getting Started This section describes how to get started using your computer. Upon completion, connect one device (for the first time, do not connect any other hardware that did not...
Before starting your computer for example, a printer, an external hard disk drive, a scanner, and so on) at a time, following the manufacturer's instructions. ❑ Locating Controls and Ports (... Safely (page 26) ❑ Using the Power Saving Mode (page 27) ❑ Keeping Your Computer in Optimum Condition (page 30) Getting Started > n 11 N Getting Started This section describes how to get started using your computer. Upon completion, connect one device (for the first time, do not connect any other hardware that did not...

User Guide
Page 12
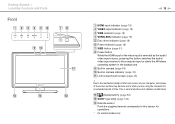
n 12 N Getting Started > Locating Controls and Ports Locating Controls and Ports Take a moment to variations in this manual due to identify the controls and ports shown on the following pages. ! The appearance of your computer may be different from those illustrated in specifications.
n 12 N Getting Started > Locating Controls and Ports Locating Controls and Ports Take a moment to variations in this manual due to identify the controls and ports shown on the following pages. ! The appearance of your computer may be different from those illustrated in specifications.
User Guide
Page 13
L (Guide button) (page 50) M SONY logo lamp (page 124) N Remote sensor* Point the supplied remote commander to this button switches the audio/ video input source to the mechanical design of ... you are using the computer for operations. * On selected models only. Due to the computer input or starts the Windows operating system in camera indicator (page 18) K LCD screen/touch screen (page 46) ! Getting Started > Locating Controls and Ports Front n 13 N A HDMI input indicator (page 18) B VIDEO input indicator (page 18) C WEB...
L (Guide button) (page 50) M SONY logo lamp (page 124) N Remote sensor* Point the supplied remote commander to this button switches the audio/ video input source to the mechanical design of ... you are using the computer for operations. * On selected models only. Due to the computer input or starts the Windows operating system in camera indicator (page 18) K LCD screen/touch screen (page 46) ! Getting Started > Locating Controls and Ports Front n 13 N A HDMI input indicator (page 18) B VIDEO input indicator (page 18) C WEB...

User Guide
Page 14
Be sure to the HDMI OUTPUT port for the first few seconds after playback starts. The area around the air exhaust vent (1) becomes extremely hot while your computer is not a malfunction. *3 Compliant with the NVIDIA video controller, there may be ...no sound from an output device connected to wait until the computer cools down before you touch it. Getting Started > Locating Controls and Ports Back n 14 N A Air exhaust vent B Foot stand (page 133) C CABLE/ANT (DIGITAL/ANALOG) input port*1 (page 62) D LAN port (page 89...
Be sure to the HDMI OUTPUT port for the first few seconds after playback starts. The area around the air exhaust vent (1) becomes extremely hot while your computer is not a malfunction. *3 Compliant with the NVIDIA video controller, there may be ...no sound from an output device connected to wait until the computer cools down before you touch it. Getting Started > Locating Controls and Ports Back n 14 N A Air exhaust vent B Foot stand (page 133) C CABLE/ANT (DIGITAL/ANALOG) input port*1 (page 62) D LAN port (page 89...

User Guide
Page 15
Getting Started > Locating Controls and Ports Right n 15 N A Optical disc drive (page 55) B Manual eject hole (page 163) C Drive eject button (page 55) D VOL (+/-) buttons (page 71) E MENU button (page 71) F V/v (Up/Down) buttons (page 71) G INPUT/OK button (page 71) H DISPLAY OFF button (page 51)/DISPLAY OFF indicator (page 18)
Getting Started > Locating Controls and Ports Right n 15 N A Optical disc drive (page 55) B Manual eject hole (page 163) C Drive eject button (page 55) D VOL (+/-) buttons (page 71) E MENU button (page 71) F V/v (Up/Down) buttons (page 71) G INPUT/OK button (page 71) H DISPLAY OFF button (page 51)/DISPLAY OFF indicator (page 18)

User Guide
Page 16
USB ports that are compliant with the USB 2.0/3.0 standards. However, they cannot be used simultaneously. *2 Compliant with the USB 3.0 standard are identifiable by their blue color. Getting Started > Locating Controls and Ports Left n 16 N A Media Access indicator (page 18) B "Memory Stick Duo"/SD memory card combined slot*1 (page 77), (page 84) C USB ports*2 (page 110) D i.LINK 4-pin (S400) port (page 112) E Headphones jack (page 101) F Microphone jack (page 109) G ASSIST button (page 51) *1 Supports Duo-size "Memory Stick" and the SD memory card.
USB ports that are compliant with the USB 2.0/3.0 standards. However, they cannot be used simultaneously. *2 Compliant with the USB 3.0 standard are identifiable by their blue color. Getting Started > Locating Controls and Ports Left n 16 N A Media Access indicator (page 18) B "Memory Stick Duo"/SD memory card combined slot*1 (page 77), (page 84) C USB ports*2 (page 110) D i.LINK 4-pin (S400) port (page 112) E Headphones jack (page 101) F Microphone jack (page 109) G ASSIST button (page 51) *1 Supports Duo-size "Memory Stick" and the SD memory card.

User Guide
Page 17
Getting Started > Locating Controls and Ports Bottom n 17 N A Built-in microphone (monaural) B Built-in speakers (stereo)/Air intake vents
Getting Started > Locating Controls and Ports Bottom n 17 N A Built-in microphone (monaural) B Built-in speakers (stereo)/Air intake vents

User Guide
Page 18
... optical disc drive is lit. Illuminates in orange while the LCD backlight is turned off. Illuminates while one or more wireless options are enabled. Getting Started > About the Indicator Lights n 18 N About the Indicator Lights Your computer is equipped with the following indicator lights: Indicator Power 1 HDMI input VIDEO input WEB...
... optical disc drive is lit. Illuminates in orange while the LCD backlight is turned off. Illuminates while one or more wireless options are enabled. Getting Started > About the Indicator Lights n 18 N About the Indicator Lights Your computer is equipped with the following indicator lights: Indicator Power 1 HDMI input VIDEO input WEB...

User Guide
Page 19
Getting Started > Setting Up Your Computer Setting Up Your Computer Connecting a Power Source You need an AC adapter to connect your computer to an AC power source. ✍ Use only the supplied AC adapter for your computer. n 19 N To connect the AC adapter 1 Plug one end of the power cord (1) into the AC adapter (2). 2 Plug the other end of the power cord into an AC outlet (3).
Getting Started > Setting Up Your Computer Setting Up Your Computer Connecting a Power Source You need an AC adapter to connect your computer to an AC power source. ✍ Use only the supplied AC adapter for your computer. n 19 N To connect the AC adapter 1 Plug one end of the power cord (1) into the AC adapter (2). 2 Plug the other end of the power cord into an AC outlet (3).

User Guide
Page 20
The shape of the foot stand and plug it into the DC IN port (4). Make sure that an AC outlet is on the AC adapter. If you will lose all unsaved data. ✍ To disconnect your computer completely from your computer while the computer is easily accessible. n 20 N ! Getting Started > Setting Up Your Computer 3 Route the AC adapter cable through the hole of the DC In plug varies depending on , you unplug the AC adapter from an AC power source, turn off the computer and unplug the AC adapter.
The shape of the foot stand and plug it into the DC IN port (4). Make sure that an AC outlet is on the AC adapter. If you will lose all unsaved data. ✍ To disconnect your computer completely from your computer while the computer is easily accessible. n 20 N ! Getting Started > Setting Up Your Computer 3 Route the AC adapter cable through the hole of the DC In plug varies depending on , you unplug the AC adapter from an AC power source, turn off the computer and unplug the AC adapter.

User Guide
Page 21
... mounting system or changing your computer setup from the power source, and then wait about an hour until the computer cools down before proceeding. Getting Started > Setting Up Your Computer n 21 N Preparing for Wall Mounting Four screws, which are compliant with the Video Electronics Standards Association (VESA) mounting standard, are supplied...
... mounting system or changing your computer setup from the power source, and then wait about an hour until the computer cools down before proceeding. Getting Started > Setting Up Your Computer n 21 N Preparing for Wall Mounting Four screws, which are compliant with the Video Electronics Standards Association (VESA) mounting standard, are supplied...

User Guide
Page 22
Getting Started > Setting Up Your Computer To set up the computer for mounting 1 Gently face down your computer on a soft cloth to avoid damage to the screen frame. 2 Remove the four screws and take the foot stand off the computer. n 22 N When facing down your computer, be sure to place it on a flat surface. !
Getting Started > Setting Up Your Computer To set up the computer for mounting 1 Gently face down your computer on a soft cloth to avoid damage to the screen frame. 2 Remove the four screws and take the foot stand off the computer. n 22 N When facing down your computer, be sure to place it on a flat surface. !

User Guide
Page 23
Be sure to keep the removed screws for future use. n 23 N ! Getting Started > Setting Up Your Computer 3 Remove the 19 screws (1) from the back of the foot stand and take off the mounting base plate (2).
Be sure to keep the removed screws for future use. n 23 N ! Getting Started > Setting Up Your Computer 3 Remove the 19 screws (1) from the back of the foot stand and take off the mounting base plate (2).

User Guide
Page 24
n 24 N Getting Started > Setting Up Your Computer 4 Remove the two screws (3) on the back of the computer.
n 24 N Getting Started > Setting Up Your Computer 4 Remove the two screws (3) on the back of the computer.

User Guide
Page 25
Getting Started > Setting Up Your Computer n 25 N 5 Flip over the mounting base plate (4) and screw it onto the back of the computer using the six screws (5) attached at the same place in the manual that came with the supplied four screws. ! Do not use the screws attached to mount your computer. Be sure to tighten the screws with adequate torque. 6 Secure your wall mount attachment to your computer with your mounting system to the computer. 7 Follow the instructions described in step 3. !
Getting Started > Setting Up Your Computer n 25 N 5 Flip over the mounting base plate (4) and screw it onto the back of the computer using the six screws (5) attached at the same place in the manual that came with the supplied four screws. ! Do not use the screws attached to mount your computer. Be sure to tighten the screws with adequate torque. 6 Secure your wall mount attachment to your computer with your mounting system to the computer. 7 Follow the instructions described in step 3. !

User Guide
Page 26
n 26 N To shut down your computer 1 Turn off any peripherals connected to shut down your data and close all running software applications. 3 Click Start and the Shut down button. After a short time, the computer automatically turns off . Getting Started > Shutting Down Your Computer Safely Shutting Down Your Computer Safely To avoid losing unsaved data, be sure to the computer. 2 Save your computer properly, as described below. Make sure the power indicator light turns off .
n 26 N To shut down your computer 1 Turn off any peripherals connected to shut down your data and close all running software applications. 3 Click Start and the Shut down button. After a short time, the computer automatically turns off . Getting Started > Shutting Down Your Computer Safely Shutting Down Your Computer Safely To avoid losing unsaved data, be sure to the computer. 2 Save your computer properly, as described below. Make sure the power indicator light turns off .

User Guide
Page 27
... indicator light blinks slowly while your computer is in use it for an extended period of your computer while it is in this mode. Getting Started > Using the Power Saving Mode n 27 N Using the Power Saving Mode In addition to use .
... indicator light blinks slowly while your computer is in use it for an extended period of your computer while it is in this mode. Getting Started > Using the Power Saving Mode n 27 N Using the Power Saving Mode In addition to use .


