
User Guide
Page 2
... VAIO Computer 29 Using the Keyboard 30 Using the Mouse 36 Using the Touch Screen 42 Using the Built-in Camera 46 Using the Optical Disc Drive 47 Using the TV Function 54 Using the HDMI/VIDEO Input Function 61 Using the Remote Commander 66 Using "Memory Stick 70 Using Other Modules / Memory Cards 76 Using the Internet 80 Using the Network (LAN 81 Using the Wireless LAN 82 Using the Bluetooth Function 85 Using Peripheral Devices 90 Connecting External Speakers or Headphones ..........91 Connecting an External Microphone 92 Connecting a USB Device 93 Connecting...
... VAIO Computer 29 Using the Keyboard 30 Using the Mouse 36 Using the Touch Screen 42 Using the Built-in Camera 46 Using the Optical Disc Drive 47 Using the TV Function 54 Using the HDMI/VIDEO Input Function 61 Using the Remote Commander 66 Using "Memory Stick 70 Using Other Modules / Memory Cards 76 Using the Internet 80 Using the Network (LAN 81 Using the Wireless LAN 82 Using the Bluetooth Function 85 Using Peripheral Devices 90 Connecting External Speakers or Headphones ..........91 Connecting an External Microphone 92 Connecting a USB Device 93 Connecting...

User Guide
Page 5
... provides support information about restoring individual software programs, hardware drivers, and drive partition(s) or your VAIO computer, and creating recovery discs and more. Safety guidelines and owner information. 2. Printed Documentation ❑ Quick Start Guide - Get started with my VAIO Get help in storage device to the original factory settings - Information about your VAIO computer. VAIO Recovery Center User Guide - Software Information Troubleshoot my VAIO Maintain and troubleshoot your VAIO computer with Internet and wireless setup, security setup, personalizing...
... provides support information about restoring individual software programs, hardware drivers, and drive partition(s) or your VAIO computer, and creating recovery discs and more. Safety guidelines and owner information. 2. Printed Documentation ❑ Quick Start Guide - Get started with my VAIO Get help in storage device to the original factory settings - Information about your VAIO computer. VAIO Recovery Center User Guide - Software Information Troubleshoot my VAIO Maintain and troubleshoot your VAIO computer with Internet and wireless setup, security setup, personalizing...

User Guide
Page 8
... serial number is causing the problem 5 A brief description of the display on the computer. 2 Your computer's serial number You can assist with a Sony certified technician at our site, you might need. In Store Service & Support (available in USA only) Make an appointment with the setup of your computer 4 The hardware component or the software program that is the last 7 digits of your VAIO PC. Before Use...
... serial number is causing the problem 5 A brief description of the display on the computer. 2 Your computer's serial number You can assist with a Sony certified technician at our site, you might need. In Store Service & Support (available in USA only) Make an appointment with the setup of your computer 4 The hardware component or the software program that is the last 7 digits of your VAIO PC. Before Use...
User Guide
Page 27
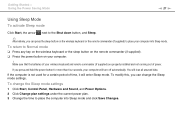
... will enter Sleep mode. To return to place the computer into Sleep mode. Getting Started > Using the Power Saving Mode n 27 N Using Sleep Mode To activate Sleep mode Click Start, the arrow next to the Shut down button, and Sleep. ✍ Alternatively, you can change the Sleep mode settings 1 Click Start, Control Panel, Hardware and Sound, and Power Options. 2 Click Change plan settings under the current power plan. 3 Change the time to Normal mode ❑ Press any key on the wireless keyboard or the sleep button on the remote...
... will enter Sleep mode. To return to place the computer into Sleep mode. Getting Started > Using the Power Saving Mode n 27 N Using Sleep Mode To activate Sleep mode Click Start, the arrow next to the Shut down button, and Sleep. ✍ Alternatively, you can change the Sleep mode settings 1 Click Start, Control Panel, Hardware and Sound, and Power Options. 2 Click Change plan settings under the current power plan. 3 Change the time to Normal mode ❑ Press any key on the wireless keyboard or the sleep button on the remote...
User Guide
Page 29
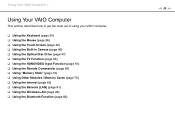
...; Using the Touch Screen (page 42) ❑ Using the Built-in Camera (page 46) ❑ Using the Optical Disc Drive (page 47) ❑ Using the TV Function (page 54) ❑ Using the HDMI/VIDEO Input Function (page 61) ❑ Using the Remote Commander (page 66) ❑ Using "Memory Stick" (page 70) ❑ Using Other Modules / Memory Cards (page 76) ❑ Using the Internet (page 80) ❑ Using the Network (LAN) (page 81) ❑ Using the Wireless LAN...
...; Using the Touch Screen (page 42) ❑ Using the Built-in Camera (page 46) ❑ Using the Optical Disc Drive (page 47) ❑ Using the TV Function (page 54) ❑ Using the HDMI/VIDEO Input Function (page 61) ❑ Using the Remote Commander (page 66) ❑ Using "Memory Stick" (page 70) ❑ Using Other Modules / Memory Cards (page 76) ❑ Using the Internet (page 80) ❑ Using the Network (LAN) (page 81) ❑ Using the Wireless LAN...
User Guide
Page 33
... using the HDMI/VIDEO input function. H Volume control buttons* Increase (+) or decrease (-) the volume. N Indicator lights (Battery): Stays off while the AA batteries for more information. J Windows key Displays the Start menu. K E key Ejects the optical disc drive tray when used in upper case. Using Your VAIO Computer > Using the Keyboard n 33 N F Zoom buttons Change the size of power. (Caps lock): Turns on and off when the connection is ready for connection with the VAIO Control Center for the wireless keyboard are sufficient and blinks...
... using the HDMI/VIDEO input function. H Volume control buttons* Increase (+) or decrease (-) the volume. N Indicator lights (Battery): Stays off while the AA batteries for more information. J Windows key Displays the Start menu. K E key Ejects the optical disc drive tray when used in upper case. Using Your VAIO Computer > Using the Keyboard n 33 N F Zoom buttons Change the size of power. (Caps lock): Turns on and off when the connection is ready for connection with the VAIO Control Center for the wireless keyboard are sufficient and blinks...
User Guide
Page 49
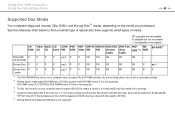
...) and BD- DVD- DVD-R/ DVD+R/ DVD+R DL DVD-R DL DVD- DVD-RAM Version 2.2/12X-SPEED DVD-RAM Revision 5.0 disc is not supported. Video Music CD CD-R/ DVD- BD- Using Your VAIO Computer > Using the Optical Disc Drive n 49 N Supported Disc Media Your computer plays and records CDs, DVDs, and Blu-ray Disc™ media, depending on your computer does not support BD-RE Disc media in Version 1.0 format and Blu-ray Disc media with a cartridge. *4 Supports writing data to single-sided DVD-RAM discs (2.6 GB) compliant...
...) and BD- DVD- DVD-R/ DVD+R/ DVD+R DL DVD-R DL DVD- DVD-RAM Version 2.2/12X-SPEED DVD-RAM Revision 5.0 disc is not supported. Video Music CD CD-R/ DVD- BD- Using Your VAIO Computer > Using the Optical Disc Drive n 49 N Supported Disc Media Your computer plays and records CDs, DVDs, and Blu-ray Disc™ media, depending on your computer does not support BD-RE Disc media in Version 1.0 format and Blu-ray Disc media with a cartridge. *4 Supports writing data to single-sided DVD-RAM discs (2.6 GB) compliant...
User Guide
Page 63
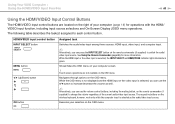
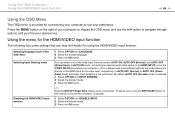
... lights illuminate in green. The respective buttons on the remote commander (if supplied) to each control button. Navigates through options on the OSD menu. While the OSD menu is not displayed and the HDMI input or the video input is selected, you can use the volume control buttons, including the muting button, on the remote commander (if supplied) to increase/decrease the volume as the audio/video input source. Touch screen operations are located...
... lights illuminate in green. The respective buttons on the remote commander (if supplied) to each control button. Navigates through options on the OSD menu. While the OSD menu is not displayed and the HDMI input or the video input is selected, you can use the volume control buttons, including the muting button, on the remote commander (if supplied) to increase/decrease the volume as the audio/video input source. Touch screen operations are located...
User Guide
Page 64
... AUTO ON mode, connecting an external audio/video device to the HDMI INPUT port or the VIDEO INPUT jacks while your computer is off or in Sleep mode automatically switches the audio/video input source to suit your preference. You can select one . To resume power, press the INPUT SELECT button on the right of your computer to display the OSD menu and use the V/v button to navigate through options until you...
... AUTO ON mode, connecting an external audio/video device to the HDMI INPUT port or the VIDEO INPUT jacks while your computer is off or in Sleep mode automatically switches the audio/video input source to suit your preference. You can select one . To resume power, press the INPUT SELECT button on the right of your computer to display the OSD menu and use the V/v button to navigate through options until you...
User Guide
Page 91
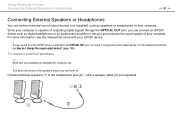
... instructions, see the manual that came with a speaker cable (3) (not supplied). Connect external speakers (1) to change the sound output device? (page 154). Using Peripheral Devices > Connecting External Speakers or Headphones n 91 N Connecting External Speakers or Headphones You can connect an S/PDIF device such as speakers or headphones, to your computer. Since your computer is capable of outputting digital signals through the OPTICAL OUT port, you can connect external sound output devices (not supplied), such as digital headphones or an audio/video...
... instructions, see the manual that came with a speaker cable (3) (not supplied). Connect external speakers (1) to change the sound output device? (page 154). Using Peripheral Devices > Connecting External Speakers or Headphones n 91 N Connecting External Speakers or Headphones You can connect an S/PDIF device such as speakers or headphones, to your computer. Since your computer is capable of outputting digital signals through the OPTICAL OUT port, you can connect external sound output devices (not supplied), such as digital headphones or an audio/video...
User Guide
Page 101
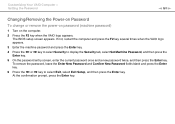
... the Enter key. The BIOS setup screen appears. To remove the password, leave the Enter New Password and Confirm New Password fields blank and press the Enter key. 6 Press the < or , key to display the Security tab, select Set Machine Password, and then press the Enter key. 5 On the password entry screen, enter the current password once and a new password twice, and then press the Enter key. Customizing Your VAIO Computer > Setting the Password n 101 N Changing/Removing the Power-on Password To change or remove the power-on password (machine password) 1 Turn on...
... the Enter key. The BIOS setup screen appears. To remove the password, leave the Enter New Password and Confirm New Password fields blank and press the Enter key. 6 Press the < or , key to display the Security tab, select Set Machine Password, and then press the Enter key. 5 On the password entry screen, enter the current password once and a new password twice, and then press the Enter key. Customizing Your VAIO Computer > Setting the Password n 101 N Changing/Removing the Power-on Password To change or remove the power-on password (machine password) 1 Turn on...

User Guide
Page 102
... Enter key. To remove the password, leave the Enter New Password and Confirm New Password fields blank and press the Enter key. 6 Press the < or , key to display the Security tab, select Set User Password, and then press the Enter key. 5 On the password entry screen, enter the current password once and a new password twice, and then press the Enter key. At the confirmation prompt, press the Enter key. Customizing Your VAIO Computer > Setting the Password n 102 N To change or remove the power-on password (user password) 1 Turn...
... Enter key. To remove the password, leave the Enter New Password and Confirm New Password fields blank and press the Enter key. 6 Press the < or , key to display the Security tab, select Set User Password, and then press the Enter key. 5 On the password entry screen, enter the current password once and a new password twice, and then press the Enter key. At the confirmation prompt, press the Enter key. Customizing Your VAIO Computer > Setting the Password n 102 N To change or remove the power-on password (user password) 1 Turn...

User Guide
Page 104
... yourself, if you are not familiar with upgrading memory on the model you purchased. See the specifications to install a new memory module. ❑ You should not touch the connectors or open the memory module compartment cover. To find out about Your VAIO Computer (page 5). For assistance, contact an authorized Sony Service Center. Upgrading Your VAIO Computer > n 104 N Upgrading Your VAIO Computer Your VAIO computer and memory modules use high precision components and electronic...
... yourself, if you are not familiar with upgrading memory on the model you purchased. See the specifications to install a new memory module. ❑ You should not touch the connectors or open the memory module compartment cover. To find out about Your VAIO Computer (page 5). For assistance, contact an authorized Sony Service Center. Upgrading Your VAIO Computer > n 104 N Upgrading Your VAIO Computer Your VAIO computer and memory modules use high precision components and electronic...

User Guide
Page 129
... power-on password? The BIOS setup screen appears. To find the nearest center or agent, see Finding More about Your VAIO Computer (page 5). How can use one of the BIOS functions to reset it keeps crashing? ❑ Check the web site of the game if there are any patches or updates to download. ❑ Make sure you have installed the latest video driver software. ❑ On some VAIO models, the graphics memory...
... power-on password? The BIOS setup screen appears. To find the nearest center or agent, see Finding More about Your VAIO Computer (page 5). How can use one of the BIOS functions to reset it keeps crashing? ❑ Check the web site of the game if there are any patches or updates to download. ❑ Make sure you have installed the latest video driver software. ❑ On some VAIO models, the graphics memory...

User Guide
Page 142
... the package to open a list of the optical disc drives of your desired drive. Follow these steps: 1 Click Start and Control Panel. 2 Click System and Security. 3 Click System. 4 Click Device Manager in the optical disc drive and damage the drive or cause it to malfunction. ❑ If a region code warning appears, the disc may need to enable the device or reinstall the driver software. 5 Double-click the optical disc drive device to make sure the region code is installed.
... the package to open a list of the optical disc drives of your desired drive. Follow these steps: 1 Click Start and Control Panel. 2 Click System and Security. 3 Click System. 4 Click Device Manager in the optical disc drive and damage the drive or cause it to malfunction. ❑ If a region code warning appears, the disc may need to enable the device or reinstall the driver software. 5 Double-click the optical disc drive device to make sure the region code is installed.

User Guide
Page 146
... cable is securely connected to the ports on the printer and your computer. ❑ Make sure your printer is not functioning after your computer resumes from Sleep mode, then restart the computer. ❑ If the bidirectional communication functions are provided with the Windows operating system installed on your computer may need to cancel the Enable bidirectional support check box. 5 Click OK. This disables...
... cable is securely connected to the ports on the printer and your computer. ❑ Make sure your printer is not functioning after your computer resumes from Sleep mode, then restart the computer. ❑ If the bidirectional communication functions are provided with the Windows operating system installed on your computer may need to cancel the Enable bidirectional support check box. 5 Click OK. This disables...
Quick Start Guide
Page 2
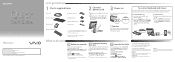
... downloading updates from Windows Update and VAIO Update, so that you to the on-screen VAIO Recovery Center User Guide under Use my VAIO in the process of the prop-up stand and plug the other end into the AC input port on the computer. Press the power button until the setup window appears. To connect keyboard 1 Slide the power switch on the keyboard to change without notice. To connect mouse 1 Slide the power switch on the mouse...
... downloading updates from Windows Update and VAIO Update, so that you to the on-screen VAIO Recovery Center User Guide under Use my VAIO in the process of the prop-up stand and plug the other end into the AC input port on the computer. Press the power button until the setup window appears. To connect keyboard 1 Slide the power switch on the keyboard to change without notice. To connect mouse 1 Slide the power switch on the mouse...
Quick Start Guide
Page 1
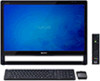
... Let's get started with my VAIO Use my VAIO Troubleshoot my VAIO Click Start , Help and Support, Use my VAIO, and VAIO User Guide. Click Start , All Programs, Windows Update or VAIO Update. Press the power button until the setup window appears. Otherwise, you to do next Update your computer Keep your computer updated by following categories: Get started 1 Check supplied items 2 Connect power cord 3 Power on Power cord Wireless keyboard1 Wireless mouse1 Remote commander2 3 AA batteries (4) or (6 ...
... Let's get started with my VAIO Use my VAIO Troubleshoot my VAIO Click Start , Help and Support, Use my VAIO, and VAIO User Guide. Click Start , All Programs, Windows Update or VAIO Update. Press the power button until the setup window appears. Otherwise, you to do next Update your computer Keep your computer updated by following categories: Get started 1 Check supplied items 2 Connect power cord 3 Power on Power cord Wireless keyboard1 Wireless mouse1 Remote commander2 3 AA batteries (4) or (6 ...
Safety Information
Page 2
... OR ERROR-FREE. Some of a separate user license agreement. The software described herein is governed by third parties. Software specifications are located on the bottom, the back panel, or inside the battery compartment of such software is subject to this product. This product contains software owned by Sony and licensed by the terms of the software may not necessarily be identical to the model and serial numbers...
... OR ERROR-FREE. Some of a separate user license agreement. The software described herein is governed by third parties. Software specifications are located on the bottom, the back panel, or inside the battery compartment of such software is subject to this product. This product contains software owned by Sony and licensed by the terms of the software may not necessarily be identical to the model and serial numbers...
Marketing Specifications (Black)
Page 2
... Supplied Accessories Power Cord Wireless Keyboard Wireless Mouse Remote Control Batteries Color: Black UPC Code: 027242780309 Inputs and Outputs Audio In: 1 (Line In) Microphone Input: 1 USB Port(s): 5 (2.0 compliant) i.LINK® Connection: 1 (4pin) i.LINK® connector (IEEE 1394)10 Headphone Output(s): 1 S/PDIF Output(s): 1 Ethernet Connection (s): 1 HDMI™ Input: 1 Power Input Voltage: 100-240V 1. Accessible capacity may require Internet services. 4. Some functionality may vary. Check with MagicGate® functionality One Secure Digital (SD memory card) media slot Start...
... Supplied Accessories Power Cord Wireless Keyboard Wireless Mouse Remote Control Batteries Color: Black UPC Code: 027242780309 Inputs and Outputs Audio In: 1 (Line In) Microphone Input: 1 USB Port(s): 5 (2.0 compliant) i.LINK® Connection: 1 (4pin) i.LINK® connector (IEEE 1394)10 Headphone Output(s): 1 S/PDIF Output(s): 1 Ethernet Connection (s): 1 HDMI™ Input: 1 Power Input Voltage: 100-240V 1. Accessible capacity may require Internet services. 4. Some functionality may vary. Check with MagicGate® functionality One Secure Digital (SD memory card) media slot Start...


