
User Guide
Page 2
n2 N Contents Before Use ...6 Documentation ...6 Ergonomic Considerations ...9 Getting Started ...11 Locating Controls and Ports...12 About the Indicator Lights ...17 Connecting a Power Source ...18 Using the Battery Pack ...20 Shutting Down Your Computer Safely ...25 Using Your VAIO Computer ...26 Using the Keyboard ...27 Using the Touch Pad ...29 Using the Optical Disc Drive ...30 Using the ExpressCard Module ...39 Using the Memory Stick Media ...42 Using Other Memory Cards ...48 Using the Internet...51 Using Wireless LAN (WLAN) ...52
n2 N Contents Before Use ...6 Documentation ...6 Ergonomic Considerations ...9 Getting Started ...11 Locating Controls and Ports...12 About the Indicator Lights ...17 Connecting a Power Source ...18 Using the Battery Pack ...20 Shutting Down Your Computer Safely ...25 Using Your VAIO Computer ...26 Using the Keyboard ...27 Using the Touch Pad ...29 Using the Optical Disc Drive ...30 Using the ExpressCard Module ...39 Using the Memory Stick Media ...42 Using Other Memory Cards ...48 Using the Internet...51 Using Wireless LAN (WLAN) ...52

User Guide
Page 3
... Bus (USB) Device...67 Connecting a Printer ...70 Connecting an i.LINK Device ...71 Connecting to a Network (LAN) ...73 Customizing Your VAIO Computer ...74 Setting the Password ...75 Setting Up Your Computer with VAIO Central ...78 Using the Power Saving Modes ...79 Managing Power with VAIO Power Management ...83 Upgrading Your VAIO Computer...85 Adding and Removing Memory...86
... Bus (USB) Device...67 Connecting a Printer ...70 Connecting an i.LINK Device ...71 Connecting to a Network (LAN) ...73 Customizing Your VAIO Computer ...74 Setting the Password ...75 Setting Up Your Computer with VAIO Central ...78 Using the Power Saving Modes ...79 Managing Power with VAIO Power Management ...83 Upgrading Your VAIO Computer...85 Adding and Removing Memory...86

User Guide
Page 4
n4 N Precautions ...92 On Handling the LCD Screen ...93 On Using the Power Source ...94 On Handling Your Computer...95 On Handling Floppy Disks ...97 On Handling Discs ...98 On Using the Battery Pack...99 On Using Headphones...100 On Handling Memory Stick Media...101 On Handling the Hard Disk ...102 On Updating Your Computer ...103 Troubleshooting ...104 Computer ...105 System Security ...112 Battery...113 Internet ...115 Networking ...117 Optical Discs ...120 Display ...124 Printing ...128 Microphone ...129 Mouse ...130 Speakers ...131 Touch Pad...132
n4 N Precautions ...92 On Handling the LCD Screen ...93 On Using the Power Source ...94 On Handling Your Computer...95 On Handling Floppy Disks ...97 On Handling Discs ...98 On Using the Battery Pack...99 On Using Headphones...100 On Handling Memory Stick Media...101 On Handling the Hard Disk ...102 On Updating Your Computer ...103 Troubleshooting ...104 Computer ...105 System Security ...112 Battery...113 Internet ...115 Networking ...117 Optical Discs ...120 Display ...124 Printing ...128 Microphone ...129 Mouse ...130 Speakers ...131 Touch Pad...132

User Guide
Page 11
..., following the manufacturers' instructions. ❑ Locating Controls and Ports (page 12) ❑ About the Indicator Lights (page 17) ❑ Connecting a Power Source (page 18) ❑ Using the Battery Pack (page 20) ❑ Shutting Down Your Computer Safely (page 25) Make sure to get started... using your VAIO computer. ! n 11 N Getting Started Getting Started This section describes how to start up your computer with your computer. Upon completion, connect...
..., following the manufacturers' instructions. ❑ Locating Controls and Ports (page 12) ❑ About the Indicator Lights (page 17) ❑ Connecting a Power Source (page 18) ❑ Using the Battery Pack (page 20) ❑ Shutting Down Your Computer Safely (page 25) Make sure to get started... using your VAIO computer. ! n 11 N Getting Started Getting Started This section describes how to start up your computer with your computer. Upon completion, connect...

User Guide
Page 12
... Front A Num lock indicator (page 17) B Caps lock indicator (page 17) C Scroll lock indicator (page 17) D Power button E LCD screen (page 93) F Keyboard (page 27) G Touch pad (page 29) H Power indicator (page 17) I Battery indicator (page 17) J Hard disk drive indicator (page 17) K WLAN (Wireless LAN)... indicator (page 17) L SD memory card slot (page 48) M Media Access indicator (page 17) N Memory Stick PRO/Duo media slot* (page 43) * Your computer ...
... Front A Num lock indicator (page 17) B Caps lock indicator (page 17) C Scroll lock indicator (page 17) D Power button E LCD screen (page 93) F Keyboard (page 27) G Touch pad (page 29) H Power indicator (page 17) I Battery indicator (page 17) J Hard disk drive indicator (page 17) K WLAN (Wireless LAN)... indicator (page 17) L SD memory card slot (page 48) M Media Access indicator (page 17) N Memory Stick PRO/Duo media slot* (page 43) * Your computer ...
User Guide
Page 17
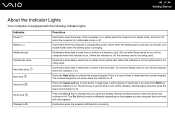
... using and does not work with the following indicator lights. Illuminates when data is read from or written to change how you are using battery power, blinks when the battery pack is running . Press the Scr Lk key to the optical disc. Illuminates when data is read from or written to... e Media Access Optical disc drive Hard disk drive Num lock Caps lock Scroll lock Wireless LAN Functions Illuminates when the power of power, and double-blinks when the battery pack is not being used . When the indicator is on . Press it a second time to activate the numeric keypad. ...
... using and does not work with the following indicator lights. Illuminates when data is read from or written to change how you are using battery power, blinks when the battery pack is running . Press the Scr Lk key to the optical disc. Illuminates when data is read from or written to... e Media Access Optical disc drive Hard disk drive Num lock Caps lock Scroll lock Wireless LAN Functions Illuminates when the power of power, and double-blinks when the battery pack is not being used . When the indicator is on . Press it a second time to activate the numeric keypad. ...

User Guide
Page 18
...has an attachment on the bottom of the computer as a power source for your computer only with the supplied AC adapter. To use either an AC adapter or a rechargeable battery pack as illustrated below. n 18 N Getting Started Connecting a Power Source You can use the AC adapter 1 Plug one end... of the power cord (1) into the AC adapter (3). 2 Plug the other end of the power cord into the DC IN port (4) on the computer, while fitting the extension ...
...has an attachment on the bottom of the computer as a power source for your computer only with the supplied AC adapter. To use either an AC adapter or a rechargeable battery pack as illustrated below. n 18 N Getting Started Connecting a Power Source You can use the AC adapter 1 Plug one end... of the power cord (1) into the AC adapter (3). 2 Plug the other end of the power cord into the DC IN port (4) on the computer, while fitting the extension ...

User Guide
Page 19
This power saving mode saves the time of time, place the computer into Hibernate mode. The plug attachment can be detached and reattached with the plug turned upside down or resuming. If you do not use your computer completely from AC power, unplug the AC adapter. Make sure that the AC outlet is easily accessible. n 19 N Getting Started ✍ To disconnect your computer for a long period of shutting down . See Using Hibernate Mode (page 82).
This power saving mode saves the time of time, place the computer into Hibernate mode. The plug attachment can be detached and reattached with the plug turned upside down or resuming. If you do not use your computer completely from AC power, unplug the AC adapter. Make sure that the AC outlet is easily accessible. n 19 N Getting Started ✍ To disconnect your computer for a long period of shutting down . See Using Hibernate Mode (page 82).

User Guide
Page 21
n 21 N Getting Started This computer is directly connected to operate only with genuine Sony batteries. 4 Slide the battery lock switch (1) to the LOCK position to secure the battery pack on the computer. ✍ When your computer is designed to AC power and has a battery pack installed, it uses power from the AC outlet. !
n 21 N Getting Started This computer is directly connected to operate only with genuine Sony batteries. 4 Slide the battery lock switch (1) to the LOCK position to secure the battery pack on the computer. ✍ When your computer is designed to AC power and has a battery pack installed, it uses power from the AC outlet. !

User Guide
Page 22
... the battery pack is charging. Battery indicator light status On Blinks Double blinks Off Meaning The computer is using AC power. The battery pack is running out of purchase. To charge the battery pack 1 Install the battery pack. 2 Connect the AC adapter to the computer. The ... indicator turns off. n 22 N Getting Started Charging the Battery Pack The battery pack supplied with your computer is not fully charged at the time of power.
... the battery pack is charging. Battery indicator light status On Blinks Double blinks Off Meaning The computer is using AC power. The battery pack is running out of purchase. To charge the battery pack 1 Install the battery pack. 2 Connect the AC adapter to the computer. The ... indicator turns off. n 22 N Getting Started Charging the Battery Pack The battery pack supplied with your computer is not fully charged at the time of power.

User Guide
Page 23
... a fully charged battery pack. The battery pack continues to recharge the battery pack or shut down your data frequently and manually activate a power management mode, such as Sleep or Hibernate. Charging a partially discharged battery pack does not affect battery life. When battery life is impossible.... To avoid loss of power, both the battery and power indicator lights start flashing. If the battery pack wears out when the computer enters Sleep mode, you use the battery pack...
... a fully charged battery pack. The battery pack continues to recharge the battery pack or shut down your data frequently and manually activate a power management mode, such as Sleep or Hibernate. Charging a partially discharged battery pack does not affect battery life. When battery life is impossible.... To avoid loss of power, both the battery and power indicator lights start flashing. If the battery pack wears out when the computer enters Sleep mode, you use the battery pack...

User Guide
Page 25
To shut down your computer 1 Turn off any peripherals connected to the computer. 2 Click Start, the arrow next to the Lock button, and Shut Down. 3 Respond to any prompts warning you to save documents or to consider other users and wait for the computer to shut down your computer properly, as described below. n 25 N Getting Started Shutting Down Your Computer Safely To avoid losing unsaved data, be sure to turn off . The power indicator light turns off automatically.
To shut down your computer 1 Turn off any peripherals connected to the computer. 2 Click Start, the arrow next to the Lock button, and Shut Down. 3 Respond to any prompts warning you to save documents or to consider other users and wait for the computer to shut down your computer properly, as described below. n 25 N Getting Started Shutting Down Your Computer Safely To avoid losing unsaved data, be sure to turn off . The power indicator light turns off automatically.

User Guide
Page 28
When you execute this command, the states of power consumption. Combinations/Feature Fn + (F12): Hibernate n 28 N Using Your VAIO Computer Functions Provides for the lowest level of the system and the peripheral devices are written to turn on power management, see Using the Power Saving Modes (page 79). To return the system to its original state, use the power button to the hard disk and the system power is turned off. For details on the power.
When you execute this command, the states of power consumption. Combinations/Feature Fn + (F12): Hibernate n 28 N Using Your VAIO Computer Functions Provides for the lowest level of the system and the peripheral devices are written to turn on power management, see Using the Power Saving Modes (page 79). To return the system to its original state, use the power button to the hard disk and the system power is turned off. For details on the power.

User Guide
Page 31
n 31 N Using Your VAIO Computer 4 Close the tray by pushing it in a power saving mode (Sleep or Hibernate). Do not remove the optical disc when your computer is in gently. ! Doing so may cause the computer to malfunction. ✍ If you plan to use an external optical disc drive, connect the drive before you launch any preinstalled CD/DVD program.
n 31 N Using Your VAIO Computer 4 Close the tray by pushing it in a power saving mode (Sleep or Hibernate). Do not remove the optical disc when your computer is in gently. ! Doing so may cause the computer to malfunction. ✍ If you plan to use an external optical disc drive, connect the drive before you launch any preinstalled CD/DVD program.

User Guide
Page 35
... AC adapter to power your computer or make sure your computer while writing data to a disc. ❑ Deactivate the screen saver and exit anti-virus software before you use circular discs. n 35 N Using Your VAIO Computer Notes on writing data to a disc ❑ Use only Sony recommended software, which...strike or shake your battery pack is preinstalled on the optical disc drive, you need to close all other applications. ❑ Do not switch power modes while using your software application to burn discs, make data on a disc readable on your software. ❑ Only use the same ...
... AC adapter to power your computer or make sure your computer while writing data to a disc. ❑ Deactivate the screen saver and exit anti-virus software before you use circular discs. n 35 N Using Your VAIO Computer Notes on writing data to a disc ❑ Use only Sony recommended software, which...strike or shake your battery pack is preinstalled on the optical disc drive, you need to close all other applications. ❑ Do not switch power modes while using your software application to burn discs, make data on a disc readable on your software. ❑ Only use the same ...

User Guide
Page 36
This may cause your computer to malfunction. ❑ Do not switch to power saving modes while your computer is playing a DVD. ❑ Region code indicators are labeled on the DVDs to indicate in most regions of player you ...-RW, or DVD-RAM disc media. ❑ Do not use memory-resident utility software to speed up disc access when playing a DVD. n 36 N Using Your VAIO Computer Notes on playing discs To achieve optimum performance when playing discs, you should follow these recommendations. ❑ Some CD players and computer's optical disc...
This may cause your computer to malfunction. ❑ Do not switch to power saving modes while your computer is playing a DVD. ❑ Region code indicators are labeled on the DVDs to indicate in most regions of player you ...-RW, or DVD-RAM disc media. ❑ Do not use memory-resident utility software to speed up disc access when playing a DVD. n 36 N Using Your VAIO Computer Notes on playing discs To achieve optimum performance when playing discs, you should follow these recommendations. ❑ Some CD players and computer's optical disc...

User Guide
Page 60
... Windows operating system, you can connect a computer display (monitor) directly to your computer. To connect a computer display 1 If necessary, plug one end of the display's power cord (1) into your computer. n 60 N Using Peripheral Devices Connecting an External Display You can also use the computer with a computer display or a projector. ✍ Connect...
... Windows operating system, you can connect a computer display (monitor) directly to your computer. To connect a computer display 1 If necessary, plug one end of the display's power cord (1) into your computer. n 60 N Using Peripheral Devices Connecting an External Display You can also use the computer with a computer display or a projector. ✍ Connect...

User Guide
Page 61
To connect a multimedia computer display 1 Plug the power cord of your computer. n 61 N Using Peripheral Devices Connecting a Multimedia Computer Display You can connect a multimedia computer display that includes built-in speakers and a microphone directly to your multimedia computer display (1) into an AC outlet. 2 Plug the display cable (2) (not supplied) into the monitor (VGA) port (3) a on the computer. 3 Plug the speaker cable (4) into the headphones jack (5) i on the computer. 4 Plug the microphone cable (6) into the microphone jack (7) m on the computer.
To connect a multimedia computer display 1 Plug the power cord of your computer. n 61 N Using Peripheral Devices Connecting a Multimedia Computer Display You can connect a multimedia computer display that includes built-in speakers and a microphone directly to your multimedia computer display (1) into an AC outlet. 2 Plug the display cable (2) (not supplied) into the monitor (VGA) port (3) a on the computer. 3 Plug the speaker cable (4) into the headphones jack (5) i on the computer. 4 Plug the microphone cable (6) into the microphone jack (7) m on the computer.

User Guide
Page 62
n 62 N Using Peripheral Devices Connecting a Projector You can connect a projector (for example, the Sony LCD projector) directly to your projector into an AC outlet. 2 Plug an RGB signal cable (2) (not supplied) into the monitor (VGA) port (3) a on the computer. 3 Plug an audio cable (4) (not supplied) into the headphones jack (5) i. 4 Plug the RGB signal cable and the audio cable into the jack and port on the projector (6). To connect a projector 1 Connect the power cord (1) of your computer.
n 62 N Using Peripheral Devices Connecting a Projector You can connect a projector (for example, the Sony LCD projector) directly to your projector into an AC outlet. 2 Plug an RGB signal cable (2) (not supplied) into the monitor (VGA) port (3) a on the computer. 3 Plug an audio cable (4) (not supplied) into the headphones jack (5) i. 4 Plug the RGB signal cable and the audio cable into the jack and port on the projector (6). To connect a projector 1 Connect the power cord (1) of your computer.

User Guide
Page 69
... it is now safe to remove the hardware device. 7 Click OK. 8 Click Close to unplug. 4 Click Stop. Disconnecting the drive when the computer is in a power saving mode (Sleep or Hibernate) may cause the computer to malfunction. n 69 N Using Peripheral Devices Disconnecting a USB floppy disk drive You can disconnect a USB floppy...
... it is now safe to remove the hardware device. 7 Click OK. 8 Click Close to unplug. 4 Click Stop. Disconnecting the drive when the computer is in a power saving mode (Sleep or Hibernate) may cause the computer to malfunction. n 69 N Using Peripheral Devices Disconnecting a USB floppy disk drive You can disconnect a USB floppy...


