User Guide
Page 2
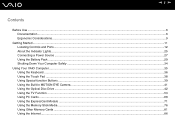
... ...6 Documentation ...6 Ergonomic Considerations ...9 Getting Started ...11 Locating Controls and Ports...12 About the Indicator Lights ...25 Connecting a Power Source ...27 Using the Battery Pack ...29 Shutting Down Your Computer Safely ...34 Using Your VAIO Computer ...35 Using the Keyboard ...36 Using the Touch Pad ...38 Using Special-function Buttons ...39 Using the...
... ...6 Documentation ...6 Ergonomic Considerations ...9 Getting Started ...11 Locating Controls and Ports...12 About the Indicator Lights ...25 Connecting a Power Source ...27 Using the Battery Pack ...29 Shutting Down Your Computer Safely ...34 Using Your VAIO Computer ...35 Using the Keyboard ...36 Using the Touch Pad ...38 Using Special-function Buttons ...39 Using the...
User Guide
Page 3
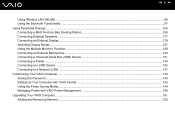
... Bus (USB) Device...131 Connecting a Printer ...134 Connecting an i.LINK Device ...135 Connecting to a Network (LAN) ...137 Customizing Your VAIO Computer ...139 Setting the Password ...140 Setting Up Your Computer with VAIO Central ...143 Using the Power Saving Modes ...144 Managing Power with VAIO Power Management ...149 Upgrading Your VAIO Computer...151 Adding and Removing Memory...152
... Bus (USB) Device...131 Connecting a Printer ...134 Connecting an i.LINK Device ...135 Connecting to a Network (LAN) ...137 Customizing Your VAIO Computer ...139 Setting the Password ...140 Setting Up Your Computer with VAIO Central ...143 Using the Power Saving Modes ...144 Managing Power with VAIO Power Management ...149 Upgrading Your VAIO Computer...151 Adding and Removing Memory...152
User Guide
Page 4
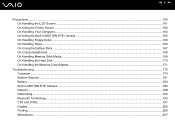
n4 N Precautions ...160 On Handling the LCD Screen ...161 On Using the Power Source ...162 On Handling Your Computer...163 On Using the Built-in MOTION EYE Camera...165 On Handling Floppy Disks ...165 On Handling Discs ...166 ...
n4 N Precautions ...160 On Handling the LCD Screen ...161 On Using the Power Source ...162 On Handling Your Computer...163 On Using the Built-in MOTION EYE Camera...165 On Handling Floppy Disks ...165 On Handling Discs ...166 ...
User Guide
Page 11
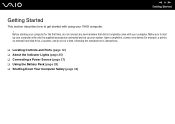
..., and so on) at a time, following the manufacturer's instructions. ❑ Locating Controls and Ports (page 12) ❑ About the Indicator Lights (page 25) ❑ Connecting a Power Source (page 27) ❑ Using the Battery Pack (page 29) ❑ Shutting Down Your Computer Safely (page 34) Make sure to get started with using... (for the first time, do not connect any new hardware that did not originally come with only the supplied accessories connected and set up your VAIO computer. !
..., and so on) at a time, following the manufacturer's instructions. ❑ Locating Controls and Ports (page 12) ❑ About the Indicator Lights (page 25) ❑ Connecting a Power Source (page 27) ❑ Using the Battery Pack (page 29) ❑ Shutting Down Your Computer Safely (page 34) Make sure to get started with using... (for the first time, do not connect any new hardware that did not originally come with only the supplied accessories connected and set up your VAIO computer. !
User Guide
Page 13
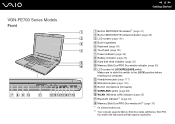
...Microphone jack (page 130) N Built-in speakers E Keyboard (page 36) F Touch pad (page 38) G Power indicator (page 25) H Battery indicator (page 25) I Hard disk drive indicator (page 25) J Memory Stick Duo/PRO Duo media indicator (page 25) K LCD screen lid LOCK/RELEASE switch Make sure to slide this switch to... the LOCK position before moving your computer. VGN-FE700 Series Models Front n 13 N Getting Started A Built-in MOTION ...
...Microphone jack (page 130) N Built-in speakers E Keyboard (page 36) F Touch pad (page 38) G Power indicator (page 25) H Battery indicator (page 25) I Hard disk drive indicator (page 25) J Memory Stick Duo/PRO Duo media indicator (page 25) K LCD screen lid LOCK/RELEASE switch Make sure to slide this switch to... the LOCK position before moving your computer. VGN-FE700 Series Models Front n 13 N Getting Started A Built-in MOTION ...
User Guide
Page 19
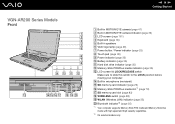
... card slot (page 83) R WIRELESS switch (page 88) S WLAN (Wireless LAN) indicator (page 25) T Bluetooth indicator*2 (page 25) *1 Your computer supports Memory Stick PRO media and Memory Stick Duo media with high speed and high capacity capabilities. *2 On selected models only. N Built-in speakers F VAIO logo lamp (page 39) G Power button / Power indicator (page 25...
... card slot (page 83) R WIRELESS switch (page 88) S WLAN (Wireless LAN) indicator (page 25) T Bluetooth indicator*2 (page 25) *1 Your computer supports Memory Stick PRO media and Memory Stick Duo media with high speed and high capacity capabilities. *2 On selected models only. N Built-in speakers F VAIO logo lamp (page 39) G Power button / Power indicator (page 25...
User Guide
Page 25
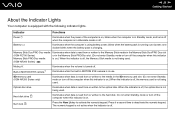
Memory Stick Duo/PRO Duo media (VGN-FE700 Series) Memory Stick PRO/Duo media (VGN-AR200 Series) Illuminates when data is not being used. Hard disk drive Illuminates when data is read from or written to the media in the ... . Press it a second time to activate the numeric keypad. Num lock Press the Num Lk key to deactivate the numeric keypad. Indicator Functions Power 1 Illuminates when the power of power, and double-blinks when the battery pack is in Hibernate mode or off. Optical disc drive Illuminates when data is read from or...
Memory Stick Duo/PRO Duo media (VGN-FE700 Series) Memory Stick PRO/Duo media (VGN-AR200 Series) Illuminates when data is not being used. Hard disk drive Illuminates when data is read from or written to the media in the ... . Press it a second time to activate the numeric keypad. Num lock Press the Num Lk key to deactivate the numeric keypad. Indicator Functions Power 1 Illuminates when the power of power, and double-blinks when the battery pack is in Hibernate mode or off. Optical disc drive Illuminates when data is read from or...
User Guide
Page 27
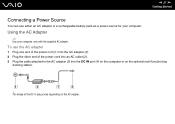
... computer only with the supplied AC adapter. Using the AC Adapter ✍ Use your computer. n 27 N Getting Started Connecting a Power Source You can use the AC adapter 1 Plug one end of the power cord (1) into the AC adapter (3). 2 Plug the other end of the DC In plug varies depending on the optional... multi function bay docking station. ! The shape of the power cord into an AC outlet (2). 3 Plug the cable attached to the AC adapter (3) into the DC IN port (4) on the computer or on the AC...
... computer only with the supplied AC adapter. Using the AC Adapter ✍ Use your computer. n 27 N Getting Started Connecting a Power Source You can use the AC adapter 1 Plug one end of the power cord (1) into the AC adapter (3). 2 Plug the other end of the DC In plug varies depending on the optional... multi function bay docking station. ! The shape of the power cord into an AC outlet (2). 3 Plug the cable attached to the AC adapter (3) into the DC IN port (4) on the computer or on the AC...

User Guide
Page 28
If you do not use your computer completely from AC power, unplug the AC adapter. This power saving mode saves the time of time, place the computer into Hibernate mode. Make sure that the AC outlet is easily accessible. See Using Hibernate Mode (page 147). n 28 N Getting Started ✍ To disconnect your computer for a long period of shutting down or resuming.
If you do not use your computer completely from AC power, unplug the AC adapter. This power saving mode saves the time of time, place the computer into Hibernate mode. Make sure that the AC outlet is easily accessible. See Using Hibernate Mode (page 147). n 28 N Getting Started ✍ To disconnect your computer for a long period of shutting down or resuming.
User Guide
Page 30
This computer is directly connected to operate only with genuine Sony batteries. n 30 N Getting Started ✍ When your computer is designed to AC power and has a battery pack installed, it uses power from the AC outlet. !
This computer is directly connected to operate only with genuine Sony batteries. n 30 N Getting Started ✍ When your computer is designed to AC power and has a battery pack installed, it uses power from the AC outlet. !
User Guide
Page 31
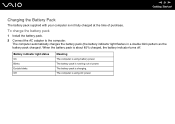
The computer is using AC power. The computer automatically charges the battery pack (the battery indicator light flashes in a double blink pattern as the battery pack charges). The battery pack is not fully charged at the time of power. Battery indicator light status On Blinks Double ...blinks Off Meaning The computer is using battery power. n 31 N Getting Started Charging the Battery Pack The battery pack supplied with your computer...
The computer is using AC power. The computer automatically charges the battery pack (the battery indicator light flashes in a double blink pattern as the battery pack charges). The battery pack is not fully charged at the time of power. Battery indicator light status On Blinks Double ...blinks Off Meaning The computer is using battery power. n 31 N Getting Started Charging the Battery Pack The battery pack supplied with your computer...
User Guide
Page 32
...life is low. The battery pack supplied with your computer is directly connected to the previous work state is nearly depleted, both the battery and power indicator lights blink. If the battery pack wears out when the computer enters Standby mode, you use the battery pack as Standby or Hibernate.... Going back to AC power. The battery indicator light is a lithium ion battery pack and can be recharged any unsaved data. When your computer is on while you will...
...life is low. The battery pack supplied with your computer is directly connected to the previous work state is nearly depleted, both the battery and power indicator lights blink. If the battery pack wears out when the computer enters Standby mode, you use the battery pack as Standby or Hibernate.... Going back to AC power. The battery indicator light is a lithium ion battery pack and can be recharged any unsaved data. When your computer is on while you will...

User Guide
Page 34
To shut down your computer 1 Turn off any prompts warning you to save documents or to consider other users and wait for the computer to the computer. 2 Click Start and then Turn Off Computer. The power indicator light turns off automatically. The Turn off computer window appears. 3 Click Turn Off. 4 Respond to any peripherals connected to turn off . n 34 N Getting Started Shutting Down Your Computer Safely To avoid losing unsaved data, be sure to shut down your computer properly, as described below.
To shut down your computer 1 Turn off any prompts warning you to save documents or to consider other users and wait for the computer to the computer. 2 Click Start and then Turn Off Computer. The power indicator light turns off automatically. The Turn off computer window appears. 3 Click Turn Off. 4 Respond to any peripherals connected to turn off . n 34 N Getting Started Shutting Down Your Computer Safely To avoid losing unsaved data, be sure to shut down your computer properly, as described below.

User Guide
Page 37
When you execute this command, the states of power consumption. Combinations/Feature Fn + (F12): Hibernate n 37 N Using Your VAIO Computer Functions Provides for the lowest level of the system and the peripheral devices are written to turn on power management, see Using the Power Saving Modes (page 144). For details on the power. To return the system to its original state, use the power button to the hard disk and the system power is turned off.
When you execute this command, the states of power consumption. Combinations/Feature Fn + (F12): Hibernate n 37 N Using Your VAIO Computer Functions Provides for the lowest level of the system and the peripheral devices are written to turn on power management, see Using the Power Saving Modes (page 144). For details on the power. To return the system to its original state, use the power button to the hard disk and the system power is turned off.
User Guide
Page 42
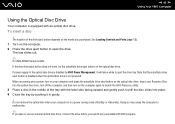
The tray slides out. ✍ On VGN-AR200 Series models: If the disc drive eject button does not work,...the middle of the drive eject button depends on the model you launch any preinstalled CD/DVD program. If power supply to use an external optical disc drive, connect the drive before you purchased. Doing so may cause ...insert a disc ! Insert your Recovery Disc into place. 4 Close the tray by VAIO Power Management, it will take a while to launch the VAIO Recovery utility. 3 Place a disc in a power saving mode (Standby or Hibernate). See Locating Controls and Ports (page 12). 1...
The tray slides out. ✍ On VGN-AR200 Series models: If the disc drive eject button does not work,...the middle of the drive eject button depends on the model you launch any preinstalled CD/DVD program. If power supply to use an external optical disc drive, connect the drive before you purchased. Doing so may cause ...insert a disc ! Insert your Recovery Disc into place. 4 Close the tray by VAIO Power Management, it will take a while to launch the VAIO Recovery utility. 3 Place a disc in a power saving mode (Standby or Hibernate). See Locating Controls and Ports (page 12). 1...
User Guide
Page 47
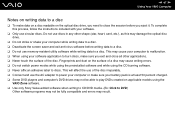
.... ❑ Never touch the surface of the disc. This may cause writing errors. ❑ Do not switch power modes while using the preinstalled software and while using the VAIO Zone software. ❑ Use only Sony Value-added software when writing to CD/DVD media. (Ex: Click to DVD) Other software programs may not...
.... ❑ Never touch the surface of the disc. This may cause writing errors. ❑ Do not switch power modes while using the preinstalled software and while using the VAIO Zone software. ❑ Use only Sony Value-added software when writing to CD/DVD media. (Ex: Click to DVD) Other software programs may not...
User Guide
Page 48
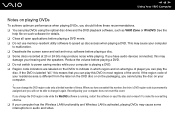
... not reset this DVD in most regions of times. If the DVD is labeled "all open applications before playing a DVD. ❑ Do not switch to power saving modes while your computer is playing a DVD. ❑ Region code indicators are labeled on the DVDs to malfunction. ❑ Deactivate the screen saver and... label on the DVD disc or on the packaging, you cannot play DVDs using the optical disc drive and the DVD playback software, such as VAIO Zone or WinDVD. If the region code of player you have exceeded this may produce noise while playing. If you can play the disc on...
... not reset this DVD in most regions of times. If the DVD is labeled "all open applications before playing a DVD. ❑ Do not switch to power saving modes while your computer is playing a DVD. ❑ Region code indicators are labeled on the DVDs to malfunction. ❑ Deactivate the screen saver and... label on the DVD disc or on the packaging, you cannot play DVDs using the optical disc drive and the DVD playback software, such as VAIO Zone or WinDVD. If the region code of player you have exceeded this may produce noise while playing. If you can play the disc on...

User Guide
Page 57
...an indoor/outdoor antenna, you may need to your computer to an indoor/outdoor antenna system, using Option 1 or Option 2 from other power sources or connectors to reduce reception interference. Connect the other end to the VHF/UHF port (6) on the type of antenna system in ... (Option 1) 1 Connect one end of a TV coaxial cable (1) (not supplied) to reorient the antenna for best reception. n 57 N Using Your VAIO Computer Connecting to a standard antenna You can connect your antenna outlet (2). Move the antenna cable away from the previous section, Connecting to standard cable access...
...an indoor/outdoor antenna, you may need to your computer to an indoor/outdoor antenna system, using Option 1 or Option 2 from other power sources or connectors to reduce reception interference. Connect the other end to the VHF/UHF port (6) on the type of antenna system in ... (Option 1) 1 Connect one end of a TV coaxial cable (1) (not supplied) to reorient the antenna for best reception. n 57 N Using Your VAIO Computer Connecting to a standard antenna You can connect your antenna outlet (2). Move the antenna cable away from the previous section, Connecting to standard cable access...
User Guide
Page 64
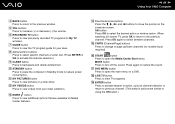
... the M, m, J STANDBY button Press to place the computer in Standby mode to view pictures or a slide show. K MY PICTURES button Press to reduce power consumption. n 64 N Using Your VAIO Computer D BACK button Press to return to view previously recorded TV programs (In My TV window). L MY VIDEOS button Press to view the...
... the M, m, J STANDBY button Press to place the computer in Standby mode to view pictures or a slide show. K MY PICTURES button Press to reduce power consumption. n 64 N Using Your VAIO Computer D BACK button Press to return to view previously recorded TV programs (In My TV window). L MY VIDEOS button Press to view the...
User Guide
Page 69
...driver provided by the PC Card manufacturer. See the manual that you remove the card before the computer enters Hibernate mode. n 69 N Using Your VAIO Computer ! For some PC Cards, if you alternate between Normal mode and Standby or Hibernate mode while the card is inserted, you may not ...enter Hibernate power management mode. It may enter Standby mode. If you are inserting the PC Card in the System Properties window, remove the software driver and then...
...driver provided by the PC Card manufacturer. See the manual that you remove the card before the computer enters Hibernate mode. n 69 N Using Your VAIO Computer ! For some PC Cards, if you alternate between Normal mode and Standby or Hibernate mode while the card is inserted, you may not ...enter Hibernate power management mode. It may enter Standby mode. If you are inserting the PC Card in the System Properties window, remove the software driver and then...


