User Guide
Page 2
......12 About the Indicator Lights ...25 Connecting a Power Source ...27 Using the Battery Pack ...29 Shutting Down Your Computer Safely ...34 Using Your VAIO Computer ...35 Using the Keyboard ...36 Using the Touch Pad ...38 Using Special-function Buttons ...39 Using the Built-in MOTION EYE Camera...41 Using the Optical Disc...
......12 About the Indicator Lights ...25 Connecting a Power Source ...27 Using the Battery Pack ...29 Shutting Down Your Computer Safely ...34 Using Your VAIO Computer ...35 Using the Keyboard ...36 Using the Touch Pad ...38 Using Special-function Buttons ...39 Using the Built-in MOTION EYE Camera...41 Using the Optical Disc...
User Guide
Page 19
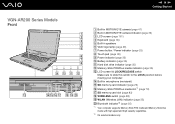
...VAIO logo lamp (page 39) G Power button / Power indicator (page 25) H Touch pad (page 38) I Power indicator (page 25) J Battery indicator (page 25) K Hard disk drive indicator (page 25) L Memory Stick PRO/Duo... media indicator (page 25) M LCD screen lid LOCK/RELEASE switch Make sure to slide this switch to the LOCK position before moving your computer. VGN-AR200 Series ...screen (page 161) D Keyboard (page 36) E Built-in microphone (monaural) O SD memory card indicator (page 25) P Memory Stick PRO/Duo media slot*1 (page 78) Q SD memory card slot (page 83) R WIRELESS switch (...
...VAIO logo lamp (page 39) G Power button / Power indicator (page 25) H Touch pad (page 38) I Power indicator (page 25) J Battery indicator (page 25) K Hard disk drive indicator (page 25) L Memory Stick PRO/Duo... media indicator (page 25) M LCD screen lid LOCK/RELEASE switch Make sure to slide this switch to the LOCK position before moving your computer. VGN-AR200 Series ...screen (page 161) D Keyboard (page 36) E Built-in microphone (monaural) O SD memory card indicator (page 25) P Memory Stick PRO/Duo media slot*1 (page 78) Q SD memory card slot (page 83) R WIRELESS switch (...
User Guide
Page 35
Using Your VAIO Computer This section describes how to get the most out of using your computer. ❑ Using the Keyboard (page 36) ❑ Using the Touch Pad (page 38) ❑ Using Special-function Buttons (page 39) ❑ Using the Built-in MOTION EYE Camera (page ... (page 81) ❑ Using the Internet (page 86) ❑ Using Wireless LAN (WLAN) (page 88) ❑ Using the Bluetooth Functionality (page 97) n 35 N Using Your VAIO Computer
Using Your VAIO Computer This section describes how to get the most out of using your computer. ❑ Using the Keyboard (page 36) ❑ Using the Touch Pad (page 38) ❑ Using Special-function Buttons (page 39) ❑ Using the Built-in MOTION EYE Camera (page ... (page 81) ❑ Using the Internet (page 86) ❑ Using Wireless LAN (WLAN) (page 88) ❑ Using the Bluetooth Functionality (page 97) n 35 N Using Your VAIO Computer
User Guide
Page 36
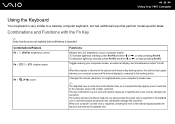
n 36 N Using Your VAIO Computer Using the Keyboard Your keyboard is launched. To decrease lightness intensity, press Fn+F5 and then m or Combinations/Feature Fn + 8 (F5/F6): brightness control Fn + /T (F7): display output Fn + (F10): ... keep pressing Fn+F6. Combinations and Functions with the Fn Key ✍ Some functions are not available before Windows is very similar to a desktop computer keyboard, but has additional keys that perform model-specific tasks.
n 36 N Using Your VAIO Computer Using the Keyboard Your keyboard is launched. To decrease lightness intensity, press Fn+F5 and then m or Combinations/Feature Fn + 8 (F5/F6): brightness control Fn + /T (F7): display output Fn + (F10): ... keep pressing Fn+F6. Combinations and Functions with the Fn Key ✍ Some functions are not available before Windows is very similar to a desktop computer keyboard, but has additional keys that perform model-specific tasks.
User Guide
Page 38
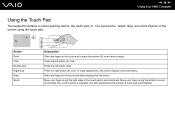
... along the right edge of the touch pad to place the pointer (2) on the screen using the touch pad. n 38 N Using Your VAIO Computer Using the Touch Pad The keyboard contains a cursor-pointing device, the touch pad (1). In many applications, this action displays a shortcut menu. Action Point Click Double-click Right-click...
... along the right edge of the touch pad to place the pointer (2) on the screen using the touch pad. n 38 N Using Your VAIO Computer Using the Touch Pad The keyboard contains a cursor-pointing device, the touch pad (1). In many applications, this action displays a shortcut menu. Action Point Click Double-click Right-click...
User Guide
Page 172
.... Many problems have simple solutions. Try these suggestions before visiting the Sony online support Web site at http://esupport.sony.com/EN/VAIO/ for customers in USA, at http://www.sony.ca/support for customers in Canada, or at http://esupport.sony.com/ES/VAIO/ for customers in Latin American countries or areas. ❑ Computer (page...; Display (page 202) ❑ Printing (page 206) ❑ Microphone (page 207) ❑ Mouse (page 208) ❑ Speakers (page 209) ❑ Touch Pad (page 210) ❑ Keyboard (page 211) ❑ Floppy Disks (page 212)
.... Many problems have simple solutions. Try these suggestions before visiting the Sony online support Web site at http://esupport.sony.com/EN/VAIO/ for customers in USA, at http://www.sony.ca/support for customers in Canada, or at http://esupport.sony.com/ES/VAIO/ for customers in Latin American countries or areas. ❑ Computer (page...; Display (page 202) ❑ Printing (page 206) ❑ Microphone (page 207) ❑ Mouse (page 208) ❑ Speakers (page 209) ❑ Touch Pad (page 210) ❑ Keyboard (page 211) ❑ Floppy Disks (page 212)
User Guide
Page 197
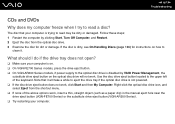
...or damaged. The disc that it . Follow these steps: 1 Restart the computer by VAIO Power Management, the substitute drive eject button on the optical disc drive will take a while... as a paper clip) in the manual eject hole near the drive eject button (VGN-FE700 Series) or the substitute drive eject button (VGN-AR200 Series). ❑ Try restarting your computer. Note that your computer is trying ...open? ❑ Make sure your computer is on. ❑ On VGN-FE700 Series models, press the drive eject button. ❑ On VGN-AR200 Series models, if power supply to the optical disc drive is ...
...or damaged. The disc that it . Follow these steps: 1 Restart the computer by VAIO Power Management, the substitute drive eject button on the optical disc drive will take a while... as a paper clip) in the manual eject hole near the drive eject button (VGN-FE700 Series) or the substitute drive eject button (VGN-AR200 Series). ❑ Try restarting your computer. Note that your computer is trying ...open? ❑ Make sure your computer is on. ❑ On VGN-FE700 Series models, press the drive eject button. ❑ On VGN-AR200 Series models, if power supply to the optical disc drive is ...


