
User Guide
Page 3
n3 N Using Peripheral Devices ...108 Connecting External Speakers ...109 Connecting an External Display ...111 Selecting Display Modes...115 Using the Multiple Monitors Function ...116 Connecting a Universal Serial Bus (USB) Device...118 Connecting a Printer ...120 Connecting an i.LINK Device ...121 Connecting to a Network (LAN) ...123 Customizing Your VAIO Computer ...125 Setting the Password ...126 Setting Up Your Computer with VAIO Control Center 131 Using the Power Saving Mode...132 Upgrading Your VAIO Computer...135 Adding and Removing Memory...136 Replacing the Hard Disk Drive ...143
n3 N Using Peripheral Devices ...108 Connecting External Speakers ...109 Connecting an External Display ...111 Selecting Display Modes...115 Using the Multiple Monitors Function ...116 Connecting a Universal Serial Bus (USB) Device...118 Connecting a Printer ...120 Connecting an i.LINK Device ...121 Connecting to a Network (LAN) ...123 Customizing Your VAIO Computer ...125 Setting the Password ...126 Setting Up Your Computer with VAIO Control Center 131 Using the Power Saving Mode...132 Upgrading Your VAIO Computer...135 Adding and Removing Memory...136 Replacing the Hard Disk Drive ...143

User Guide
Page 8
... and Support. 2 Click Use my VAIO. 3 Click VAIO Recovery Center User Guide. n8 N Before Use Non-printed Documentation ❑ User Guide (this manual by clicking their respective URLs beginning with http://, your computer must be connected to the Internet. ❑ Specifications - To view the online specifications: 1 Connect to the Internet. 2 Go to the original factory settings. It also includes information about restoring individual software programs, hardware drivers, and drive partition(s) or your entire hard disk drive to the Sony online support...
... and Support. 2 Click Use my VAIO. 3 Click VAIO Recovery Center User Guide. n8 N Before Use Non-printed Documentation ❑ User Guide (this manual by clicking their respective URLs beginning with http://, your computer must be connected to the Internet. ❑ Specifications - To view the online specifications: 1 Connect to the Internet. 2 Go to the original factory settings. It also includes information about restoring individual software programs, hardware drivers, and drive partition(s) or your entire hard disk drive to the Sony online support...

User Guide
Page 20
n 20 N Getting Started About the Indicator Lights Your computer is equipped with the following indicator lights: Indicator Power 1 System power CF memory card Media Access HDMI SELECT DISPLAY OFF Hard disk drive/Optical disc drive WIRELESS Functions Illuminates in green when the computer is on, illuminates in orange while the computer is in Sleep mode, and turns off when the computer is lit. Do not place the computer into Sleep mode or turn it off...
n 20 N Getting Started About the Indicator Lights Your computer is equipped with the following indicator lights: Indicator Power 1 System power CF memory card Media Access HDMI SELECT DISPLAY OFF Hard disk drive/Optical disc drive WIRELESS Functions Illuminates in green when the computer is on, illuminates in orange while the computer is in Sleep mode, and turns off when the computer is lit. Do not place the computer into Sleep mode or turn it off...

User Guide
Page 40
... button Turns the volume on the computer screen. J S1 button Opens the Media Center Start menu by default. ✍ The default S1 button assignment may be different from the above. To change the volume for the HDMI input, see Using the HDMI Input Control Buttons (page 75) for the wireless keyboard are sufficient and switches to indicate that the keyboard is in certain software applications. M Applications key Displays a shortcut menu in place to batteries wear out. See Setting...
... button Turns the volume on the computer screen. J S1 button Opens the Media Center Start menu by default. ✍ The default S1 button assignment may be different from the above. To change the volume for the HDMI input, see Using the HDMI Input Control Buttons (page 75) for the wireless keyboard are sufficient and switches to indicate that the keyboard is in certain software applications. M Applications key Displays a shortcut menu in place to batteries wear out. See Setting...
User Guide
Page 42
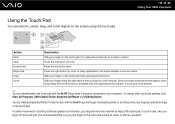
... center to your finger on the screen using the touch pad. To change other touch pad settings, click Start, All Programs, VAIO Control Center, Keyboard and Mouse and Pointing Device. It is connected to start an operation. Press the left button (3) once. In many applications, this action displays a shortcut menu. Press the left button twice. Slide your computer. You can disable/enable the Motion Pointer feature with the Fn+F11 keys while a mouse...
... center to your finger on the screen using the touch pad. To change other touch pad settings, click Start, All Programs, VAIO Control Center, Keyboard and Mouse and Pointing Device. It is connected to start an operation. Press the left button (3) once. In many applications, this action displays a shortcut menu. Press the left button twice. Slide your computer. You can disable/enable the Motion Pointer feature with the Fn+F11 keys while a mouse...
User Guide
Page 48
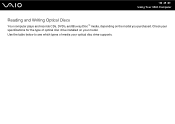
n 48 N Using Your VAIO Computer Reading and Writing Optical Discs Your computer plays and records CDs, DVDs, and Blu-ray Disc™ media, depending on your optical disc drive supports. Check your specifications for the type of media your model. Use the table below to see which types of optical disc drive installed on the model you purchased.
n 48 N Using Your VAIO Computer Reading and Writing Optical Discs Your computer plays and records CDs, DVDs, and Blu-ray Disc™ media, depending on your optical disc drive supports. Check your specifications for the type of media your model. Use the table below to see which types of optical disc drive installed on the model you purchased.
User Guide
Page 63
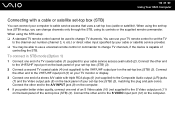
.... ❑ You may be used to change TV channels, if the device is capable of controlling the STB. n 63 N Using Your VAIO Computer Connecting with triple RCA plugs (6) (not supplied) to the Composite Audio output (L/R) jacks (7) and the Video output jack (8) on the back panel of your set-top box (STB) (3), matching the plug and jack colors. To connect in STB mode (Option 1) 1 Connect one end of your computer...
.... ❑ You may be used to change TV channels, if the device is capable of controlling the STB. n 63 N Using Your VAIO Computer Connecting with triple RCA plugs (6) (not supplied) to the Composite Audio output (L/R) jacks (7) and the Video output jack (8) on the back panel of your set-top box (STB) (3), matching the plug and jack colors. To connect in STB mode (Option 1) 1 Connect one end of your computer...
User Guide
Page 108
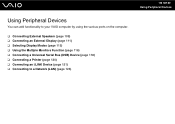
Using Peripheral Devices You can add functionality to your VAIO computer by using the various ports on the computer. ❑ Connecting External Speakers (page 109) ❑ Connecting an External Display (page 111) ❑ Selecting Display Modes (page 115) ❑ Using the Multiple Monitors Function (page 116) ❑ Connecting a Universal Serial Bus (USB) Device (page 118) ❑ Connecting a Printer (page 120) ❑ Connecting an i.LINK Device (page 121) ❑ Connecting to a Network (LAN) (page 123) n 108 N Using Peripheral Devices
Using Peripheral Devices You can add functionality to your VAIO computer by using the various ports on the computer. ❑ Connecting External Speakers (page 109) ❑ Connecting an External Display (page 111) ❑ Selecting Display Modes (page 115) ❑ Using the Multiple Monitors Function (page 116) ❑ Connecting a Universal Serial Bus (USB) Device (page 118) ❑ Connecting a Printer (page 120) ❑ Connecting an i.LINK Device (page 121) ❑ Connecting to a Network (LAN) (page 123) n 108 N Using Peripheral Devices
User Guide
Page 109
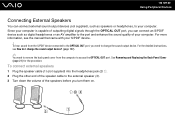
Since your computer. See Removing and Replacing the Back Panel Cover (page 21) for the procedure. To hear sound from the S/PDIF device connected to the OPTICAL OUT port, you need to remove the back panel cover from the computer to access the OPTICAL OUT port. n 109 N Using Peripheral Devices Connecting External Speakers You can connect external sound output devices (not supplied), such as digital headphones or an AV amplifier to change the sound output device? (page 197). ✍ You...
Since your computer. See Removing and Replacing the Back Panel Cover (page 21) for the procedure. To hear sound from the S/PDIF device connected to the OPTICAL OUT port, you need to remove the back panel cover from the computer to access the OPTICAL OUT port. n 109 N Using Peripheral Devices Connecting External Speakers You can connect external sound output devices (not supplied), such as digital headphones or an AV amplifier to change the sound output device? (page 197). ✍ You...
User Guide
Page 111
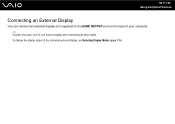
To change the display output to the HDMI OUTPUT port on the back of your computer. ✍ Connect the power cord of your external display after connecting all other cables. n 111 N Using Peripheral Devices Connecting an External Display You can connect an external display (not supplied) to the connected external display, see Selecting Display Modes (page 115).
To change the display output to the HDMI OUTPUT port on the back of your computer. ✍ Connect the power cord of your external display after connecting all other cables. n 111 N Using Peripheral Devices Connecting an External Display You can connect an external display (not supplied) to the connected external display, see Selecting Display Modes (page 115).
User Guide
Page 112
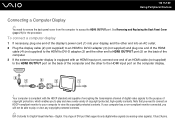
... monitor connected, you need to remove the back panel cover from the computer to view the copyright protected contents. To connect a computer display 1 If necessary, plug one end of the display's power cord (1) into your computer to access the HDMI OUTPUT port. It is equipped with the HDCP standard and capable of encrypting the transmission channel of digital video signals for the procedure. n 112 N Using Peripheral Devices Connecting a Computer Display...
... monitor connected, you need to remove the back panel cover from the computer to view the copyright protected contents. To connect a computer display 1 If necessary, plug one end of the display's power cord (1) into your computer to access the HDMI OUTPUT port. It is equipped with the HDCP standard and capable of encrypting the transmission channel of digital video signals for the procedure. n 112 N Using Peripheral Devices Connecting a Computer Display...

User Guide
Page 113
... Removing and Replacing the Back Panel Cover (page 21) for sound output. n 113 N Using Peripheral Devices Connecting a TV If your TV is equipped with an HDMI input port, you can connect the TV to your computer. ✍ You need to remove the back panel cover from the device connected to the HDMI OUTPUT port, you need to change the sound output device? (page 197). 1 Plug the power cord of the TV to access the HDMI OUTPUT port. To connect...
... Removing and Replacing the Back Panel Cover (page 21) for sound output. n 113 N Using Peripheral Devices Connecting a TV If your TV is equipped with an HDMI input port, you can connect the TV to your computer. ✍ You need to remove the back panel cover from the device connected to the HDMI OUTPUT port, you need to change the sound output device? (page 197). 1 Plug the power cord of the TV to access the HDMI OUTPUT port. To connect...
User Guide
Page 120
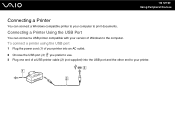
To connect a printer using the USB port 1 Plug the power cord (1) of your printer into an AC outlet. 2 Choose the USB port (3) you prefer to use. 3 Plug one end of Windows to the computer. n 120 N Using Peripheral Devices Connecting a Printer You can connect a USB printer compatible with your version of a USB printer cable (2) (not supplied) into the USB port and the other end to print documents. Connecting a Printer Using the USB Port You can connect a Windows-compatible printer to your computer to your printer.
To connect a printer using the USB port 1 Plug the power cord (1) of your printer into an AC outlet. 2 Choose the USB port (3) you prefer to use. 3 Plug one end of Windows to the computer. n 120 N Using Peripheral Devices Connecting a Printer You can connect a USB printer compatible with your version of a USB printer cable (2) (not supplied) into the USB port and the other end to print documents. Connecting a Printer Using the USB Port You can connect a Windows-compatible printer to your computer to your printer.
User Guide
Page 123
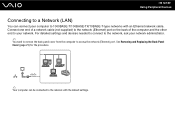
...; Your computer can connect your computer to your network administrator. ✍ You need to remove the back panel cover from the computer to the network with an Ethernet network cable. n 123 N Using Peripheral Devices Connecting to a Network (LAN) You can be connected to access the network (Ethernet) port. Connect one end of a network cable (not supplied) to the network (Ethernet) port on the back of the computer and the other end to 1000BASE-T/100BASE-TX/10BASE-T-type networks with the default settings.
...; Your computer can connect your computer to your network administrator. ✍ You need to remove the back panel cover from the computer to the network with an Ethernet network cable. n 123 N Using Peripheral Devices Connecting to a Network (LAN) You can be connected to access the network (Ethernet) port. Connect one end of a network cable (not supplied) to the network (Ethernet) port on the back of the computer and the other end to 1000BASE-T/100BASE-TX/10BASE-T-type networks with the default settings.
User Guide
Page 144
... -screen guide: 1 Click Start and Help and Support. 2 Click Use my VAIO. 3 Click VAIO Recovery Center User Guide. n 144 N Upgrading Your VAIO Computer Notes on installing hard disk drives ❑ The entire repair cost will cause a malfunction of your computer. ❑ If you replace the original hard disk drive, the preinstalled VAIO Recovery Center cannot restore the drive partitions, operating system, or original software programs. Before replacing the hard disk drive, create your own recovery discs. Improper installation or removal will be charged if there is plugged to a power...
... -screen guide: 1 Click Start and Help and Support. 2 Click Use my VAIO. 3 Click VAIO Recovery Center User Guide. n 144 N Upgrading Your VAIO Computer Notes on installing hard disk drives ❑ The entire repair cost will cause a malfunction of your computer. ❑ If you replace the original hard disk drive, the preinstalled VAIO Recovery Center cannot restore the drive partitions, operating system, or original software programs. Before replacing the hard disk drive, create your own recovery discs. Improper installation or removal will be charged if there is plugged to a power...

User Guide
Page 173
... remember the power-on password, contact an authorized Sony Service Center to reset it keeps crashing? ❑ Check the web site of the BIOS functions to select your computer. 2 Press the F2 key when the VAIO logo appears. The optimal graphic performance in this case is shared with the system. If you have installed the latest video driver. ❑ On some VAIO models, the graphics memory is not...
... remember the power-on password, contact an authorized Sony Service Center to reset it keeps crashing? ❑ Check the web site of the BIOS functions to select your computer. 2 Press the F2 key when the VAIO logo appears. The optimal graphic performance in this case is shared with the system. If you have installed the latest video driver. ❑ On some VAIO models, the graphics memory is not...
User Guide
Page 184
... you are using external speakers, check the volume settings on my computer? ❑ Make sure the disc is inserted into the optical disc drive with the volume down button and Restart to restart the computer. 2 Remove the disc from the optical disc drive. 3 Check the disc for instructions. ❑ If you . ❑ Make sure the necessary program(s) is installed according to the Shut down button on the wireless keyboard or the remote commander...
... you are using external speakers, check the volume settings on my computer? ❑ Make sure the disc is inserted into the optical disc drive with the volume down button and Restart to restart the computer. 2 Remove the disc from the optical disc drive. 3 Check the disc for instructions. ❑ If you . ❑ Make sure the necessary program(s) is installed according to the Shut down button on the wireless keyboard or the remote commander...

User Guide
Page 186
... DVD±RW/±R DL/RAM drive does not support it must be able to the Internet, see Using the Internet (page 99). Note the possibility that some Blu-ray Disc contents on the computer, it . ❑ BD-R Disc media are using VAIO Update. To download and install the updates on your optical disc drive supports the Blu-ray Disc writing function. To play Blu-ray Disc media? n 186 N Troubleshooting What should I do not work...
... DVD±RW/±R DL/RAM drive does not support it must be able to the Internet, see Using the Internet (page 99). Note the possibility that some Blu-ray Disc contents on the computer, it . ❑ BD-R Disc media are using VAIO Update. To download and install the updates on your optical disc drive supports the Blu-ray Disc writing function. To play Blu-ray Disc media? n 186 N Troubleshooting What should I do not work...

User Guide
Page 188
... driver software before you use your computer may enable printing. This disables the bidirectional communication functions of the printer, such as data transfer, status monitoring, and remote panel. Follow these steps: 1 Click Start and Control Panel. 2 Click Printer under Hardware and Sound. 3 Right-click the printer icon and select Properties. 4 Click the Ports tab. 5 Click to cancel the Enable bidirectional support check box. 6 Click OK. n 188 N Troubleshooting...
... driver software before you use your computer may enable printing. This disables the bidirectional communication functions of the printer, such as data transfer, status monitoring, and remote panel. Follow these steps: 1 Click Start and Control Panel. 2 Click Printer under Hardware and Sound. 3 Right-click the printer icon and select Properties. 4 Click the Ports tab. 5 Click to cancel the Enable bidirectional support check box. 6 Click OK. n 188 N Troubleshooting...
User Guide
Page 194
... stop working properly. These devices may be mismatched. To change the keyboard configuration, follow these characters. ❑ Avoid using any wireless devices that the Num lock indicator light is wrong? The language layout of the wireless keyboard is lit, press the Num Lk key to turn it off before entering these steps: 1 Click Start and Control Panel. 2 Click Clock, Language, and Region, and click Regional and Language Options. 3 Change the settings...
... stop working properly. These devices may be mismatched. To change the keyboard configuration, follow these characters. ❑ Avoid using any wireless devices that the Num lock indicator light is wrong? The language layout of the wireless keyboard is lit, press the Num Lk key to turn it off before entering these steps: 1 Click Start and Control Panel. 2 Click Clock, Language, and Region, and click Regional and Language Options. 3 Change the settings...


