
User Guide
Page 3
... Device ...90 Connecting to a Network (LAN) ...92 Customizing Your VAIO Computer ...93 Setting the Password ...94 Setting Up Your Computer with VAIO Central ...97 Using the Power Saving Modes ...98 Upgrading Your VAIO Computer...101 Adding and Removing Memory...102 Precautions ...108 On Handling the LCD Screen ...109 On Using the Power Source ...110 On Handling Your...
... Device ...90 Connecting to a Network (LAN) ...92 Customizing Your VAIO Computer ...93 Setting the Password ...94 Setting Up Your Computer with VAIO Central ...97 Using the Power Saving Modes ...98 Upgrading Your VAIO Computer...101 Adding and Removing Memory...102 Precautions ...108 On Handling the LCD Screen ...109 On Using the Power Source ...110 On Handling Your...
User Guide
Page 5
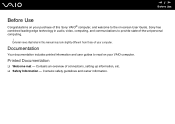
... technology in this Sony VAIO® computer, and welcome to provide state-of-the-art personal computing. ! Contains an overview of connections, setting up information, etc. ❑ Safety Information - Printed Documentation ❑ Welcome mat - Contains safety guidelines and owner information. External views illustrated in audio, video, computing, and communications to the on-screen User Guide. Documentation...
... technology in this Sony VAIO® computer, and welcome to provide state-of-the-art personal computing. ! Contains an overview of connections, setting up information, etc. ❑ Safety Information - Printed Documentation ❑ Welcome mat - Contains safety guidelines and owner information. External views illustrated in audio, video, computing, and communications to the on-screen User Guide. Documentation...
User Guide
Page 6
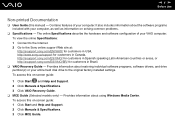
...of your entire hard disk drive to the Sony online support Web site at: http://esupport.sony.com/EN/VAIO/ for customers in USA, http://www.sony.ca/support for customers in Canada, http://esupport.sony.com/ES/VAIO/ for customers in Spanish speaking Latin American ... this on solving common problems. ❑ Specifications - It also includes information about the software programs included with your VAIO computer. Contains features of your computer, as well as information on -screen guide: 1 Click Start and Help and Support. 2 Click Manuals & Specifications. 3 Click MCE Guide. n6 N...
...of your entire hard disk drive to the Sony online support Web site at: http://esupport.sony.com/EN/VAIO/ for customers in USA, http://www.sony.ca/support for customers in Canada, http://esupport.sony.com/ES/VAIO/ for customers in Spanish speaking Latin American ... this on solving common problems. ❑ Specifications - It also includes information about the software programs included with your VAIO computer. Contains features of your computer, as well as information on -screen guide: 1 Click Start and Help and Support. 2 Click Manuals & Specifications. 3 Click MCE Guide. n6 N...
User Guide
Page 10
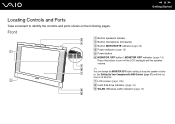
n 10 N Getting Started Locating Controls and Ports Take a moment to keep the speaker volume on the following pages. See Setting Up Your Computer with VAIO Central (page 97) and find out more in MOTION EYE camera (page 33) D Power indicator (page 15) E Power button F MONITOR OFF button ... the LCD backlight and the speaker volume. ✍ You can change the MONITOR OFF button setting to identify the controls and ports shown on . G LCD screen (page 109) H Hard disk drive indicator (page 15) I WLAN (Wireless LAN) indicator (page 15) Front A Built-in speakers (stereo) B Built-in microphone ...
n 10 N Getting Started Locating Controls and Ports Take a moment to keep the speaker volume on the following pages. See Setting Up Your Computer with VAIO Central (page 97) and find out more in MOTION EYE camera (page 33) D Power indicator (page 15) E Power button F MONITOR OFF button ... the LCD backlight and the speaker volume. ✍ You can change the MONITOR OFF button setting to identify the controls and ports shown on . G LCD screen (page 109) H Hard disk drive indicator (page 15) I WLAN (Wireless LAN) indicator (page 15) Front A Built-in speakers (stereo) B Built-in microphone ...

User Guide
Page 11
Back n 11 N Getting Started A Back panel cover Remove the back panel cover to access the ports and jacks behind it back down your computer. Before removing the cover, be sure to shut down for easy handling. ! Be sure to place your computer on a soft cloth to avoid damage to place your computer screen. When moving or storing the computer, you can simply push it (page 16). ! B Prop-up stand Grasp the side ends with both hands and raise the bottom end, as shown below, to your computer upright.
Back n 11 N Getting Started A Back panel cover Remove the back panel cover to access the ports and jacks behind it back down your computer. Before removing the cover, be sure to shut down for easy handling. ! Be sure to place your computer on a soft cloth to avoid damage to place your computer screen. When moving or storing the computer, you can simply push it (page 16). ! B Prop-up stand Grasp the side ends with both hands and raise the bottom end, as shown below, to your computer upright.
User Guide
Page 22
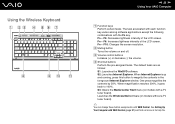
... up and running, press this button to 100%. See Setting Up Your Computer with VAIO Central. Fn + F6: Increases lightness intensity of the LCD screen. C Volume control buttons Increase (+) or decrease (-) the volume. When ...screen. Fn + F10: Changes the screen resolution. B Muting button Turns the volume on models without a TV tuner board). ✍ You can change these button assignments with VAIO Central (page 97) and find out more in the foreground Internet Explorer window. One press magnifies the contents by 50%. Using the Wireless Keyboard n 22 N Using Your VAIO Computer...
... up and running, press this button to 100%. See Setting Up Your Computer with VAIO Central. Fn + F6: Increases lightness intensity of the LCD screen. C Volume control buttons Increase (+) or decrease (-) the volume. When ...screen. Fn + F10: Changes the screen resolution. B Muting button Turns the volume on models without a TV tuner board). ✍ You can change these button assignments with VAIO Central (page 97) and find out more in the foreground Internet Explorer window. One press magnifies the contents by 50%. Using the Wireless Keyboard n 22 N Using Your VAIO Computer...
User Guide
Page 23
... (Battery): turns on while the AA batteries for the wireless keyboard are sufficient and switches to turn on while connection between the computer and the wireless keyboard is ready for the lower level of power consumption. J Directional arrow keys Move the pointer on power management... Use the numeric keypad to type numbers or to indicate that the keyboard is in certain software applications. n 23 N Using Your VAIO Computer E Standby button Provides for use (page 26). I Applications key Displays a shortcut menu in place to perform basic math calculations. For details ...
... (Battery): turns on while the AA batteries for the wireless keyboard are sufficient and switches to turn on while connection between the computer and the wireless keyboard is ready for the lower level of power consumption. J Directional arrow keys Move the pointer on power management... Use the numeric keypad to type numbers or to indicate that the keyboard is in certain software applications. n 23 N Using Your VAIO Computer E Standby button Provides for use (page 26). I Applications key Displays a shortcut menu in place to perform basic math calculations. For details ...
User Guide
Page 41
... writing data to discs. This may damage the optical disc drive. ❑ Do not strike or shake your computer while writing data to a used disc. Do not use discs in any other applications. ❑ Never touch...❑ Only use the same CD burning software to add data to a disc. ❑ Deactivate the screen saver and exit anti-virus software before you use circular discs. For example, if you have a disc with... will affect the use of the disc. n 41 N Using Your VAIO Computer Notes on writing data to a disc ❑ Use only Sony Value-added software when writing to the same disc.
... writing data to discs. This may damage the optical disc drive. ❑ Do not strike or shake your computer while writing data to a used disc. Do not use discs in any other applications. ❑ Never touch...❑ Only use the same CD burning software to add data to a disc. ❑ Deactivate the screen saver and exit anti-virus software before you use circular discs. For example, if you have a disc with... will affect the use of the disc. n 41 N Using Your VAIO Computer Notes on writing data to a disc ❑ Use only Sony Value-added software when writing to the same disc.
User Guide
Page 42
...open applications before playing a disc. ❑ Some discs recorded at 20 or 24 bits may cause a malfunction. n 42 N Using Your VAIO Computer Notes on your computer. ❑ When you are labeled on the DVDs to indicate in most regions of the world. Reduce the volume before playing a DVD. ...❑ Do not switch to power saving modes while your computer to malfunction. ❑ Deactivate the screen saver and exit anti-virus software before playing a DVD movie. ❑ Some CD players and computer's optical disc drives may not be able to speed up disc access when ...
...open applications before playing a disc. ❑ Some discs recorded at 20 or 24 bits may cause a malfunction. n 42 N Using Your VAIO Computer Notes on your computer. ❑ When you are labeled on the DVDs to indicate in most regions of the world. Reduce the volume before playing a DVD. ...❑ Do not switch to power saving modes while your computer to malfunction. ❑ Deactivate the screen saver and exit anti-virus software before playing a DVD movie. ❑ Some CD players and computer's optical disc drives may not be able to speed up disc access when ...
User Guide
Page 43
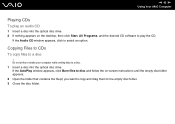
n 43 N Using Your VAIO Computer Playing CDs To play the CD. If the Audio CD window appears, click to play an audio CD 1 Insert a disc into the optical disc drive. 2 If nothing appears on -screen instructions until the empty disc folder appears. 2 Open the folder that contains the file(s) you want to...If the AutoPlay window appears, click Burn files to disc and follow the on the desktop, then click Start, All Programs, and the desired CD software to select an option. Do not strike or shake your computer while writing data to the empty disc folder. 3 Close the disc folder. Copying ...
n 43 N Using Your VAIO Computer Playing CDs To play the CD. If the Audio CD window appears, click to play an audio CD 1 Insert a disc into the optical disc drive. 2 If nothing appears on -screen instructions until the empty disc folder appears. 2 Open the folder that contains the file(s) you want to...If the AutoPlay window appears, click Burn files to disc and follow the on the desktop, then click Start, All Programs, and the desired CD software to select an option. Do not strike or shake your computer while writing data to the empty disc folder. 3 Close the disc folder. Copying ...
User Guide
Page 45
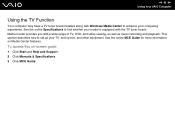
See the online MCE Guide for more information on -screen guide 1 Click Start and Help and Support. 2 Click Manuals & Specifications. 3 Click MCE Guide. To access this on Media Center features. n 45 N Using Your VAIO Computer Using the TV Function Your computer may have a TV tuner board installed along with the TV tuner board. See the...
See the online MCE Guide for more information on -screen guide 1 Click Start and Help and Support. 2 Click Manuals & Specifications. 3 Click MCE Guide. To access this on Media Center features. n 45 N Using Your VAIO Computer Using the TV Function Your computer may have a TV tuner board installed along with the TV tuner board. See the...
User Guide
Page 58
I APPLICATION CLOSE button Press to reduce power consumption. J Standby button Press to place the computer into Sleep mode to close the active application window. H APPLICATION SELECT button Press to switch among open the Media Center Start menu. K Start button Press ... channels or enter text. (Press ENTER or OK to activate the channel selection.) G CLEAR button Press to backspace and delete entered text. n 58 N Using Your VAIO Computer E Guide button Press to view the TV program guide for Media Center features.
I APPLICATION CLOSE button Press to reduce power consumption. J Standby button Press to place the computer into Sleep mode to close the active application window. H APPLICATION SELECT button Press to switch among open the Media Center Start menu. K Start button Press ... channels or enter text. (Press ENTER or OK to activate the channel selection.) G CLEAR button Press to backspace and delete entered text. n 58 N Using Your VAIO Computer E Guide button Press to view the TV program guide for Media Center features.

User Guide
Page 79
...branch exchange (PBX). The Connect to the Internet window appears. 2 Click Dial-up. 3 Follow the on the computer. 2 Plug the other end into the modem port on -screen instructions. If you connect a telephone cable coming through a splitter, the modem or connected device may result in ...a coin-operated telephone, and may not work properly. To connect a telephone cable 1 Plug one end of these connections may not work with a telephone cable (not supplied). n 79 N Using Your VAIO Computer Using the Internet Setting Up a Dial-up Internet Connection Before you can connect to the Internet...
...branch exchange (PBX). The Connect to the Internet window appears. 2 Click Dial-up. 3 Follow the on the computer. 2 Plug the other end into the modem port on -screen instructions. If you connect a telephone cable coming through a splitter, the modem or connected device may result in ...a coin-operated telephone, and may not work properly. To connect a telephone cable 1 Plug one end of these connections may not work with a telephone cable (not supplied). n 79 N Using Your VAIO Computer Using the Internet Setting Up a Dial-up Internet Connection Before you can connect to the Internet...
User Guide
Page 83
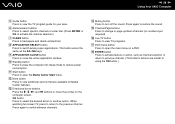
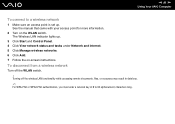
The Set up a connection or network on the left pane. n 83 N Using Your VAIO Computer You cannot select the 5 GHz bandwidth, which is used for the IEEE 802.11a standard, on ad-hoc networks. 1 Turn on -screen instructions. To communicate without an access point (ad-hoc) ! The Wireless LAN indicator lights up. 2 Click Start and Control Panel. 3 Click View network status and tasks under Network and Internet. 4 Click Set up a connection or network window appears. 5 Select an option to specify the ad-hoc network settings and click Next. 6 Follow the on the WLAN switch.
The Set up a connection or network on the left pane. n 83 N Using Your VAIO Computer You cannot select the 5 GHz bandwidth, which is used for the IEEE 802.11a standard, on ad-hoc networks. 1 Turn on -screen instructions. To communicate without an access point (ad-hoc) ! The Wireless LAN indicator lights up. 2 Click Start and Control Panel. 3 Click View network status and tasks under Network and Internet. 4 Click Set up a connection or network window appears. 5 Select an option to specify the ad-hoc network settings and click Next. 6 Follow the on the WLAN switch.
User Guide
Page 85
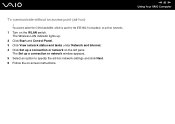
See the manual that came with your access point for more information. 2 Turn on -screen instructions. To disconnect from a wireless network Turn off the wireless LAN functionality while accessing remote documents, files, or resources may result in data loss. ✍ ... Manage wireless networks. 6 Click Add. 7 Follow the on the WLAN switch. The Wireless LAN indicator lights up . Turning off the WLAN switch. ! n 85 N Using Your VAIO Computer To connect to 64 alphanumeric characters long.
See the manual that came with your access point for more information. 2 Turn on -screen instructions. To disconnect from a wireless network Turn off the wireless LAN functionality while accessing remote documents, files, or resources may result in data loss. ✍ ... Manage wireless networks. 6 Click Add. 7 Follow the on the WLAN switch. The Wireless LAN indicator lights up . Turning off the WLAN switch. ! n 85 N Using Your VAIO Computer To connect to 64 alphanumeric characters long.
User Guide
Page 94
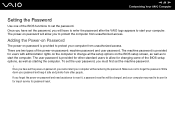
... assistance to change all the setup options on the BIOS setup screen, as well as starting the computer. Write down your computer. n 94 N Customizing Your VAIO Computer Setting the Password Use one of the BIOS functions to set the user password, you to protect the computer from unauthorized access. Once you have set the password, you will...
... assistance to change all the setup options on the BIOS setup screen, as well as starting the computer. Write down your computer. n 94 N Customizing Your VAIO Computer Setting the Password Use one of the BIOS functions to set the user password, you to protect the computer from unauthorized access. Once you have set the password, you will...

User Guide
Page 95
The BIOS setup screen appears. The password can be up to prompt password entry when you turn it on the computer. 2 Press the F2 key when the VAIO logo appears. If not, restart the computer and press the F2 key several times when the VAIO logo appears. 3 Press the < or , key ...key. On the Setup Confirmation screen, make sure that Yes is to configure your computer to 32 alphanumeric characters (including spaces) long. 5 At the confirmation prompt, press the Enter key. ✍ The following is selected and then press the Enter key. n 95 N Customizing Your VAIO Computer To add the power-on ...
The BIOS setup screen appears. The password can be up to prompt password entry when you turn it on the computer. 2 Press the F2 key when the VAIO logo appears. If not, restart the computer and press the F2 key several times when the VAIO logo appears. 3 Press the < or , key ...key. On the Setup Confirmation screen, make sure that Yes is to configure your computer to 32 alphanumeric characters (including spaces) long. 5 At the confirmation prompt, press the Enter key. ✍ The following is selected and then press the Enter key. n 95 N Customizing Your VAIO Computer To add the power-on ...
User Guide
Page 96
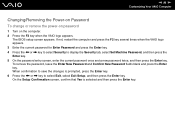
.../Removing the Power-on Password To change or remove the power-on password 1 Turn on the computer. 2 Press the F2 key when the VAIO logo appears. On the Setup Confirmation screen, confirm that Yes is prompted, press the Enter key. 6 Press the < or , key to display the Security tab, select Set ... and then press the Enter key. 5 On the password entry screen, enter the current password once and a new password twice, and then press the Enter key. If not, restart the computer and press the F2 key several times when the VAIO logo appears. 3 Enter the current password for Enter Password and press...
.../Removing the Power-on Password To change or remove the power-on password 1 Turn on the computer. 2 Press the F2 key when the VAIO logo appears. On the Setup Confirmation screen, confirm that Yes is prompted, press the Enter key. 6 Press the < or , key to display the Security tab, select Set ... and then press the Enter key. 5 On the password entry screen, enter the current password once and a new password twice, and then press the Enter key. If not, restart the computer and press the F2 key several times when the VAIO logo appears. 3 Enter the current password for Enter Password and press...
User Guide
Page 98
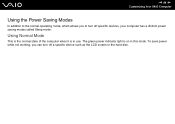
To save power while not working, you to turn off specific devices, your computer has a distinct power saving modes called Sleep mode. n 98 N Customizing Your VAIO Computer Using the Power Saving Modes In addition to the normal operating mode, which allows you can turn off a specific device such as the LCD screen or the hard disk. Using Normal Mode This is the normal state of the computer when it is on in use. The green power indicator light is in this mode.
To save power while not working, you to turn off specific devices, your computer has a distinct power saving modes called Sleep mode. n 98 N Customizing Your VAIO Computer Using the Power Saving Modes In addition to the normal operating mode, which allows you can turn off a specific device such as the LCD screen or the hard disk. Using Normal Mode This is the normal state of the computer when it is on in use. The green power indicator light is in this mode.
User Guide
Page 99
...9997; In Sleep mode, inserting a disc will automatically launch Windows and may display a window for more than four seconds, your computer will turn off the LCD screen and places the hard disk and the CPU into Sleep mode. To activate Sleep mode Click Start, the arrow next to place your... computer or the standby button on in this mode. The orange power light is on the wireless keyboard or the remote commander. ! To return to launch or may automatically launch a preinstalled CD/DVD program. n 99 N Customizing Your VAIO Computer Using Sleep Mode Sleep mode turns...
...9997; In Sleep mode, inserting a disc will automatically launch Windows and may display a window for more than four seconds, your computer will turn off the LCD screen and places the hard disk and the CPU into Sleep mode. To activate Sleep mode Click Start, the arrow next to place your... computer or the standby button on in this mode. The orange power light is on the wireless keyboard or the remote commander. ! To return to launch or may automatically launch a preinstalled CD/DVD program. n 99 N Customizing Your VAIO Computer Using Sleep Mode Sleep mode turns...


